
Copyright 2026 © Leading Tools Industrial Co., Ltd.
All Rights Reserved. Website Design by Awakening Design
CATALOG TYPE
Product Categories
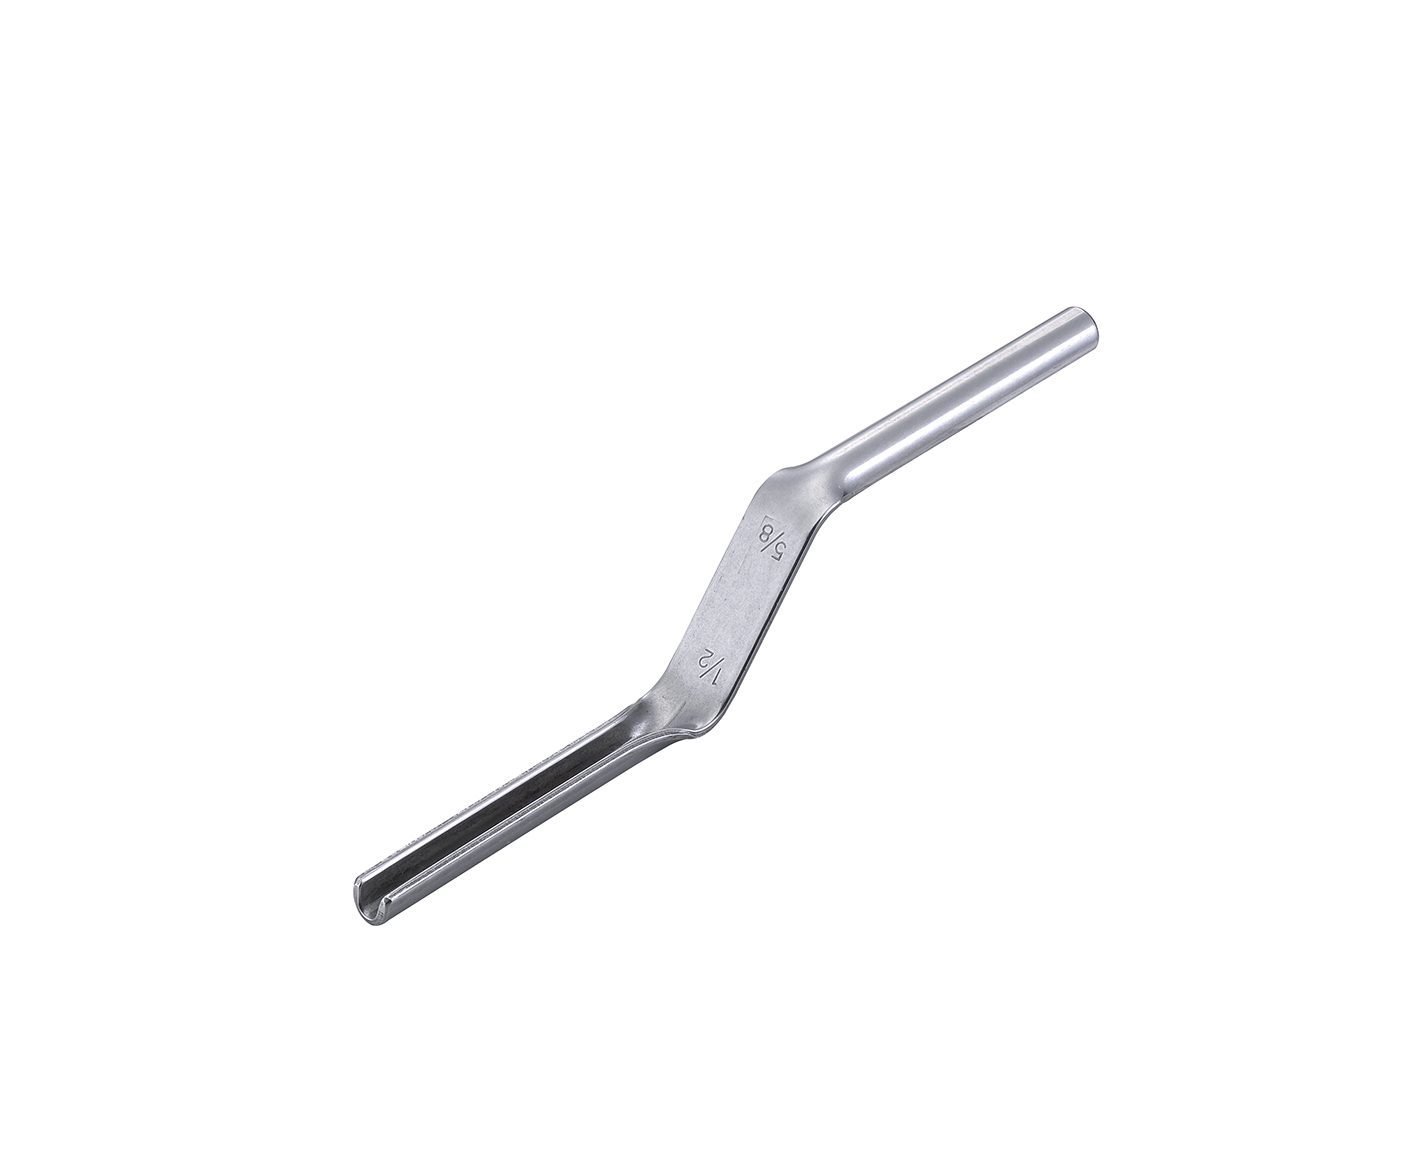
Brick Jointer
Product Description
Product Name: Brick Jointer
Art. Nr: 300053, 300054, 300055
Product Line: Brick Jointer group in the Leading Tools range, which also contains the Grapevine Jointer (300024–300025), the Heavy Duty Convex Jointer (300033, 300036 and 300037) and the Heavy Duty Tempered Convex Jointer (300034, 300035 and 300043 to 300047)
Nominal sizes: 300053 = 3/8"x1/2" · 300054 = 1/2"x5/8" · 300055 = 5/8"x3/4"
The Brick Jointer is the tool a mason uses to finish a mortar joint after the wall has been laid. It is a double-ended, one-piece steel bar with a rounded working end at each end, cranked into a shallow S so that the operator's hand clears the wall face while the working end sits square in the joint. Drawn along a bed or head joint that has firmed up to thumbprint hardness, the rounded end compacts the mortar and shapes it into a concave (rounded) joint, a common finish in brickwork that drains well.
Specify this article when you want a plain rounded concave joint in one of the three most-used joint widths, from a tool with nothing on it that can come loose. If you need widths above 5/8", the Heavy Duty Convex Jointer (300033, 300036 and 300037) in the same Leading Tools range runs to 1". If you need a decorative centered line for period work, that is the Grapevine Jointer (300024–300025), not this article.
A note on the name. Buyers also search for this tool as an S-shaped jointer. Its rounded face forms a concave mortar joint, also called a half-round or rodded joint, despite the "convex" in the names of related jointers, a convex jointer makes a concave joint.
Why the concave joint is the one to specify by default. Tooling compacts the mortar surface into tight contact with the brick, and the curved face sheds water rather than ponding it. Raked joints look good but leave a recess that can hold water. That is why the concave joint is the usual specification for exterior brickwork.
Why three articles and not one. The sizing rule is that the working end should match the joint or be very slightly wider, so that the tool bears on the brick arris on both sides of the joint and cannot wander inside it. A single-size tool therefore does not cover a job. Because these are double-ended, three articles cover four widths: 3/8", 1/2", 5/8", 3/4", and 5/8" appears on two of them, which is the width a crew most often needs a second tool for.
| Situation | Use the Brick Jointer? | Reason |
|---|---|---|
| Finishing bed and head joints on new facing brickwork | Yes, this is the primary application | Tooling compacts the mortar, improving both weather resistance and appearance |
| Exterior walls in a high-rainfall or freeze-thaw climate | Yes | The compacted concave profile drains well |
| Repointing an existing wall that already has a concave joint | Yes | Matching the existing profile is what keeps the repair invisible |
| Interior exposed brickwork: lofts, restaurants, feature walls | Yes | The rounded joint gives a clean, finished appearance on visible interior brick |
| Corners, reveals and detail work | Yes | A hand tool reaches where a wheeled raker cannot |
| Larger-format brick or block walls with 5/8" to 3/4" joints | 300055 (5/8" and 3/4" ends) | Match the end to the actual joint width |
| Joint width 7/8" or wider | No, use Heavy Duty Convex Jointer 300036 or 300037 | The widest end on this article is 3/4" |
| Raking mortar out to a set depth | No, use the Skate Wheel Mortar Raker 301110 | That tool removes mortar; this one compacts it |
| Filling an empty or under-filled joint | No, fill with a Tuck Pointing Trowel or trowel first | This is a finishing tool; it cannot make up a shortfall of mortar |
| Matching a grapevine, V or struck joint on a heritage wall | No, a plain rounded joint will read as wrong | Match the existing profile with the correct dedicated tool |
| Step | Action | Why it matters |
|---|---|---|
| 1 | Select the end that matches the joint width, or is very slightly wider, so the tool bears on the brick arris on both sides | Too narrow and the tool wanders inside the joint; too wide and it rides onto the brick faces and can damage the arrises |
| 2 | Wait for thumbprint hard: press a thumb firmly into the mortar: a clean impression that does not pick up on the thumb means it is ready | Too early and the joint smears and the bond is disturbed; too late and the mortar tears and the edges crumble |
| 3 | Check the working ends before starting: no set mortar, no nicks, no flat spots | The end profile is what defines the joint, so damage there shows up directly in the wall |
| 4 | Set the rounded end into the joint with the tool bearing on the brick edges either side, then draw it along with steady, continuous pressure | One unbroken stroke gives a joint of uniform depth and color; stopping mid-joint leaves a visible mark |
| 5 | Work from the top of the wall downwards | Mortar crumbs and dust fall onto work that has not been tooled yet, rather than onto finished joints |
| 6 | Tool the head (vertical) joints and the bed (horizontal) joints, each from the top down and each in one direction; many masons do the head joints first, which is a common practice | Mortar dragged out of the heads can smear a finished bed joint, which is why many masons start with the head joints. Keep the same sequence for the whole elevation |
| 7 | Slow down at corners, keep both sides of the tool in contact with the brick, and make a second pass if needed | Corners are where the tool most easily lifts and breaks the line |
| 8 | Trowel or brush off the mortar crumbs before the mortar sets hard, using a soft brush and a light touch | Heavy brushing while the joint is still soft damages the profile you just made; leaving the crumbs until they set makes them far harder to remove |
| 9 | Practice on a sample panel before the elevation that matters | Grip, pressure and speed are what make the joint uniform, and they are learned by doing |
Timing. The window depends on the weather, the mortar and how absorbent the brick is. The interval varies, so the thumbprint test, not the clock, is the guide.
This is the volume application. The wall is laid, the joints are filled as the work proceeds, and the whole elevation is tooled once the mortar reaches thumbprint hardness.
Because mortar in different parts of an elevation stiffens at different rates: sun, wind and the suction of the brick all matter, work in bays that were laid at about the same time rather than tooling the whole wall at once. Joints tooled at noticeably different mortar stiffnesses come out at different colors as well as different depths, and the difference is visible from the street.
On repointing, the joint profile is part of the existing fabric. Rake out the old mortar to a uniform depth, wet the joint so the masonry does not draw water out of the fresh mortar, fill in stages on deep joints, and tool at thumbprint hardness with an end matched to the existing joint width.
Two cautions specific to older work: lime mortar sets more slowly than Portland-cement mortar, so the tooling window arrives later and lasts longer; and if the wall carries a grapevine, V or struck profile, a rounded jointer is the wrong tool and the repair will be visible. Rake depth and curing regime should follow the conservation specification for the building rather than a generic figure.
On exposed interior brick: lofts, restaurants, feature walls, the rounded joint is chosen for appearance rather than for weather performance. The relevant point is consistency: interior brick is viewed at close range and under raking artificial light, which shows up variation in joint depth far more clearly than an exterior elevation does.
Inside corners and window and door reveals are places where a hand jointer is useful, because a wheeled raker or a long jointer cannot fit. Slow the stroke at the corner, keep both flanks of the tool bearing on the brick, and accept that a corner may need two or three passes to come out uniform.
For larger-format brick or block walls with 5/8" to 3/4" joints, use 300055 (5/8" and 3/4" ends). The technique is the same; the difference is that a wider joint holds more mortar and therefore takes longer to reach thumbprint hardness. Measure the joint before choosing the end; do not assume the nominal figure.
Q: What joint does this tool make?
A: A concave (rounded) joint: a shallow half-round recess set slightly back from the brick face. Both ends are rounded, with no square or angled edge, so it does not make a flush joint or a struck (sloped) joint; those need different tools.
Q: How do I pick the size?
A: Match the working end to the measured joint width, or go very slightly wider so the tool bears on the brick edges on both sides. Too narrow and it wanders inside the joint; too wide and it rides up onto the brick faces and can damage the edges. For a 3/8" joint order 300053 (3/8"x1/2"); the widest end in this range is 3/4" (300055), so for 7/8" or 1" joints use Heavy Duty Convex Jointer 300036 or 300037.
Q: When should I tool the joint?
A: When a firm thumb press leaves a clean impression without the mortar picking up on your thumb. The time depends on weather, mortar and brick, so use the test rather than the clock. Tool the vertical (head) and horizontal (bed) joints, always working from the top down; many masons do the head joints first, which is a common practice.
Q: The mortar tears, smears or leaves a wavy joint. What is wrong?
A: Tearing usually means the mortar has gone too hard, or the working end is narrower than the joint so the tool drags instead of bearing on the brick edges.
Smearing means the mortar is still too wet or set mortar on the working end is dragging fresh material out of the joint, so wait and clean the end before each run. A wavy joint comes from stopping or changing pressure mid-stroke, so keep the stroke continuous.
Q: Does the tool have a handle, and how do I stop it rusting?
A: There is no separate handle: it is a one-piece S-cranked steel bar gripped on the flattened center section. Clean the mortar off before it sets, dry the tool, and wipe on a thin film of machine oil before storage, because mortar residue holds moisture. Pitting on a working end prints into every joint, so on this tool rust prevention affects how well it works, not just how it looks.
The working end is rounded, not flat and not square. Each end of the bar is formed into a half-round section whose outside face is the working surface; drawn along the joint, it presses the mortar into a matching half-round hollow. The two ends are of different width, and the widths are stamped into the flattened center of the bar.
This article produces a rounded, recessed (concave) mortar joint, also called an inverted half-round joint.
Concave (rounded) joint:
| Art. Nr | Size | Metric equivalent (1" = 25.4 mm) | Working ends | Typical application |
|---|---|---|---|---|
| 300053 | 3/8"x1/2" | ≈ 10 mm x ≈ 13 mm | Two: one 3/8", one 1/2" | The 3/8" standard bed joint and one step above it |
| 300054 | 1/2"x5/8" | ≈ 13 mm x ≈ 16 mm | Two: one 1/2", one 5/8" | The all-round pair; wider residential joints and restoration work |
| 300055 | 5/8"x3/4" | ≈ 16 mm x ≈ 19 mm | Two: one 5/8", one 3/4" | Larger-format brick and wider historic joints |
How to read the two numbers. The two figures are the widths of the tool's two working ends, which differ in width and are stamped into the center section.
| Specification | Value |
|---|---|
| Blade material | Heat-treated |
This is a one-piece steel bar with no separate handle. The bar is cranked into a shallow S; each end is formed into a rounded working end; the center section is flattened and widened, carries the stamped size markings, and is where the tool is gripped. There is no wooden grip, no cushion grip and no ferrule anywhere on the tool. The cranked bar is the handle.
It is a bare steel bar, with no wood handle and no soft-grip option.
| Feature | Brick Jointer (300053–300055) | Heavy Duty Convex Jointer (300033, 300036 and 300037) | Heavy Duty Tempered Convex Jointer (300034, 300035 and 300043 to 300047) | Grapevine Jointer (300024–300025) |
|---|---|---|---|---|
| Joint produced | Rounded concave joint | Rounded concave joint | Rounded concave joint | Compacted band with one fine recessed line down the center |
| Sizes | 3/8"x1/2", 1/2"x5/8", 5/8"x3/4" | 3/8"x1/2", 3/4"x7/8", 7/8"x1" (three sizes) | 3/8"x1/2" through 7/8"x1" (five sizes) | 1/2"x5/8", 5/8"x3/4" |
| Reaches the 3/8" standard width | Yes (300053) | Yes (300033) | Yes (300043, 300034) | No |
| Reaches 3/4" and above | 3/4" only, on 300055 | Yes, to 1" | Yes, to 1" | 3/4" only, on 300025 |
| When to specify it | The three most-used widths, plain concave finish | When the job needs widths of 3/4" and above, or the 3/8" standard in the heavy-duty line | The full five sizes from 3/8"x1/2" to 7/8"x1", including 1/2"x5/8" and 5/8"x3/4" | Colonial, Federal and antique-finish facades needing the centered line |
The sizing rule that matters most. Choose a working end that matches the joint width, or is very slightly wider: a few millimeters at most, so that the tool bears on the brick arris on both sides of the joint.
Too narrow and the tool skates around inside the joint and wanders, leaving a wavy line; too wide and it rides up onto the brick faces and can damage the arrises. Decide the end before the wall starts, not halfway up it.
Match the existing joint, not the brick. On repointing and extension work the number that governs is the width of the joint already in the wall, measured on site, not the nominal joint width for the brick format. Measure several joints in different elevations; old walls are rarely uniform.
| Mortar joint width | Article to specify | Working end to use |
|---|---|---|
| 3/8" (≈10 mm), the North American standard bed joint | 300053 | 3/8" end |
| 1/2" (≈13 mm) | 300053 or 300054 | 1/2" end (present on both) |
| 5/8" (≈16 mm) | 300054 or 300055 | 5/8" end (present on both) |
| 3/4" (≈19 mm) | 300055 | 3/4" end |
| 7/8" (≈22 mm) or wider | Not this article, use Heavy Duty Convex Jointer 300036 or 300037 | — |
| Mixed widths across one project | 300054 covers 1/2" and 5/8"; add 300053 for 3/8" or 300055 for 3/4" | — |
| Joint profile needed | Tool to specify | Art. Nr |
|---|---|---|
| Rounded concave joint, widths 3/8" to 3/4" | Brick Jointer | 300053, 300054, 300055 |
| Rounded concave joint, widths up to 1" | Heavy Duty Convex Jointer | 300033, 300036 and 300037 |
| Rounded concave joint, all five sizes from 3/8" to 1" | Heavy Duty Tempered Convex Jointer | 300034, 300035 and 300043 to 300047 |
| Decorative centered line (grapevine / Colonial) | Grapevine Jointer | 300024, 300025 |
| Raked (recessed flat) joint | Not a jointer, use the Skate Wheel Mortar Raker | 301110 |
| Flush joint level with the brick face | Not in this jointer range, a slicker or flat jointer, or the edge of the trowel | — |
| Weathered (sloped) joint | Not in this jointer range, a dedicated jointer | — |
Complete article-number reference for the Brick Jointer. All three article numbers are listed, with the article number and size for each.
| Art. Nr | Size | Metric equivalent (1" = 25.4 mm) | Handle / construction |
|---|---|---|---|
| 300053 | 3/8"x1/2" | ≈ 10 mm x ≈ 13 mm | One-piece S-cranked steel bar, rounded working end at each end, no separate handle |
| 300054 | 1/2"x5/8" | ≈ 13 mm x ≈ 16 mm | One-piece S-cranked steel bar, rounded working end at each end, no separate handle |
| 300055 | 5/8"x3/4" | ≈ 16 mm x ≈ 19 mm | One-piece S-cranked steel bar, rounded working end at each end, no separate handle |
Related articles in the same Leading Tools jointer range, for widths above 5/8" or a decorative profile:
| Product | Art. Nr | Size |
|---|---|---|
| Grapevine Jointer | 300024 | 1/2"x5/8" |
| Grapevine Jointer | 300025 | 5/8"x3/4" |
| Heavy Duty Convex Jointer | 300033 | 3/8"x1/2" |
| Heavy Duty Convex Jointer | 300036 | 3/4"x7/8" |
| Heavy Duty Convex Jointer | 300037 | 7/8"x1" |
| Heavy Duty Tempered Convex Jointer | 300043 | 3/8"x1/2" |
| Heavy Duty Tempered Convex Jointer | 300034 | 3/8"x1/2" |
| Heavy Duty Tempered Convex Jointer | 300044 | 1/2"x5/8" |
| Heavy Duty Tempered Convex Jointer | 300045 | 5/8"x3/4" |
| Heavy Duty Tempered Convex Jointer | 300035 | 5/8"x3/4" |
| Heavy Duty Tempered Convex Jointer | 300046 | 3/4"x7/8" |
| Heavy Duty Tempered Convex Jointer | 300047 | 7/8"x1" |
The relevant practices are the general ones for masonry work: mortar is alkaline and irritates skin and eyes, so follow the site's own PPE rules.
Product Name: Brick Jointer
Art. Nr: 300053, 300054, 300055
Product Line: Brick Jointer group in the Leading Tools range, which also contains the Grapevine Jointer (300024–300025), the Heavy Duty Convex Jointer (300033, 300036 and 300037) and the Heavy Duty Tempered Convex Jointer (300034, 300035 and 300043 to 300047)
Nominal sizes: 300053 = 3/8"x1/2" · 300054 = 1/2"x5/8" · 300055 = 5/8"x3/4"
The Brick Jointer is the tool a mason uses to finish a mortar joint after the wall has been laid. It is a double-ended, one-piece steel bar with a rounded working end at each end, cranked into a shallow S so that the operator's hand clears the wall face while the working end sits square in the joint. Drawn along a bed or head joint that has firmed up to thumbprint hardness, the rounded end compacts the mortar and shapes it into a concave (rounded) joint, a common finish in brickwork that drains well.
Specify this article when you want a plain rounded concave joint in one of the three most-used joint widths, from a tool with nothing on it that can come loose. If you need widths above 5/8", the Heavy Duty Convex Jointer (300033, 300036 and 300037) in the same Leading Tools range runs to 1". If you need a decorative centered line for period work, that is the Grapevine Jointer (300024–300025), not this article.
A note on the name. Buyers also search for this tool as an S-shaped jointer. Its rounded face forms a concave mortar joint, also called a half-round or rodded joint, despite the "convex" in the names of related jointers, a convex jointer makes a concave joint.
Why the concave joint is the one to specify by default. Tooling compacts the mortar surface into tight contact with the brick, and the curved face sheds water rather than ponding it. Raked joints look good but leave a recess that can hold water. That is why the concave joint is the usual specification for exterior brickwork.
Why three articles and not one. The sizing rule is that the working end should match the joint or be very slightly wider, so that the tool bears on the brick arris on both sides of the joint and cannot wander inside it. A single-size tool therefore does not cover a job. Because these are double-ended, three articles cover four widths: 3/8", 1/2", 5/8", 3/4", and 5/8" appears on two of them, which is the width a crew most often needs a second tool for.
| Situation | Use the Brick Jointer? | Reason |
|---|---|---|
| Finishing bed and head joints on new facing brickwork | Yes, this is the primary application | Tooling compacts the mortar, improving both weather resistance and appearance |
| Exterior walls in a high-rainfall or freeze-thaw climate | Yes | The compacted concave profile drains well |
| Repointing an existing wall that already has a concave joint | Yes | Matching the existing profile is what keeps the repair invisible |
| Interior exposed brickwork: lofts, restaurants, feature walls | Yes | The rounded joint gives a clean, finished appearance on visible interior brick |
| Corners, reveals and detail work | Yes | A hand tool reaches where a wheeled raker cannot |
| Larger-format brick or block walls with 5/8" to 3/4" joints | 300055 (5/8" and 3/4" ends) | Match the end to the actual joint width |
| Joint width 7/8" or wider | No, use Heavy Duty Convex Jointer 300036 or 300037 | The widest end on this article is 3/4" |
| Raking mortar out to a set depth | No, use the Skate Wheel Mortar Raker 301110 | That tool removes mortar; this one compacts it |
| Filling an empty or under-filled joint | No, fill with a Tuck Pointing Trowel or trowel first | This is a finishing tool; it cannot make up a shortfall of mortar |
| Matching a grapevine, V or struck joint on a heritage wall | No, a plain rounded joint will read as wrong | Match the existing profile with the correct dedicated tool |
| Step | Action | Why it matters |
|---|---|---|
| 1 | Select the end that matches the joint width, or is very slightly wider, so the tool bears on the brick arris on both sides | Too narrow and the tool wanders inside the joint; too wide and it rides onto the brick faces and can damage the arrises |
| 2 | Wait for thumbprint hard: press a thumb firmly into the mortar: a clean impression that does not pick up on the thumb means it is ready | Too early and the joint smears and the bond is disturbed; too late and the mortar tears and the edges crumble |
| 3 | Check the working ends before starting: no set mortar, no nicks, no flat spots | The end profile is what defines the joint, so damage there shows up directly in the wall |
| 4 | Set the rounded end into the joint with the tool bearing on the brick edges either side, then draw it along with steady, continuous pressure | One unbroken stroke gives a joint of uniform depth and color; stopping mid-joint leaves a visible mark |
| 5 | Work from the top of the wall downwards | Mortar crumbs and dust fall onto work that has not been tooled yet, rather than onto finished joints |
| 6 | Tool the head (vertical) joints and the bed (horizontal) joints, each from the top down and each in one direction; many masons do the head joints first, which is a common practice | Mortar dragged out of the heads can smear a finished bed joint, which is why many masons start with the head joints. Keep the same sequence for the whole elevation |
| 7 | Slow down at corners, keep both sides of the tool in contact with the brick, and make a second pass if needed | Corners are where the tool most easily lifts and breaks the line |
| 8 | Trowel or brush off the mortar crumbs before the mortar sets hard, using a soft brush and a light touch | Heavy brushing while the joint is still soft damages the profile you just made; leaving the crumbs until they set makes them far harder to remove |
| 9 | Practice on a sample panel before the elevation that matters | Grip, pressure and speed are what make the joint uniform, and they are learned by doing |
Timing. The window depends on the weather, the mortar and how absorbent the brick is. The interval varies, so the thumbprint test, not the clock, is the guide.
This is the volume application. The wall is laid, the joints are filled as the work proceeds, and the whole elevation is tooled once the mortar reaches thumbprint hardness.
Because mortar in different parts of an elevation stiffens at different rates: sun, wind and the suction of the brick all matter, work in bays that were laid at about the same time rather than tooling the whole wall at once. Joints tooled at noticeably different mortar stiffnesses come out at different colors as well as different depths, and the difference is visible from the street.
On repointing, the joint profile is part of the existing fabric. Rake out the old mortar to a uniform depth, wet the joint so the masonry does not draw water out of the fresh mortar, fill in stages on deep joints, and tool at thumbprint hardness with an end matched to the existing joint width.
Two cautions specific to older work: lime mortar sets more slowly than Portland-cement mortar, so the tooling window arrives later and lasts longer; and if the wall carries a grapevine, V or struck profile, a rounded jointer is the wrong tool and the repair will be visible. Rake depth and curing regime should follow the conservation specification for the building rather than a generic figure.
On exposed interior brick: lofts, restaurants, feature walls, the rounded joint is chosen for appearance rather than for weather performance. The relevant point is consistency: interior brick is viewed at close range and under raking artificial light, which shows up variation in joint depth far more clearly than an exterior elevation does.
Inside corners and window and door reveals are places where a hand jointer is useful, because a wheeled raker or a long jointer cannot fit. Slow the stroke at the corner, keep both flanks of the tool bearing on the brick, and accept that a corner may need two or three passes to come out uniform.
For larger-format brick or block walls with 5/8" to 3/4" joints, use 300055 (5/8" and 3/4" ends). The technique is the same; the difference is that a wider joint holds more mortar and therefore takes longer to reach thumbprint hardness. Measure the joint before choosing the end; do not assume the nominal figure.
Q: What joint does this tool make?
A: A concave (rounded) joint: a shallow half-round recess set slightly back from the brick face. Both ends are rounded, with no square or angled edge, so it does not make a flush joint or a struck (sloped) joint; those need different tools.
Q: How do I pick the size?
A: Match the working end to the measured joint width, or go very slightly wider so the tool bears on the brick edges on both sides. Too narrow and it wanders inside the joint; too wide and it rides up onto the brick faces and can damage the edges. For a 3/8" joint order 300053 (3/8"x1/2"); the widest end in this range is 3/4" (300055), so for 7/8" or 1" joints use Heavy Duty Convex Jointer 300036 or 300037.
Q: When should I tool the joint?
A: When a firm thumb press leaves a clean impression without the mortar picking up on your thumb. The time depends on weather, mortar and brick, so use the test rather than the clock. Tool the vertical (head) and horizontal (bed) joints, always working from the top down; many masons do the head joints first, which is a common practice.
Q: The mortar tears, smears or leaves a wavy joint. What is wrong?
A: Tearing usually means the mortar has gone too hard, or the working end is narrower than the joint so the tool drags instead of bearing on the brick edges.
Smearing means the mortar is still too wet or set mortar on the working end is dragging fresh material out of the joint, so wait and clean the end before each run. A wavy joint comes from stopping or changing pressure mid-stroke, so keep the stroke continuous.
Q: Does the tool have a handle, and how do I stop it rusting?
A: There is no separate handle: it is a one-piece S-cranked steel bar gripped on the flattened center section. Clean the mortar off before it sets, dry the tool, and wipe on a thin film of machine oil before storage, because mortar residue holds moisture. Pitting on a working end prints into every joint, so on this tool rust prevention affects how well it works, not just how it looks.
The working end is rounded, not flat and not square. Each end of the bar is formed into a half-round section whose outside face is the working surface; drawn along the joint, it presses the mortar into a matching half-round hollow. The two ends are of different width, and the widths are stamped into the flattened center of the bar.
This article produces a rounded, recessed (concave) mortar joint, also called an inverted half-round joint.
Concave (rounded) joint:
| Art. Nr | Size | Metric equivalent (1" = 25.4 mm) | Working ends | Typical application |
|---|---|---|---|---|
| 300053 | 3/8"x1/2" | ≈ 10 mm x ≈ 13 mm | Two: one 3/8", one 1/2" | The 3/8" standard bed joint and one step above it |
| 300054 | 1/2"x5/8" | ≈ 13 mm x ≈ 16 mm | Two: one 1/2", one 5/8" | The all-round pair; wider residential joints and restoration work |
| 300055 | 5/8"x3/4" | ≈ 16 mm x ≈ 19 mm | Two: one 5/8", one 3/4" | Larger-format brick and wider historic joints |
How to read the two numbers. The two figures are the widths of the tool's two working ends, which differ in width and are stamped into the center section.
| Specification | Value |
|---|---|
| Blade material | Heat-treated |
This is a one-piece steel bar with no separate handle. The bar is cranked into a shallow S; each end is formed into a rounded working end; the center section is flattened and widened, carries the stamped size markings, and is where the tool is gripped. There is no wooden grip, no cushion grip and no ferrule anywhere on the tool. The cranked bar is the handle.
It is a bare steel bar, with no wood handle and no soft-grip option.
| Feature | Brick Jointer (300053–300055) | Heavy Duty Convex Jointer (300033, 300036 and 300037) | Heavy Duty Tempered Convex Jointer (300034, 300035 and 300043 to 300047) | Grapevine Jointer (300024–300025) |
|---|---|---|---|---|
| Joint produced | Rounded concave joint | Rounded concave joint | Rounded concave joint | Compacted band with one fine recessed line down the center |
| Sizes | 3/8"x1/2", 1/2"x5/8", 5/8"x3/4" | 3/8"x1/2", 3/4"x7/8", 7/8"x1" (three sizes) | 3/8"x1/2" through 7/8"x1" (five sizes) | 1/2"x5/8", 5/8"x3/4" |
| Reaches the 3/8" standard width | Yes (300053) | Yes (300033) | Yes (300043, 300034) | No |
| Reaches 3/4" and above | 3/4" only, on 300055 | Yes, to 1" | Yes, to 1" | 3/4" only, on 300025 |
| When to specify it | The three most-used widths, plain concave finish | When the job needs widths of 3/4" and above, or the 3/8" standard in the heavy-duty line | The full five sizes from 3/8"x1/2" to 7/8"x1", including 1/2"x5/8" and 5/8"x3/4" | Colonial, Federal and antique-finish facades needing the centered line |
The sizing rule that matters most. Choose a working end that matches the joint width, or is very slightly wider: a few millimeters at most, so that the tool bears on the brick arris on both sides of the joint.
Too narrow and the tool skates around inside the joint and wanders, leaving a wavy line; too wide and it rides up onto the brick faces and can damage the arrises. Decide the end before the wall starts, not halfway up it.
Match the existing joint, not the brick. On repointing and extension work the number that governs is the width of the joint already in the wall, measured on site, not the nominal joint width for the brick format. Measure several joints in different elevations; old walls are rarely uniform.
| Mortar joint width | Article to specify | Working end to use |
|---|---|---|
| 3/8" (≈10 mm), the North American standard bed joint | 300053 | 3/8" end |
| 1/2" (≈13 mm) | 300053 or 300054 | 1/2" end (present on both) |
| 5/8" (≈16 mm) | 300054 or 300055 | 5/8" end (present on both) |
| 3/4" (≈19 mm) | 300055 | 3/4" end |
| 7/8" (≈22 mm) or wider | Not this article, use Heavy Duty Convex Jointer 300036 or 300037 | — |
| Mixed widths across one project | 300054 covers 1/2" and 5/8"; add 300053 for 3/8" or 300055 for 3/4" | — |
| Joint profile needed | Tool to specify | Art. Nr |
|---|---|---|
| Rounded concave joint, widths 3/8" to 3/4" | Brick Jointer | 300053, 300054, 300055 |
| Rounded concave joint, widths up to 1" | Heavy Duty Convex Jointer | 300033, 300036 and 300037 |
| Rounded concave joint, all five sizes from 3/8" to 1" | Heavy Duty Tempered Convex Jointer | 300034, 300035 and 300043 to 300047 |
| Decorative centered line (grapevine / Colonial) | Grapevine Jointer | 300024, 300025 |
| Raked (recessed flat) joint | Not a jointer, use the Skate Wheel Mortar Raker | 301110 |
| Flush joint level with the brick face | Not in this jointer range, a slicker or flat jointer, or the edge of the trowel | — |
| Weathered (sloped) joint | Not in this jointer range, a dedicated jointer | — |
Complete article-number reference for the Brick Jointer. All three article numbers are listed, with the article number and size for each.
| Art. Nr | Size | Metric equivalent (1" = 25.4 mm) | Handle / construction |
|---|---|---|---|
| 300053 | 3/8"x1/2" | ≈ 10 mm x ≈ 13 mm | One-piece S-cranked steel bar, rounded working end at each end, no separate handle |
| 300054 | 1/2"x5/8" | ≈ 13 mm x ≈ 16 mm | One-piece S-cranked steel bar, rounded working end at each end, no separate handle |
| 300055 | 5/8"x3/4" | ≈ 16 mm x ≈ 19 mm | One-piece S-cranked steel bar, rounded working end at each end, no separate handle |
Related articles in the same Leading Tools jointer range, for widths above 5/8" or a decorative profile:
| Product | Art. Nr | Size |
|---|---|---|
| Grapevine Jointer | 300024 | 1/2"x5/8" |
| Grapevine Jointer | 300025 | 5/8"x3/4" |
| Heavy Duty Convex Jointer | 300033 | 3/8"x1/2" |
| Heavy Duty Convex Jointer | 300036 | 3/4"x7/8" |
| Heavy Duty Convex Jointer | 300037 | 7/8"x1" |
| Heavy Duty Tempered Convex Jointer | 300043 | 3/8"x1/2" |
| Heavy Duty Tempered Convex Jointer | 300034 | 3/8"x1/2" |
| Heavy Duty Tempered Convex Jointer | 300044 | 1/2"x5/8" |
| Heavy Duty Tempered Convex Jointer | 300045 | 5/8"x3/4" |
| Heavy Duty Tempered Convex Jointer | 300035 | 5/8"x3/4" |
| Heavy Duty Tempered Convex Jointer | 300046 | 3/4"x7/8" |
| Heavy Duty Tempered Convex Jointer | 300047 | 7/8"x1" |
The relevant practices are the general ones for masonry work: mortar is alkaline and irritates skin and eyes, so follow the site's own PPE rules.

In compliance with EU personal data protection laws, we are committed to protecting and providing you with control over your personal data. By clicking "Accept All", you allow us to place cookies to enhance your experience on this site, help us analyze site performance and usage, and enable us to deliver relevant marketing content. You can manage your cookie settings below. By clicking "Agree" you agree to the current settings. For more information, please visit the Privacy Statement.
This website uses cookies
In compliance with EU personal data protection laws, we are committed to protecting your personal data and providing you with control over it. By clicking "Agree", you allow us to place cookies to improve your experience on this site, help us analyze site performance and usage, and allow us to deliver relevant marketing content.
By clicking "Only necessary" you allow us to place only necessary cookies. The website cannot function without these cookies and you cannot switch them off on your system. These cookies are typically set only in response to an action you perform (i.e. a service request), such as setting privacy preferences, logging in, or filling in a form. You can set your browser to block or prompt you for these cookies, but this may prevent some site features from working.



