
Copyright 2026 © Leading Tools Industrial Co., Ltd.
All Rights Reserved. Website Design by Awakening Design
CATALOG TYPE
Product Categories
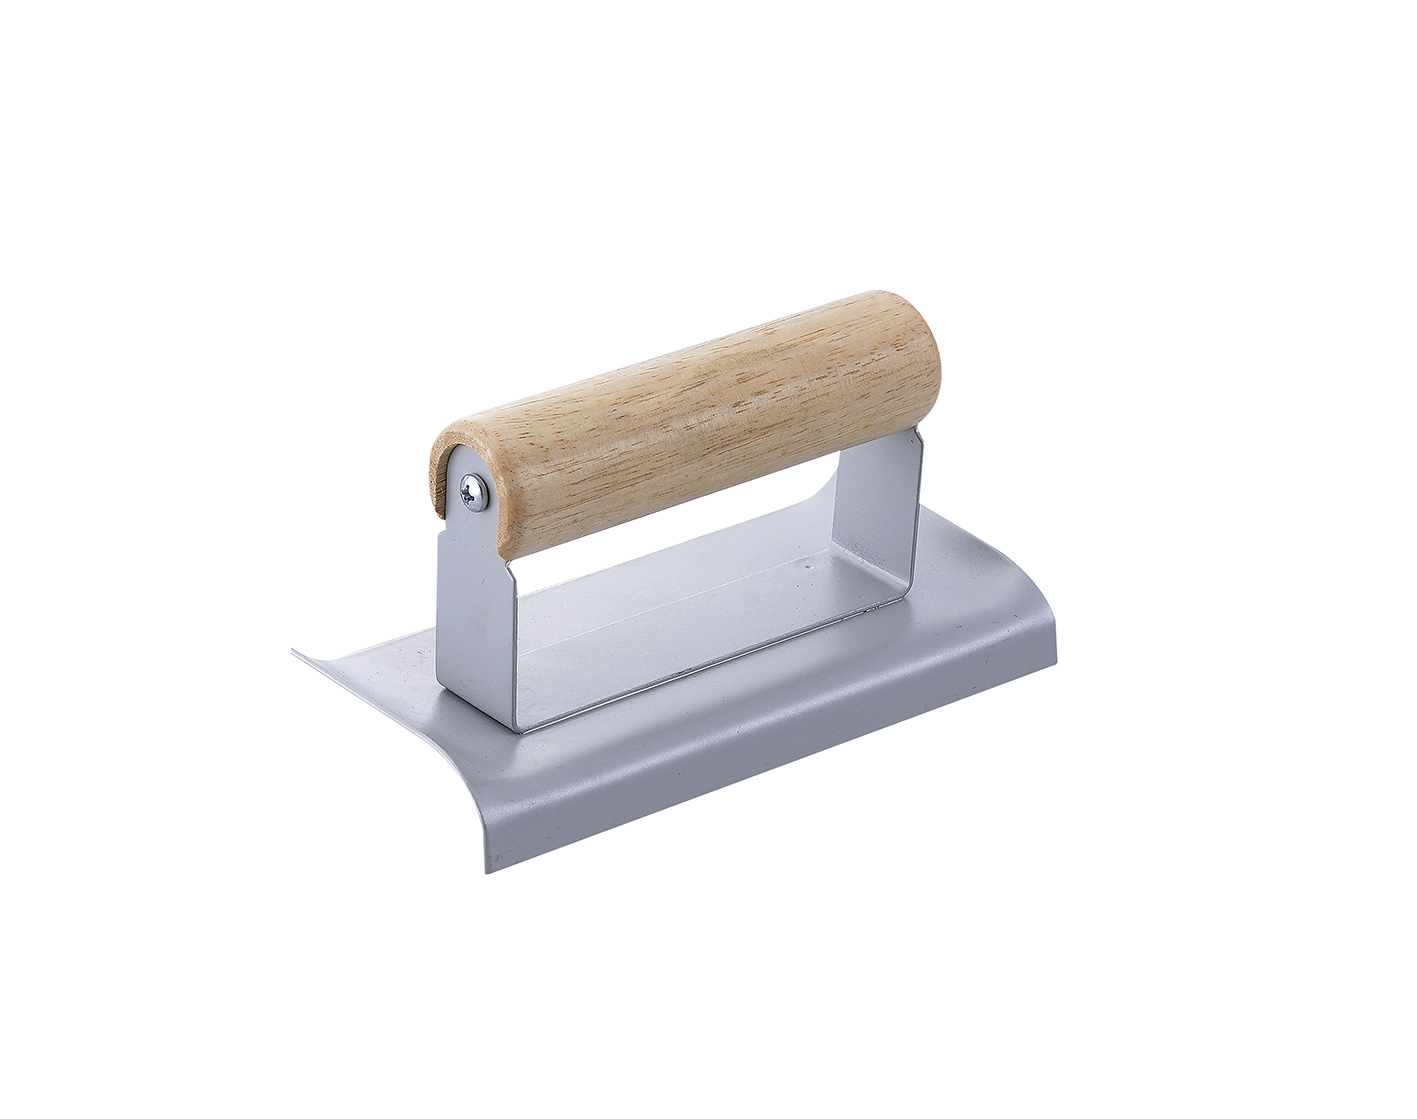
Concrete Edger
Product Description
Concrete Edger
Art. Nr: 300100, 300101, 300171, 300172, 300173
The Concrete Edger is a hand finishing tool that forms the rounded perimeter edge, the arris, on a freshly placed concrete slab, so that the edge does not chip or spall once the slab is in service. It is used on the outside edge of the slab only. The control joints inside the slab face are cut with a groover, and the two tools are not interchangeable.
Leading Tools lists the Concrete Edger in the Corner group, in five blade sizes across two builds: wood-handled 300100 at 3" × 6" and 300101 at 4" × 10", and stainless steel with a blue soft-grip handle 300171 at 3" × 6", 300172 at 4" × 11" (the Curved End Outside Edger) and 300173 at 4" × 6" (1" = 25.4 mm). Three related tools sit alongside it in the same group: Concrete Groover 300110, Straight End Edger 300170 and Universal Groover 300181, and the Selection Guide on the Specification tab sets out which job belongs to which tool.
End form. Edgers come in curved-end and straight-end forms. The 300100 / 300101 and 300171–300173 blades have both ends turned up (curved end), while the Straight End Edger 300170 is the straight-end version.
An un-edged slab arris is a sharp 90° corner in a material that has almost no tensile strength at the corner. Edging replaces it with a radius, and that radius is what stops sidewalk, driveway and walkway edges from chipping and spalling once the slab is loaded and weathered. The same treatment is applied alongside expansion and isolation joints, where the slab edge is equally exposed.
Edging and grooving are two different jobs and two different tools. The edger rounds the outside perimeter of the slab; the groover cuts the control joint inside the slab face, so that shrinkage cracking is directed to a planned line instead of appearing at random. Buyers who own one tool frequently do not realize they need the other.
| Situation | Use the Concrete Edger? | What to do |
|---|---|---|
| Perimeter of a newly placed slab: sidewalk, driveway, walkway | Yes | Edge the full perimeter before the forms are stripped |
| Alongside an expansion or isolation joint | Yes | Edge both sides of the joint |
| Control joint inside the slab face | No, use a groover | Edge first, then cut the joint with the groover (300110 / 300181) |
| Bleed water still standing on the surface | Not yet | Wait; working the surface now presses bleed water back in and causes dusting and scaling |
| Surface has gone matte, thumb leaves a clear impression, no water rising | Yes, this is the window | Begin the forming pass; typically 30–90 minutes after placement depending on air temperature |
| Concrete has hardened past the window | No | Stop; the edge cannot be formed without excessive force, and tool marks can no longer be worked out |
| Forms already stripped | Too late | The blade has to ride between the form and the slab |
| Step | Action | What to watch |
|---|---|---|
| 1 | Check readiness. Wait until surface bleed water has completely disappeared and the wet sheen has turned matte. A thumb or footprint should leave a clear impression with no water rising around it. | Starting early is the single most common finishing defect; it presses bleed water back into the top surface, raises the surface water-cement ratio and causes dusting and scaling |
| 2 | Prepare the tool. Make sure the blade is clean and free of dried cement paste; wipe a previously used blade with a damp cloth. A light film of form release oil or concrete tool oil on the blade face helps prevent sticking. | Hardened paste on the face will scratch the fresh surface |
| 3 | Position the blade between the form and the slab. Set the lip down into the gap so the formed radius lands exactly on the intended edge line. | The blade must sit in the form/slab gap, not on top of the arris |
| 4 | Keep the blade flat and glide it. Concentrate on keeping the top face level on the slab rather than staring at the edge itself. | Watching only the edge tends to twist the blade, producing a "rolled edge" that sits below the slab surface |
| 5 | Lift the leading edge slightly and take long strokes. Raising the front of the blade a little and working with long, continuous passes drives coarse aggregate back down until the edge is smooth and round. | A blade that bites in will gouge a channel instead of forming a radius |
| 6 | Use long, smooth strokes. Avoid short, jerky jabbing along the edge. | Short jabbing strokes tear the edge and leave an irregular profile |
| 7 | Clean up the tool marks while the concrete is still wet. The lines left where a pass starts and stops are very difficult to correct once the slab has set. | Work them out on the next pass, not after set |
| 8 | Apply steady downward pressure while walking forward. Load the forming edge through the handle with both hands and a steady pace, so pressure stays even from one end of the run to the other. | |
| 9 | Finish before the forms are stripped. Complete the full perimeter, then move on to jointing. | Once the forms are off, the blade has nothing to ride against |
The concrete finishing sequence runs: 1. placement → 2. screeding (strike off) → 3. bull floating → 4. edging: Concrete Edger 300100 / 300101 used here → 5. jointing / grooving (groover) → 6. final floating → 7. steel troweling (optional) → 8. curing.
Edging comes before grooving. Edging shapes and protects the slab perimeter; grooving then creates the control joint that directs shrinkage cracking to a planned line. Where a control joint meets the slab edge, at a doorway, for example, finish the edge first and let the groove run cleanly into it; a clean junction is what prevents chipping at that point.
This is the core application: the perimeter of newly placed flatwork, where a rounded arris is what stops the edge chipping and spalling under foot and wheel traffic.
Edge alongside expansion and isolation joints as well as at the slab perimeter.
On curb faces and raised slab edges, the operator works from outside the curb, pressing the forming edge against the face and moving along the length of the curb. The same rules apply: keep the blade flat against the face, use long strokes, and clean up tool marks before the surface sets.
On stamped, exposed aggregate and other decorative finishes, follow the edging sequence set for that finishing method.
The 30–90 minute window between placement and the forming pass shifts with air temperature, so the readiness test, bleed water gone, sheen matte, clear thumb impression, governs, not the clock.
Below about 10 °C (50 °F) concrete sets more slowly and the wait may extend by several hours; never finish frozen or frost-laden concrete. Above about 30 °C (86 °F), especially in direct sun, set can be very rapid: work early morning or late afternoon, use cold mixing water within specification, have every finishing tool laid out before the truck arrives, and consider a retarder.
Q: When exactly should I start edging, and what if I start too early or too late?
A: Start when the surface bleed water has completely disappeared and the wet sheen has turned matte; a thumb or footprint should leave a clear impression with no water rising around it, typically 30 to 90 minutes after placement.
Too early and the edger sinks and the edge slumps; too late and the edge crumbles or tears. Judge by the bleed-water test rather than the clock.
Q: The finished edge is rolled, wavy or uneven. What went wrong?
A: A rolled edge, one that sits lower than the slab surface, means the blade was twisted during the pass, usually because the operator watched the edge instead of the blade. Keep the top face flat on the slab and let it glide. A wavy profile means pressure and pace changed, so use long, continuous strokes with steady pressure rather than short, jerky movements.
Q: Which size should I buy?
A: 3" × 6" (300100 with wood handle; 300171 in stainless steel with soft grip) is the more versatile footprint for general residential and light commercial flatwork and is easier to control on tight radii. 4" × 10" (300101) covers more edge per pass on long straight commercial runs; the stainless 4" × 11" (300172) is the longest blade, and the stainless 4" × 6" (300173) is a wider plate at the standard length.
Q: What is the difference between the Concrete Edger and the Straight End Edger or the groovers?
A: End form. The Concrete Edger models (300100 / 300101 and 300171–300173) have turned-up ends, while 300170 is the straight-end edger. Within the Concrete Edger, 300100 / 300101 have wood roller handles and 300171–300173 are stainless steel with a blue soft-grip handle. An edger rounds the slab perimeter and cannot cut the control joint; that is the job of the Concrete Groover 300110 or the Universal Groover 300181.
Q: The blade has rust spots after storage. What should I do?
A: Remove light rust with fine abrasive paper or emery cloth, then wipe the blade clean. To prevent it, clean and dry the blade after every use and store it with a light oil film; a scratch in the finish is where rust starts.
| Model | Blade Size | Metric equivalent |
|---|---|---|
| 300100 | 3" × 6" | 76 × 152 mm |
| 300101 | 4" × 10" | 102 × 254 mm |
| 300171 | 3" × 6" | 76 × 152 mm |
| 300172 | 4" × 11" (Outside Edger) | 102 × 279 mm |
| 300173 | 4" × 6" | 102 × 152 mm |
| Item | Value |
|---|---|
| Product name / product group | Concrete Edger — Corner, Professional Tools |
| Art. numbers | 300100, 300101, 300171, 300172, 300173 |
| Blade sizes | 3" × 6"; 4" × 10"; 3" × 6"; 4" × 11"; 4" × 6" |
| Blade material | Please contact us (300100, 300101); Stainless Steel (300171, 300172, 300173) |
| End form | Curved end (both ends turned up) |
| Handle | Natural wood roller handle on a steel bracket (300100, 300101); blue soft-grip handle (300171, 300172, 300173) |
Radius and lip depth: contact us.
The Concrete Edger has a rounded forming edge, not a sharp cutting edge. The blade consists of:
The 3" × 6" blade (300100) is the general-purpose footprint; the 4" × 10" blade (300101) covers a longer run per pass, which matters on long straight commercial edges.
The 300100 / 300101 has a natural wood roller handle mounted on a steel bracket, while the stainless steel 300171 / 300172 / 300173 have a blue soft-grip handle, so the handle type differs within the Concrete Edger family. In the same Corner group, the Straight End Edger (300170) and Universal Groover (300181) also have blue soft-grip handles.
The tool needs enough mass and a handle placed high enough over the blade for the operator to load the forming edge through their arms and body weight while walking forward, rather than by leaning awkwardly over the slab.
General recommendation: 3" × 6" (300100) is the more versatile footprint and suits the majority of residential and light commercial work; 4" × 10" (300101) is the choice for large, open commercial slabs where fewer passes are wanted along a long straight edge. Both are mainstream sizes, so neither is a specialty item. The stainless steel soft-grip models follow the same logic: 300171 (3" × 6") matches the 300100 footprint, 300173 (4" × 6") is a wider plate at the same length, and 300172 (4" × 11") is the longest blade, for long continuous runs.
The size designation refers to the blade dimensions. A longer blade:
Radius is set by the lip geometry of the blade, not by its footprint, so it does not follow from blade size.
Radius and lip depth: contact us.
Wooden roller handles are traditional and are what 300100 / 300101 have; soft-grip plastic handles reduce hand fatigue on long pours and are the configuration on the Concrete Edger 300171–300173, the Straight End Edger and the Universal Groover.
| Tool | Art. Nr and size | What it does | When it is used |
|---|---|---|---|
| Concrete Edger | 300100 3" × 6"; 300101 4" × 10" (wood roller handle); 300171 3" × 6"; 300172 4" × 11" (Curved End Outside Edger); 300173 4" × 6" (300171–300173: Stainless Steel; blue soft-grip handle) | Rounds the outside perimeter of the slab so the arris resists chipping and spalling | After floating, before the forms are stripped |
| Concrete Groover | 300110 3" × 6" (wood roller handle) | Cuts the control joint inside the slab face so shrinkage cracking follows a planned line | After edging |
| Straight End Edger | 300170 3-1/2" × 6" (Stainless Steel; blue soft-grip handle) | Same edging function, but with straight ends instead of turned-up ends; curved-end and straight-end edgers are two distinct end forms | Where the edge run must finish flush against a wall, step riser or existing slab rather than being lifted out mid-run |
| Universal Groover | 300181 3" × 6" (Stainless Steel; blue soft-grip handle) | Grooving tool with a different bracket and handle configuration from 300110 | After edging, while the concrete is still plastic |
Complete art-number reference for the Concrete Edger family.
| Art. Nr | Blade Size | Metric equivalent | Blade material | Handle |
|---|---|---|---|---|
| 300100 | 3" × 6" | 76 × 152 mm | Please contact us | Natural wood roller on steel bracket |
| 300101 | 4" × 10" | 102 × 254 mm | Please contact us | Natural wood roller on steel bracket |
| 300171 | 3" × 6" | 76 × 152 mm | Stainless Steel | Blue soft grip |
| 300172 | 4" × 11" (Outside Edger) | 102 × 279 mm | Stainless Steel | Blue soft grip |
| 300173 | 4" × 6" | 102 × 152 mm | Stainless Steel | Blue soft grip |
| Factor | 300100 (3" × 6") | 300101 (4" × 10") |
|---|---|---|
| Slab size | All sizes, more maneuverable | Large commercial slabs |
| Edge length per pass | Shorter, more passes | Longer, fewer passes |
| Maneuverability | Easier in tight spaces | Less maneuverable |
| Step and curb work | Preferred for radii and tight curves | May be too long for tight radius work |
| Commercial projects | Suitable | Often preferred |
| Typical user | Residential contractors | Large-scale contractors |
Before each use, check:
The rounded edge of the Concrete Edger is a forming edge, not a cutting edge, and must not be sharpened like a knife. If the tool stops producing a clean, consistent radius:
Wear gloves when edging; the blade edges and the point where the tool meets the formwork can cut the hand. Fresh concrete is strongly alkaline (pH roughly 12–13) and will irritate skin on prolonged contact, so wash splashes off promptly.
Concrete Edger
Art. Nr: 300100, 300101, 300171, 300172, 300173
The Concrete Edger is a hand finishing tool that forms the rounded perimeter edge, the arris, on a freshly placed concrete slab, so that the edge does not chip or spall once the slab is in service. It is used on the outside edge of the slab only. The control joints inside the slab face are cut with a groover, and the two tools are not interchangeable.
Leading Tools lists the Concrete Edger in the Corner group, in five blade sizes across two builds: wood-handled 300100 at 3" × 6" and 300101 at 4" × 10", and stainless steel with a blue soft-grip handle 300171 at 3" × 6", 300172 at 4" × 11" (the Curved End Outside Edger) and 300173 at 4" × 6" (1" = 25.4 mm). Three related tools sit alongside it in the same group: Concrete Groover 300110, Straight End Edger 300170 and Universal Groover 300181, and the Selection Guide on the Specification tab sets out which job belongs to which tool.
End form. Edgers come in curved-end and straight-end forms. The 300100 / 300101 and 300171–300173 blades have both ends turned up (curved end), while the Straight End Edger 300170 is the straight-end version.
An un-edged slab arris is a sharp 90° corner in a material that has almost no tensile strength at the corner. Edging replaces it with a radius, and that radius is what stops sidewalk, driveway and walkway edges from chipping and spalling once the slab is loaded and weathered. The same treatment is applied alongside expansion and isolation joints, where the slab edge is equally exposed.
Edging and grooving are two different jobs and two different tools. The edger rounds the outside perimeter of the slab; the groover cuts the control joint inside the slab face, so that shrinkage cracking is directed to a planned line instead of appearing at random. Buyers who own one tool frequently do not realize they need the other.
| Situation | Use the Concrete Edger? | What to do |
|---|---|---|
| Perimeter of a newly placed slab: sidewalk, driveway, walkway | Yes | Edge the full perimeter before the forms are stripped |
| Alongside an expansion or isolation joint | Yes | Edge both sides of the joint |
| Control joint inside the slab face | No, use a groover | Edge first, then cut the joint with the groover (300110 / 300181) |
| Bleed water still standing on the surface | Not yet | Wait; working the surface now presses bleed water back in and causes dusting and scaling |
| Surface has gone matte, thumb leaves a clear impression, no water rising | Yes, this is the window | Begin the forming pass; typically 30–90 minutes after placement depending on air temperature |
| Concrete has hardened past the window | No | Stop; the edge cannot be formed without excessive force, and tool marks can no longer be worked out |
| Forms already stripped | Too late | The blade has to ride between the form and the slab |
| Step | Action | What to watch |
|---|---|---|
| 1 | Check readiness. Wait until surface bleed water has completely disappeared and the wet sheen has turned matte. A thumb or footprint should leave a clear impression with no water rising around it. | Starting early is the single most common finishing defect; it presses bleed water back into the top surface, raises the surface water-cement ratio and causes dusting and scaling |
| 2 | Prepare the tool. Make sure the blade is clean and free of dried cement paste; wipe a previously used blade with a damp cloth. A light film of form release oil or concrete tool oil on the blade face helps prevent sticking. | Hardened paste on the face will scratch the fresh surface |
| 3 | Position the blade between the form and the slab. Set the lip down into the gap so the formed radius lands exactly on the intended edge line. | The blade must sit in the form/slab gap, not on top of the arris |
| 4 | Keep the blade flat and glide it. Concentrate on keeping the top face level on the slab rather than staring at the edge itself. | Watching only the edge tends to twist the blade, producing a "rolled edge" that sits below the slab surface |
| 5 | Lift the leading edge slightly and take long strokes. Raising the front of the blade a little and working with long, continuous passes drives coarse aggregate back down until the edge is smooth and round. | A blade that bites in will gouge a channel instead of forming a radius |
| 6 | Use long, smooth strokes. Avoid short, jerky jabbing along the edge. | Short jabbing strokes tear the edge and leave an irregular profile |
| 7 | Clean up the tool marks while the concrete is still wet. The lines left where a pass starts and stops are very difficult to correct once the slab has set. | Work them out on the next pass, not after set |
| 8 | Apply steady downward pressure while walking forward. Load the forming edge through the handle with both hands and a steady pace, so pressure stays even from one end of the run to the other. | |
| 9 | Finish before the forms are stripped. Complete the full perimeter, then move on to jointing. | Once the forms are off, the blade has nothing to ride against |
The concrete finishing sequence runs: 1. placement → 2. screeding (strike off) → 3. bull floating → 4. edging: Concrete Edger 300100 / 300101 used here → 5. jointing / grooving (groover) → 6. final floating → 7. steel troweling (optional) → 8. curing.
Edging comes before grooving. Edging shapes and protects the slab perimeter; grooving then creates the control joint that directs shrinkage cracking to a planned line. Where a control joint meets the slab edge, at a doorway, for example, finish the edge first and let the groove run cleanly into it; a clean junction is what prevents chipping at that point.
This is the core application: the perimeter of newly placed flatwork, where a rounded arris is what stops the edge chipping and spalling under foot and wheel traffic.
Edge alongside expansion and isolation joints as well as at the slab perimeter.
On curb faces and raised slab edges, the operator works from outside the curb, pressing the forming edge against the face and moving along the length of the curb. The same rules apply: keep the blade flat against the face, use long strokes, and clean up tool marks before the surface sets.
On stamped, exposed aggregate and other decorative finishes, follow the edging sequence set for that finishing method.
The 30–90 minute window between placement and the forming pass shifts with air temperature, so the readiness test, bleed water gone, sheen matte, clear thumb impression, governs, not the clock.
Below about 10 °C (50 °F) concrete sets more slowly and the wait may extend by several hours; never finish frozen or frost-laden concrete. Above about 30 °C (86 °F), especially in direct sun, set can be very rapid: work early morning or late afternoon, use cold mixing water within specification, have every finishing tool laid out before the truck arrives, and consider a retarder.
Q: When exactly should I start edging, and what if I start too early or too late?
A: Start when the surface bleed water has completely disappeared and the wet sheen has turned matte; a thumb or footprint should leave a clear impression with no water rising around it, typically 30 to 90 minutes after placement.
Too early and the edger sinks and the edge slumps; too late and the edge crumbles or tears. Judge by the bleed-water test rather than the clock.
Q: The finished edge is rolled, wavy or uneven. What went wrong?
A: A rolled edge, one that sits lower than the slab surface, means the blade was twisted during the pass, usually because the operator watched the edge instead of the blade. Keep the top face flat on the slab and let it glide. A wavy profile means pressure and pace changed, so use long, continuous strokes with steady pressure rather than short, jerky movements.
Q: Which size should I buy?
A: 3" × 6" (300100 with wood handle; 300171 in stainless steel with soft grip) is the more versatile footprint for general residential and light commercial flatwork and is easier to control on tight radii. 4" × 10" (300101) covers more edge per pass on long straight commercial runs; the stainless 4" × 11" (300172) is the longest blade, and the stainless 4" × 6" (300173) is a wider plate at the standard length.
Q: What is the difference between the Concrete Edger and the Straight End Edger or the groovers?
A: End form. The Concrete Edger models (300100 / 300101 and 300171–300173) have turned-up ends, while 300170 is the straight-end edger. Within the Concrete Edger, 300100 / 300101 have wood roller handles and 300171–300173 are stainless steel with a blue soft-grip handle. An edger rounds the slab perimeter and cannot cut the control joint; that is the job of the Concrete Groover 300110 or the Universal Groover 300181.
Q: The blade has rust spots after storage. What should I do?
A: Remove light rust with fine abrasive paper or emery cloth, then wipe the blade clean. To prevent it, clean and dry the blade after every use and store it with a light oil film; a scratch in the finish is where rust starts.
| Model | Blade Size | Metric equivalent |
|---|---|---|
| 300100 | 3" × 6" | 76 × 152 mm |
| 300101 | 4" × 10" | 102 × 254 mm |
| 300171 | 3" × 6" | 76 × 152 mm |
| 300172 | 4" × 11" (Outside Edger) | 102 × 279 mm |
| 300173 | 4" × 6" | 102 × 152 mm |
| Item | Value |
|---|---|
| Product name / product group | Concrete Edger — Corner, Professional Tools |
| Art. numbers | 300100, 300101, 300171, 300172, 300173 |
| Blade sizes | 3" × 6"; 4" × 10"; 3" × 6"; 4" × 11"; 4" × 6" |
| Blade material | Please contact us (300100, 300101); Stainless Steel (300171, 300172, 300173) |
| End form | Curved end (both ends turned up) |
| Handle | Natural wood roller handle on a steel bracket (300100, 300101); blue soft-grip handle (300171, 300172, 300173) |
Radius and lip depth: contact us.
The Concrete Edger has a rounded forming edge, not a sharp cutting edge. The blade consists of:
The 3" × 6" blade (300100) is the general-purpose footprint; the 4" × 10" blade (300101) covers a longer run per pass, which matters on long straight commercial edges.
The 300100 / 300101 has a natural wood roller handle mounted on a steel bracket, while the stainless steel 300171 / 300172 / 300173 have a blue soft-grip handle, so the handle type differs within the Concrete Edger family. In the same Corner group, the Straight End Edger (300170) and Universal Groover (300181) also have blue soft-grip handles.
The tool needs enough mass and a handle placed high enough over the blade for the operator to load the forming edge through their arms and body weight while walking forward, rather than by leaning awkwardly over the slab.
General recommendation: 3" × 6" (300100) is the more versatile footprint and suits the majority of residential and light commercial work; 4" × 10" (300101) is the choice for large, open commercial slabs where fewer passes are wanted along a long straight edge. Both are mainstream sizes, so neither is a specialty item. The stainless steel soft-grip models follow the same logic: 300171 (3" × 6") matches the 300100 footprint, 300173 (4" × 6") is a wider plate at the same length, and 300172 (4" × 11") is the longest blade, for long continuous runs.
The size designation refers to the blade dimensions. A longer blade:
Radius is set by the lip geometry of the blade, not by its footprint, so it does not follow from blade size.
Radius and lip depth: contact us.
Wooden roller handles are traditional and are what 300100 / 300101 have; soft-grip plastic handles reduce hand fatigue on long pours and are the configuration on the Concrete Edger 300171–300173, the Straight End Edger and the Universal Groover.
| Tool | Art. Nr and size | What it does | When it is used |
|---|---|---|---|
| Concrete Edger | 300100 3" × 6"; 300101 4" × 10" (wood roller handle); 300171 3" × 6"; 300172 4" × 11" (Curved End Outside Edger); 300173 4" × 6" (300171–300173: Stainless Steel; blue soft-grip handle) | Rounds the outside perimeter of the slab so the arris resists chipping and spalling | After floating, before the forms are stripped |
| Concrete Groover | 300110 3" × 6" (wood roller handle) | Cuts the control joint inside the slab face so shrinkage cracking follows a planned line | After edging |
| Straight End Edger | 300170 3-1/2" × 6" (Stainless Steel; blue soft-grip handle) | Same edging function, but with straight ends instead of turned-up ends; curved-end and straight-end edgers are two distinct end forms | Where the edge run must finish flush against a wall, step riser or existing slab rather than being lifted out mid-run |
| Universal Groover | 300181 3" × 6" (Stainless Steel; blue soft-grip handle) | Grooving tool with a different bracket and handle configuration from 300110 | After edging, while the concrete is still plastic |
Complete art-number reference for the Concrete Edger family.
| Art. Nr | Blade Size | Metric equivalent | Blade material | Handle |
|---|---|---|---|---|
| 300100 | 3" × 6" | 76 × 152 mm | Please contact us | Natural wood roller on steel bracket |
| 300101 | 4" × 10" | 102 × 254 mm | Please contact us | Natural wood roller on steel bracket |
| 300171 | 3" × 6" | 76 × 152 mm | Stainless Steel | Blue soft grip |
| 300172 | 4" × 11" (Outside Edger) | 102 × 279 mm | Stainless Steel | Blue soft grip |
| 300173 | 4" × 6" | 102 × 152 mm | Stainless Steel | Blue soft grip |
| Factor | 300100 (3" × 6") | 300101 (4" × 10") |
|---|---|---|
| Slab size | All sizes, more maneuverable | Large commercial slabs |
| Edge length per pass | Shorter, more passes | Longer, fewer passes |
| Maneuverability | Easier in tight spaces | Less maneuverable |
| Step and curb work | Preferred for radii and tight curves | May be too long for tight radius work |
| Commercial projects | Suitable | Often preferred |
| Typical user | Residential contractors | Large-scale contractors |
Before each use, check:
The rounded edge of the Concrete Edger is a forming edge, not a cutting edge, and must not be sharpened like a knife. If the tool stops producing a clean, consistent radius:
Wear gloves when edging; the blade edges and the point where the tool meets the formwork can cut the hand. Fresh concrete is strongly alkaline (pH roughly 12–13) and will irritate skin on prolonged contact, so wash splashes off promptly.

In compliance with EU personal data protection laws, we are committed to protecting and providing you with control over your personal data. By clicking "Accept All", you allow us to place cookies to enhance your experience on this site, help us analyze site performance and usage, and enable us to deliver relevant marketing content. You can manage your cookie settings below. By clicking "Agree" you agree to the current settings. For more information, please visit the Privacy Statement.
This website uses cookies
In compliance with EU personal data protection laws, we are committed to protecting your personal data and providing you with control over it. By clicking "Agree", you allow us to place cookies to improve your experience on this site, help us analyze site performance and usage, and allow us to deliver relevant marketing content.
By clicking "Only necessary" you allow us to place only necessary cookies. The website cannot function without these cookies and you cannot switch them off on your system. These cookies are typically set only in response to an action you perform (i.e. a service request), such as setting privacy preferences, logging in, or filling in a form. You can set your browser to block or prompt you for these cookies, but this may prevent some site features from working.



