
Copyright 2026 © Leading Tools Industrial Co., Ltd.
All Rights Reserved. Website Design by Awakening Design
CATALOG TYPE
Product Categories
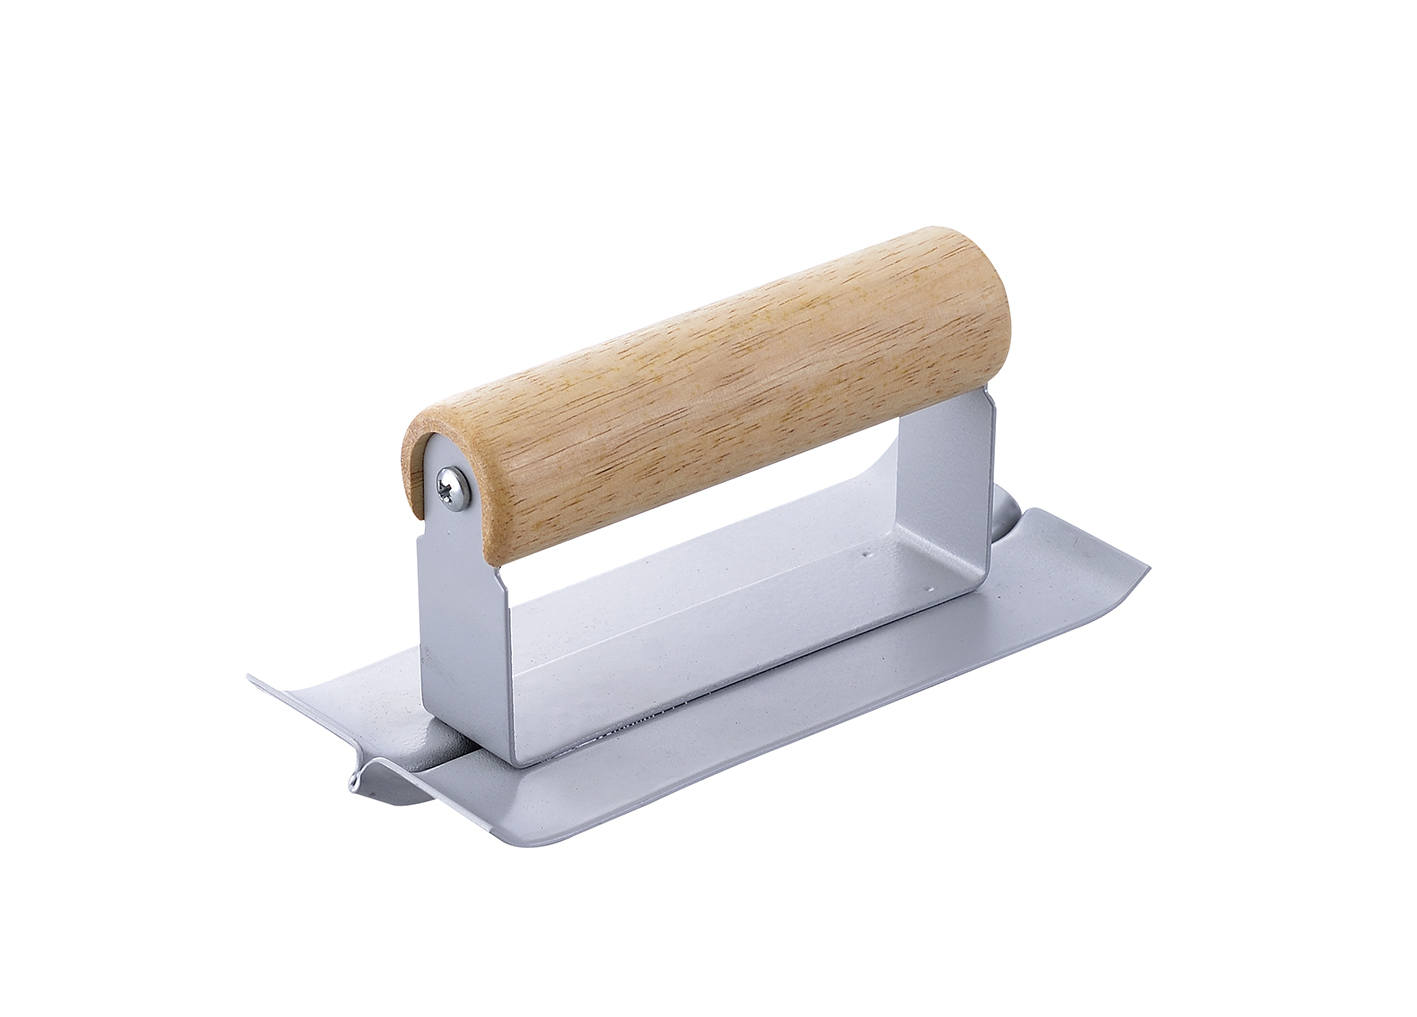
Concrete Groover
Product Description
Concrete Groover
Art. Nr: 300110
The Concrete Groover is a hand tool that presses a groove into a concrete slab while the concrete is still plastic, forming a control joint (also called a contraction joint) so that drying shrinkage and thermal movement crack along that planned line instead of appearing at random across the slab face. It is a forming tool, not a cutting tool: the groove is pushed into green concrete during the early finishing stage, before final troweling.
The groover and the edger are two different tools for two different jobs. The edger rounds the outside perimeter of the slab; the groover cuts the control joint inside the slab face. Buyers who own one regularly do not realize they need the other, and the two are not interchangeable.
Leading Tools lists the Concrete Groover in the Corner group as a single art number: 300110 at 3" × 6" (76 × 152 mm; 1" = 25.4 mm). Three related tools sit alongside it in the same group: Concrete Edger 300100 / 300101 / 300171–300173, Straight End Edger 300170 and Universal Groover 300181, and the Selection Guide on the Specification tab sets out which job belongs to which tool.
Concrete shrinks as it dries and moves with temperature, and a slab restrained at its base will crack. A control joint does not prevent that movement; it decides where the crack goes, by creating a deliberate weakened plane that the crack follows out of sight below the groove.
Because the groove is pressed in during the finishing sequence that is happening anyway, the joint is created with no additional visit to site, no saw hire, no blade consumables and no waiting for the concrete to reach cutting hardness. Saw-cutting the same joints means coming back 12–24 hours later with a powered saw. On residential drives, paths, patios and small commercial pads, that difference is the reason the hand groover is still standard equipment.
Leading Tools' Corner group puts four related tools side by side.
In short: Concrete Edger 300100/300101/300171–300173 rounds the outside perimeter of the slab; Concrete Groover 300110 cuts the control joint inside the slab face; Straight End Edger 300170 does the edger's job where the run has to finish flush against a wall or riser; Universal Groover 300181 is the stainless, soft-grip grooving option. The Selection Guide on the Specification tab sets this out in full.
3" × 6" is a mainstream groover size, not a specialty. A purchasing team replacing a standard 3" × 6" groover can specify 300110 as a direct substitute on plate size.
| Situation | Use the Concrete Groover? | What to do |
|---|---|---|
| Control joint in a fresh slab, concrete still plastic | Yes, this is the tool's job | Groove during early finishing, before final troweling |
| Slab perimeter / outside edge | No, use the edger | Edge first with 300100 / 300101, then groove |
| Concrete has hardened past hand-tool stage | No | Switch to saw-cutting |
| Bleed water still standing on the surface | Not yet | Wait; working the surface now weakens the top surface |
| Structural slab where the specification calls for a joint at 1/4 of slab depth | Not on its own | Joint depth should be at least 1/4 of the slab thickness (ACI 360R recommendation); where the groove is shallower, saw-cut or use a crack inducer |
| Construction joint between two pours | No | Formed at the pour edge, not with a groover |
| Isolation / expansion joint against a wall, column or footing | No | Needs a compressible filler; not a groover job |
| Re-entrant (inside) corner in the slab plan | Yes | Run a joint through the corner; see below |
| Step | Action | What to watch |
|---|---|---|
| 1 | Check readiness. The groover needs a firmer surface than the edger. Wait until the surface will carry the tool without the plate sinking, but while the concrete is still plastic enough to displace. | Grooving is an early-finishing operation performed before final troweling, not after the slab has set |
| 2 | Mark the joint layout first. Snap or mark every joint line on the surface or off the forms before starting, so the whole grid is set before the concrete moves on. | Working out spacing mid-pour is how joints end up in the wrong place |
| 3 | Set the plate flat on the surface at the start of the run, with the bit on the marked line. | If the plate is not flat, the groove depth varies from the first stroke |
| 4 | Load downward and move along the line. Groovers are worked either pulled toward the operator or pushed away, depending on the tool and the operator's preference. Enough downward pressure to keep the bit engaged; no more. | Excessive force tears the groove walls instead of forming them |
| 5 | Guide the run. Use a string line, chalk line or a straight guide board for long runs; do not groove freehand over distance. | A wandering joint line is permanent |
| 6 | Make one continuous pass along the full joint length rather than several short overlapping ones. | Restarting mid-run leaves a step in the groove floor |
| 7 | Check the groove. Walls should be clean and defined, depth even along the run, and the profile should narrow toward the surface. | Ragged walls mean the concrete has gone too hard, stop and switch to saw-cutting |
| 8 | Finish around the joint. Groove before final troweling, so the trowel pass afterwards blends the shoulders of the joint into the slab surface. | Grooving after final troweling leaves a torn edge on each shoulder |
Joint depth should be at least one quarter of the slab thickness (ACI 360R recommendation).
Joint spacing and depth follow the project specification and drawings.
Inside corners in the slab plan concentrate stress and are the first place a slab cracks. Run a control joint out of every re-entrant corner, and continue it far enough past the corner that the crack has somewhere to go; the joint layout follows the project drawings.
On stamped concrete the joints are formed after stamping, while the surface is still workable, and the groove has to be cut through the stamped texture so the crack-control line stays continuous. Where joints are also a design feature, set them out with the stamp pattern rather than against it. Because a wet-formed groove leaves the surrounding texture intact, hand grooving suits decorative work better than saw-cutting does.
The readiness of the surface, not the clock, governs when to groove. Grooving happens in the early finishing window, and that window moves with temperature, sun, wind and mix design.
In low humidity or wind, rapid surface drying can cause plastic shrinkage cracking before the joints exist; use fog misting or an evaporation retarder and start finishing as early as possible.
Q: What is the difference between a groover and an edger?
A: The edger rounds the outside perimeter of the slab so the edge does not chip; the groover presses a control joint into the slab face so shrinkage cracking follows a planned line. They do different jobs and are not interchangeable.
Q: When exactly do I groove, and what if the groove closes up or comes out ragged?
A: Groove during early finishing, while the concrete is still plastic but firm enough to carry the tool without the plate sinking, and before final troweling.
If the groove closes up behind the tool, the concrete was still too soft, so wait for a firmer surface and re-form it. If the walls are torn, the concrete has gone past the workable stage or the bit is worn, so check the bit and, if the surface is already too hard, switch to saw-cutting.
Q: How do I get a straight groove of even depth?
A: Use a string line, chalk line or guide board, because freehand grooving over a distance wanders. Keep the plate flat and the downward pressure steady through the pass, and check the bit for uneven wear.
Q: How do I clean it?
A: Clean the tool immediately after use. If cement paste has hardened on the bit, soak it in warm water with a mild detergent, then clear it with a nylon brush and rinse; avoid acidic cleaners, and scrape larger lumps with a plastic scraper along the blade face rather than across it. Hardened paste in the bit root changes the groove profile.
Q: What is the difference between the Concrete Groover 300110 and the Universal Groover 300181?
A: Both are 3" × 6". 300181 is marked Stainless Steel and has a blue soft-grip handle on a taller twin-leg bracket, while 300110 has a wood roller handle on a single bracket.
| Model | Blade Size | Metric equivalent |
|---|---|---|
| 300110 | 3" × 6" | 76 × 152 mm |
| Item | Value |
|---|---|
| Product name / product group | Concrete Groover — Corner, Professional Tools |
| Art. number | 300110 |
| Base plate size | 3" × 6" (76 × 152 mm) |
| End form | Both ends turned up |
| Bit position | Single raised rib on the underside centerline, running the full plate length |
| Handle | Natural wood roller handle on a folded metal bracket |
| Blade material | Please contact us |
The Concrete Groover is built differently from an edger:
Note that an edger has a rounded lip on one long edge and no bit; a groover has a centerline bit and no forming lip. That is why they cannot substitute for one another.
The bit is the working part of the tool and the only part that wears in normal use.
The 300110 has a natural wood roller handle riveted to a folded sheet-metal bracket mounted on the top face of the plate. Within the Corner group, Concrete Edger 300100/300101 and Concrete Groover 300110 have wood roller handles, while Concrete Edger 300171–300173, Straight End Edger 300170 and Universal Groover 300181 have blue soft-grip handles.
The 3" × 6" designation refers to the base plate, not to the groove. The groove that the tool produces is set by the bit:
| Factor | Consideration |
|---|---|
| Maneuverability | Short enough to follow curved joint lines as well as straight runs |
| Groove length per pass | Moderate, suits residential and light commercial slabs |
| Bit visibility | The 3" front-to-back dimension lets the operator see the bit and the marked joint line at the same time |
| Bearing area | The plate is long enough to bridge minor surface irregularities and keep depth consistent |
| Weight | Light enough for a full day of jointing without fatigue |
The groove is set by the bit, not by the 3" × 6" plate size. Groove depth and profile: contact us.
Wooden roller handles, the configuration on the 300110, are the traditional choice. Soft-grip handles are the fatigue-reducing alternative and are what the Concrete Edger 300171–300173, Straight End Edger and Universal Groover use.
Choose the groover when:
Choose saw-cutting when:
The full comparison table is under Full Size Reference below.
| Tool | Art. Nr and size | What it does | When it is used |
|---|---|---|---|
| Concrete Edger | 300100 3" × 6"; 300101 4" × 10" (wood roller handle); 300171 3" × 6"; 300172 4" × 11" (Curved End Outside Edger); 300173 4" × 6" (300171–300173: Stainless Steel; blue soft-grip handle) | Rounds the outside perimeter of the slab so the arris resists chipping and spalling | After floating, before the forms are stripped |
| Concrete Groover | 300110 3" × 6" (wood roller handle) | Presses the control joint into the slab face so shrinkage cracking follows a planned line | Early finishing, before final troweling, after edging |
| Straight End Edger | 300170 3-1/2" × 6" (Stainless Steel; blue soft-grip handle) | Edging function with straight ends instead of turned-up ends | Where the edge run must finish flush against a wall, step riser or existing slab |
| Universal Groover | 300181 3" × 6" (Stainless Steel; blue soft-grip handle) | Grooving function, in stainless with a soft-grip handle and a taller twin-leg bracket than 300110 | Early finishing, before final troweling, after edging |
Between the two groovers, the difference is that 300181 is designated Stainless Steel with a soft-grip handle, while 300110 has a wood roller handle.
Complete art-number reference for the Concrete Groover.
| Art. Nr | Blade Size | Metric equivalent | Blade material | Handle |
|---|---|---|---|---|
| 300110 | 3" × 6" | 76 × 152 mm | Please contact us | Natural wood roller on metal bracket |
| Art. Nr | Tool | Size | Handle |
|---|---|---|---|
| 300100 | Concrete Edger | 3" × 6" | Wood roller |
| 300101 | Concrete Edger | 4" × 10" | Wood roller |
| 300110 | Concrete Groover | 3" × 6" | Wood roller |
| 300170 | Straight End Edger | 3-1/2" × 6" | Blue soft grip |
| 300171 | Concrete Edger | 3" × 6" | Blue soft grip |
| 300172 | Concrete Edger (Curved End Outside Edger) | 4" × 11" | Blue soft grip |
| 300173 | Concrete Edger | 4" × 6" | Blue soft grip |
| 300181 | Universal Groover | 3" × 6" | Blue soft grip |
| Factor | Groover (300110) | Saw-cut |
|---|---|---|
| Timing | During finishing, while the concrete is still plastic and before final troweling | After the concrete hardens |
| Equipment | Hand tool: no power, no blades, no water feed | Concrete saw plus consumable blades |
| Joint profile | Formed by the raised bit; profile: contact us | Square or rectangular cut |
| Crack direction | The groove forms the weakened plane that directs the crack | Same principle, achieved by the saw kerf |
| Depth control | Limited by bit projection; plate bottoms out on the slab | Set on the saw, so ACI's 1/4-slab-depth rule can be met on any slab thickness |
| Achievable depth | Limited by the bit; groove depth: contact us | Set on the saw to the required depth |
| Dust / slurry | None, wet process | Dry cutting produces dust; wet cutting produces slurry |
| Edge chipping risk | Low while the concrete is plastic | Higher if cut too early or with a worn blade |
| Cost per joint metre | Tool cost only, no hire and no consumables | Saw hire plus blade wear plus a second site visit |
The bit is the only part of the tool that determines groove quality, so inspect it, not the plate:
Wear gloves. Fresh concrete is strongly alkaline and irritates skin on prolonged contact, so wash splashes off promptly and change out of concrete-soaked clothing.
Concrete Groover
Art. Nr: 300110
The Concrete Groover is a hand tool that presses a groove into a concrete slab while the concrete is still plastic, forming a control joint (also called a contraction joint) so that drying shrinkage and thermal movement crack along that planned line instead of appearing at random across the slab face. It is a forming tool, not a cutting tool: the groove is pushed into green concrete during the early finishing stage, before final troweling.
The groover and the edger are two different tools for two different jobs. The edger rounds the outside perimeter of the slab; the groover cuts the control joint inside the slab face. Buyers who own one regularly do not realize they need the other, and the two are not interchangeable.
Leading Tools lists the Concrete Groover in the Corner group as a single art number: 300110 at 3" × 6" (76 × 152 mm; 1" = 25.4 mm). Three related tools sit alongside it in the same group: Concrete Edger 300100 / 300101 / 300171–300173, Straight End Edger 300170 and Universal Groover 300181, and the Selection Guide on the Specification tab sets out which job belongs to which tool.
Concrete shrinks as it dries and moves with temperature, and a slab restrained at its base will crack. A control joint does not prevent that movement; it decides where the crack goes, by creating a deliberate weakened plane that the crack follows out of sight below the groove.
Because the groove is pressed in during the finishing sequence that is happening anyway, the joint is created with no additional visit to site, no saw hire, no blade consumables and no waiting for the concrete to reach cutting hardness. Saw-cutting the same joints means coming back 12–24 hours later with a powered saw. On residential drives, paths, patios and small commercial pads, that difference is the reason the hand groover is still standard equipment.
Leading Tools' Corner group puts four related tools side by side.
In short: Concrete Edger 300100/300101/300171–300173 rounds the outside perimeter of the slab; Concrete Groover 300110 cuts the control joint inside the slab face; Straight End Edger 300170 does the edger's job where the run has to finish flush against a wall or riser; Universal Groover 300181 is the stainless, soft-grip grooving option. The Selection Guide on the Specification tab sets this out in full.
3" × 6" is a mainstream groover size, not a specialty. A purchasing team replacing a standard 3" × 6" groover can specify 300110 as a direct substitute on plate size.
| Situation | Use the Concrete Groover? | What to do |
|---|---|---|
| Control joint in a fresh slab, concrete still plastic | Yes, this is the tool's job | Groove during early finishing, before final troweling |
| Slab perimeter / outside edge | No, use the edger | Edge first with 300100 / 300101, then groove |
| Concrete has hardened past hand-tool stage | No | Switch to saw-cutting |
| Bleed water still standing on the surface | Not yet | Wait; working the surface now weakens the top surface |
| Structural slab where the specification calls for a joint at 1/4 of slab depth | Not on its own | Joint depth should be at least 1/4 of the slab thickness (ACI 360R recommendation); where the groove is shallower, saw-cut or use a crack inducer |
| Construction joint between two pours | No | Formed at the pour edge, not with a groover |
| Isolation / expansion joint against a wall, column or footing | No | Needs a compressible filler; not a groover job |
| Re-entrant (inside) corner in the slab plan | Yes | Run a joint through the corner; see below |
| Step | Action | What to watch |
|---|---|---|
| 1 | Check readiness. The groover needs a firmer surface than the edger. Wait until the surface will carry the tool without the plate sinking, but while the concrete is still plastic enough to displace. | Grooving is an early-finishing operation performed before final troweling, not after the slab has set |
| 2 | Mark the joint layout first. Snap or mark every joint line on the surface or off the forms before starting, so the whole grid is set before the concrete moves on. | Working out spacing mid-pour is how joints end up in the wrong place |
| 3 | Set the plate flat on the surface at the start of the run, with the bit on the marked line. | If the plate is not flat, the groove depth varies from the first stroke |
| 4 | Load downward and move along the line. Groovers are worked either pulled toward the operator or pushed away, depending on the tool and the operator's preference. Enough downward pressure to keep the bit engaged; no more. | Excessive force tears the groove walls instead of forming them |
| 5 | Guide the run. Use a string line, chalk line or a straight guide board for long runs; do not groove freehand over distance. | A wandering joint line is permanent |
| 6 | Make one continuous pass along the full joint length rather than several short overlapping ones. | Restarting mid-run leaves a step in the groove floor |
| 7 | Check the groove. Walls should be clean and defined, depth even along the run, and the profile should narrow toward the surface. | Ragged walls mean the concrete has gone too hard, stop and switch to saw-cutting |
| 8 | Finish around the joint. Groove before final troweling, so the trowel pass afterwards blends the shoulders of the joint into the slab surface. | Grooving after final troweling leaves a torn edge on each shoulder |
Joint depth should be at least one quarter of the slab thickness (ACI 360R recommendation).
Joint spacing and depth follow the project specification and drawings.
Inside corners in the slab plan concentrate stress and are the first place a slab cracks. Run a control joint out of every re-entrant corner, and continue it far enough past the corner that the crack has somewhere to go; the joint layout follows the project drawings.
On stamped concrete the joints are formed after stamping, while the surface is still workable, and the groove has to be cut through the stamped texture so the crack-control line stays continuous. Where joints are also a design feature, set them out with the stamp pattern rather than against it. Because a wet-formed groove leaves the surrounding texture intact, hand grooving suits decorative work better than saw-cutting does.
The readiness of the surface, not the clock, governs when to groove. Grooving happens in the early finishing window, and that window moves with temperature, sun, wind and mix design.
In low humidity or wind, rapid surface drying can cause plastic shrinkage cracking before the joints exist; use fog misting or an evaporation retarder and start finishing as early as possible.
Q: What is the difference between a groover and an edger?
A: The edger rounds the outside perimeter of the slab so the edge does not chip; the groover presses a control joint into the slab face so shrinkage cracking follows a planned line. They do different jobs and are not interchangeable.
Q: When exactly do I groove, and what if the groove closes up or comes out ragged?
A: Groove during early finishing, while the concrete is still plastic but firm enough to carry the tool without the plate sinking, and before final troweling.
If the groove closes up behind the tool, the concrete was still too soft, so wait for a firmer surface and re-form it. If the walls are torn, the concrete has gone past the workable stage or the bit is worn, so check the bit and, if the surface is already too hard, switch to saw-cutting.
Q: How do I get a straight groove of even depth?
A: Use a string line, chalk line or guide board, because freehand grooving over a distance wanders. Keep the plate flat and the downward pressure steady through the pass, and check the bit for uneven wear.
Q: How do I clean it?
A: Clean the tool immediately after use. If cement paste has hardened on the bit, soak it in warm water with a mild detergent, then clear it with a nylon brush and rinse; avoid acidic cleaners, and scrape larger lumps with a plastic scraper along the blade face rather than across it. Hardened paste in the bit root changes the groove profile.
Q: What is the difference between the Concrete Groover 300110 and the Universal Groover 300181?
A: Both are 3" × 6". 300181 is marked Stainless Steel and has a blue soft-grip handle on a taller twin-leg bracket, while 300110 has a wood roller handle on a single bracket.
| Model | Blade Size | Metric equivalent |
|---|---|---|
| 300110 | 3" × 6" | 76 × 152 mm |
| Item | Value |
|---|---|
| Product name / product group | Concrete Groover — Corner, Professional Tools |
| Art. number | 300110 |
| Base plate size | 3" × 6" (76 × 152 mm) |
| End form | Both ends turned up |
| Bit position | Single raised rib on the underside centerline, running the full plate length |
| Handle | Natural wood roller handle on a folded metal bracket |
| Blade material | Please contact us |
The Concrete Groover is built differently from an edger:
Note that an edger has a rounded lip on one long edge and no bit; a groover has a centerline bit and no forming lip. That is why they cannot substitute for one another.
The bit is the working part of the tool and the only part that wears in normal use.
The 300110 has a natural wood roller handle riveted to a folded sheet-metal bracket mounted on the top face of the plate. Within the Corner group, Concrete Edger 300100/300101 and Concrete Groover 300110 have wood roller handles, while Concrete Edger 300171–300173, Straight End Edger 300170 and Universal Groover 300181 have blue soft-grip handles.
The 3" × 6" designation refers to the base plate, not to the groove. The groove that the tool produces is set by the bit:
| Factor | Consideration |
|---|---|
| Maneuverability | Short enough to follow curved joint lines as well as straight runs |
| Groove length per pass | Moderate, suits residential and light commercial slabs |
| Bit visibility | The 3" front-to-back dimension lets the operator see the bit and the marked joint line at the same time |
| Bearing area | The plate is long enough to bridge minor surface irregularities and keep depth consistent |
| Weight | Light enough for a full day of jointing without fatigue |
The groove is set by the bit, not by the 3" × 6" plate size. Groove depth and profile: contact us.
Wooden roller handles, the configuration on the 300110, are the traditional choice. Soft-grip handles are the fatigue-reducing alternative and are what the Concrete Edger 300171–300173, Straight End Edger and Universal Groover use.
Choose the groover when:
Choose saw-cutting when:
The full comparison table is under Full Size Reference below.
| Tool | Art. Nr and size | What it does | When it is used |
|---|---|---|---|
| Concrete Edger | 300100 3" × 6"; 300101 4" × 10" (wood roller handle); 300171 3" × 6"; 300172 4" × 11" (Curved End Outside Edger); 300173 4" × 6" (300171–300173: Stainless Steel; blue soft-grip handle) | Rounds the outside perimeter of the slab so the arris resists chipping and spalling | After floating, before the forms are stripped |
| Concrete Groover | 300110 3" × 6" (wood roller handle) | Presses the control joint into the slab face so shrinkage cracking follows a planned line | Early finishing, before final troweling, after edging |
| Straight End Edger | 300170 3-1/2" × 6" (Stainless Steel; blue soft-grip handle) | Edging function with straight ends instead of turned-up ends | Where the edge run must finish flush against a wall, step riser or existing slab |
| Universal Groover | 300181 3" × 6" (Stainless Steel; blue soft-grip handle) | Grooving function, in stainless with a soft-grip handle and a taller twin-leg bracket than 300110 | Early finishing, before final troweling, after edging |
Between the two groovers, the difference is that 300181 is designated Stainless Steel with a soft-grip handle, while 300110 has a wood roller handle.
Complete art-number reference for the Concrete Groover.
| Art. Nr | Blade Size | Metric equivalent | Blade material | Handle |
|---|---|---|---|---|
| 300110 | 3" × 6" | 76 × 152 mm | Please contact us | Natural wood roller on metal bracket |
| Art. Nr | Tool | Size | Handle |
|---|---|---|---|
| 300100 | Concrete Edger | 3" × 6" | Wood roller |
| 300101 | Concrete Edger | 4" × 10" | Wood roller |
| 300110 | Concrete Groover | 3" × 6" | Wood roller |
| 300170 | Straight End Edger | 3-1/2" × 6" | Blue soft grip |
| 300171 | Concrete Edger | 3" × 6" | Blue soft grip |
| 300172 | Concrete Edger (Curved End Outside Edger) | 4" × 11" | Blue soft grip |
| 300173 | Concrete Edger | 4" × 6" | Blue soft grip |
| 300181 | Universal Groover | 3" × 6" | Blue soft grip |
| Factor | Groover (300110) | Saw-cut |
|---|---|---|
| Timing | During finishing, while the concrete is still plastic and before final troweling | After the concrete hardens |
| Equipment | Hand tool: no power, no blades, no water feed | Concrete saw plus consumable blades |
| Joint profile | Formed by the raised bit; profile: contact us | Square or rectangular cut |
| Crack direction | The groove forms the weakened plane that directs the crack | Same principle, achieved by the saw kerf |
| Depth control | Limited by bit projection; plate bottoms out on the slab | Set on the saw, so ACI's 1/4-slab-depth rule can be met on any slab thickness |
| Achievable depth | Limited by the bit; groove depth: contact us | Set on the saw to the required depth |
| Dust / slurry | None, wet process | Dry cutting produces dust; wet cutting produces slurry |
| Edge chipping risk | Low while the concrete is plastic | Higher if cut too early or with a worn blade |
| Cost per joint metre | Tool cost only, no hire and no consumables | Saw hire plus blade wear plus a second site visit |
The bit is the only part of the tool that determines groove quality, so inspect it, not the plate:
Wear gloves. Fresh concrete is strongly alkaline and irritates skin on prolonged contact, so wash splashes off promptly and change out of concrete-soaked clothing.

In compliance with EU personal data protection laws, we are committed to protecting and providing you with control over your personal data. By clicking "Accept All", you allow us to place cookies to enhance your experience on this site, help us analyze site performance and usage, and enable us to deliver relevant marketing content. You can manage your cookie settings below. By clicking "Agree" you agree to the current settings. For more information, please visit the Privacy Statement.
This website uses cookies
In compliance with EU personal data protection laws, we are committed to protecting your personal data and providing you with control over it. By clicking "Agree", you allow us to place cookies to improve your experience on this site, help us analyze site performance and usage, and allow us to deliver relevant marketing content.
By clicking "Only necessary" you allow us to place only necessary cookies. The website cannot function without these cookies and you cannot switch them off on your system. These cookies are typically set only in response to an action you perform (i.e. a service request), such as setting privacy preferences, logging in, or filling in a form. You can set your browser to block or prompt you for these cookies, but this may prevent some site features from working.



