
Copyright 2026 © Leading Tools Industrial Co., Ltd.
All Rights Reserved. Website Design by Awakening Design
CATALOG TYPE
Product Categories
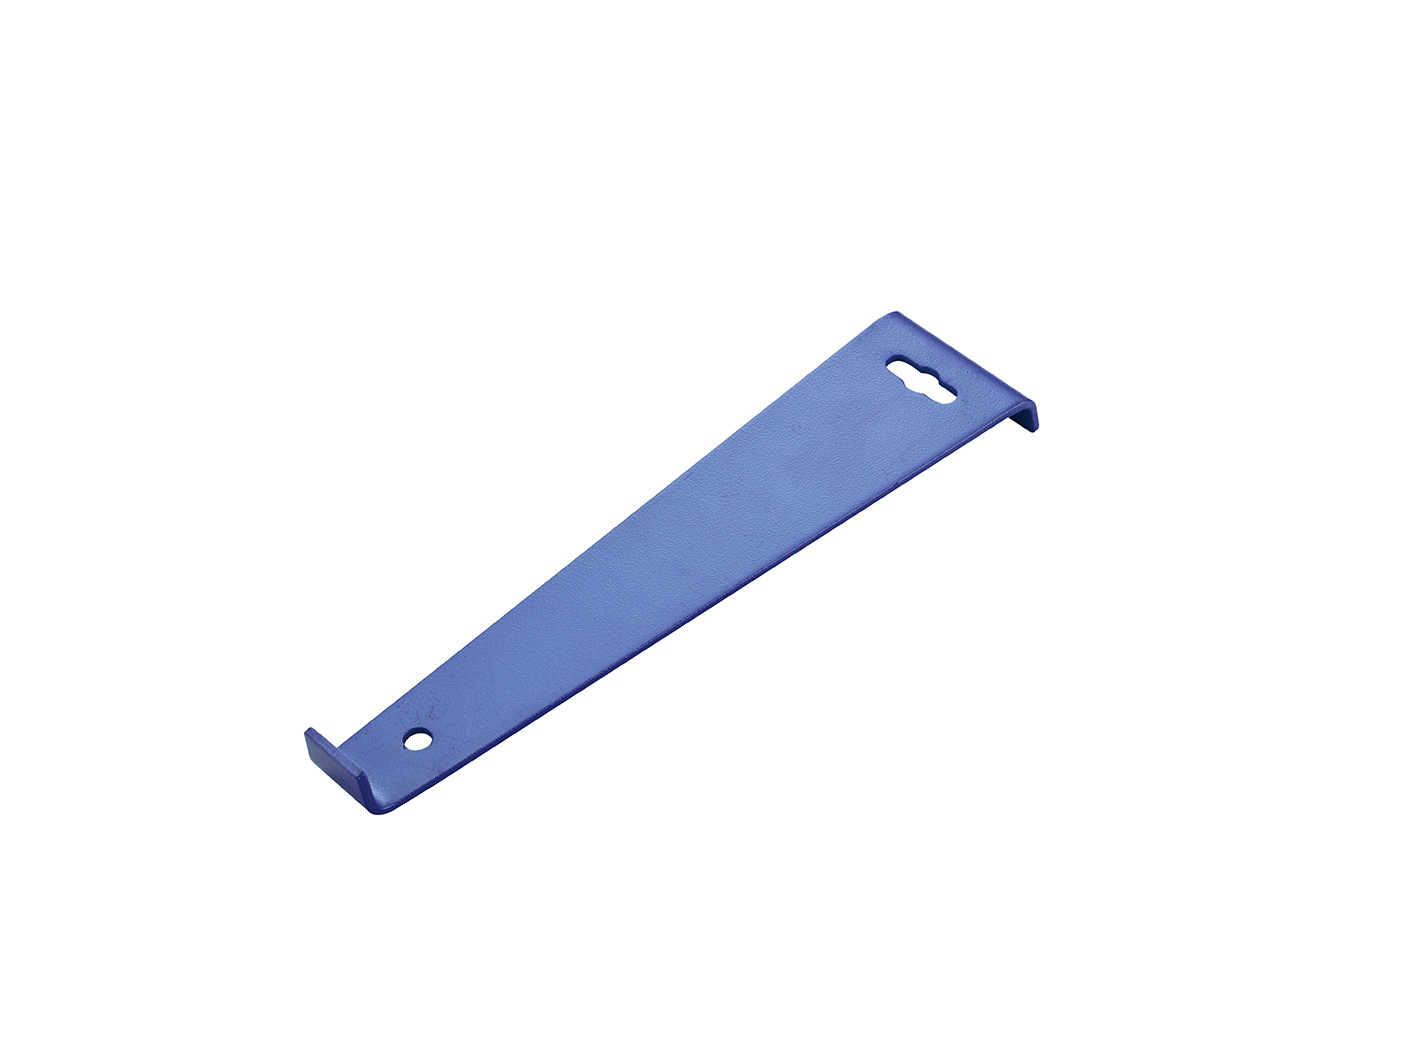
DIY Floor Pull Bar
Product Description
What the tool is. It is a flat steel bar, painted blue, with a folded lip at each end. One end is folded into a lip that hooks over the edge of a floor board; the other end is the striking end, used with a protective shim against the wall. A keyhole-shaped hanging slot is near the striking end, and a small round hole sits just behind the hooking lip.
What it does. It draws a tongue-and-groove or click-lock floating floor board sideways or endwise into its neighbor, closing the joint, in the places where a tapping block and mallet physically will not fit: hard against a wall, under a door casing, beside a radiator pipe, under a kitchen kickboard.
| Situation | Right tool | Why |
|---|---|---|
| Long-edge joints in the open field of the room | Tapping block + rubber mallet | There is room behind the board for the block and for the mallet swing |
| Last row against the wall | DIY Floor Pull Bar 350002 | No space for a block behind the board; the pull bar reaches over the board and pulls it back |
| End joints in a narrow corridor | DIY Floor Pull Bar 350002 | Corridor width leaves no swing clearance at the board end |
| Under a door casing, beside a radiator pipe, under a kitchen kickboard | DIY Floor Pull Bar 350002 | These are the confined obstructions the tool class is specifically sold for |
| Dense engineered wood or solid parquet, all day, every day | Pro Floor Pull Bar 350003 | Heavy-duty class: thicker section, longer bar |
| Levering up boards, prying skirting, general demolition | Not this tool | Do not repurpose a pull bar as a general pry bar, the marks end up on the finished floor |
| Step | Action | Notes |
|---|---|---|
| 1 | Cut the last board to width, subtracting the expansion gap | The gap is left deliberately and must not be closed up; ignoring it is one of the standard installation errors |
| 2 | Angle the board into the groove of the previous row | Get the joint started by hand before reaching for the bar |
| 3 | Inspect the bar | Check that neither folded end is bent open and that no burr has formed on the hooking lip; a bent bar no longer transfers force cleanly |
| 4 | Hook the folded lip over the far edge of the board | Hook the board edge itself, not the tongue: hooking the tongue damages the joint profile |
| 5 | Lay the bar flat and parallel to the board | The bar must sit flat on the floor. If it lifts or twists, the force goes in at an angle and the joint will not close evenly |
| 6 | Put a thin shim between the striking end and the wall | Protects plaster, paint and skirting from the hammer blow |
| 7 | Strike the end opposite the lip with a rubber or soft-faced mallet | Never a steel hammer on a plain bar. Use several medium blows rather than one heavy one, watching the joint close |
| 8 | Stop when the joint is closed | On click-lock systems you will usually hear the lock engage; then the joint is home |
| 9 | Remove the bar and check the seam | Confirm no gap remains and the surface is flush before moving on |
Closing the last row of a floating floor. This is the tool's primary job. The final board is cut to width, angled into the groove, and then pulled home from the wall side because there is no room to work from behind it.
Work along the board in stages: hook, shim, tap, move 300–400 mm along, repeat, rather than trying to close the whole length from one position. Progressive closing keeps the board parallel and stops one end running ahead of the other.
End joints in corridors and doorways. In a corridor the room is narrow enough that the end of every board finishes near a wall or a door casing. Here the bar is used across the short axis of the board, hooking the end edge and pulling it into the previous board's end joint. Keep the shim in place at the wall: doorway architraves and casings mark easily.
Around fixed obstructions: radiators, pipe collars, kitchen kickboards. These are the situations this type of tool is made for: the board slides under or behind a fixture, and the only accessible side is the one the installer is standing on. Slide the bar in flat, hook the visible edge and pull. Where the fixture leaves only a narrow slot, the 4 mm section of 350002 matters more than its length.
Protecting the finished surface. The bar slides on an already-laid, already-visible floor, and 350002 is a bare painted bar, so keep the underside clean of grit, and lay a scrap of felt or offcut underneath if the floor finish is delicate.
Q: When should I use the pull bar instead of a tapping block?
A: Use the tapping block for joints in the open field where there is room behind the board for the block and for the mallet swing. Switch to the pull bar at walls, at board ends in narrow spaces, and around fixed obstructions where that room does not exist.
Q: How do I use it without slipping or damaging the board edge or the wall?
A: Lay the bar flat on the floor and parallel to the board, with the lip hooked over the board edge rather than resting on the tongue. Strike it with a rubber or soft-faced mallet, not a steel hammer, using several medium blows rather than one heavy one. Put a thin shim or board offcut between the striking end of the bar and the wall.
Q: Should I choose 350002 or 350003?
A: 350002 for domestic laminate/LVP work and occasional use: a 300 mm bar and a wide 75 mm lip. 350003 for daily professional use and thicker or denser solid parquet: a 530 mm bar and a 9 mm section that resists bending. If a bar bends in normal use, replace it rather than straightening it, and step up to the Pro Floor Pull Bar 350003.
Q: What is it not suitable for, and does it have padding?
A: It is a floating-floor installation tool for tongue-and-groove and click-lock systems (laminate, engineered wood, LVP/SPC) only; it is not for tile, stone or cement board. It is a bare painted bar with no felt padding, so on a delicate floor finish lay an offcut or a felt pad under the bar yourself.
| Art. Nr | Thickness | Bar width | Overall length |
|---|---|---|---|
| 350002 | 4 mm (0.16") | 75 mm (2.95") | 300 mm (11.8") |
Both tools are in the Leading Tools range and both are the same category of tool. The differences that matter are set out below:
| DIY Floor Pull Bar 350002 | Pro Floor Pull Bar 350003 | What the difference buys you | |
|---|---|---|---|
| Overall length | 300 mm | 530 mm | The longer bar is easier to hold flat and square to the board |
| Bar thickness | 4 mm | 9 mm | The thicker section resists bending under repeated heavy blows; bending is the normal failure mode of a pull bar and a bent bar no longer transfers force cleanly |
| Bar width | 75 mm | 38 mm | 350002 has a wide 75 mm lip. Where the gap alongside the board is tight, the narrower 38 mm bar on 350003 is the easier shape to slide in. |
| Bend detail | Plain folded lip at each end | White plastic part at the bend near the upturned lip | 350003 has a white plastic part at the bend; 350002 has none |
| Hanging feature | Keyhole slot | Hole in the foot plate | Storage only |
Complete art-number reference for this model.
| Art. Nr | Size (thickness × width × length) | Material | Handle |
|---|---|---|---|
| 350002 | 4 × 75 × 300 mm | Steel, painted blue | None, one-piece flat bar, no separate handle |
Companion item in the Leading Tools range:
| Art. Nr | Product | Size (thickness × width × length) | Material | Handle |
|---|---|---|---|---|
| 350003 | Pro Floor Pull Bar | 9 × 38 × 530 mm | Steel, painted blue, with a white plastic part at the bend | None, one-piece bar with a flared foot plate |
What the tool is. It is a flat steel bar, painted blue, with a folded lip at each end. One end is folded into a lip that hooks over the edge of a floor board; the other end is the striking end, used with a protective shim against the wall. A keyhole-shaped hanging slot is near the striking end, and a small round hole sits just behind the hooking lip.
What it does. It draws a tongue-and-groove or click-lock floating floor board sideways or endwise into its neighbor, closing the joint, in the places where a tapping block and mallet physically will not fit: hard against a wall, under a door casing, beside a radiator pipe, under a kitchen kickboard.
| Situation | Right tool | Why |
|---|---|---|
| Long-edge joints in the open field of the room | Tapping block + rubber mallet | There is room behind the board for the block and for the mallet swing |
| Last row against the wall | DIY Floor Pull Bar 350002 | No space for a block behind the board; the pull bar reaches over the board and pulls it back |
| End joints in a narrow corridor | DIY Floor Pull Bar 350002 | Corridor width leaves no swing clearance at the board end |
| Under a door casing, beside a radiator pipe, under a kitchen kickboard | DIY Floor Pull Bar 350002 | These are the confined obstructions the tool class is specifically sold for |
| Dense engineered wood or solid parquet, all day, every day | Pro Floor Pull Bar 350003 | Heavy-duty class: thicker section, longer bar |
| Levering up boards, prying skirting, general demolition | Not this tool | Do not repurpose a pull bar as a general pry bar, the marks end up on the finished floor |
| Step | Action | Notes |
|---|---|---|
| 1 | Cut the last board to width, subtracting the expansion gap | The gap is left deliberately and must not be closed up; ignoring it is one of the standard installation errors |
| 2 | Angle the board into the groove of the previous row | Get the joint started by hand before reaching for the bar |
| 3 | Inspect the bar | Check that neither folded end is bent open and that no burr has formed on the hooking lip; a bent bar no longer transfers force cleanly |
| 4 | Hook the folded lip over the far edge of the board | Hook the board edge itself, not the tongue: hooking the tongue damages the joint profile |
| 5 | Lay the bar flat and parallel to the board | The bar must sit flat on the floor. If it lifts or twists, the force goes in at an angle and the joint will not close evenly |
| 6 | Put a thin shim between the striking end and the wall | Protects plaster, paint and skirting from the hammer blow |
| 7 | Strike the end opposite the lip with a rubber or soft-faced mallet | Never a steel hammer on a plain bar. Use several medium blows rather than one heavy one, watching the joint close |
| 8 | Stop when the joint is closed | On click-lock systems you will usually hear the lock engage; then the joint is home |
| 9 | Remove the bar and check the seam | Confirm no gap remains and the surface is flush before moving on |
Closing the last row of a floating floor. This is the tool's primary job. The final board is cut to width, angled into the groove, and then pulled home from the wall side because there is no room to work from behind it.
Work along the board in stages: hook, shim, tap, move 300–400 mm along, repeat, rather than trying to close the whole length from one position. Progressive closing keeps the board parallel and stops one end running ahead of the other.
End joints in corridors and doorways. In a corridor the room is narrow enough that the end of every board finishes near a wall or a door casing. Here the bar is used across the short axis of the board, hooking the end edge and pulling it into the previous board's end joint. Keep the shim in place at the wall: doorway architraves and casings mark easily.
Around fixed obstructions: radiators, pipe collars, kitchen kickboards. These are the situations this type of tool is made for: the board slides under or behind a fixture, and the only accessible side is the one the installer is standing on. Slide the bar in flat, hook the visible edge and pull. Where the fixture leaves only a narrow slot, the 4 mm section of 350002 matters more than its length.
Protecting the finished surface. The bar slides on an already-laid, already-visible floor, and 350002 is a bare painted bar, so keep the underside clean of grit, and lay a scrap of felt or offcut underneath if the floor finish is delicate.
Q: When should I use the pull bar instead of a tapping block?
A: Use the tapping block for joints in the open field where there is room behind the board for the block and for the mallet swing. Switch to the pull bar at walls, at board ends in narrow spaces, and around fixed obstructions where that room does not exist.
Q: How do I use it without slipping or damaging the board edge or the wall?
A: Lay the bar flat on the floor and parallel to the board, with the lip hooked over the board edge rather than resting on the tongue. Strike it with a rubber or soft-faced mallet, not a steel hammer, using several medium blows rather than one heavy one. Put a thin shim or board offcut between the striking end of the bar and the wall.
Q: Should I choose 350002 or 350003?
A: 350002 for domestic laminate/LVP work and occasional use: a 300 mm bar and a wide 75 mm lip. 350003 for daily professional use and thicker or denser solid parquet: a 530 mm bar and a 9 mm section that resists bending. If a bar bends in normal use, replace it rather than straightening it, and step up to the Pro Floor Pull Bar 350003.
Q: What is it not suitable for, and does it have padding?
A: It is a floating-floor installation tool for tongue-and-groove and click-lock systems (laminate, engineered wood, LVP/SPC) only; it is not for tile, stone or cement board. It is a bare painted bar with no felt padding, so on a delicate floor finish lay an offcut or a felt pad under the bar yourself.
| Art. Nr | Thickness | Bar width | Overall length |
|---|---|---|---|
| 350002 | 4 mm (0.16") | 75 mm (2.95") | 300 mm (11.8") |
Both tools are in the Leading Tools range and both are the same category of tool. The differences that matter are set out below:
| DIY Floor Pull Bar 350002 | Pro Floor Pull Bar 350003 | What the difference buys you | |
|---|---|---|---|
| Overall length | 300 mm | 530 mm | The longer bar is easier to hold flat and square to the board |
| Bar thickness | 4 mm | 9 mm | The thicker section resists bending under repeated heavy blows; bending is the normal failure mode of a pull bar and a bent bar no longer transfers force cleanly |
| Bar width | 75 mm | 38 mm | 350002 has a wide 75 mm lip. Where the gap alongside the board is tight, the narrower 38 mm bar on 350003 is the easier shape to slide in. |
| Bend detail | Plain folded lip at each end | White plastic part at the bend near the upturned lip | 350003 has a white plastic part at the bend; 350002 has none |
| Hanging feature | Keyhole slot | Hole in the foot plate | Storage only |
Complete art-number reference for this model.
| Art. Nr | Size (thickness × width × length) | Material | Handle |
|---|---|---|---|
| 350002 | 4 × 75 × 300 mm | Steel, painted blue | None, one-piece flat bar, no separate handle |
Companion item in the Leading Tools range:
| Art. Nr | Product | Size (thickness × width × length) | Material | Handle |
|---|---|---|---|---|
| 350003 | Pro Floor Pull Bar | 9 × 38 × 530 mm | Steel, painted blue, with a white plastic part at the bend | None, one-piece bar with a flared foot plate |

In compliance with EU personal data protection laws, we are committed to protecting and providing you with control over your personal data. By clicking "Accept All", you allow us to place cookies to enhance your experience on this site, help us analyze site performance and usage, and enable us to deliver relevant marketing content. You can manage your cookie settings below. By clicking "Agree" you agree to the current settings. For more information, please visit the Privacy Statement.
This website uses cookies
In compliance with EU personal data protection laws, we are committed to protecting your personal data and providing you with control over it. By clicking "Agree", you allow us to place cookies to improve your experience on this site, help us analyze site performance and usage, and allow us to deliver relevant marketing content.
By clicking "Only necessary" you allow us to place only necessary cookies. The website cannot function without these cookies and you cannot switch them off on your system. These cookies are typically set only in response to an action you perform (i.e. a service request), such as setting privacy preferences, logging in, or filling in a form. You can set your browser to block or prompt you for these cookies, but this may prevent some site features from working.



