
Copyright 2026 © Leading Tools Industrial Co., Ltd.
All Rights Reserved. Website Design by Awakening Design
CATALOG TYPE
Product Categories
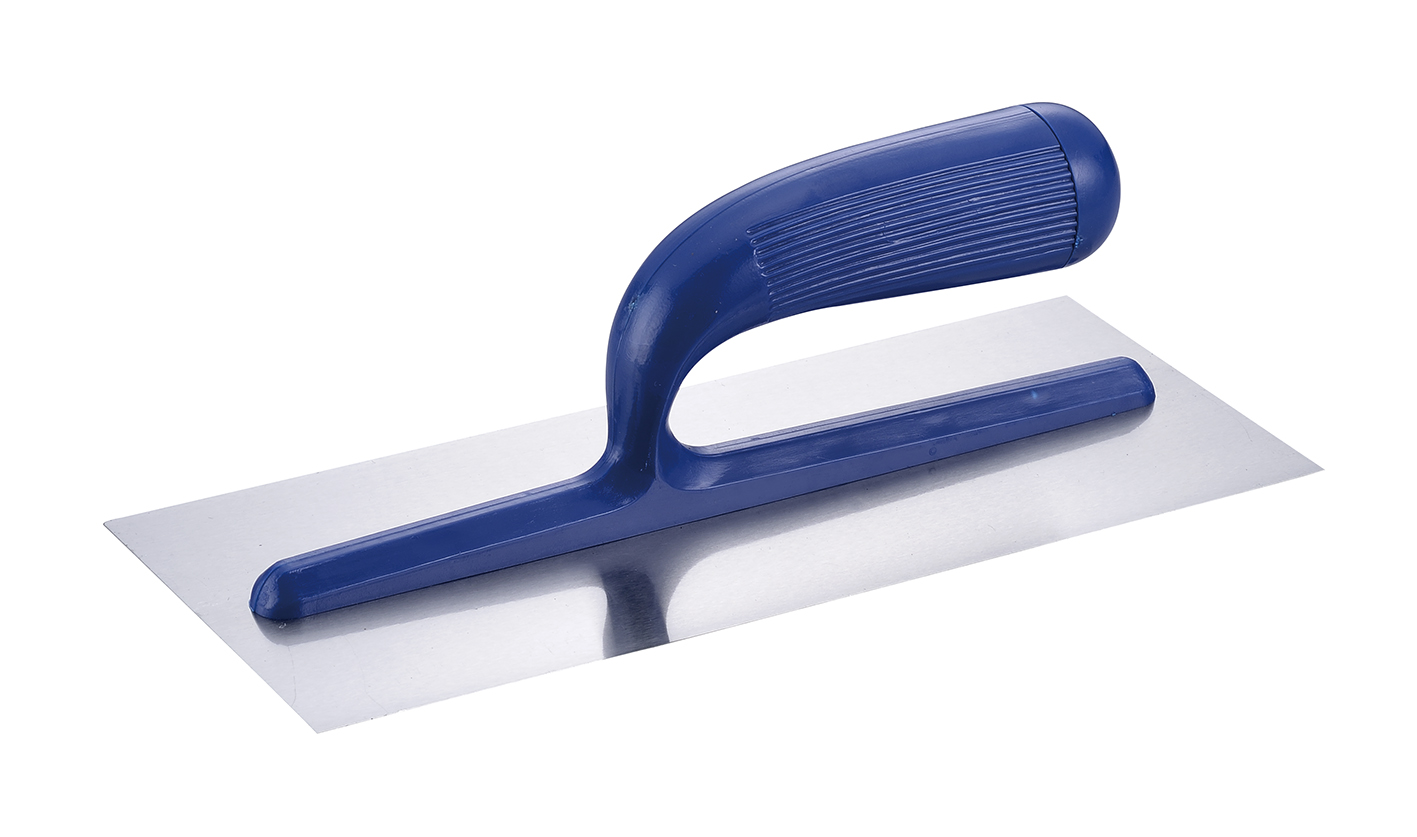
DIY Trowel — 4-1/2" × 10-1/2"
Product Description
| Item | Detail |
|---|---|
| Product name | DIY Trowel |
| Article number | 611510 |
| Product family | Plaster Trowel |
| Size | 4-1/2" × 10-1/2" (114 × 267 mm) |
| Construction | Spot Riveted, Light Weight |
| Blade material | Contact sales |
| Handle | One-piece molded plastic handle and shank, blue |
| Note | Quality Consistent |
The DIY Trowel 611510 is the light-duty member of the Leading Tools Plaster Trowel line. It is a flat rectangular plastering trowel with a molded plastic handle (Spot Riveted), and compared with the Finishing Trowel 690721 / 691721 in the same line it works the same way, with a lighter build and a plastic handle instead of a soft-grip one.
| Advantage | What it means on the job | Who benefits most |
|---|---|---|
| Low blade mass | Longer working sessions before hand and forearm fatigue force a break; noticeably easier on ladder and overhead work | DIY homeowners, maintenance crews |
| Forgiving handling | A lighter blade punishes over-gripping less, so beginners get a usable pass sooner; the technique fix is to relax grip and let the blade glide rather than press | Entry-level users learning technique |
| Small-to-mid footprint | Fits around door casings, switch boxes and furniture without lifting off the surface; a 14" blade cannot reach the same places | Renovation and patch-repair workers |
Where it is not the right tool. Large-area plastering, long leveling passes across open walls, and work where a heavier blade is wanted for compaction and finish consistency call for a 12"–18" professional trowel, in the Leading Tools range, for example the 4-1/2" × 14"–18" Pointed Finishing Trowels 608821 / 609821 / 610821. If a chamfered edge and a soft-grip handle are wanted for finishing, see the compact Finishing Trowel 690721 / 691721.
| Situation | Use 611510? | Why |
|---|---|---|
| Filling and leveling a wall patch after plumbing or electrical work | Yes | Small blade stays flat over a limited repair area and lets you feather out to sound plaster |
| Local skim coat over a repair before painting | Yes | Thin repeated passes at a shallow angle are the standard method for this size of area |
| Small ceiling patch, overhead touch-up | Yes | Low blade mass is the reason this size is chosen for overhead work |
| Crack and hole repair, uneven spots on wall, ceiling or floor | Yes | The typical job list for this tool type |
| Spreading light adhesive, filler or repair mortar with a flat blade | Yes | A plain flat blade is the correct tool where no notch profile is required |
| Full-wall production plaster or render | No | Use a 12"–18" finishing trowel; a small light blade costs too many passes |
| Combing tile adhesive to a set bed thickness | No | This blade has no teeth; a notched trowel is a different tool |
| Scraping off nails, screws, hardened lumps | No | Nicks the working edge and the tool never finishes cleanly again |
| Step | Action | Note |
|---|---|---|
| 1 | Remove all loose and friable material from the damaged area | Anything that comes away under a scraper will come away later under paint |
| 2 | Dampen or prime the substrate as the filler manufacturer specifies | A dry substrate pulls water out of the mix and causes tearing at the finish pass |
| 3 | Load a manageable amount of filler, plaster or compound onto the blade | Overloading is the most common cause of "the tool feels uncontrollable" |
| 4 | Press material into the void, working from the center outward | Ensures the repair is filled rather than bridged |
| 5 | Draw the blade outward at a shallow angle to flatten and feather | Feathering out 6–12 in past the repair takes the fill to zero thickness so no ridge shows after painting |
| 6 | Build in thin coats, letting each coat dry before the next | Deep holes need a base coat, a filling coat and a finish coat rather than one thick fill |
| 7 | Hold the grip firm but relaxed and let the blade glide | Excessive grip pressure reduces control instead of increasing it |
| 8 | Once the final coat is dry, polish with a fine sponge in a circular motion | Standard closing step for a patched plaster surface |
This is the tool's core job. Clean out the damage, treat the substrate, then work in thin coats rather than one thick one, because thickness is what causes cracking and shrinkage marks as the material dries. Each pass ends by drawing the blade outward past the edge of the repair rather than stopping at it. The 6–12 in feather zone is what makes the repair disappear once the wall is repainted; a repair that is still visible after drying almost always failed at this step, not at the fill step.
For a local skim, apply the material thin and hold the blade at a shallow angle. The purpose of the pass is to spread and refine, not to deposit bulk; several thin passes give a cleaner surface than one heavy pass. Keep the blade clean between passes; a dirty edge drags and leaves tracks.
Low blade mass is the main reason this size gets picked for small ceiling patching and overhead touch-up. Keep loads small and use short, controlled strokes so material does not fall off the blade, and reload more often rather than trying to carry a full blade overhead.
A lighter blade lowers the fatigue cost of practice, and light, forgiving blades suit users who are still building technique. The four habits worth drilling with this tool are blade angle control, consistent pressure, feathering, and finishing in thin coats.
Because the blade is short and the tool is easy to steer, it is practical in furnished or partially occupied rooms where the user has to work around obstacles and cannot swing a large trowel. Mask, work small, and clean the blade often.
Beyond filler and plaster, the flat blade also places light-duty adhesive, repair mortar and jointing compound wherever a plain flat face is preferred over a heavier masonry tool. It is not a substitute for a bricklaying trowel and should not be used to cut or dress brick.
Q1: The patch is still visible after it dries. What went wrong?
A: Almost always insufficient feathering or too much material in a single pass. Apply thinner coats and widen the finishing strokes so the fill tapers to zero thickness 6–12 in beyond the repair.
Q2: The tool feels hard to control.
A: Over-gripping or overloading the blade. Relax the grip, let the blade glide over the surface instead of pressing down, and carry less material per load.
Q3: Carbon steel or stainless, which should I order?
A: Each art number corresponds to one blade material; contact Leading Tools sales to confirm the material of the art number you need. As a guide, carbon steel must be dried and oiled after every use.
Stainless has high corrosion resistance, needs only washing and drying, and avoids oxide marks on pale gypsum skim finishes. For occasional users and wet sites, stainless is the better choice.
Q4: Which of 611510, 611511 and 611512 should I stock?
A: 611510 (4-1/2" × 10-1/2") for the tightest work and the easiest handling, 611511 (4-1/2" × 11") for a slightly longer leveling pass at the same width, and 611512 (4-3/4" × 11") when the customer wants the most coverage in the light-weight class. All three share the same construction and handle; confirm the blade material with sales.
Q5: Is this tool suitable for a full wall?
A: It will do the work, but slowly. Open-wall production is normally done with a 12"–18" finishing trowel, so a 10-1/2" light blade simply needs more passes.
| Item | Detail |
|---|---|
| Product name | DIY Trowel |
| Article number | 611510 |
| Size | 4-1/2" × 10-1/2" (114 × 267 mm) |
| Construction | Spot Riveted Light Weight |
| Blade material | Contact sales |
| Handle | Molded plastic, blue |
| Note | Quality Consistent |
The blade is a flat rectangle with no teeth, so it spreads and levels material rather than combing it into ridges. Blade rigidity is what separates a laying-on trowel (stiffer, used to load and level) from a finishing trowel (thinner and more flexible, used for the closing polish pass); using a very soft blade to lay on material produces wavy "zebra" marks. The 611510 is a general-purpose light blade.
A single molded plastic piece forms both the grip and the handle mount. The blade is Spot Riveted. This gives a light tool.
Each art number corresponds to one blade material; contact Leading Tools sales to confirm the material of the art number you need. The comparison below is for reference.
| Version | Handling character | Maintenance requirement | Best fit |
|---|---|---|---|
| Carbon Steel | Blade rusts if left damp | Must be wiped clean and dried after every use, and lightly oiled before longer storage, or brown rust spotting appears | Dry-site repair work, users who will maintain the tool |
| Stainless Steel | Blade resists rust | High corrosion resistance and low maintenance; chlorinated water, coastal air or prolonged soaking can still cause rust spots, so rinse with clean water and dry after use; no oiling | Wet cleanup, humid sites, gypsum skim coats where carbon steel can leave oxide marks on pale finishes |
A light plastering trowel earns its place when the user does not plaster every day, when hand fatigue is the limiting factor rather than coverage rate, when the work is many small repairs instead of one large wall, and when overhead or ladder work makes tool control harder than tool speed. The trade-off is real: a lighter blade feels less planted under heavy production work than a substantial professional finishing trowel.
Choose the 4-1/2" × 10-1/2" DIY Trowel when the buyer needs a lighter tool for casual or intermittent use, better comfort on patch repair and small jobs, easier control for beginners or general maintenance staff, or one practical general-purpose trowel for home and light-site work. Small blades suit detail and small-area work, the 12"–18" finishing sizes are for open wall area, and lighter, more forgiving blades are the better choice for people still learning; 611510 sits in the first group.
| Article | Size | Choose it when |
|---|---|---|
| 611510 | 4-1/2" × 10-1/2" (114 × 267 mm) | Most confined work; the shortest blade in the group is the easiest to keep flat on a small patch |
| 611511 | 4-1/2" × 11" (114 × 279 mm) | Same width, slightly longer pass; a small gain in leveling reach at the same handling feel |
| 611512 | 4-3/4" × 11" (121 × 279 mm) | Widest and longest of the three; the most material moved per stroke while staying in the light-weight class |
Move the customer up to a professional trowel when the work is large-area plastering, when long leveling passes on open walls are the job, when a heavier blade feel is wanted for compression and finish consistency, or when daily professional output matters more than low fatigue.
In the Leading Tools range, take a 12"–18" class trowel such as the Pointed Finishing Trowels 608821 / 609821 / 610821 (4-1/2" × 14" / 16" / 18"). The Finishing Trowel 690721 / 691721 adds a chamfered edge and a soft-grip handle in a compact size.
| Version | Best for | Main consideration |
|---|---|---|
| Carbon Steel | General dry-site repair; users who will maintain the tool | Must be dried after every use and oiled for storage, or it will spot |
| Stainless Steel | Wet cleanup, damp storage conditions, gypsum skim finishes, low-maintenance users | High corrosion resistance and low maintenance; usually the better default for occasional users |
All article numbers in the DIY Trowel group.
| Article number | Size (inch) | Size (mm) | Blade material | Handle | Construction |
|---|---|---|---|---|---|
| 611510 | 4-1/2" × 10-1/2" | 114 × 267 mm | Contact sales | Molded plastic, blue | Spot riveted, light weight |
| 611511 | 4-1/2" × 11" | 114 × 279 mm | Contact sales | Molded plastic, blue | Spot riveted, light weight |
| 611512 | 4-3/4" × 11" | 121 × 279 mm | Contact sales | Molded plastic, blue | Spot riveted, light weight |
Metric values are conversions of the nominal inch dimensions at 1" = 25.4 mm, rounded to the nearest millimeter.
| Item | Detail |
|---|---|
| Product name | DIY Trowel |
| Article number | 611510 |
| Product family | Plaster Trowel |
| Size | 4-1/2" × 10-1/2" (114 × 267 mm) |
| Construction | Spot Riveted, Light Weight |
| Blade material | Contact sales |
| Handle | One-piece molded plastic handle and shank, blue |
| Note | Quality Consistent |
The DIY Trowel 611510 is the light-duty member of the Leading Tools Plaster Trowel line. It is a flat rectangular plastering trowel with a molded plastic handle (Spot Riveted), and compared with the Finishing Trowel 690721 / 691721 in the same line it works the same way, with a lighter build and a plastic handle instead of a soft-grip one.
| Advantage | What it means on the job | Who benefits most |
|---|---|---|
| Low blade mass | Longer working sessions before hand and forearm fatigue force a break; noticeably easier on ladder and overhead work | DIY homeowners, maintenance crews |
| Forgiving handling | A lighter blade punishes over-gripping less, so beginners get a usable pass sooner; the technique fix is to relax grip and let the blade glide rather than press | Entry-level users learning technique |
| Small-to-mid footprint | Fits around door casings, switch boxes and furniture without lifting off the surface; a 14" blade cannot reach the same places | Renovation and patch-repair workers |
Where it is not the right tool. Large-area plastering, long leveling passes across open walls, and work where a heavier blade is wanted for compaction and finish consistency call for a 12"–18" professional trowel, in the Leading Tools range, for example the 4-1/2" × 14"–18" Pointed Finishing Trowels 608821 / 609821 / 610821. If a chamfered edge and a soft-grip handle are wanted for finishing, see the compact Finishing Trowel 690721 / 691721.
| Situation | Use 611510? | Why |
|---|---|---|
| Filling and leveling a wall patch after plumbing or electrical work | Yes | Small blade stays flat over a limited repair area and lets you feather out to sound plaster |
| Local skim coat over a repair before painting | Yes | Thin repeated passes at a shallow angle are the standard method for this size of area |
| Small ceiling patch, overhead touch-up | Yes | Low blade mass is the reason this size is chosen for overhead work |
| Crack and hole repair, uneven spots on wall, ceiling or floor | Yes | The typical job list for this tool type |
| Spreading light adhesive, filler or repair mortar with a flat blade | Yes | A plain flat blade is the correct tool where no notch profile is required |
| Full-wall production plaster or render | No | Use a 12"–18" finishing trowel; a small light blade costs too many passes |
| Combing tile adhesive to a set bed thickness | No | This blade has no teeth; a notched trowel is a different tool |
| Scraping off nails, screws, hardened lumps | No | Nicks the working edge and the tool never finishes cleanly again |
| Step | Action | Note |
|---|---|---|
| 1 | Remove all loose and friable material from the damaged area | Anything that comes away under a scraper will come away later under paint |
| 2 | Dampen or prime the substrate as the filler manufacturer specifies | A dry substrate pulls water out of the mix and causes tearing at the finish pass |
| 3 | Load a manageable amount of filler, plaster or compound onto the blade | Overloading is the most common cause of "the tool feels uncontrollable" |
| 4 | Press material into the void, working from the center outward | Ensures the repair is filled rather than bridged |
| 5 | Draw the blade outward at a shallow angle to flatten and feather | Feathering out 6–12 in past the repair takes the fill to zero thickness so no ridge shows after painting |
| 6 | Build in thin coats, letting each coat dry before the next | Deep holes need a base coat, a filling coat and a finish coat rather than one thick fill |
| 7 | Hold the grip firm but relaxed and let the blade glide | Excessive grip pressure reduces control instead of increasing it |
| 8 | Once the final coat is dry, polish with a fine sponge in a circular motion | Standard closing step for a patched plaster surface |
This is the tool's core job. Clean out the damage, treat the substrate, then work in thin coats rather than one thick one, because thickness is what causes cracking and shrinkage marks as the material dries. Each pass ends by drawing the blade outward past the edge of the repair rather than stopping at it. The 6–12 in feather zone is what makes the repair disappear once the wall is repainted; a repair that is still visible after drying almost always failed at this step, not at the fill step.
For a local skim, apply the material thin and hold the blade at a shallow angle. The purpose of the pass is to spread and refine, not to deposit bulk; several thin passes give a cleaner surface than one heavy pass. Keep the blade clean between passes; a dirty edge drags and leaves tracks.
Low blade mass is the main reason this size gets picked for small ceiling patching and overhead touch-up. Keep loads small and use short, controlled strokes so material does not fall off the blade, and reload more often rather than trying to carry a full blade overhead.
A lighter blade lowers the fatigue cost of practice, and light, forgiving blades suit users who are still building technique. The four habits worth drilling with this tool are blade angle control, consistent pressure, feathering, and finishing in thin coats.
Because the blade is short and the tool is easy to steer, it is practical in furnished or partially occupied rooms where the user has to work around obstacles and cannot swing a large trowel. Mask, work small, and clean the blade often.
Beyond filler and plaster, the flat blade also places light-duty adhesive, repair mortar and jointing compound wherever a plain flat face is preferred over a heavier masonry tool. It is not a substitute for a bricklaying trowel and should not be used to cut or dress brick.
Q1: The patch is still visible after it dries. What went wrong?
A: Almost always insufficient feathering or too much material in a single pass. Apply thinner coats and widen the finishing strokes so the fill tapers to zero thickness 6–12 in beyond the repair.
Q2: The tool feels hard to control.
A: Over-gripping or overloading the blade. Relax the grip, let the blade glide over the surface instead of pressing down, and carry less material per load.
Q3: Carbon steel or stainless, which should I order?
A: Each art number corresponds to one blade material; contact Leading Tools sales to confirm the material of the art number you need. As a guide, carbon steel must be dried and oiled after every use.
Stainless has high corrosion resistance, needs only washing and drying, and avoids oxide marks on pale gypsum skim finishes. For occasional users and wet sites, stainless is the better choice.
Q4: Which of 611510, 611511 and 611512 should I stock?
A: 611510 (4-1/2" × 10-1/2") for the tightest work and the easiest handling, 611511 (4-1/2" × 11") for a slightly longer leveling pass at the same width, and 611512 (4-3/4" × 11") when the customer wants the most coverage in the light-weight class. All three share the same construction and handle; confirm the blade material with sales.
Q5: Is this tool suitable for a full wall?
A: It will do the work, but slowly. Open-wall production is normally done with a 12"–18" finishing trowel, so a 10-1/2" light blade simply needs more passes.
| Item | Detail |
|---|---|
| Product name | DIY Trowel |
| Article number | 611510 |
| Size | 4-1/2" × 10-1/2" (114 × 267 mm) |
| Construction | Spot Riveted Light Weight |
| Blade material | Contact sales |
| Handle | Molded plastic, blue |
| Note | Quality Consistent |
The blade is a flat rectangle with no teeth, so it spreads and levels material rather than combing it into ridges. Blade rigidity is what separates a laying-on trowel (stiffer, used to load and level) from a finishing trowel (thinner and more flexible, used for the closing polish pass); using a very soft blade to lay on material produces wavy "zebra" marks. The 611510 is a general-purpose light blade.
A single molded plastic piece forms both the grip and the handle mount. The blade is Spot Riveted. This gives a light tool.
Each art number corresponds to one blade material; contact Leading Tools sales to confirm the material of the art number you need. The comparison below is for reference.
| Version | Handling character | Maintenance requirement | Best fit |
|---|---|---|---|
| Carbon Steel | Blade rusts if left damp | Must be wiped clean and dried after every use, and lightly oiled before longer storage, or brown rust spotting appears | Dry-site repair work, users who will maintain the tool |
| Stainless Steel | Blade resists rust | High corrosion resistance and low maintenance; chlorinated water, coastal air or prolonged soaking can still cause rust spots, so rinse with clean water and dry after use; no oiling | Wet cleanup, humid sites, gypsum skim coats where carbon steel can leave oxide marks on pale finishes |
A light plastering trowel earns its place when the user does not plaster every day, when hand fatigue is the limiting factor rather than coverage rate, when the work is many small repairs instead of one large wall, and when overhead or ladder work makes tool control harder than tool speed. The trade-off is real: a lighter blade feels less planted under heavy production work than a substantial professional finishing trowel.
Choose the 4-1/2" × 10-1/2" DIY Trowel when the buyer needs a lighter tool for casual or intermittent use, better comfort on patch repair and small jobs, easier control for beginners or general maintenance staff, or one practical general-purpose trowel for home and light-site work. Small blades suit detail and small-area work, the 12"–18" finishing sizes are for open wall area, and lighter, more forgiving blades are the better choice for people still learning; 611510 sits in the first group.
| Article | Size | Choose it when |
|---|---|---|
| 611510 | 4-1/2" × 10-1/2" (114 × 267 mm) | Most confined work; the shortest blade in the group is the easiest to keep flat on a small patch |
| 611511 | 4-1/2" × 11" (114 × 279 mm) | Same width, slightly longer pass; a small gain in leveling reach at the same handling feel |
| 611512 | 4-3/4" × 11" (121 × 279 mm) | Widest and longest of the three; the most material moved per stroke while staying in the light-weight class |
Move the customer up to a professional trowel when the work is large-area plastering, when long leveling passes on open walls are the job, when a heavier blade feel is wanted for compression and finish consistency, or when daily professional output matters more than low fatigue.
In the Leading Tools range, take a 12"–18" class trowel such as the Pointed Finishing Trowels 608821 / 609821 / 610821 (4-1/2" × 14" / 16" / 18"). The Finishing Trowel 690721 / 691721 adds a chamfered edge and a soft-grip handle in a compact size.
| Version | Best for | Main consideration |
|---|---|---|
| Carbon Steel | General dry-site repair; users who will maintain the tool | Must be dried after every use and oiled for storage, or it will spot |
| Stainless Steel | Wet cleanup, damp storage conditions, gypsum skim finishes, low-maintenance users | High corrosion resistance and low maintenance; usually the better default for occasional users |
All article numbers in the DIY Trowel group.
| Article number | Size (inch) | Size (mm) | Blade material | Handle | Construction |
|---|---|---|---|---|---|
| 611510 | 4-1/2" × 10-1/2" | 114 × 267 mm | Contact sales | Molded plastic, blue | Spot riveted, light weight |
| 611511 | 4-1/2" × 11" | 114 × 279 mm | Contact sales | Molded plastic, blue | Spot riveted, light weight |
| 611512 | 4-3/4" × 11" | 121 × 279 mm | Contact sales | Molded plastic, blue | Spot riveted, light weight |
Metric values are conversions of the nominal inch dimensions at 1" = 25.4 mm, rounded to the nearest millimeter.

In compliance with EU personal data protection laws, we are committed to protecting and providing you with control over your personal data. By clicking "Accept All", you allow us to place cookies to enhance your experience on this site, help us analyze site performance and usage, and enable us to deliver relevant marketing content. You can manage your cookie settings below. By clicking "Agree" you agree to the current settings. For more information, please visit the Privacy Statement.
This website uses cookies
In compliance with EU personal data protection laws, we are committed to protecting your personal data and providing you with control over it. By clicking "Agree", you allow us to place cookies to improve your experience on this site, help us analyze site performance and usage, and allow us to deliver relevant marketing content.
By clicking "Only necessary" you allow us to place only necessary cookies. The website cannot function without these cookies and you cannot switch them off on your system. These cookies are typically set only in response to an action you perform (i.e. a service request), such as setting privacy preferences, logging in, or filling in a form. You can set your browser to block or prompt you for these cookies, but this may prevent some site features from working.



