
Copyright 2026 © Leading Tools Industrial Co., Ltd.
All Rights Reserved. Website Design by Awakening Design
CATALOG TYPE
Product Categories
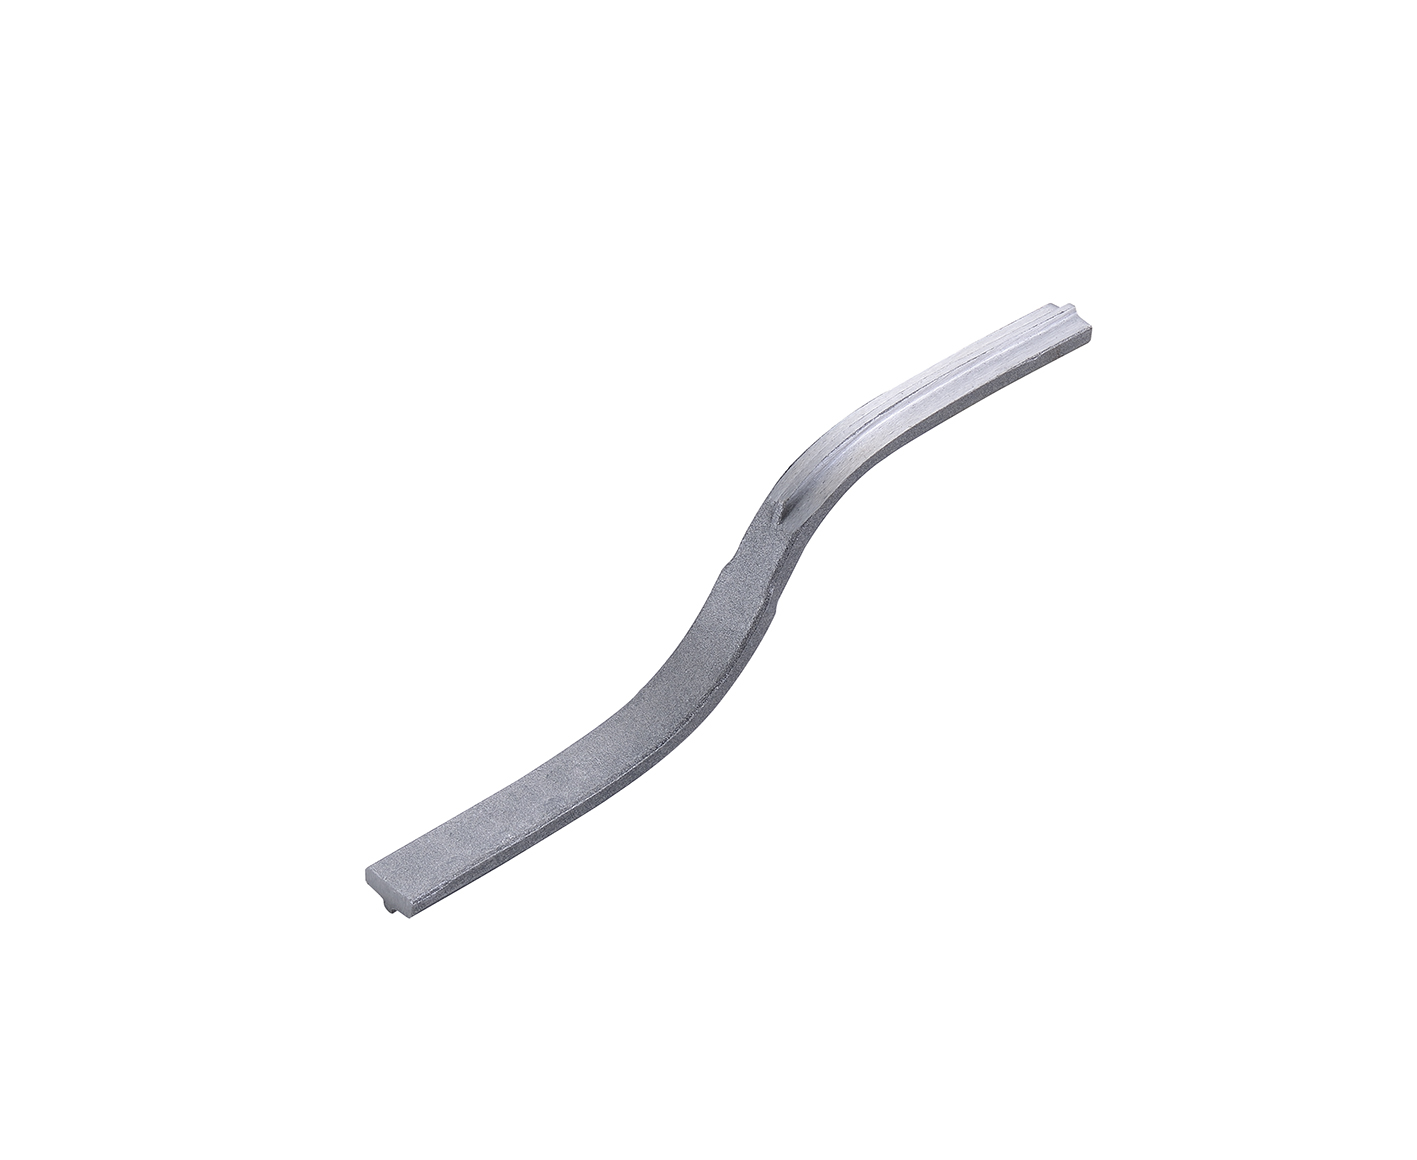
Grapevine Jointer
Product Description
Product Name: Grapevine Jointer
Art. Nr: 300024, 300025
Product Line: Leading Tools Brick Jointer range, alongside the Heavy Duty Convex Jointer, the Heavy Duty Tempered Convex Jointer and the Brick Jointer
Sizes: 300024 = 1/2"x5/8" · 300025 = 5/8"x3/4"
The Grapevine Jointer is a finishing tool, not a filling tool.
Drawn along a mortar joint that has already been struck flush, its ridged working face compacts the mortar between the two brick arrises and presses one fine recessed line down the center of the joint, producing the slightly rough, meandering line that gives the profile its name. The result is the grapevine joint: the decorative joint most closely associated with American Colonial-period brickwork and with matte-finish and antique-finish brick today.
Specify this tool when the facade needs that centered line. If a plain rounded concave joint is acceptable, the Heavy Duty Convex Jointer or the Brick Jointer in the Leading Tools range can also produce it, and offer a wider range of joint widths.
Also called the colonial joint. The grapevine jointer forms a shallow joint with an indented center line. It is used on heavily textured or antique-finish brick, in colonial-style work and in restoration work, and it is meant for brick only, not for concrete block.
Why choose this tool over a plain jointer. The grapevine profile does something a concave joint cannot: it puts a shadow line at the exact center of every joint, which reads at a distance as a finer, more deliberately built wall.
What it costs in use. The recessed line collects dirt and needs periodic washing, and the profile demands more tool control than a flush or plain concave finish.
Where this size range sits. 3/8" is the standard bed-joint width in North American brickwork. Leading Tools' two article numbers start one step above that, at 1/2", and reach 3/4": the band that covers restoration joints and larger-format brick. For a true 3/8" joint, Leading Tools' own Brick Jointer 300053 (3/8"x1/2") is the correct answer.
| Situation | Use the Grapevine Jointer? | Reason |
|---|---|---|
| Repointing or extending a wall that already has a grapevine joint | Yes, this tool | Matching the existing profile is what keeps the repair invisible |
| New Federal, Georgian or Colonial Revival brickwork | Yes | The profile is period-correct and is specified as a design feature |
| Matte-finish or antique-finish brick, decorative facade | Yes | The profile is often seen on this brick type |
| Decorative garden walls and landscape masonry | Yes, where visual continuity with historic work is wanted | The compacted recess still sheds water, though drainage design governs below grade |
| Standard modern brickwork, plain concave joint acceptable | No, use Heavy Duty Convex Jointer or Brick Jointer | Wider size range |
| Joint width 3/8" | No, neither article reaches it | 3/8" is the North American standard width; use Brick Jointer 300053 |
| Filling or raking out a joint | No | This is a finishing tool; the joint must be filled and struck flush first |
| Concrete block walls | No, brick only | The grapevine profile is a brick joint; for block walls use a plain concave jointer (Heavy Duty Convex Jointer or Brick Jointer) |
| Step | Action | Why it matters |
|---|---|---|
| 1 | Select the end that matches the joint, choosing an end slightly wider than the joint so the tool bears on both brick arrises | Too narrow and the tool skates inside the joint; too wide and it will not enter |
| 2 | Grip the tool at its middle, between thumb and forefinger | Center grip is what lets both flanks stay in contact with the brick |
| 3 | Strike the mortar flush with the trowel first | The jointer finishes an already-full joint; it cannot make up a shortfall of mortar |
| 4 | Wait for thumbprint hard: a firm thumb press leaves a print but the mortar does not pick up on the thumb | Too early and the joint smears; too late and the edges crumble |
| 5 | Set the ridged face into the joint with both flanks bearing on the brick edges, then draw it along with steady, continuous pressure | One stroke compacts, smooths and cuts the center line together |
| 6 | Tool the head (vertical) joints and the bed (horizontal) joints, starting at the top of the wall and drawing each joint in one continuous stroke in one direction; many masons do the head joints first, which is a common practice | A consistent sequence keeps the line uniform |
| 7 | Slow down at corners and make more than one pass if needed | Corners are where the tool most easily lifts and breaks the line |
| 8 | Brush or trowel off the mortar crumbs afterwards, gently | Aggressive cleanup smears mortar across the brick faces, which is far harder to fix than a joint |
This is the tool's core application. When a historic building is repointed, the joint profile is part of the historic fabric, and a plain concave joint on a grapevine-jointed wall is a visible error.
Sequence for repointing: rake out the old mortar to a uniform depth, wet the joint thoroughly so the masonry does not draw the water out of a lime mortar, fill in stages with a mortar appropriate to the substrate, tool with the grapevine jointer at thumbprint hard, and keep the finished work damp while a lime mortar cures. Rake depth and curing period should follow the conservation specification for the building rather than a generic figure.
New houses built in Federal, Georgian or Colonial Revival styles use the grapevine joint as a deliberate design feature; the centered line raises the perceived quality of the brickwork and suits period details such as jack arches, keystones and gauged brick. On new work, run a sample panel first and agree it with the architect; the profile is prominent enough that a client will notice a change of hand halfway up a wall.
Decorative garden walls, estate boundary walls and landscape features take the grapevine profile for continuity with historic precedent. The compacted recess still sheds water, but below-grade and coping details are governed by drainage design and damp-proofing, not by joint profile.
When extending or patching existing grapevine work, match the joint before ordering: measure the existing joint width, then choose the end one step wider. Between 300024 and 300025 the two articles cover 1/2", 5/8" and 3/4", which spans the widths found in this type of brickwork. Tool a trial joint on a sample panel and compare it against the existing wall in the same light before committing to the elevation.
Q: What is the difference between a grapevine joint and a plain concave joint?
A: A concave jointer leaves one continuous rounded hollow across the whole joint. A grapevine jointer compacts the joint into a flat band and presses one additional fine recessed line down the center of that band, which casts a continuous shadow line. If the design does not call for that centered line, the Heavy Duty Convex Jointer or the Brick Jointer in the Leading Tools range will produce a plain concave joint.
Q: How do I choose the size?
A: Each tool has two working ends, so "1/2"x5/8"" means one 1/2" end and one 5/8" end. Choose an end slightly wider than the joint so the tool bears on the brick edges on both sides: a narrower tool skates around inside the joint, and a much wider one will not enter. For a 3/8" joint neither grapevine article is right; Brick Jointer 300053 (3/8"x1/2") is the match, but it makes a rounded concave joint rather than a grapevine joint.
Q: When should I tool the joint, and what if the mortar sticks to the tool?
A: When the mortar is "thumbprint hard": a firm thumb press leaves a print but the mortar does not pick up on the thumb. Tooled too early, the mortar smears and the line closes up; tooled too late, the edges of the recess crumble. If mortar sticks and smears the brick, it is still too wet, so wait for it to firm up and clean the tool face before each run.
Q: Does the tool have a wooden handle?
A: Not 300024 or 300025. It is a one-piece S-bent steel bar with a flattened working end at each end and no separate handle; you grip it on the shank at the middle.
Q: How do I stop it rusting?
A: Wash it soon after use, dry it, and store it with a thin film of machine oil in a dry place; moisture is the main cause of corrosion on steel masonry tools, and coastal sites are worse. Pitting on the ridge changes the joint the tool cuts, so on this tool rust prevention affects how well it works, not just how it looks.
The working face is not flat. Along its center runs a raised ridge; the two flanks of the face ride on the brick arrises on either side of the joint.
As the tool is drawn along, the flanks compact and smooth the mortar band while the ridge displaces mortar out of the center line, leaving a narrow recess that runs continuously along the joint. The visual effect is a fine, slightly irregular line reminiscent of a climbing vine, hence the name.
This is a genuinely different geometry from the convex jointers in the Leading Tools range. A convex jointer presents a single smooth rounded surface that leaves one continuous rounded hollow; the grapevine face leaves a compacted flat band plus a line inside it. That is the whole reason both tools exist.
| Art. Nr | Nominal size | Metric equivalent (1" = 25.4 mm) | Working ends | Typical application |
|---|---|---|---|---|
| 300024 | 1/2"x5/8" | ≈ 13 mm x ≈ 16 mm | Two: one 1/2", one 5/8" | Standard residential brick and restoration joints in the common band |
| 300025 | 5/8"x3/4" | ≈ 16 mm x ≈ 19 mm | Two: one 5/8", one 3/4" | Larger-format brick and wider historic joints |
How to read the two numbers. Double-ended grapevine jointers are designated by the blade width of each end: 1/2"x5/8" means one 1/2" end and one 5/8" end, and the two ends are different widths.
| Specification | Value |
|---|---|
| Blade material | Heat-treated |
The tool is a one-piece steel bar with no separate handle: an S-bent shank with a flattened working end at each end, gripped directly on the shank. There is no wooden grip, no soft-grip overmold and no ferrule anywhere on the tool. The tool is held at its middle, between thumb and forefinger, in the usual way for a double-ended jointer.
The finished grapevine joint is a compacted mortar band with a single recessed line running down its center. Two consequences follow:
The sizing rule that matters most: go one step wider than the joint. Select an end slightly wider than the joint being finished, so that the tool bears on the brick arrises on both sides. Too narrow and the tool skates around inside the joint and wanders; too wide and it will not enter the joint at all.
Rule of thumb by brick format. For standard North American residential brick and most restoration joints, 300024 (1/2" and 5/8" ends) covers the usual range. Move up to 300025 (5/8" and 3/4" ends) for larger-format brick or when matching an existing wider joint. Because 5/8" appears on both articles, a contractor working across two joint widths on one project often carries both.
If the specification calls for a 3/8" joint, neither grapevine article reaches it; 3/8" is the North American standard bed-joint width, and a 3/8"x1/2" jointer is needed. In the Leading Tools range, Brick Jointer 300053 covers 3/8"x1/2".
| Joint profile needed | Tool to specify | Art. Nr |
|---|---|---|
| Decorative compacted band with one centered recessed line (grapevine / Colonial) | Grapevine Jointer | 300024, 300025 |
| Standard rounded concave joint | Heavy Duty Convex Jointer | 300033, 300036 and 300037 |
| Standard rounded concave joint, including the 1/2"x5/8" and 5/8"x3/4" sizes | Heavy Duty Tempered Convex Jointer | 300034, 300035 and 300043 to 300047 |
| Standard rounded concave joint, core sizes only | Brick Jointer | 300053–300055 |
| Product | Art. Nr | Sizes | Joint produced | When to specify it |
|---|---|---|---|---|
| Grapevine Jointer | 300024, 300025 | 1/2"x5/8", 5/8"x3/4" | Compacted band with one fine recessed line down the center | Colonial-period, matte-finish and antique-finish facades; repointing or extending an existing grapevine-jointed wall |
| Heavy Duty Convex Jointer | 300033, 300036, 300037 | 3/8"x1/2", 3/4"x7/8", 7/8"x1" | Rounded concave joint | Three sizes between 3/8" and 1" (no 5/8" end); the usual finish for general brickwork |
| Heavy Duty Tempered Convex Jointer | 300043, 300034, 300044, 300045, 300035, 300046, 300047 | 3/8"x1/2", 1/2"x5/8", 5/8"x3/4", 3/4"x7/8", 7/8"x1" | Rounded concave joint | Seven article numbers in five sizes, including 1/2"x5/8" and 5/8"x3/4"; 300034 is 3/8"x1/2" like 300043, and 300035 is 5/8"x3/4" like 300045 |
| Brick Jointer | 300053, 300054, 300055 | 3/8"x1/2", 1/2"x5/8", 5/8"x3/4" | Rounded concave joint | The three most-used North American joint widths, including the 3/8" standard, when a full five-size range is not needed |
Complete article-number reference for the Grapevine Jointer. Both article numbers are listed.
| Art. Nr | Size | Metric equivalent (1" = 25.4 mm) | Handle / construction |
|---|---|---|---|
| 300024 | 1/2"x5/8" | ≈ 13 mm x ≈ 16 mm | One-piece steel bar, no separate handle |
| 300025 | 5/8"x3/4" | ≈ 16 mm x ≈ 19 mm | One-piece steel bar, no separate handle |
Related Leading Tools articles, for when a rounded concave joint or a 3/8" width is needed:
| Product | Art. Nr | Size |
|---|---|---|
| Heavy Duty Convex Jointer | 300033 | 3/8"x1/2" |
| Heavy Duty Convex Jointer | 300036 | 3/4"x7/8" |
| Heavy Duty Convex Jointer | 300037 | 7/8"x1" |
| Heavy Duty Tempered Convex Jointer | 300043 | 3/8"x1/2" |
| Heavy Duty Tempered Convex Jointer | 300034 | 3/8"x1/2" |
| Heavy Duty Tempered Convex Jointer | 300044 | 1/2"x5/8" |
| Heavy Duty Tempered Convex Jointer | 300045 | 5/8"x3/4" |
| Heavy Duty Tempered Convex Jointer | 300035 | 5/8"x3/4" |
| Heavy Duty Tempered Convex Jointer | 300046 | 3/4"x7/8" |
| Heavy Duty Tempered Convex Jointer | 300047 | 7/8"x1" |
| Brick Jointer | 300053 | 3/8"x1/2" |
| Brick Jointer | 300054 | 1/2"x5/8" |
| Brick Jointer | 300055 | 5/8"x3/4" |
Moisture is the main cause of corrosion on steel masonry tools, and coastal or humid sites make it markedly worse. On this tool the consequence is specific: pitting on the ridge or on the flanks of the working face transfers directly into the finished joint, so corrosion is a functional failure here and not merely a cosmetic one. If light rust does appear, remove it with a fine abrasive and re-oil the tool immediately.
The practices above are the general ones for steel masonry hand tools; follow the site's own PPE rules.
Product Name: Grapevine Jointer
Art. Nr: 300024, 300025
Product Line: Leading Tools Brick Jointer range, alongside the Heavy Duty Convex Jointer, the Heavy Duty Tempered Convex Jointer and the Brick Jointer
Sizes: 300024 = 1/2"x5/8" · 300025 = 5/8"x3/4"
The Grapevine Jointer is a finishing tool, not a filling tool.
Drawn along a mortar joint that has already been struck flush, its ridged working face compacts the mortar between the two brick arrises and presses one fine recessed line down the center of the joint, producing the slightly rough, meandering line that gives the profile its name. The result is the grapevine joint: the decorative joint most closely associated with American Colonial-period brickwork and with matte-finish and antique-finish brick today.
Specify this tool when the facade needs that centered line. If a plain rounded concave joint is acceptable, the Heavy Duty Convex Jointer or the Brick Jointer in the Leading Tools range can also produce it, and offer a wider range of joint widths.
Also called the colonial joint. The grapevine jointer forms a shallow joint with an indented center line. It is used on heavily textured or antique-finish brick, in colonial-style work and in restoration work, and it is meant for brick only, not for concrete block.
Why choose this tool over a plain jointer. The grapevine profile does something a concave joint cannot: it puts a shadow line at the exact center of every joint, which reads at a distance as a finer, more deliberately built wall.
What it costs in use. The recessed line collects dirt and needs periodic washing, and the profile demands more tool control than a flush or plain concave finish.
Where this size range sits. 3/8" is the standard bed-joint width in North American brickwork. Leading Tools' two article numbers start one step above that, at 1/2", and reach 3/4": the band that covers restoration joints and larger-format brick. For a true 3/8" joint, Leading Tools' own Brick Jointer 300053 (3/8"x1/2") is the correct answer.
| Situation | Use the Grapevine Jointer? | Reason |
|---|---|---|
| Repointing or extending a wall that already has a grapevine joint | Yes, this tool | Matching the existing profile is what keeps the repair invisible |
| New Federal, Georgian or Colonial Revival brickwork | Yes | The profile is period-correct and is specified as a design feature |
| Matte-finish or antique-finish brick, decorative facade | Yes | The profile is often seen on this brick type |
| Decorative garden walls and landscape masonry | Yes, where visual continuity with historic work is wanted | The compacted recess still sheds water, though drainage design governs below grade |
| Standard modern brickwork, plain concave joint acceptable | No, use Heavy Duty Convex Jointer or Brick Jointer | Wider size range |
| Joint width 3/8" | No, neither article reaches it | 3/8" is the North American standard width; use Brick Jointer 300053 |
| Filling or raking out a joint | No | This is a finishing tool; the joint must be filled and struck flush first |
| Concrete block walls | No, brick only | The grapevine profile is a brick joint; for block walls use a plain concave jointer (Heavy Duty Convex Jointer or Brick Jointer) |
| Step | Action | Why it matters |
|---|---|---|
| 1 | Select the end that matches the joint, choosing an end slightly wider than the joint so the tool bears on both brick arrises | Too narrow and the tool skates inside the joint; too wide and it will not enter |
| 2 | Grip the tool at its middle, between thumb and forefinger | Center grip is what lets both flanks stay in contact with the brick |
| 3 | Strike the mortar flush with the trowel first | The jointer finishes an already-full joint; it cannot make up a shortfall of mortar |
| 4 | Wait for thumbprint hard: a firm thumb press leaves a print but the mortar does not pick up on the thumb | Too early and the joint smears; too late and the edges crumble |
| 5 | Set the ridged face into the joint with both flanks bearing on the brick edges, then draw it along with steady, continuous pressure | One stroke compacts, smooths and cuts the center line together |
| 6 | Tool the head (vertical) joints and the bed (horizontal) joints, starting at the top of the wall and drawing each joint in one continuous stroke in one direction; many masons do the head joints first, which is a common practice | A consistent sequence keeps the line uniform |
| 7 | Slow down at corners and make more than one pass if needed | Corners are where the tool most easily lifts and breaks the line |
| 8 | Brush or trowel off the mortar crumbs afterwards, gently | Aggressive cleanup smears mortar across the brick faces, which is far harder to fix than a joint |
This is the tool's core application. When a historic building is repointed, the joint profile is part of the historic fabric, and a plain concave joint on a grapevine-jointed wall is a visible error.
Sequence for repointing: rake out the old mortar to a uniform depth, wet the joint thoroughly so the masonry does not draw the water out of a lime mortar, fill in stages with a mortar appropriate to the substrate, tool with the grapevine jointer at thumbprint hard, and keep the finished work damp while a lime mortar cures. Rake depth and curing period should follow the conservation specification for the building rather than a generic figure.
New houses built in Federal, Georgian or Colonial Revival styles use the grapevine joint as a deliberate design feature; the centered line raises the perceived quality of the brickwork and suits period details such as jack arches, keystones and gauged brick. On new work, run a sample panel first and agree it with the architect; the profile is prominent enough that a client will notice a change of hand halfway up a wall.
Decorative garden walls, estate boundary walls and landscape features take the grapevine profile for continuity with historic precedent. The compacted recess still sheds water, but below-grade and coping details are governed by drainage design and damp-proofing, not by joint profile.
When extending or patching existing grapevine work, match the joint before ordering: measure the existing joint width, then choose the end one step wider. Between 300024 and 300025 the two articles cover 1/2", 5/8" and 3/4", which spans the widths found in this type of brickwork. Tool a trial joint on a sample panel and compare it against the existing wall in the same light before committing to the elevation.
Q: What is the difference between a grapevine joint and a plain concave joint?
A: A concave jointer leaves one continuous rounded hollow across the whole joint. A grapevine jointer compacts the joint into a flat band and presses one additional fine recessed line down the center of that band, which casts a continuous shadow line. If the design does not call for that centered line, the Heavy Duty Convex Jointer or the Brick Jointer in the Leading Tools range will produce a plain concave joint.
Q: How do I choose the size?
A: Each tool has two working ends, so "1/2"x5/8"" means one 1/2" end and one 5/8" end. Choose an end slightly wider than the joint so the tool bears on the brick edges on both sides: a narrower tool skates around inside the joint, and a much wider one will not enter. For a 3/8" joint neither grapevine article is right; Brick Jointer 300053 (3/8"x1/2") is the match, but it makes a rounded concave joint rather than a grapevine joint.
Q: When should I tool the joint, and what if the mortar sticks to the tool?
A: When the mortar is "thumbprint hard": a firm thumb press leaves a print but the mortar does not pick up on the thumb. Tooled too early, the mortar smears and the line closes up; tooled too late, the edges of the recess crumble. If mortar sticks and smears the brick, it is still too wet, so wait for it to firm up and clean the tool face before each run.
Q: Does the tool have a wooden handle?
A: Not 300024 or 300025. It is a one-piece S-bent steel bar with a flattened working end at each end and no separate handle; you grip it on the shank at the middle.
Q: How do I stop it rusting?
A: Wash it soon after use, dry it, and store it with a thin film of machine oil in a dry place; moisture is the main cause of corrosion on steel masonry tools, and coastal sites are worse. Pitting on the ridge changes the joint the tool cuts, so on this tool rust prevention affects how well it works, not just how it looks.
The working face is not flat. Along its center runs a raised ridge; the two flanks of the face ride on the brick arrises on either side of the joint.
As the tool is drawn along, the flanks compact and smooth the mortar band while the ridge displaces mortar out of the center line, leaving a narrow recess that runs continuously along the joint. The visual effect is a fine, slightly irregular line reminiscent of a climbing vine, hence the name.
This is a genuinely different geometry from the convex jointers in the Leading Tools range. A convex jointer presents a single smooth rounded surface that leaves one continuous rounded hollow; the grapevine face leaves a compacted flat band plus a line inside it. That is the whole reason both tools exist.
| Art. Nr | Nominal size | Metric equivalent (1" = 25.4 mm) | Working ends | Typical application |
|---|---|---|---|---|
| 300024 | 1/2"x5/8" | ≈ 13 mm x ≈ 16 mm | Two: one 1/2", one 5/8" | Standard residential brick and restoration joints in the common band |
| 300025 | 5/8"x3/4" | ≈ 16 mm x ≈ 19 mm | Two: one 5/8", one 3/4" | Larger-format brick and wider historic joints |
How to read the two numbers. Double-ended grapevine jointers are designated by the blade width of each end: 1/2"x5/8" means one 1/2" end and one 5/8" end, and the two ends are different widths.
| Specification | Value |
|---|---|
| Blade material | Heat-treated |
The tool is a one-piece steel bar with no separate handle: an S-bent shank with a flattened working end at each end, gripped directly on the shank. There is no wooden grip, no soft-grip overmold and no ferrule anywhere on the tool. The tool is held at its middle, between thumb and forefinger, in the usual way for a double-ended jointer.
The finished grapevine joint is a compacted mortar band with a single recessed line running down its center. Two consequences follow:
The sizing rule that matters most: go one step wider than the joint. Select an end slightly wider than the joint being finished, so that the tool bears on the brick arrises on both sides. Too narrow and the tool skates around inside the joint and wanders; too wide and it will not enter the joint at all.
Rule of thumb by brick format. For standard North American residential brick and most restoration joints, 300024 (1/2" and 5/8" ends) covers the usual range. Move up to 300025 (5/8" and 3/4" ends) for larger-format brick or when matching an existing wider joint. Because 5/8" appears on both articles, a contractor working across two joint widths on one project often carries both.
If the specification calls for a 3/8" joint, neither grapevine article reaches it; 3/8" is the North American standard bed-joint width, and a 3/8"x1/2" jointer is needed. In the Leading Tools range, Brick Jointer 300053 covers 3/8"x1/2".
| Joint profile needed | Tool to specify | Art. Nr |
|---|---|---|
| Decorative compacted band with one centered recessed line (grapevine / Colonial) | Grapevine Jointer | 300024, 300025 |
| Standard rounded concave joint | Heavy Duty Convex Jointer | 300033, 300036 and 300037 |
| Standard rounded concave joint, including the 1/2"x5/8" and 5/8"x3/4" sizes | Heavy Duty Tempered Convex Jointer | 300034, 300035 and 300043 to 300047 |
| Standard rounded concave joint, core sizes only | Brick Jointer | 300053–300055 |
| Product | Art. Nr | Sizes | Joint produced | When to specify it |
|---|---|---|---|---|
| Grapevine Jointer | 300024, 300025 | 1/2"x5/8", 5/8"x3/4" | Compacted band with one fine recessed line down the center | Colonial-period, matte-finish and antique-finish facades; repointing or extending an existing grapevine-jointed wall |
| Heavy Duty Convex Jointer | 300033, 300036, 300037 | 3/8"x1/2", 3/4"x7/8", 7/8"x1" | Rounded concave joint | Three sizes between 3/8" and 1" (no 5/8" end); the usual finish for general brickwork |
| Heavy Duty Tempered Convex Jointer | 300043, 300034, 300044, 300045, 300035, 300046, 300047 | 3/8"x1/2", 1/2"x5/8", 5/8"x3/4", 3/4"x7/8", 7/8"x1" | Rounded concave joint | Seven article numbers in five sizes, including 1/2"x5/8" and 5/8"x3/4"; 300034 is 3/8"x1/2" like 300043, and 300035 is 5/8"x3/4" like 300045 |
| Brick Jointer | 300053, 300054, 300055 | 3/8"x1/2", 1/2"x5/8", 5/8"x3/4" | Rounded concave joint | The three most-used North American joint widths, including the 3/8" standard, when a full five-size range is not needed |
Complete article-number reference for the Grapevine Jointer. Both article numbers are listed.
| Art. Nr | Size | Metric equivalent (1" = 25.4 mm) | Handle / construction |
|---|---|---|---|
| 300024 | 1/2"x5/8" | ≈ 13 mm x ≈ 16 mm | One-piece steel bar, no separate handle |
| 300025 | 5/8"x3/4" | ≈ 16 mm x ≈ 19 mm | One-piece steel bar, no separate handle |
Related Leading Tools articles, for when a rounded concave joint or a 3/8" width is needed:
| Product | Art. Nr | Size |
|---|---|---|
| Heavy Duty Convex Jointer | 300033 | 3/8"x1/2" |
| Heavy Duty Convex Jointer | 300036 | 3/4"x7/8" |
| Heavy Duty Convex Jointer | 300037 | 7/8"x1" |
| Heavy Duty Tempered Convex Jointer | 300043 | 3/8"x1/2" |
| Heavy Duty Tempered Convex Jointer | 300034 | 3/8"x1/2" |
| Heavy Duty Tempered Convex Jointer | 300044 | 1/2"x5/8" |
| Heavy Duty Tempered Convex Jointer | 300045 | 5/8"x3/4" |
| Heavy Duty Tempered Convex Jointer | 300035 | 5/8"x3/4" |
| Heavy Duty Tempered Convex Jointer | 300046 | 3/4"x7/8" |
| Heavy Duty Tempered Convex Jointer | 300047 | 7/8"x1" |
| Brick Jointer | 300053 | 3/8"x1/2" |
| Brick Jointer | 300054 | 1/2"x5/8" |
| Brick Jointer | 300055 | 5/8"x3/4" |
Moisture is the main cause of corrosion on steel masonry tools, and coastal or humid sites make it markedly worse. On this tool the consequence is specific: pitting on the ridge or on the flanks of the working face transfers directly into the finished joint, so corrosion is a functional failure here and not merely a cosmetic one. If light rust does appear, remove it with a fine abrasive and re-oil the tool immediately.
The practices above are the general ones for steel masonry hand tools; follow the site's own PPE rules.

In compliance with EU personal data protection laws, we are committed to protecting and providing you with control over your personal data. By clicking "Accept All", you allow us to place cookies to enhance your experience on this site, help us analyze site performance and usage, and enable us to deliver relevant marketing content. You can manage your cookie settings below. By clicking "Agree" you agree to the current settings. For more information, please visit the Privacy Statement.
This website uses cookies
In compliance with EU personal data protection laws, we are committed to protecting your personal data and providing you with control over it. By clicking "Agree", you allow us to place cookies to improve your experience on this site, help us analyze site performance and usage, and allow us to deliver relevant marketing content.
By clicking "Only necessary" you allow us to place only necessary cookies. The website cannot function without these cookies and you cannot switch them off on your system. These cookies are typically set only in response to an action you perform (i.e. a service request), such as setting privacy preferences, logging in, or filling in a form. You can set your browser to block or prompt you for these cookies, but this may prevent some site features from working.



