
Copyright 2026 © Leading Tools Industrial Co., Ltd.
All Rights Reserved. Website Design by Awakening Design
CATALOG TYPE
Product Categories
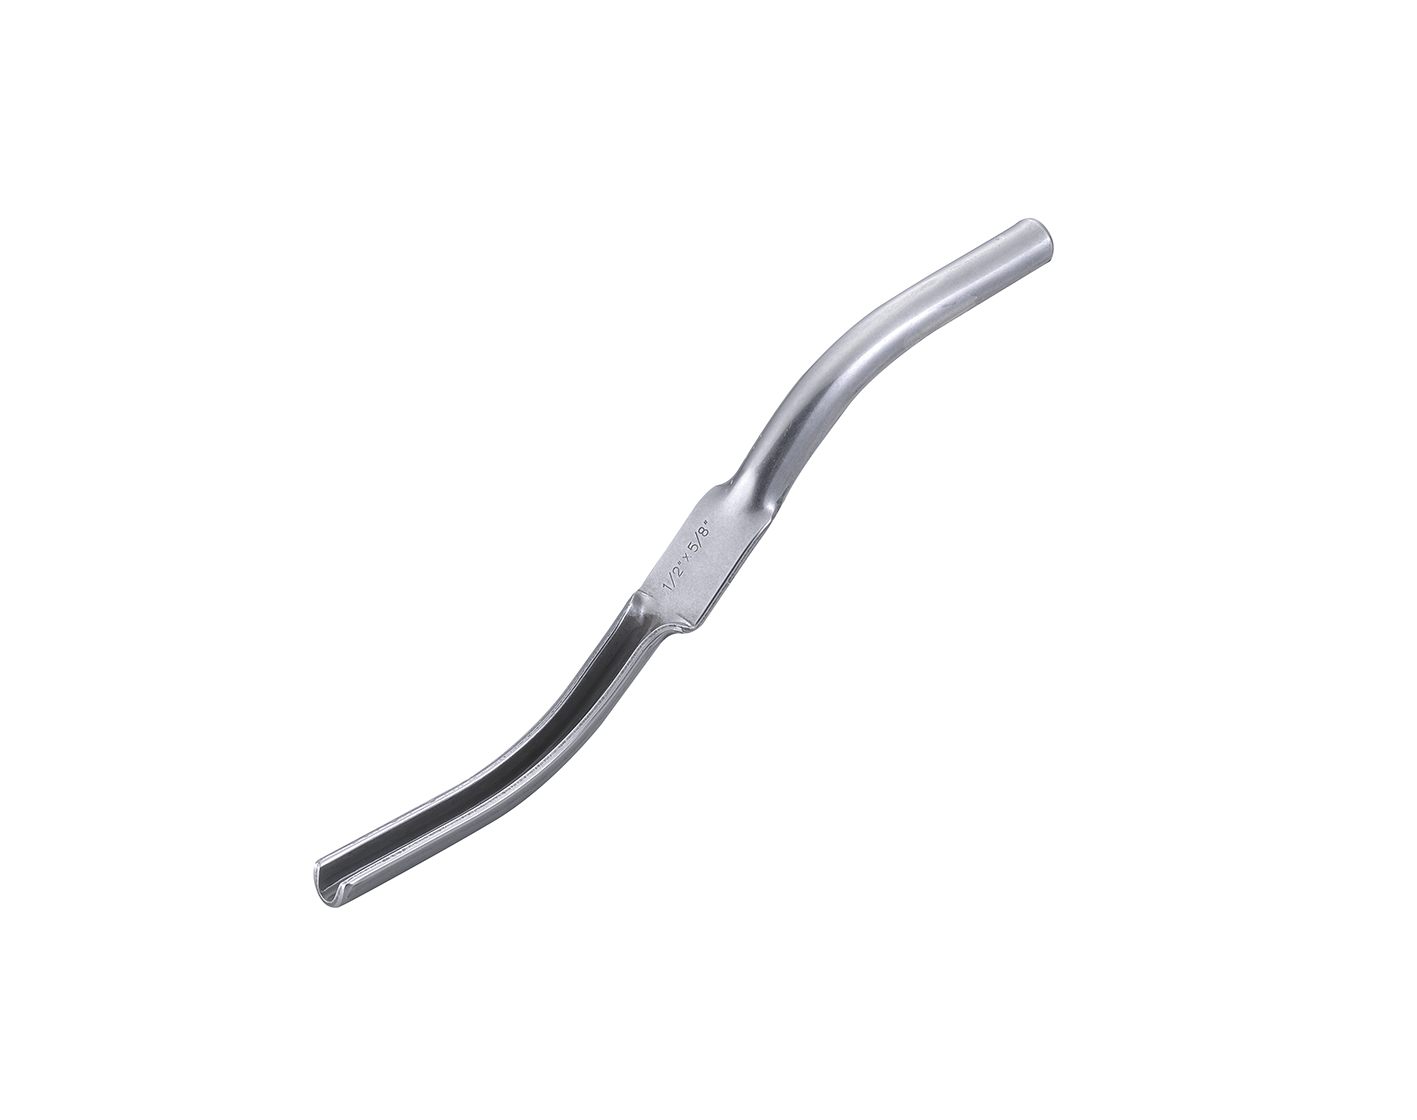
Heavy Duty Convex Jointer
Product Description
Product Name: Heavy Duty Convex Jointer
Art. Nr: 300033, 300036, 300037 (three article numbers)
Product Line: Leading Tools Brick Jointer range, sitting between the Grapevine Jointer (300024–300025) and the Heavy Duty Tempered Convex Jointer (300034, 300035 and 300043 to 300047)
Sizes: 300033 = 3/8"x1/2" · 300036 = 3/4"x7/8" · 300037 = 7/8"x1"
The Heavy Duty Convex Jointer is the tool that produces the standard rounded concave mortar joint, the most common finished joint in residential and commercial brickwork. The working face of the tool is convex, and it presses a concave hollow into the mortar.
The tool is a single S-bent steel bar with a half-round convex working end at each end and the size stamped into the flattened center section. There is no wooden handle and no separate grip component. The tool is held at the flattened center section, and each end is a working end.
Specify this line when the finished wall needs a plain rounded concave joint in a 3/8", 1/2", 3/4", 7/8" or 1" joint width. For a 5/8" joint, see the Heavy Duty Tempered Convex Jointer. If the facade needs a decorative center line instead, the Grapevine Jointer in the Leading Tools range is the tool; if only the three core North American widths are needed, the Brick Jointer 300053–300055 covers them.
A note on the name. Despite the name, a convex jointer's rounded face forms a concave mortar joint. Buyers also know this joint as a half-round or rodded joint, and this double-ended, S-bent style of jointer as an S-shaped jointer.
| Situation | Use this tool? | Why |
|---|---|---|
| Exterior above-grade brickwork | Yes | The compacted concave joint drains well |
| Walls in freeze-thaw climates | Yes | The recess sheds water instead of holding it in a ledge, so less water is present to freeze in the joint face |
| Repointing existing concave-jointed brickwork | Yes, matched to the existing joint width | The concave profile is the standard historic and modern joint; a mismatched profile reads as a repair line |
| Reproducing a Colonial-period grapevine facade | No, use the Grapevine Jointer 300024/300025 | The grapevine profile carries a centered recessed line the convex face cannot produce |
| Sheltered or interior work where a recessed square joint is specified | No, use a mortar raker such as the Skate Wheel Mortar Raker 301110 | A raked joint is a different profile and admits more water outdoors |
| Below-grade masonry | Not as the waterproofing measure | Damp-proofing below grade requires membrane, weepholes and backfill drainage, not joint profile |
| Step | Action | What to watch |
|---|---|---|
| 1 | Confirm the article number matches the specified joint width | An end that is too narrow skates inside the joint; too wide and it rides on the brick and never seats |
| 2 | Inspect the convex face for wear before the session | A face worn flat in the center leaves a shallow, inconsistent recess |
| 3 | Clean dried mortar off the working face; oil a tool that has been stored | Keep the tool clean and lightly oiled to stay rust-free and to make a slick joint |
| 4 | Test the mortar for thumbprint hardness | Press a thumb into the mortar: a clear impression that does not stick to the thumb is the moment to tool |
| 5 | Tool the head (vertical) and bed (horizontal) joints, working from the top down; many masons do the head joints first, which is a common practice | Mortar dragged out of the heads can smear a finished bed joint, which is why many masons start with the head joints |
| 6 | Draw the tool along the joint in one continuous stroke, holding a constant angle and constant pressure | Consistent pressure is what makes the finished wall read evenly; pausing or reversing mid-joint leaves a visible mark |
| 7 | Work in sections so each area is tooled at the same mortar hardness | Mortar in different parts of a wall reaches thumbprint hardness at different times |
| 8 | Inspect: a clean, smooth, evenly curved recess with no loose material at the edges | If the recess is irregular or shallow, check tool wear, stroke angle, and mortar timing |
The joint is not made by the tool alone; it is made by tooling at the right moment. The trade test is thumbprint hard: press a thumb firmly into the mortar in an inconspicuous place. If the mortar takes a clear impression and does not stick to the thumb, tool now. Tool too early and the joint will not seal; tool too late and the tool tends to pull the mortar away from the unit rather than compress it.
How long that takes depends on the weather, the mortar and how absorbent the brick is, so rely on the thumbprint test rather than on a fixed time.
Head (vertical) joints. Many masons tool these first, which is a common practice rather than a rule. Run each head joint from the top downward with the end of the tool that matches the joint width; head and bed joints on the same wall should be the same width.
Bed (horizontal) joints. Position the convex face against the mortar with the shank angled slightly up, start at one end, and draw the tool toward you: pulling, not pushing, in one smooth continuous motion, holding the angle constant the whole way. Lift cleanly at the end rather than trailing off.
One direction, one hardness, one pressure. These three consistencies are what separate a professional-looking wall from an amateur one, far more than tool brand does.
On a large commercial veneer there may be tens of thousands of linear feet of joint, all of it tooled by hand. Two consequences follow for the buyer: the tool has to survive the job, and the joint width has to be decided once and held. For a commercial package, specify the matching article number in quantity rather than one tool per crew.
In a cavity wall the outer wythe carries the weather and the inner wythe usually does not. The concave joint belongs on the outer wythe, where its water-shedding recess and compacted brick-to-mortar interface do their work. Whether the inner wythe is tooled at all, struck flush, or left as laid is a specification decision rather than a tool decision.
Repointing is where this tool class earns its reputation. The sequence:
Hot, dry weather shortens the window, so the mason must tool in smaller sections and check hardness more often, and should work the shaded elevations in the middle of the day.
Cool, damp weather extends the window, which allows longer runs to be laid before tooling but also means a crew that tools on habit rather than on the thumb test will tool too early and fail to seal the joint.
Q1. Does a convex jointer make a convex joint?
A. No. "Convex" describes the tool's working face, which bulges outward; pressed into mortar it leaves a hollow that curves inward, which is a concave joint.
Q2. What do the two figures in "1/2"x5/8"" mean, and which size should I order if I only order one?
A. They are the widths of the tool's two working ends, so it forms a 1/2" joint at one end and a 5/8" joint at the other. If you only order one, choose 300033 (3/8"x1/2") or, from the Heavy Duty Tempered Convex Jointer, 300044 (1/2"x5/8"): 3/8" is the standard North American bed-joint width, and 1/2"x5/8" is the all-round pairing.
Q3. Does this tool have a wooden handle, and how do I look after it?
A. No. It is a one-piece S-bent steel bar with a convex working end at each end and the size stamped in the center; the mason holds the flattened center section directly. Clean it, dry it and keep it lightly oiled.
Q4. When should I tool the joint, and in what order?
A. When a firm thumb press leaves a clear impression and the mortar does not stick to the thumb. The time depends on weather, mortar and brick. Tool the vertical (head) and horizontal (bed) joints; many masons do the head joints first, which is a common practice. Work in sections so the whole area is tooled at the same mortar hardness.
Q5. The finished recess is shallow and uneven, or the mortar crumbles or smears. What is wrong?
A. A shallow, uneven recess most often means the convex face has worn flat in the center (lay a straightedge across it: a worn-flat face lies flat against the straightedge instead of touching only at the center); it cannot be recut on site, so replace the tool.
If the mortar crumbles, it has gone past the right moment: cut it out and repoint rather than tooling a failed joint. If it smears and sticks, you tooled too early or the tool face is dirty, so wait for the mortar to firm up and clean the face before each pass.
The working face of the blade bulges outward in the middle. When that face is drawn along a mortar joint, it displaces mortar out of the center of the joint and packs it toward the two brick arrises, leaving behind a hollow that curves inward. A convex working face makes a concave joint.
The concave groove works for three related reasons:
This is why a concave joint drains well, and why raked joints, which leave a horizontal ledge, admit more water than a concave joint.
| Art. Nr | Nominal size | Metric equivalent (1" = 25.4 mm) | Working ends | Typical application |
|---|---|---|---|---|
| 300033 | 3/8"x1/2" | ≈ 10 mm x ≈ 13 mm | Two: one 3/8", one 1/2" | 3/8" is the standard North American bed-joint width; also narrow joints in older brickwork |
| 300036 | 3/4"x7/8" | ≈ 19 mm x ≈ 22 mm | Two: one 3/4", one 7/8" | Oversize and architectural brick |
| 300037 | 7/8"x1" | ≈ 22 mm x ≈ 25 mm | Two: one 7/8", one 1" | Widest joints in this range |
How to read the two numbers. The two figures are the widths of the tool's two working ends: 300033 has a 3/8" end and a 1/2" end, 300036 a 3/4" end and a 7/8" end, and 300037 a 7/8" end and a 1" end. Turn the tool end for end to use the other width.
"Heavy Duty" is part of the product name. The catalog does not state bar thickness or weight; please contact sales for these details.
| Specification | Value |
|---|---|
| Construction | One-piece S-bent steel bar; flattened center section, half-round convex working end at each end |
| Size marking | Size stamped into the flat of the center section |
| Working ends per tool | Two, of different widths, per article number |
| Blade material | Heat-treated |
There is no handle at all. The tool is a single steel bar: the mason grips the flattened center section directly, and each end is a working end. There is no wooden grip, no soft-grip overmold, no cushion grip and no ferrule anywhere on the tool.
Start from the specified joint width, not from the brick. The first figure of each pair is a joint width the tool will finish, and the second figure is the other end of the same tool. The three Heavy Duty Convex articles cover the 3/8", 1/2", 3/4", 7/8" and 1" joint widths; for a 5/8" joint, choose an article from the Heavy Duty Tempered Convex Jointer (300044, 300045 or 300035).
3/8" is the default. It is the standard North American bed-joint width, and in the Leading Tools range it is reached by Heavy Duty Convex Jointer 300033, Heavy Duty Tempered Convex Jointer 300043 or 300034 and Brick Jointer 300053. If a customer asks for one jointer and gives no other information, 300033 (3/8"x1/2") or the Heavy Duty Tempered Convex Jointer 300044 (1/2"x5/8") is the safe first recommendation.
Match, do not guess, on restoration work. For repointing an existing wall, measure the existing joint and select the nearest end width; a joint finished with a tool of the wrong width will read as a repair line across the facade even when the mortar color matches.
| Joint profile needed | Tool to specify | Art. Nr |
|---|---|---|
| Standard rounded concave (round struck) | Heavy Duty Convex Jointer | 300033, 300036 and 300037 |
| Standard rounded concave, including the 1/2"x5/8" and 5/8"x3/4" sizes | Heavy Duty Tempered Convex Jointer | 300034, 300035 and 300043 to 300047 |
| Standard rounded concave, three core sizes only | Brick Jointer | 300053–300055 |
| Decorative compacted band with one centered recessed line (grapevine / Colonial) | Grapevine Jointer | 300024, 300025 |
| V-shaped groove | V-jointer, not in this range | |
| Raked / recessed square joint | Mortar raker, not a jointer: Skate Wheel Mortar Raker | 301110 |
One line of that table needs a word of explanation. A raked joint leaves a horizontal ledge and admits more water than a concave joint, which is why it belongs on sheltered and interior work rather than on an exposed elevation.
| Product | Art. Nr | Sizes | Joint produced | When to specify it |
|---|---|---|---|---|
| Grapevine Jointer | 300024, 300025 | 1/2"x5/8", 5/8"x3/4" | Compacted band with one fine recessed line down the center | Colonial-period, matte-finish and antique-finish facades; repointing an existing grapevine-jointed wall |
| Heavy Duty Convex Jointer | 300033, 300036, 300037 | 3/8"x1/2", 3/4"x7/8", 7/8"x1" | Rounded concave joint | Three sizes between 3/8" and 1" (no 5/8" end); the usual finish for general brickwork |
| Heavy Duty Tempered Convex Jointer | 300043, 300034, 300044, 300045, 300035, 300046, 300047 | 3/8"x1/2", 1/2"x5/8", 5/8"x3/4", 3/4"x7/8", 7/8"x1" | Rounded concave joint | Seven article numbers in five sizes, including 1/2"x5/8" and 5/8"x3/4"; 300034 is 3/8"x1/2" like 300043, and 300035 is 5/8"x3/4" like 300045 |
| Brick Jointer | 300053, 300054, 300055 | 3/8"x1/2", 1/2"x5/8", 5/8"x3/4" | Rounded concave joint | The three most-used North American joint widths when a full five-size range is not needed |
Both lines are heat-treated and form the same rounded concave joint. They differ in the sizes they cover:
Complete article-number reference for the Heavy Duty Convex Jointer. All three article numbers are listed.
| Art. Nr | Size | Metric equivalent (1" = 25.4 mm) | Handle / construction |
|---|---|---|---|
| 300033 | 3/8"x1/2" | ≈ 10 mm x ≈ 13 mm | One-piece S-bent steel bar, no separate handle |
| 300036 | 3/4"x7/8" | ≈ 19 mm x ≈ 22 mm | One-piece S-bent steel bar, no separate handle |
| 300037 | 7/8"x1" | ≈ 22 mm x ≈ 25 mm | One-piece S-bent steel bar, no separate handle |
Selection shortcut by project type:
| Project type | Recommended size | Art. Nr |
|---|---|---|
| Standard North American residential brick, 3/8" specified bed joint | 3/8"x1/2" | 300033 |
| Oversize and architectural brick | 3/4"x7/8" | 300036 |
| Wide joints, 7/8" to 1" | 7/8"x1" | 300037 |
| Repointing / matching an existing wall | Measure the existing joint and select the nearest end width | 300033, 300036 and 300037; for the 1/2" and 5/8" ends, the Heavy Duty Tempered Convex Jointer |
Related Leading Tools articles, for when a decorative joint or the Heavy Duty Tempered Convex line is needed:
| Product | Art. Nr | Size |
|---|---|---|
| Grapevine Jointer | 300024 | 1/2"x5/8" |
| Grapevine Jointer | 300025 | 5/8"x3/4" |
| Heavy Duty Tempered Convex Jointer | 300043 | 3/8"x1/2" |
| Heavy Duty Tempered Convex Jointer | 300034 | 3/8"x1/2" |
| Heavy Duty Tempered Convex Jointer | 300044 | 1/2"x5/8" |
| Heavy Duty Tempered Convex Jointer | 300045 | 5/8"x3/4" |
| Heavy Duty Tempered Convex Jointer | 300035 | 5/8"x3/4" |
| Heavy Duty Tempered Convex Jointer | 300046 | 3/4"x7/8" |
| Heavy Duty Tempered Convex Jointer | 300047 | 7/8"x1" |
| Brick Jointer | 300053 | 3/8"x1/2" |
| Brick Jointer | 300054 | 1/2"x5/8" |
| Brick Jointer | 300055 | 5/8"x3/4" |
Convex profile wear: the check that matters. Lay a straightedge across the convex face. A convex face touches the straightedge only at the center, with light showing on both sides. If the straightedge lies flat against the face and no light shows at the sides, the curve has flattened and the tool will no longer form a full-depth recess. Replace it; a flattened face cannot be restored to the original arc on site.
Bar straightness. A bar that has been sprung out of its S geometry will not present the face at a consistent angle. Minor deviation can sometimes be corrected; significant deformation means replacement.
Surface condition. Pitting on the working face transfers to the finished joint. A tool left standing in wet mortar will pit far faster than one cleaned at the end of each day.
There is no handle-to-blade junction to inspect on this tool, because there is no separate handle.
Some modern mortars carry air-entraining agents and other admixtures that can change the color or surface texture of the tooled joint. Test on a small, inconspicuous area before tooling a whole elevation with an unfamiliar mortar formulation.
Product Name: Heavy Duty Convex Jointer
Art. Nr: 300033, 300036, 300037 (three article numbers)
Product Line: Leading Tools Brick Jointer range, sitting between the Grapevine Jointer (300024–300025) and the Heavy Duty Tempered Convex Jointer (300034, 300035 and 300043 to 300047)
Sizes: 300033 = 3/8"x1/2" · 300036 = 3/4"x7/8" · 300037 = 7/8"x1"
The Heavy Duty Convex Jointer is the tool that produces the standard rounded concave mortar joint, the most common finished joint in residential and commercial brickwork. The working face of the tool is convex, and it presses a concave hollow into the mortar.
The tool is a single S-bent steel bar with a half-round convex working end at each end and the size stamped into the flattened center section. There is no wooden handle and no separate grip component. The tool is held at the flattened center section, and each end is a working end.
Specify this line when the finished wall needs a plain rounded concave joint in a 3/8", 1/2", 3/4", 7/8" or 1" joint width. For a 5/8" joint, see the Heavy Duty Tempered Convex Jointer. If the facade needs a decorative center line instead, the Grapevine Jointer in the Leading Tools range is the tool; if only the three core North American widths are needed, the Brick Jointer 300053–300055 covers them.
A note on the name. Despite the name, a convex jointer's rounded face forms a concave mortar joint. Buyers also know this joint as a half-round or rodded joint, and this double-ended, S-bent style of jointer as an S-shaped jointer.
| Situation | Use this tool? | Why |
|---|---|---|
| Exterior above-grade brickwork | Yes | The compacted concave joint drains well |
| Walls in freeze-thaw climates | Yes | The recess sheds water instead of holding it in a ledge, so less water is present to freeze in the joint face |
| Repointing existing concave-jointed brickwork | Yes, matched to the existing joint width | The concave profile is the standard historic and modern joint; a mismatched profile reads as a repair line |
| Reproducing a Colonial-period grapevine facade | No, use the Grapevine Jointer 300024/300025 | The grapevine profile carries a centered recessed line the convex face cannot produce |
| Sheltered or interior work where a recessed square joint is specified | No, use a mortar raker such as the Skate Wheel Mortar Raker 301110 | A raked joint is a different profile and admits more water outdoors |
| Below-grade masonry | Not as the waterproofing measure | Damp-proofing below grade requires membrane, weepholes and backfill drainage, not joint profile |
| Step | Action | What to watch |
|---|---|---|
| 1 | Confirm the article number matches the specified joint width | An end that is too narrow skates inside the joint; too wide and it rides on the brick and never seats |
| 2 | Inspect the convex face for wear before the session | A face worn flat in the center leaves a shallow, inconsistent recess |
| 3 | Clean dried mortar off the working face; oil a tool that has been stored | Keep the tool clean and lightly oiled to stay rust-free and to make a slick joint |
| 4 | Test the mortar for thumbprint hardness | Press a thumb into the mortar: a clear impression that does not stick to the thumb is the moment to tool |
| 5 | Tool the head (vertical) and bed (horizontal) joints, working from the top down; many masons do the head joints first, which is a common practice | Mortar dragged out of the heads can smear a finished bed joint, which is why many masons start with the head joints |
| 6 | Draw the tool along the joint in one continuous stroke, holding a constant angle and constant pressure | Consistent pressure is what makes the finished wall read evenly; pausing or reversing mid-joint leaves a visible mark |
| 7 | Work in sections so each area is tooled at the same mortar hardness | Mortar in different parts of a wall reaches thumbprint hardness at different times |
| 8 | Inspect: a clean, smooth, evenly curved recess with no loose material at the edges | If the recess is irregular or shallow, check tool wear, stroke angle, and mortar timing |
The joint is not made by the tool alone; it is made by tooling at the right moment. The trade test is thumbprint hard: press a thumb firmly into the mortar in an inconspicuous place. If the mortar takes a clear impression and does not stick to the thumb, tool now. Tool too early and the joint will not seal; tool too late and the tool tends to pull the mortar away from the unit rather than compress it.
How long that takes depends on the weather, the mortar and how absorbent the brick is, so rely on the thumbprint test rather than on a fixed time.
Head (vertical) joints. Many masons tool these first, which is a common practice rather than a rule. Run each head joint from the top downward with the end of the tool that matches the joint width; head and bed joints on the same wall should be the same width.
Bed (horizontal) joints. Position the convex face against the mortar with the shank angled slightly up, start at one end, and draw the tool toward you: pulling, not pushing, in one smooth continuous motion, holding the angle constant the whole way. Lift cleanly at the end rather than trailing off.
One direction, one hardness, one pressure. These three consistencies are what separate a professional-looking wall from an amateur one, far more than tool brand does.
On a large commercial veneer there may be tens of thousands of linear feet of joint, all of it tooled by hand. Two consequences follow for the buyer: the tool has to survive the job, and the joint width has to be decided once and held. For a commercial package, specify the matching article number in quantity rather than one tool per crew.
In a cavity wall the outer wythe carries the weather and the inner wythe usually does not. The concave joint belongs on the outer wythe, where its water-shedding recess and compacted brick-to-mortar interface do their work. Whether the inner wythe is tooled at all, struck flush, or left as laid is a specification decision rather than a tool decision.
Repointing is where this tool class earns its reputation. The sequence:
Hot, dry weather shortens the window, so the mason must tool in smaller sections and check hardness more often, and should work the shaded elevations in the middle of the day.
Cool, damp weather extends the window, which allows longer runs to be laid before tooling but also means a crew that tools on habit rather than on the thumb test will tool too early and fail to seal the joint.
Q1. Does a convex jointer make a convex joint?
A. No. "Convex" describes the tool's working face, which bulges outward; pressed into mortar it leaves a hollow that curves inward, which is a concave joint.
Q2. What do the two figures in "1/2"x5/8"" mean, and which size should I order if I only order one?
A. They are the widths of the tool's two working ends, so it forms a 1/2" joint at one end and a 5/8" joint at the other. If you only order one, choose 300033 (3/8"x1/2") or, from the Heavy Duty Tempered Convex Jointer, 300044 (1/2"x5/8"): 3/8" is the standard North American bed-joint width, and 1/2"x5/8" is the all-round pairing.
Q3. Does this tool have a wooden handle, and how do I look after it?
A. No. It is a one-piece S-bent steel bar with a convex working end at each end and the size stamped in the center; the mason holds the flattened center section directly. Clean it, dry it and keep it lightly oiled.
Q4. When should I tool the joint, and in what order?
A. When a firm thumb press leaves a clear impression and the mortar does not stick to the thumb. The time depends on weather, mortar and brick. Tool the vertical (head) and horizontal (bed) joints; many masons do the head joints first, which is a common practice. Work in sections so the whole area is tooled at the same mortar hardness.
Q5. The finished recess is shallow and uneven, or the mortar crumbles or smears. What is wrong?
A. A shallow, uneven recess most often means the convex face has worn flat in the center (lay a straightedge across it: a worn-flat face lies flat against the straightedge instead of touching only at the center); it cannot be recut on site, so replace the tool.
If the mortar crumbles, it has gone past the right moment: cut it out and repoint rather than tooling a failed joint. If it smears and sticks, you tooled too early or the tool face is dirty, so wait for the mortar to firm up and clean the face before each pass.
The working face of the blade bulges outward in the middle. When that face is drawn along a mortar joint, it displaces mortar out of the center of the joint and packs it toward the two brick arrises, leaving behind a hollow that curves inward. A convex working face makes a concave joint.
The concave groove works for three related reasons:
This is why a concave joint drains well, and why raked joints, which leave a horizontal ledge, admit more water than a concave joint.
| Art. Nr | Nominal size | Metric equivalent (1" = 25.4 mm) | Working ends | Typical application |
|---|---|---|---|---|
| 300033 | 3/8"x1/2" | ≈ 10 mm x ≈ 13 mm | Two: one 3/8", one 1/2" | 3/8" is the standard North American bed-joint width; also narrow joints in older brickwork |
| 300036 | 3/4"x7/8" | ≈ 19 mm x ≈ 22 mm | Two: one 3/4", one 7/8" | Oversize and architectural brick |
| 300037 | 7/8"x1" | ≈ 22 mm x ≈ 25 mm | Two: one 7/8", one 1" | Widest joints in this range |
How to read the two numbers. The two figures are the widths of the tool's two working ends: 300033 has a 3/8" end and a 1/2" end, 300036 a 3/4" end and a 7/8" end, and 300037 a 7/8" end and a 1" end. Turn the tool end for end to use the other width.
"Heavy Duty" is part of the product name. The catalog does not state bar thickness or weight; please contact sales for these details.
| Specification | Value |
|---|---|
| Construction | One-piece S-bent steel bar; flattened center section, half-round convex working end at each end |
| Size marking | Size stamped into the flat of the center section |
| Working ends per tool | Two, of different widths, per article number |
| Blade material | Heat-treated |
There is no handle at all. The tool is a single steel bar: the mason grips the flattened center section directly, and each end is a working end. There is no wooden grip, no soft-grip overmold, no cushion grip and no ferrule anywhere on the tool.
Start from the specified joint width, not from the brick. The first figure of each pair is a joint width the tool will finish, and the second figure is the other end of the same tool. The three Heavy Duty Convex articles cover the 3/8", 1/2", 3/4", 7/8" and 1" joint widths; for a 5/8" joint, choose an article from the Heavy Duty Tempered Convex Jointer (300044, 300045 or 300035).
3/8" is the default. It is the standard North American bed-joint width, and in the Leading Tools range it is reached by Heavy Duty Convex Jointer 300033, Heavy Duty Tempered Convex Jointer 300043 or 300034 and Brick Jointer 300053. If a customer asks for one jointer and gives no other information, 300033 (3/8"x1/2") or the Heavy Duty Tempered Convex Jointer 300044 (1/2"x5/8") is the safe first recommendation.
Match, do not guess, on restoration work. For repointing an existing wall, measure the existing joint and select the nearest end width; a joint finished with a tool of the wrong width will read as a repair line across the facade even when the mortar color matches.
| Joint profile needed | Tool to specify | Art. Nr |
|---|---|---|
| Standard rounded concave (round struck) | Heavy Duty Convex Jointer | 300033, 300036 and 300037 |
| Standard rounded concave, including the 1/2"x5/8" and 5/8"x3/4" sizes | Heavy Duty Tempered Convex Jointer | 300034, 300035 and 300043 to 300047 |
| Standard rounded concave, three core sizes only | Brick Jointer | 300053–300055 |
| Decorative compacted band with one centered recessed line (grapevine / Colonial) | Grapevine Jointer | 300024, 300025 |
| V-shaped groove | V-jointer, not in this range | |
| Raked / recessed square joint | Mortar raker, not a jointer: Skate Wheel Mortar Raker | 301110 |
One line of that table needs a word of explanation. A raked joint leaves a horizontal ledge and admits more water than a concave joint, which is why it belongs on sheltered and interior work rather than on an exposed elevation.
| Product | Art. Nr | Sizes | Joint produced | When to specify it |
|---|---|---|---|---|
| Grapevine Jointer | 300024, 300025 | 1/2"x5/8", 5/8"x3/4" | Compacted band with one fine recessed line down the center | Colonial-period, matte-finish and antique-finish facades; repointing an existing grapevine-jointed wall |
| Heavy Duty Convex Jointer | 300033, 300036, 300037 | 3/8"x1/2", 3/4"x7/8", 7/8"x1" | Rounded concave joint | Three sizes between 3/8" and 1" (no 5/8" end); the usual finish for general brickwork |
| Heavy Duty Tempered Convex Jointer | 300043, 300034, 300044, 300045, 300035, 300046, 300047 | 3/8"x1/2", 1/2"x5/8", 5/8"x3/4", 3/4"x7/8", 7/8"x1" | Rounded concave joint | Seven article numbers in five sizes, including 1/2"x5/8" and 5/8"x3/4"; 300034 is 3/8"x1/2" like 300043, and 300035 is 5/8"x3/4" like 300045 |
| Brick Jointer | 300053, 300054, 300055 | 3/8"x1/2", 1/2"x5/8", 5/8"x3/4" | Rounded concave joint | The three most-used North American joint widths when a full five-size range is not needed |
Both lines are heat-treated and form the same rounded concave joint. They differ in the sizes they cover:
Complete article-number reference for the Heavy Duty Convex Jointer. All three article numbers are listed.
| Art. Nr | Size | Metric equivalent (1" = 25.4 mm) | Handle / construction |
|---|---|---|---|
| 300033 | 3/8"x1/2" | ≈ 10 mm x ≈ 13 mm | One-piece S-bent steel bar, no separate handle |
| 300036 | 3/4"x7/8" | ≈ 19 mm x ≈ 22 mm | One-piece S-bent steel bar, no separate handle |
| 300037 | 7/8"x1" | ≈ 22 mm x ≈ 25 mm | One-piece S-bent steel bar, no separate handle |
Selection shortcut by project type:
| Project type | Recommended size | Art. Nr |
|---|---|---|
| Standard North American residential brick, 3/8" specified bed joint | 3/8"x1/2" | 300033 |
| Oversize and architectural brick | 3/4"x7/8" | 300036 |
| Wide joints, 7/8" to 1" | 7/8"x1" | 300037 |
| Repointing / matching an existing wall | Measure the existing joint and select the nearest end width | 300033, 300036 and 300037; for the 1/2" and 5/8" ends, the Heavy Duty Tempered Convex Jointer |
Related Leading Tools articles, for when a decorative joint or the Heavy Duty Tempered Convex line is needed:
| Product | Art. Nr | Size |
|---|---|---|
| Grapevine Jointer | 300024 | 1/2"x5/8" |
| Grapevine Jointer | 300025 | 5/8"x3/4" |
| Heavy Duty Tempered Convex Jointer | 300043 | 3/8"x1/2" |
| Heavy Duty Tempered Convex Jointer | 300034 | 3/8"x1/2" |
| Heavy Duty Tempered Convex Jointer | 300044 | 1/2"x5/8" |
| Heavy Duty Tempered Convex Jointer | 300045 | 5/8"x3/4" |
| Heavy Duty Tempered Convex Jointer | 300035 | 5/8"x3/4" |
| Heavy Duty Tempered Convex Jointer | 300046 | 3/4"x7/8" |
| Heavy Duty Tempered Convex Jointer | 300047 | 7/8"x1" |
| Brick Jointer | 300053 | 3/8"x1/2" |
| Brick Jointer | 300054 | 1/2"x5/8" |
| Brick Jointer | 300055 | 5/8"x3/4" |
Convex profile wear: the check that matters. Lay a straightedge across the convex face. A convex face touches the straightedge only at the center, with light showing on both sides. If the straightedge lies flat against the face and no light shows at the sides, the curve has flattened and the tool will no longer form a full-depth recess. Replace it; a flattened face cannot be restored to the original arc on site.
Bar straightness. A bar that has been sprung out of its S geometry will not present the face at a consistent angle. Minor deviation can sometimes be corrected; significant deformation means replacement.
Surface condition. Pitting on the working face transfers to the finished joint. A tool left standing in wet mortar will pit far faster than one cleaned at the end of each day.
There is no handle-to-blade junction to inspect on this tool, because there is no separate handle.
Some modern mortars carry air-entraining agents and other admixtures that can change the color or surface texture of the tooled joint. Test on a small, inconspicuous area before tooling a whole elevation with an unfamiliar mortar formulation.

In compliance with EU personal data protection laws, we are committed to protecting and providing you with control over your personal data. By clicking "Accept All", you allow us to place cookies to enhance your experience on this site, help us analyze site performance and usage, and enable us to deliver relevant marketing content. You can manage your cookie settings below. By clicking "Agree" you agree to the current settings. For more information, please visit the Privacy Statement.
This website uses cookies
In compliance with EU personal data protection laws, we are committed to protecting your personal data and providing you with control over it. By clicking "Agree", you allow us to place cookies to improve your experience on this site, help us analyze site performance and usage, and allow us to deliver relevant marketing content.
By clicking "Only necessary" you allow us to place only necessary cookies. The website cannot function without these cookies and you cannot switch them off on your system. These cookies are typically set only in response to an action you perform (i.e. a service request), such as setting privacy preferences, logging in, or filling in a form. You can set your browser to block or prompt you for these cookies, but this may prevent some site features from working.



