
Copyright 2026 © Leading Tools Industrial Co., Ltd.
All Rights Reserved. Website Design by Awakening Design
CATALOG TYPE
Product Categories
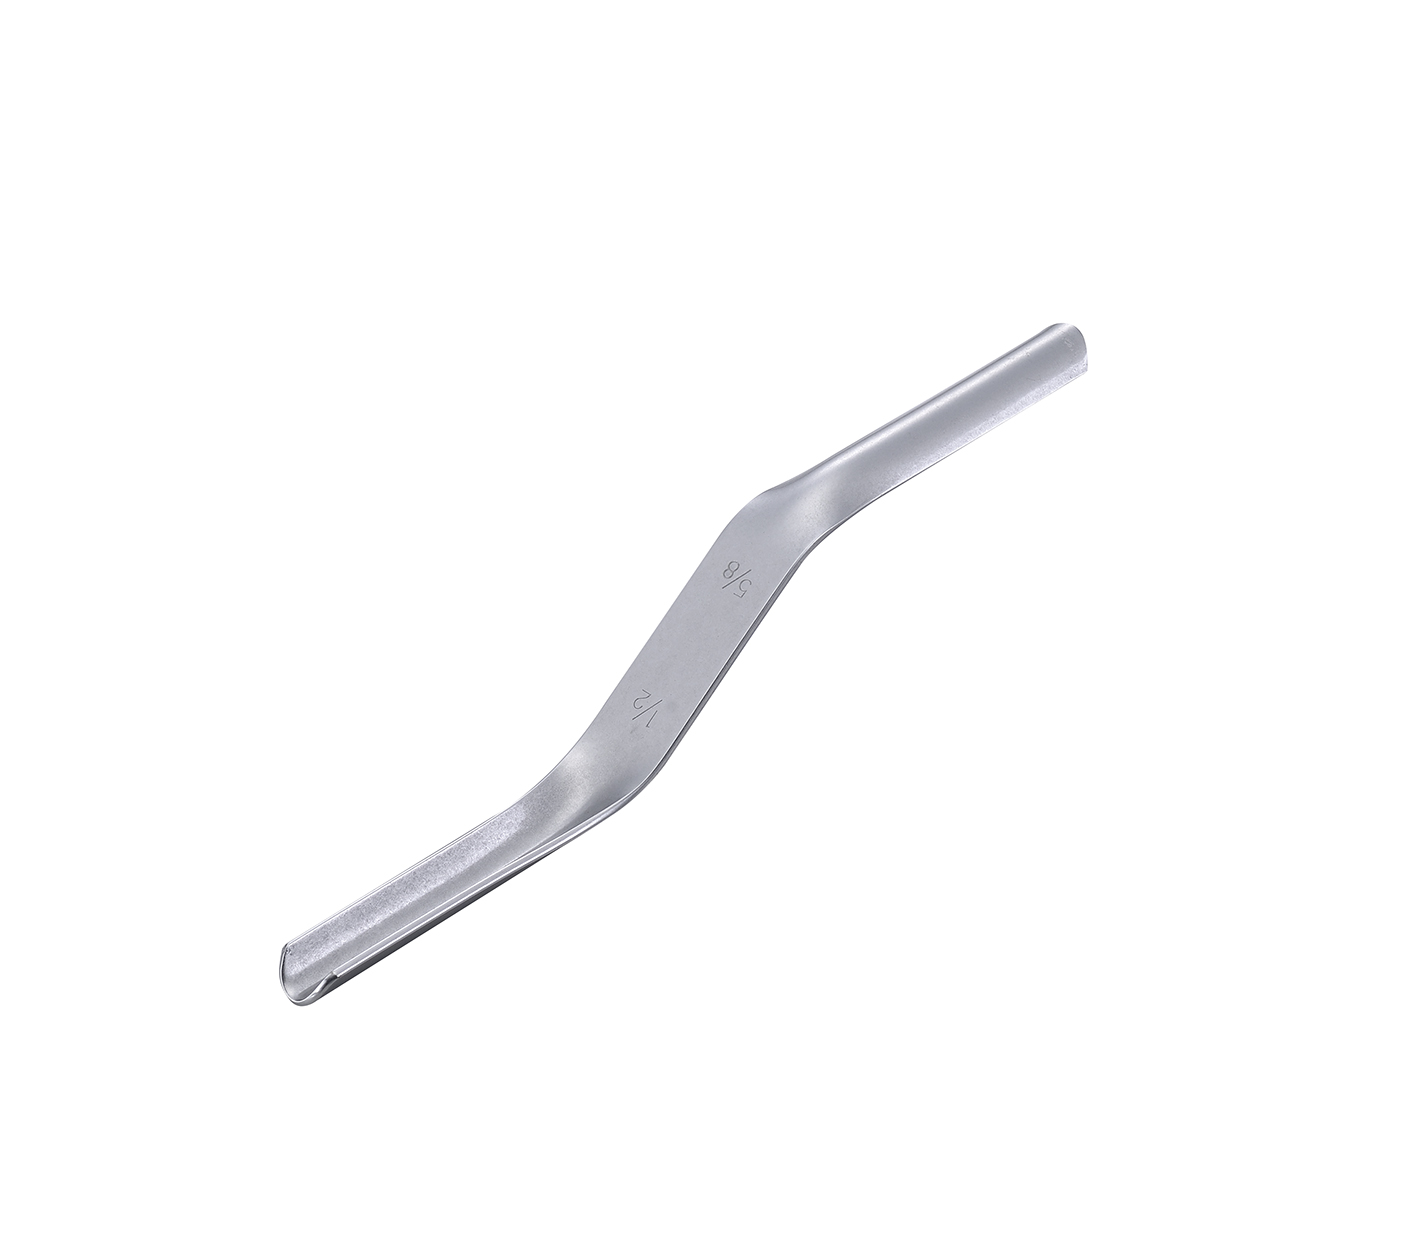
Heavy Duty Tempered Convex Jointer
Product Description
Seven article numbers, five joint-width pairs, one profile: the rounded concave joint. The Heavy Duty Tempered Convex Jointer is offered in five sizes from 3/8" to 1"; the Heavy Duty Convex Jointer (300033, 300036 and 300037) covers three of those sizes.
Heavy Duty Tempered Convex Jointer
| Art. Nr | Size | Metric equivalent (1" = 25.4 mm) |
|---|---|---|
| 300043 | 3/8"x1/2" | ≈10 mm / ≈13 mm |
| 300034 | 3/8"x1/2" | ≈10 mm / ≈13 mm |
| 300044 | 1/2"x5/8" | ≈13 mm / ≈16 mm |
| 300045 | 5/8"x3/4" | ≈16 mm / ≈19 mm |
| 300035 | 5/8"x3/4" | ≈16 mm / ≈19 mm |
| 300046 | 3/4"x7/8" | ≈19 mm / ≈22 mm |
| 300047 | 7/8"x1" | ≈22 mm / ≈25 mm |
What the two figures in a size mean. They are the widths of the two working ends of one double-ended tool, not a width-and-depth pair. Buying 300044 gives a mason a 1/2" end and a 5/8" end on the same bar.
Form. The tool is a single one-piece steel bar. The centre section is flattened into a pad carrying the stamped sizes, and the bar steps out on both sides into straight, slightly tapered arms that end in the half-round working faces. There is no separate handle, no ferrule, no wood grip and no cushion sleeve on this product.
Joint profile. The tool face bulges out; the finished mortar line curves in. This is the concave joint.
A note on the name. Despite the name, a convex jointer's rounded face forms a concave mortar joint, also called a half-round or rodded joint. Buyers also search for this class of double-ended jointer as an S-shaped jointer.
Against a raked or scraped joint. The convex face works by compaction. Mortar is pressed back against the brick arrises instead of being dragged out.
Against buying single-width jointers. Five double-ended sizes cover six joint widths from 3/8" to 1" (1/2", 5/8", 3/4" and 7/8" each appear on two sizes). 300043, 300044 and 300045 cover the 3/8" to 3/4" joint widths; 300046 and 300047 extend the line to 7/8" and 1".
Against the Heavy Duty Convex Jointer (300033, 300036 and 300037). Same rounded concave joint and the same one-piece construction. The Heavy Duty Tempered Convex line adds the 1/2"x5/8" and 5/8"x3/4" sizes, so every joint width from 3/8" to 1" is covered. See the Selection Guide below.
The range reaches 7/8"x1" (300047) for the widest joints.
| Condition on the wall | Action |
|---|---|
| Mortar still soft and wet, fingerprint sinks in easily | Wait. Tooling now smears the mortar and leaves a slumped, discoloured line |
| Mortar firm enough to hold a thumbprint without sticking to the thumb | Tool now. This is the working window |
| Mortar has gone hard and crumbles under the blade | Too late. Tooling now tears the surface instead of compacting it |
| Excess mortar still standing proud of the joint | Cut it back with a trowel first, then joint |
| Blade width does not match the measured joint | Change to the article whose end matches; a mismatched blade slips or will not seat |
| Head joints and bed joints both to be finished | Tool both; many masons do the head (vertical) joints first, then the bed (horizontal) joints, which is a common practice |
| Step | Action |
|---|---|
| 1 | Strike off surplus mortar with a trowel so the joint presents a clean face to work on |
| 2 | Grip the bar at its flattened centre pad, thumb resting on the top curve, remaining fingers wrapped around the shaft |
| 3 | Seat the back of the working end into the joint so it bears against the brick edges on both sides |
| 4 | Draw the tool along the joint with steady, continuous pressure: one pass, no stopping and no reversing mid-joint |
| 5 | Work the vertical head joints and the horizontal bed joints, top to bottom; many masons do the head joints first, which is a common practice |
| 6 | Draw each joint in one direction, without stopping or reversing mid-joint |
| 7 | Slow down through corners and keep contact and pressure constant |
| 8 | Cut away the mortar burrs the tool pushes out, using the trowel |
| 9 | Clean the blade with a brush or damp cloth before mortar builds up on it |
Because each article is double-ended, one tool can finish two joint widths; for example, 300044 has a 1/2" end and a 5/8" end. Use the end that matches the joint and turn the bar over to switch. The stamped sizes on the centre pad tell the mason which end is in the hand without measuring, which matters when the working window is short.
On an extension or a repair, measure an existing joint before ordering. A blade narrower than the joint slips inside it and produces an uneven line; a blade wider than the joint sits on the brick faces and cannot compact the mortar. Common widths fall in the 3/8" to 3/4" band in 1/8" steps, so 300043, 300044 and 300045 between them cover almost all matching work; 300046 and 300047 cover the oversize cases.
The Heavy Duty Tempered Convex Jointer is a single bar that works both bed and head joints, so on very long bed runs the operator should plan the pass in advance: start at one end, keep the pressure constant, and finish the joint without pausing, because a stop mark in a compacted joint cannot be worked out afterwards.
The concave joint is chosen for exterior elevations because its curved, compacted surface sheds rainwater off the wall face. That performance comes from compaction, so the pass has to press mortar against both brick arrises rather than merely shape the surface.
Q: Does a convex jointer make a convex joint?
A: No, it makes a concave joint: the tool face is convex, and the finished mortar line curves inward. It is a masonry mortar-joint tool, and its sizes (3/8" to 1") are brickwork joint widths, not tile grout widths.
Q: What do the two numbers in "1/2"x5/8"" mean, and which size should I order?
A: They are the widths of the two working ends of the same double-ended tool, not a width and a depth, so one article covers two joint widths.
Measure an existing joint first, because the blade width must match the joint width: too narrow and the tool wanders inside the joint, too wide and it will not seat. If you must stock one size without knowing, 300044 (1/2"x5/8") is the most common pair.
Q: How is this different from the Heavy Duty Convex Jointer (300033, 300036 and 300037)?
A: Both lines are heat-treated and form the same rounded concave joint. The difference is the size range: the Heavy Duty Tempered Convex Jointer covers five sizes, from 3/8"x1/2" to 7/8"x1", including 1/2"x5/8" and 5/8"x3/4"; the Heavy Duty Convex Jointer covers 3/8"x1/2", 3/4"x7/8" and 7/8"x1".
Q: Does it have a wood handle, and does heat treatment prevent rust?
A: There is no wood handle and no soft-grip option: it is a one-piece steel bar with a flattened, size-stamped center section that serves as the grip. Clean it, dry it and keep it lightly oiled; do not assume that heat treatment protects against rust.
Q: The groove is shallow or uneven, or the mortar smears. What is wrong?
A: If the groove is shallow under firm pressure, check the working face against a straightedge: a face worn flat in the center can no longer form the curve, and the tool should be replaced.
If the depth is uneven, work each joint in one continuous pass with constant pressure, without stopping or reversing. If the mortar smears and sticks, it is either still too wet or has built up on the working face, so wait for it to firm up and clean the blade with a brush or damp cloth.
| Attribute | Value |
|---|---|
| Product name | Heavy Duty Tempered Convex Jointer |
| Article numbers | 300043, 300034, 300044, 300045, 300035, 300046, 300047 |
| Joint profile produced | Standard concave (round struck) |
| Working face | Convex, half-round, one at each end of the bar |
| Construction | One-piece steel bar; flattened centre pad with stamped sizes; no separate handle |
| Handle | None. The gripped area is the bar's own centre section, no wood handle, no soft-grip sleeve |
| Blade material | Heat-treated |
| Art. Nr | Size | End A (calculated) | End B (calculated) | Typical application |
|---|---|---|---|---|
| 300043 | 3/8"x1/2" | ≈10 mm | ≈13 mm | 3/8" is the common narrow joint width in the standard 1/8"-increment range |
| 300034 | 3/8"x1/2" | ≈10 mm | ≈13 mm | 3/8" is the common narrow joint width in the standard 1/8"-increment range |
| 300044 | 1/2"x5/8" | ≈13 mm | ≈16 mm | The most common pair |
| 300045 | 5/8"x3/4" | ≈16 mm | ≈19 mm | Larger-format brick |
| 300035 | 5/8"x3/4" | ≈16 mm | ≈19 mm | Larger-format brick |
| 300046 | 3/4"x7/8" | ≈19 mm | ≈22 mm | Oversize and architectural brick |
| 300047 | 7/8"x1" | ≈22 mm | ≈25 mm | Widest joints in this range |
Metric values are calculated. Nominal sizes are stated in inches. Conversions above use 1" = 25.4 mm rounded to whole millimetres and should always be treated as approximate.
The single rule that governs jointer selection is that blade width must match the mortar joint width. A blade that is too narrow slips inside the joint and leaves an uneven, wandering line; a blade that is too wide will not seat in the joint and cannot compact the mortar properly. Joint widths in the common range run from 3/8" to 3/4" in 1/8" steps, which is precisely the band covered by 300043 through 300045; 300046 and 300047 extend past it.
| Situation on site | Article to specify |
|---|---|
| Joints measured at 3/8" and 1/2" | 300043 or 300034 |
| Joints measured at 1/2" and 5/8", the most common pair | 300044 |
| Joints measured at 5/8" and 3/4" | 300045 or 300035 |
| Joints measured at 3/4" and 7/8" | 300046 |
| Joints measured at 7/8" and 1" | 300047 |
| Joint width unknown or matching existing work | Measure an existing joint first, then pick the article whose end matches |
Both lines belong to the Leading Tools Brick Jointer range. Both are heat-treated, one-piece steel bars with convex working faces, and both form the same rounded concave joint. They differ in the sizes they cover: the Heavy Duty Tempered Convex Jointer covers all five sizes from 3/8"x1/2" to 7/8"x1", while the Heavy Duty Convex Jointer covers 3/8"x1/2", 3/4"x7/8" and 7/8"x1". Choose by the joint width you need.
| Point of comparison | Heavy Duty Tempered Convex (300034, 300035 and 300043 to 300047) | Heavy Duty Convex (300033, 300036 and 300037) |
|---|---|---|
| Size range | 3/8"x1/2" to 7/8"x1", five sizes, seven articles | 3/8"x1/2", 3/4"x7/8" and 7/8"x1", three articles |
| Joint profile produced | Concave | Concave |
| Heat treatment | Heat-treated | Heat-treated |
| Construction | One-piece steel bar, no separate handle | One-piece steel bar, no separate handle |
Both lines are heat-treated and form the same joint profile; choose by the joint widths you need.
Complete article-number reference for the Heavy Duty Tempered Convex Jointer. All seven article numbers are listed.
| Art. Nr | Size | End A | End B | Joint profile | Material | Handle |
|---|---|---|---|---|---|---|
| 300043 | 3/8"x1/2" | ≈10 mm | ≈13 mm | Concave (tool face convex) | Heat-treated | None, one-piece bar, gripped at the stamped centre pad |
| 300034 | 3/8"x1/2" | ≈10 mm | ≈13 mm | Concave (tool face convex) | Heat-treated | None, one-piece bar, gripped at the stamped centre pad |
| 300044 | 1/2"x5/8" | ≈13 mm | ≈16 mm | Concave (tool face convex) | Heat-treated | None, one-piece bar, gripped at the stamped centre pad |
| 300045 | 5/8"x3/4" | ≈16 mm | ≈19 mm | Concave (tool face convex) | Heat-treated | None, one-piece bar, gripped at the stamped centre pad |
| 300035 | 5/8"x3/4" | ≈16 mm | ≈19 mm | Concave (tool face convex) | Heat-treated | None, one-piece bar, gripped at the stamped centre pad |
| 300046 | 3/4"x7/8" | ≈19 mm | ≈22 mm | Concave (tool face convex) | Heat-treated | None, one-piece bar, gripped at the stamped centre pad |
| 300047 | 7/8"x1" | ≈22 mm | ≈25 mm | Concave (tool face convex) | Heat-treated | None, one-piece bar, gripped at the stamped centre pad |
Metric figures are calculated at 1" = 25.4 mm and rounded to whole millimetres; nominal sizes are stated in inches.
Seven article numbers, five joint-width pairs, one profile: the rounded concave joint. The Heavy Duty Tempered Convex Jointer is offered in five sizes from 3/8" to 1"; the Heavy Duty Convex Jointer (300033, 300036 and 300037) covers three of those sizes.
Heavy Duty Tempered Convex Jointer
| Art. Nr | Size | Metric equivalent (1" = 25.4 mm) |
|---|---|---|
| 300043 | 3/8"x1/2" | ≈10 mm / ≈13 mm |
| 300034 | 3/8"x1/2" | ≈10 mm / ≈13 mm |
| 300044 | 1/2"x5/8" | ≈13 mm / ≈16 mm |
| 300045 | 5/8"x3/4" | ≈16 mm / ≈19 mm |
| 300035 | 5/8"x3/4" | ≈16 mm / ≈19 mm |
| 300046 | 3/4"x7/8" | ≈19 mm / ≈22 mm |
| 300047 | 7/8"x1" | ≈22 mm / ≈25 mm |
What the two figures in a size mean. They are the widths of the two working ends of one double-ended tool, not a width-and-depth pair. Buying 300044 gives a mason a 1/2" end and a 5/8" end on the same bar.
Form. The tool is a single one-piece steel bar. The centre section is flattened into a pad carrying the stamped sizes, and the bar steps out on both sides into straight, slightly tapered arms that end in the half-round working faces. There is no separate handle, no ferrule, no wood grip and no cushion sleeve on this product.
Joint profile. The tool face bulges out; the finished mortar line curves in. This is the concave joint.
A note on the name. Despite the name, a convex jointer's rounded face forms a concave mortar joint, also called a half-round or rodded joint. Buyers also search for this class of double-ended jointer as an S-shaped jointer.
Against a raked or scraped joint. The convex face works by compaction. Mortar is pressed back against the brick arrises instead of being dragged out.
Against buying single-width jointers. Five double-ended sizes cover six joint widths from 3/8" to 1" (1/2", 5/8", 3/4" and 7/8" each appear on two sizes). 300043, 300044 and 300045 cover the 3/8" to 3/4" joint widths; 300046 and 300047 extend the line to 7/8" and 1".
Against the Heavy Duty Convex Jointer (300033, 300036 and 300037). Same rounded concave joint and the same one-piece construction. The Heavy Duty Tempered Convex line adds the 1/2"x5/8" and 5/8"x3/4" sizes, so every joint width from 3/8" to 1" is covered. See the Selection Guide below.
The range reaches 7/8"x1" (300047) for the widest joints.
| Condition on the wall | Action |
|---|---|
| Mortar still soft and wet, fingerprint sinks in easily | Wait. Tooling now smears the mortar and leaves a slumped, discoloured line |
| Mortar firm enough to hold a thumbprint without sticking to the thumb | Tool now. This is the working window |
| Mortar has gone hard and crumbles under the blade | Too late. Tooling now tears the surface instead of compacting it |
| Excess mortar still standing proud of the joint | Cut it back with a trowel first, then joint |
| Blade width does not match the measured joint | Change to the article whose end matches; a mismatched blade slips or will not seat |
| Head joints and bed joints both to be finished | Tool both; many masons do the head (vertical) joints first, then the bed (horizontal) joints, which is a common practice |
| Step | Action |
|---|---|
| 1 | Strike off surplus mortar with a trowel so the joint presents a clean face to work on |
| 2 | Grip the bar at its flattened centre pad, thumb resting on the top curve, remaining fingers wrapped around the shaft |
| 3 | Seat the back of the working end into the joint so it bears against the brick edges on both sides |
| 4 | Draw the tool along the joint with steady, continuous pressure: one pass, no stopping and no reversing mid-joint |
| 5 | Work the vertical head joints and the horizontal bed joints, top to bottom; many masons do the head joints first, which is a common practice |
| 6 | Draw each joint in one direction, without stopping or reversing mid-joint |
| 7 | Slow down through corners and keep contact and pressure constant |
| 8 | Cut away the mortar burrs the tool pushes out, using the trowel |
| 9 | Clean the blade with a brush or damp cloth before mortar builds up on it |
Because each article is double-ended, one tool can finish two joint widths; for example, 300044 has a 1/2" end and a 5/8" end. Use the end that matches the joint and turn the bar over to switch. The stamped sizes on the centre pad tell the mason which end is in the hand without measuring, which matters when the working window is short.
On an extension or a repair, measure an existing joint before ordering. A blade narrower than the joint slips inside it and produces an uneven line; a blade wider than the joint sits on the brick faces and cannot compact the mortar. Common widths fall in the 3/8" to 3/4" band in 1/8" steps, so 300043, 300044 and 300045 between them cover almost all matching work; 300046 and 300047 cover the oversize cases.
The Heavy Duty Tempered Convex Jointer is a single bar that works both bed and head joints, so on very long bed runs the operator should plan the pass in advance: start at one end, keep the pressure constant, and finish the joint without pausing, because a stop mark in a compacted joint cannot be worked out afterwards.
The concave joint is chosen for exterior elevations because its curved, compacted surface sheds rainwater off the wall face. That performance comes from compaction, so the pass has to press mortar against both brick arrises rather than merely shape the surface.
Q: Does a convex jointer make a convex joint?
A: No, it makes a concave joint: the tool face is convex, and the finished mortar line curves inward. It is a masonry mortar-joint tool, and its sizes (3/8" to 1") are brickwork joint widths, not tile grout widths.
Q: What do the two numbers in "1/2"x5/8"" mean, and which size should I order?
A: They are the widths of the two working ends of the same double-ended tool, not a width and a depth, so one article covers two joint widths.
Measure an existing joint first, because the blade width must match the joint width: too narrow and the tool wanders inside the joint, too wide and it will not seat. If you must stock one size without knowing, 300044 (1/2"x5/8") is the most common pair.
Q: How is this different from the Heavy Duty Convex Jointer (300033, 300036 and 300037)?
A: Both lines are heat-treated and form the same rounded concave joint. The difference is the size range: the Heavy Duty Tempered Convex Jointer covers five sizes, from 3/8"x1/2" to 7/8"x1", including 1/2"x5/8" and 5/8"x3/4"; the Heavy Duty Convex Jointer covers 3/8"x1/2", 3/4"x7/8" and 7/8"x1".
Q: Does it have a wood handle, and does heat treatment prevent rust?
A: There is no wood handle and no soft-grip option: it is a one-piece steel bar with a flattened, size-stamped center section that serves as the grip. Clean it, dry it and keep it lightly oiled; do not assume that heat treatment protects against rust.
Q: The groove is shallow or uneven, or the mortar smears. What is wrong?
A: If the groove is shallow under firm pressure, check the working face against a straightedge: a face worn flat in the center can no longer form the curve, and the tool should be replaced.
If the depth is uneven, work each joint in one continuous pass with constant pressure, without stopping or reversing. If the mortar smears and sticks, it is either still too wet or has built up on the working face, so wait for it to firm up and clean the blade with a brush or damp cloth.
| Attribute | Value |
|---|---|
| Product name | Heavy Duty Tempered Convex Jointer |
| Article numbers | 300043, 300034, 300044, 300045, 300035, 300046, 300047 |
| Joint profile produced | Standard concave (round struck) |
| Working face | Convex, half-round, one at each end of the bar |
| Construction | One-piece steel bar; flattened centre pad with stamped sizes; no separate handle |
| Handle | None. The gripped area is the bar's own centre section, no wood handle, no soft-grip sleeve |
| Blade material | Heat-treated |
| Art. Nr | Size | End A (calculated) | End B (calculated) | Typical application |
|---|---|---|---|---|
| 300043 | 3/8"x1/2" | ≈10 mm | ≈13 mm | 3/8" is the common narrow joint width in the standard 1/8"-increment range |
| 300034 | 3/8"x1/2" | ≈10 mm | ≈13 mm | 3/8" is the common narrow joint width in the standard 1/8"-increment range |
| 300044 | 1/2"x5/8" | ≈13 mm | ≈16 mm | The most common pair |
| 300045 | 5/8"x3/4" | ≈16 mm | ≈19 mm | Larger-format brick |
| 300035 | 5/8"x3/4" | ≈16 mm | ≈19 mm | Larger-format brick |
| 300046 | 3/4"x7/8" | ≈19 mm | ≈22 mm | Oversize and architectural brick |
| 300047 | 7/8"x1" | ≈22 mm | ≈25 mm | Widest joints in this range |
Metric values are calculated. Nominal sizes are stated in inches. Conversions above use 1" = 25.4 mm rounded to whole millimetres and should always be treated as approximate.
The single rule that governs jointer selection is that blade width must match the mortar joint width. A blade that is too narrow slips inside the joint and leaves an uneven, wandering line; a blade that is too wide will not seat in the joint and cannot compact the mortar properly. Joint widths in the common range run from 3/8" to 3/4" in 1/8" steps, which is precisely the band covered by 300043 through 300045; 300046 and 300047 extend past it.
| Situation on site | Article to specify |
|---|---|
| Joints measured at 3/8" and 1/2" | 300043 or 300034 |
| Joints measured at 1/2" and 5/8", the most common pair | 300044 |
| Joints measured at 5/8" and 3/4" | 300045 or 300035 |
| Joints measured at 3/4" and 7/8" | 300046 |
| Joints measured at 7/8" and 1" | 300047 |
| Joint width unknown or matching existing work | Measure an existing joint first, then pick the article whose end matches |
Both lines belong to the Leading Tools Brick Jointer range. Both are heat-treated, one-piece steel bars with convex working faces, and both form the same rounded concave joint. They differ in the sizes they cover: the Heavy Duty Tempered Convex Jointer covers all five sizes from 3/8"x1/2" to 7/8"x1", while the Heavy Duty Convex Jointer covers 3/8"x1/2", 3/4"x7/8" and 7/8"x1". Choose by the joint width you need.
| Point of comparison | Heavy Duty Tempered Convex (300034, 300035 and 300043 to 300047) | Heavy Duty Convex (300033, 300036 and 300037) |
|---|---|---|
| Size range | 3/8"x1/2" to 7/8"x1", five sizes, seven articles | 3/8"x1/2", 3/4"x7/8" and 7/8"x1", three articles |
| Joint profile produced | Concave | Concave |
| Heat treatment | Heat-treated | Heat-treated |
| Construction | One-piece steel bar, no separate handle | One-piece steel bar, no separate handle |
Both lines are heat-treated and form the same joint profile; choose by the joint widths you need.
Complete article-number reference for the Heavy Duty Tempered Convex Jointer. All seven article numbers are listed.
| Art. Nr | Size | End A | End B | Joint profile | Material | Handle |
|---|---|---|---|---|---|---|
| 300043 | 3/8"x1/2" | ≈10 mm | ≈13 mm | Concave (tool face convex) | Heat-treated | None, one-piece bar, gripped at the stamped centre pad |
| 300034 | 3/8"x1/2" | ≈10 mm | ≈13 mm | Concave (tool face convex) | Heat-treated | None, one-piece bar, gripped at the stamped centre pad |
| 300044 | 1/2"x5/8" | ≈13 mm | ≈16 mm | Concave (tool face convex) | Heat-treated | None, one-piece bar, gripped at the stamped centre pad |
| 300045 | 5/8"x3/4" | ≈16 mm | ≈19 mm | Concave (tool face convex) | Heat-treated | None, one-piece bar, gripped at the stamped centre pad |
| 300035 | 5/8"x3/4" | ≈16 mm | ≈19 mm | Concave (tool face convex) | Heat-treated | None, one-piece bar, gripped at the stamped centre pad |
| 300046 | 3/4"x7/8" | ≈19 mm | ≈22 mm | Concave (tool face convex) | Heat-treated | None, one-piece bar, gripped at the stamped centre pad |
| 300047 | 7/8"x1" | ≈22 mm | ≈25 mm | Concave (tool face convex) | Heat-treated | None, one-piece bar, gripped at the stamped centre pad |
Metric figures are calculated at 1" = 25.4 mm and rounded to whole millimetres; nominal sizes are stated in inches.

In compliance with EU personal data protection laws, we are committed to protecting and providing you with control over your personal data. By clicking "Accept All", you allow us to place cookies to enhance your experience on this site, help us analyze site performance and usage, and enable us to deliver relevant marketing content. You can manage your cookie settings below. By clicking "Agree" you agree to the current settings. For more information, please visit the Privacy Statement.
This website uses cookies
In compliance with EU personal data protection laws, we are committed to protecting your personal data and providing you with control over it. By clicking "Agree", you allow us to place cookies to improve your experience on this site, help us analyze site performance and usage, and allow us to deliver relevant marketing content.
By clicking "Only necessary" you allow us to place only necessary cookies. The website cannot function without these cookies and you cannot switch them off on your system. These cookies are typically set only in response to an action you perform (i.e. a service request), such as setting privacy preferences, logging in, or filling in a form. You can set your browser to block or prompt you for these cookies, but this may prevent some site features from working.



