
Copyright 2026 © Leading Tools Industrial Co., Ltd.
All Rights Reserved. Website Design by Awakening Design
CATALOG TYPE
Product Categories
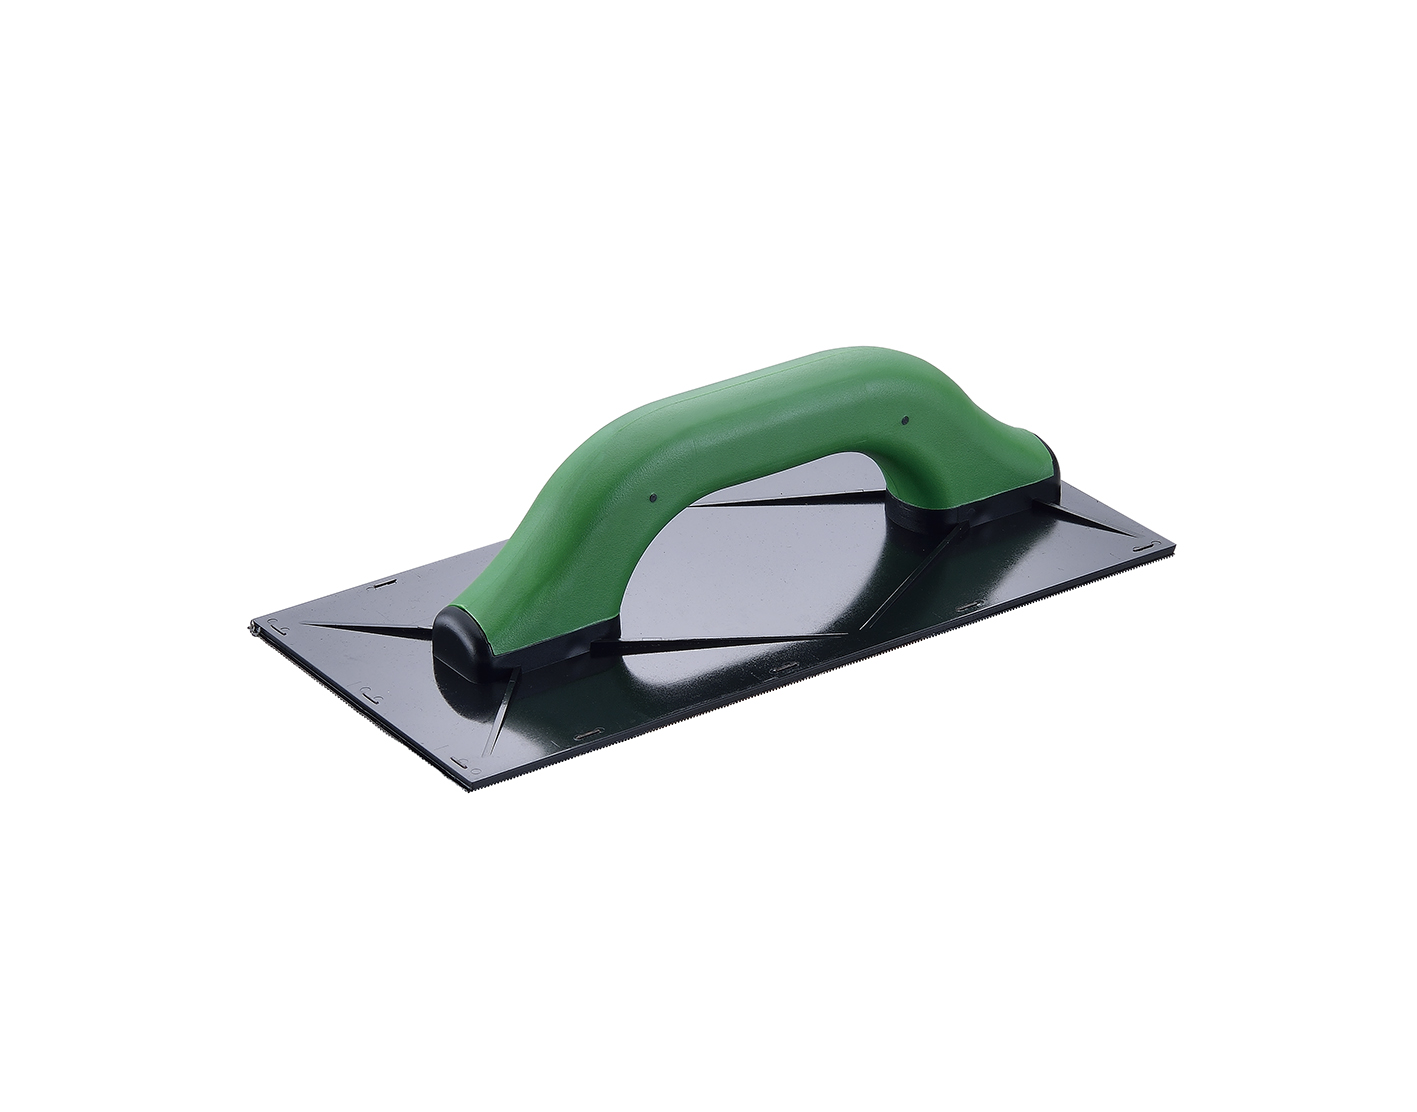
Hook-and-Loop Sponge Float
Product Description
Hook-and-Loop Sponge Float
Art. Nr: 611685 — 130 mm × 270 mm
Companion product in the Leading Tools Float range: Sponge Float
Art. Nr: 611686 — 130 mm × 305 mm
Leading Tools lists these as two independent products, each with its own product name, art number and size:
Every section that carries specification data lists both 611685 and 611686, so the two can be compared side by side before ordering.
A sponge float is a finishing tool, not a placing tool.
It is used at the closing stage of plastering and rendering, after the material has been laid on and leveled, and after it has begun to set, to compact the surface, draw the fine material to the top, and erase trowel lines, giving an even, slightly open, breathable texture.
The same mechanism (a damp open-cell sponge on a rigid backing plate with a handle) is used in tiling to wash off grout haze, dress the joint face and clean adhesive residue from the tile face. Both trades use the same tool.
A steel trowel pressed onto setting plaster closes and densifies the surface.
That is exactly what you want on an interior gypsum skim you intend to polish, and exactly what you do not want on lime plaster, render, monocouche and exterior stucco, where the finish has to stay breathable so the wall can dry outward and move without crazing. The sponge float compacts and evens the surface while leaving the pore structure open, Lime plaster is normally closed with a wood or sponge float to keep the surface open.
The problem the sponge float solves is the record of the previous tool. Trowel lines, laps and the chalky laitance that rises during leveling are all lifted and redistributed by a damp sponge worked in circles or a figure-of-eight, which brings the fine material back to the surface and merges the passes into one continuous face.
The removable-pad construction means:
A bonded float is the right answer when the texture is decided before the job starts and will not change: production rendering, a single-finish contract, a second tool kept in the van, or a crew where sponge pads simply do not come back. There is no hook face to contaminate, no pad to peel off in a bucket, and nothing to reorder.
611686 at 130 × 305 mm is close to the common 12" × 5" size. 611685 at 130 × 270 mm is 35 mm shorter.
The single most common mistake with this tool is timing, and it is not a matter of the clock but of the state of the surface. Sponge floating is done after the material has taken its initial set, when the wet sheen has gone and the surface is firm but the top film is still workable.
The test is a fingertip or thumb press:
| What you see / feel | Verdict |
|---|---|
| Surface still glistening wet; finger sinks in | Too early. The sponge will drag the binder out and pull the surface open. Keep troweling and wait |
| Sheen gone; firm press leaves a mark but nothing comes away on the finger | Correct. This is the window |
| No impression at all; surface hard | Late. Work with lighter pressure and less water; expect less correction than you would have got earlier |
Material-specific guidance:
| Step | Action | Detail |
|---|---|---|
| 1 | Fit the pad (611685 only) | Choose the pad for the finish. Press the hook-backed pad firmly onto the hook face over its whole area. It should not shift under working pressure, but must still peel off by hand for the next change |
| 2 | Wet and squeeze out the sponge | Dip in clean water, then squeeze it out. The sponge should be damp, not dripping. Excess water dilutes the surface and drags the binder out of the face, leaving a weak, dusty finish |
| 3 | First pass | Hold the tool flat on the surface with light-to-moderate pressure and work in large circles or a figure-of-eight. Let the sponge do the work: pressure is not what closes the surface; contact and motion are |
| 4 | Rinse frequently | Rinse and squeeze out every few square metres. A clogged sponge stops absorbing and starts dragging, and that is what leaves scratch lines in the finish |
| 5 | Follow up, if the finish calls for it | Judge by the state of the surface (sheen gone, a firm press leaves a mark but nothing comes away on the finger) rather than by the clock; this depends on the material and conditions. |
| 6 | Second pass, if needed | A second, lighter pass after the surface has firmed further gives a more uniform face. |
On broad walls and floors, put both hands on the handle to distribute pressure evenly across the plate; the 270–305 mm plate lengths of these two models make a two-hand grip practical. Rotating the tool roughly 90° between passes distributes wear across the sponge instead of concentrating it on one edge.
Lime plaster behaves differently from gypsum: it cures by carbonation and the wall has to be able to breathe. A steel trowel can close the face more densely, so lime plaster is normally closed with a wood or sponge float. Work at partial set, with a well squeezed-out sponge, light pressure and small circles. If the surface starts pulling or scratching, you have gone in too early; stop and let it firm before returning to the sponge.
On exterior render the sponge float does two jobs at once: it flattens out the closing trowel's laps and it sets the final texture. Because the surface has to be thumb-print hard first, the practical routine on a render job is to lay on and rule off the whole elevation, then come back and sponge in the same order, so each area is at the same state when you reach it.
The sponge float is among the tools used for finishing cementitious base coats and acrylic finish coats, alongside plastic floats, trowels and rollers. What it is not used for is cutting the scratch-coat texture: that mechanical key is made with a scarifier, a different tool at a different stage. Treat this as a finishing float on an EIFS wall, not a texturing tool for the base.
The hook-and-loop sponge float (611685) is a standard tiling tool as well as a plastering one.
After grouting, once the grout has stiffened, a damp sponge on a holder is used to wash the grout haze off the tile face, dress and shape the joint, and lift adhesive residue, the holder giving flat, even pressure that a hand-held sponge cannot. The discipline is the same as in plastering: squeeze the sponge out until damp, rinse often, and do not flood the joints, because excess water washes the cement out of fresh grout.
Q1: Are 611685 and 611686 the same product in two sizes?
A: No. 611685 (130 × 270 mm) is a float with a hook-and-loop face that takes removable sponge pads, while 611686 (130 × 305 mm) is a float with the sponge permanently bonded to a perforated plate. 611685 is supplied with no pad fitted, so contact Leading Tools for box contents and replacement pads.
Q2: What pore grade should I buy?
A: Sponge pore grade and pad supply: please contact us.
Q3: I am getting drag marks and scratches, or plaster is sticking to the sponge. What is wrong?
A: Either the sponge is clogged with set material, so rinse it thoroughly and replace the pad if it will not clear, or you went in too early, before the surface took its set.
Wait until the sheen has gone and the surface is firm to a press. The sponge should be damp, not dripping, since too much water drags the binder out of the face and leaves a weak, dusty finish.
Q4: The pad will not stay on the hook face, and when do I replace the sponge?
A: If the pad will not stay on the 611685, the hook face is fouled with dried material or the pad was not pressed down over its whole area, so brush the hook face out and press the new pad firmly across its full width.
Replace the sponge when it stops absorbing water, or when it has tears or hardened areas that will not clear. On 611686 the sponge is bonded, so the whole tool is replaced.
Q5: Can I use this tool for tiling as well as plastering?
A: Yes. The hook-and-loop sponge float is a standard tiling tool for washing off grout haze, dressing joints and clearing adhesive residue from tile faces. Use a clean pad, squeeze it out well and rinse often so you do not wash cement out of fresh grout.
| Attribute | Specification |
|---|---|
| Product name / product group | Hook-and-Loop Sponge Float — Float, Professional Tools |
| Art. number | 611685 |
| Size | 130 mm × 270 mm (≈5-1/8" × 10-5/8"; 1" = 25.4 mm) |
| Working face | Hook-and-loop hook face: takes hook-backed sponge pads, tool-free change |
| Backing plate | Flat plate, black |
| Handle | Green soft-grip, mounted on two end-blocks with webbed ribs to the plate corners |
| Sponge pad | Not fitted to the tool; for sponge pads, please contact us |
| Compatible pad grades | Please contact us |
| Attribute | Specification |
|---|---|
| Product name / product group | Sponge Float — Float, Professional Tools |
| Art. number | 611686 |
| Size | 130 mm × 305 mm (≈ 5-1/8" × 12"; 1" = 25.4 mm) |
| Construction | Sponge permanently bonded to a perforated mounting plate: integral unit, sponge not replaceable |
| Mounting plate | Perforated (punched round holes across the full face) |
| Sponge face | Thick white open-cell foam block, projecting slightly beyond the plate on all four sides |
| Handle | Blue soft-grip on two end-blocks |
| 611685 Hook-and-Loop Sponge Float | 611686 Sponge Float | |
|---|---|---|
| Size | 130 × 270 mm | 130 × 305 mm |
| Sponge attachment | Hook-and-loop, removable by hand | Permanently bonded |
| Plate | Flat black plate | Perforated plate |
| Handle color | Green soft-grip | Blue soft-grip |
| Sponge supplied | No: for pad supply, please contact us | Yes, integral to the tool |
| Pore grade | Chosen per pad, changeable on site | Fixed at purchase |
| End of sponge life | Replace the pad | Replace the tool |
| Consideration | 611685 Hook-and-Loop Sponge Float | 611686 Sponge Float |
|---|---|---|
| Changing the sponge on site | Yes: swap the pad in seconds | No: one sponge, fixed |
| What wears out | The pad only; the body stays in service | The whole tool |
| Inventory | Requires keeping spare pads on the van | None |
| Risk of losing parts | The pad can be left in a bucket or peel off if the hook face is fouled | Nothing to lose |
| Second trade | Doubles as a tile grout-haze and joint-dressing tool by fitting the right pad | Usable for the same job, but the grade is whatever is bonded on |
| Best for | Contractors running mixed work: lime, skim, render, tiling, and wanting one body | Production runs on one specification; a spare tool; crews where pads do not come back |
They are complementary, not alternatives. A workable set-up is 611686 as the everyday bonded float, plus 611685 with pads for jobs that need a different texture or a tiling clean-off. Because 611685 is 35 mm shorter, it is also the more maneuverable of the two in tight areas, at reveals, and overhead; 611686's extra length is the advantage on open wall and floor areas.
Sponge pore grade determines the finish. For the pore grades available for 611685 and for the sponge on 611686, please contact us.
Both tools share the same 130 mm width; only length differs (270 mm and 305 mm). Practical effects of the 35 mm:
| Job | Recommended | Why |
|---|---|---|
| Lime plaster: heritage and restoration | Either | Lime plaster is normally closed with a wood or sponge float to keep the surface open |
| Sand-and-cement render, monocouche one-coat render | Either | The sponge float evens the surface and sets the final texture on cement renders |
| Production rendering, one specification, high volume | 611686 | Nothing to attach, nothing to lose |
| Tiling: grout haze removal, joint dressing, adhesive clean-off | 611685 | The hook-and-loop float suits exactly this work |
| EIFS / external insulation systems | Either, as a finishing float | Sponge floats are used for finishing cementitious base coats and acrylic finish coats, not for cutting the scratch texture, which is done with a scarifier |
Complete art-number and size reference for this product group.
| Art. Nr | Product name | Size | Sponge attachment | Plate | Handle |
|---|---|---|---|---|---|
| 611685 | Hook-and-Loop Sponge Float | 130 mm × 270 mm | Hook-and-loop: removable pad | Flat black plate | Green soft-grip on two webbed end-blocks |
| 611686 | Sponge Float | 130 mm × 305 mm | Permanently bonded: integral | Perforated (punched-hole) plate | Blue soft-grip on two end-blocks |
Imperial equivalents (1" = 25.4 mm): 611685 ≈ 5-1/8" × 10-5/8"; 611686 ≈ 5-1/8" × 12".
| Art. Nr | Product name | Size |
|---|---|---|
| 611701 | Rubber Grout Float | 95 mm × 245 mm |
| 301090 | Aluminum Hand Sander | 80 mm × 235 mm |
| 611685 | Hook-and-Loop Sponge Float | 130 mm × 270 mm |
| 611686 | Sponge Float | 130 mm × 305 mm |
611685 takes hook-backed sponge pads. Contact Leading Tools for pad grades and replacement-pad art numbers.
Soak the sponge in warm water with a mild detergent to clear the pores.
The reliable rule, rather than a calendar: replace the sponge when it stops absorbing. A sponge that no longer takes up water has hardened material in its pores, and from that point it drags rather than closes the surface.
Hook-and-Loop Sponge Float
Art. Nr: 611685 — 130 mm × 270 mm
Companion product in the Leading Tools Float range: Sponge Float
Art. Nr: 611686 — 130 mm × 305 mm
Leading Tools lists these as two independent products, each with its own product name, art number and size:
Every section that carries specification data lists both 611685 and 611686, so the two can be compared side by side before ordering.
A sponge float is a finishing tool, not a placing tool.
It is used at the closing stage of plastering and rendering, after the material has been laid on and leveled, and after it has begun to set, to compact the surface, draw the fine material to the top, and erase trowel lines, giving an even, slightly open, breathable texture.
The same mechanism (a damp open-cell sponge on a rigid backing plate with a handle) is used in tiling to wash off grout haze, dress the joint face and clean adhesive residue from the tile face. Both trades use the same tool.
A steel trowel pressed onto setting plaster closes and densifies the surface.
That is exactly what you want on an interior gypsum skim you intend to polish, and exactly what you do not want on lime plaster, render, monocouche and exterior stucco, where the finish has to stay breathable so the wall can dry outward and move without crazing. The sponge float compacts and evens the surface while leaving the pore structure open, Lime plaster is normally closed with a wood or sponge float to keep the surface open.
The problem the sponge float solves is the record of the previous tool. Trowel lines, laps and the chalky laitance that rises during leveling are all lifted and redistributed by a damp sponge worked in circles or a figure-of-eight, which brings the fine material back to the surface and merges the passes into one continuous face.
The removable-pad construction means:
A bonded float is the right answer when the texture is decided before the job starts and will not change: production rendering, a single-finish contract, a second tool kept in the van, or a crew where sponge pads simply do not come back. There is no hook face to contaminate, no pad to peel off in a bucket, and nothing to reorder.
611686 at 130 × 305 mm is close to the common 12" × 5" size. 611685 at 130 × 270 mm is 35 mm shorter.
The single most common mistake with this tool is timing, and it is not a matter of the clock but of the state of the surface. Sponge floating is done after the material has taken its initial set, when the wet sheen has gone and the surface is firm but the top film is still workable.
The test is a fingertip or thumb press:
| What you see / feel | Verdict |
|---|---|
| Surface still glistening wet; finger sinks in | Too early. The sponge will drag the binder out and pull the surface open. Keep troweling and wait |
| Sheen gone; firm press leaves a mark but nothing comes away on the finger | Correct. This is the window |
| No impression at all; surface hard | Late. Work with lighter pressure and less water; expect less correction than you would have got earlier |
Material-specific guidance:
| Step | Action | Detail |
|---|---|---|
| 1 | Fit the pad (611685 only) | Choose the pad for the finish. Press the hook-backed pad firmly onto the hook face over its whole area. It should not shift under working pressure, but must still peel off by hand for the next change |
| 2 | Wet and squeeze out the sponge | Dip in clean water, then squeeze it out. The sponge should be damp, not dripping. Excess water dilutes the surface and drags the binder out of the face, leaving a weak, dusty finish |
| 3 | First pass | Hold the tool flat on the surface with light-to-moderate pressure and work in large circles or a figure-of-eight. Let the sponge do the work: pressure is not what closes the surface; contact and motion are |
| 4 | Rinse frequently | Rinse and squeeze out every few square metres. A clogged sponge stops absorbing and starts dragging, and that is what leaves scratch lines in the finish |
| 5 | Follow up, if the finish calls for it | Judge by the state of the surface (sheen gone, a firm press leaves a mark but nothing comes away on the finger) rather than by the clock; this depends on the material and conditions. |
| 6 | Second pass, if needed | A second, lighter pass after the surface has firmed further gives a more uniform face. |
On broad walls and floors, put both hands on the handle to distribute pressure evenly across the plate; the 270–305 mm plate lengths of these two models make a two-hand grip practical. Rotating the tool roughly 90° between passes distributes wear across the sponge instead of concentrating it on one edge.
Lime plaster behaves differently from gypsum: it cures by carbonation and the wall has to be able to breathe. A steel trowel can close the face more densely, so lime plaster is normally closed with a wood or sponge float. Work at partial set, with a well squeezed-out sponge, light pressure and small circles. If the surface starts pulling or scratching, you have gone in too early; stop and let it firm before returning to the sponge.
On exterior render the sponge float does two jobs at once: it flattens out the closing trowel's laps and it sets the final texture. Because the surface has to be thumb-print hard first, the practical routine on a render job is to lay on and rule off the whole elevation, then come back and sponge in the same order, so each area is at the same state when you reach it.
The sponge float is among the tools used for finishing cementitious base coats and acrylic finish coats, alongside plastic floats, trowels and rollers. What it is not used for is cutting the scratch-coat texture: that mechanical key is made with a scarifier, a different tool at a different stage. Treat this as a finishing float on an EIFS wall, not a texturing tool for the base.
The hook-and-loop sponge float (611685) is a standard tiling tool as well as a plastering one.
After grouting, once the grout has stiffened, a damp sponge on a holder is used to wash the grout haze off the tile face, dress and shape the joint, and lift adhesive residue, the holder giving flat, even pressure that a hand-held sponge cannot. The discipline is the same as in plastering: squeeze the sponge out until damp, rinse often, and do not flood the joints, because excess water washes the cement out of fresh grout.
Q1: Are 611685 and 611686 the same product in two sizes?
A: No. 611685 (130 × 270 mm) is a float with a hook-and-loop face that takes removable sponge pads, while 611686 (130 × 305 mm) is a float with the sponge permanently bonded to a perforated plate. 611685 is supplied with no pad fitted, so contact Leading Tools for box contents and replacement pads.
Q2: What pore grade should I buy?
A: Sponge pore grade and pad supply: please contact us.
Q3: I am getting drag marks and scratches, or plaster is sticking to the sponge. What is wrong?
A: Either the sponge is clogged with set material, so rinse it thoroughly and replace the pad if it will not clear, or you went in too early, before the surface took its set.
Wait until the sheen has gone and the surface is firm to a press. The sponge should be damp, not dripping, since too much water drags the binder out of the face and leaves a weak, dusty finish.
Q4: The pad will not stay on the hook face, and when do I replace the sponge?
A: If the pad will not stay on the 611685, the hook face is fouled with dried material or the pad was not pressed down over its whole area, so brush the hook face out and press the new pad firmly across its full width.
Replace the sponge when it stops absorbing water, or when it has tears or hardened areas that will not clear. On 611686 the sponge is bonded, so the whole tool is replaced.
Q5: Can I use this tool for tiling as well as plastering?
A: Yes. The hook-and-loop sponge float is a standard tiling tool for washing off grout haze, dressing joints and clearing adhesive residue from tile faces. Use a clean pad, squeeze it out well and rinse often so you do not wash cement out of fresh grout.
| Attribute | Specification |
|---|---|
| Product name / product group | Hook-and-Loop Sponge Float — Float, Professional Tools |
| Art. number | 611685 |
| Size | 130 mm × 270 mm (≈5-1/8" × 10-5/8"; 1" = 25.4 mm) |
| Working face | Hook-and-loop hook face: takes hook-backed sponge pads, tool-free change |
| Backing plate | Flat plate, black |
| Handle | Green soft-grip, mounted on two end-blocks with webbed ribs to the plate corners |
| Sponge pad | Not fitted to the tool; for sponge pads, please contact us |
| Compatible pad grades | Please contact us |
| Attribute | Specification |
|---|---|
| Product name / product group | Sponge Float — Float, Professional Tools |
| Art. number | 611686 |
| Size | 130 mm × 305 mm (≈ 5-1/8" × 12"; 1" = 25.4 mm) |
| Construction | Sponge permanently bonded to a perforated mounting plate: integral unit, sponge not replaceable |
| Mounting plate | Perforated (punched round holes across the full face) |
| Sponge face | Thick white open-cell foam block, projecting slightly beyond the plate on all four sides |
| Handle | Blue soft-grip on two end-blocks |
| 611685 Hook-and-Loop Sponge Float | 611686 Sponge Float | |
|---|---|---|
| Size | 130 × 270 mm | 130 × 305 mm |
| Sponge attachment | Hook-and-loop, removable by hand | Permanently bonded |
| Plate | Flat black plate | Perforated plate |
| Handle color | Green soft-grip | Blue soft-grip |
| Sponge supplied | No: for pad supply, please contact us | Yes, integral to the tool |
| Pore grade | Chosen per pad, changeable on site | Fixed at purchase |
| End of sponge life | Replace the pad | Replace the tool |
| Consideration | 611685 Hook-and-Loop Sponge Float | 611686 Sponge Float |
|---|---|---|
| Changing the sponge on site | Yes: swap the pad in seconds | No: one sponge, fixed |
| What wears out | The pad only; the body stays in service | The whole tool |
| Inventory | Requires keeping spare pads on the van | None |
| Risk of losing parts | The pad can be left in a bucket or peel off if the hook face is fouled | Nothing to lose |
| Second trade | Doubles as a tile grout-haze and joint-dressing tool by fitting the right pad | Usable for the same job, but the grade is whatever is bonded on |
| Best for | Contractors running mixed work: lime, skim, render, tiling, and wanting one body | Production runs on one specification; a spare tool; crews where pads do not come back |
They are complementary, not alternatives. A workable set-up is 611686 as the everyday bonded float, plus 611685 with pads for jobs that need a different texture or a tiling clean-off. Because 611685 is 35 mm shorter, it is also the more maneuverable of the two in tight areas, at reveals, and overhead; 611686's extra length is the advantage on open wall and floor areas.
Sponge pore grade determines the finish. For the pore grades available for 611685 and for the sponge on 611686, please contact us.
Both tools share the same 130 mm width; only length differs (270 mm and 305 mm). Practical effects of the 35 mm:
| Job | Recommended | Why |
|---|---|---|
| Lime plaster: heritage and restoration | Either | Lime plaster is normally closed with a wood or sponge float to keep the surface open |
| Sand-and-cement render, monocouche one-coat render | Either | The sponge float evens the surface and sets the final texture on cement renders |
| Production rendering, one specification, high volume | 611686 | Nothing to attach, nothing to lose |
| Tiling: grout haze removal, joint dressing, adhesive clean-off | 611685 | The hook-and-loop float suits exactly this work |
| EIFS / external insulation systems | Either, as a finishing float | Sponge floats are used for finishing cementitious base coats and acrylic finish coats, not for cutting the scratch texture, which is done with a scarifier |
Complete art-number and size reference for this product group.
| Art. Nr | Product name | Size | Sponge attachment | Plate | Handle |
|---|---|---|---|---|---|
| 611685 | Hook-and-Loop Sponge Float | 130 mm × 270 mm | Hook-and-loop: removable pad | Flat black plate | Green soft-grip on two webbed end-blocks |
| 611686 | Sponge Float | 130 mm × 305 mm | Permanently bonded: integral | Perforated (punched-hole) plate | Blue soft-grip on two end-blocks |
Imperial equivalents (1" = 25.4 mm): 611685 ≈ 5-1/8" × 10-5/8"; 611686 ≈ 5-1/8" × 12".
| Art. Nr | Product name | Size |
|---|---|---|
| 611701 | Rubber Grout Float | 95 mm × 245 mm |
| 301090 | Aluminum Hand Sander | 80 mm × 235 mm |
| 611685 | Hook-and-Loop Sponge Float | 130 mm × 270 mm |
| 611686 | Sponge Float | 130 mm × 305 mm |
611685 takes hook-backed sponge pads. Contact Leading Tools for pad grades and replacement-pad art numbers.
Soak the sponge in warm water with a mild detergent to clear the pores.
The reliable rule, rather than a calendar: replace the sponge when it stops absorbing. A sponge that no longer takes up water has hardened material in its pores, and from that point it drags rather than closes the surface.

In compliance with EU personal data protection laws, we are committed to protecting and providing you with control over your personal data. By clicking "Accept All", you allow us to place cookies to enhance your experience on this site, help us analyze site performance and usage, and enable us to deliver relevant marketing content. You can manage your cookie settings below. By clicking "Agree" you agree to the current settings. For more information, please visit the Privacy Statement.
This website uses cookies
In compliance with EU personal data protection laws, we are committed to protecting your personal data and providing you with control over it. By clicking "Agree", you allow us to place cookies to improve your experience on this site, help us analyze site performance and usage, and allow us to deliver relevant marketing content.
By clicking "Only necessary" you allow us to place only necessary cookies. The website cannot function without these cookies and you cannot switch them off on your system. These cookies are typically set only in response to an action you perform (i.e. a service request), such as setting privacy preferences, logging in, or filling in a form. You can set your browser to block or prompt you for these cookies, but this may prevent some site features from working.



