
Copyright 2026 © Leading Tools Industrial Co., Ltd.
All Rights Reserved. Website Design by Awakening Design
CATALOG TYPE
Product Categories
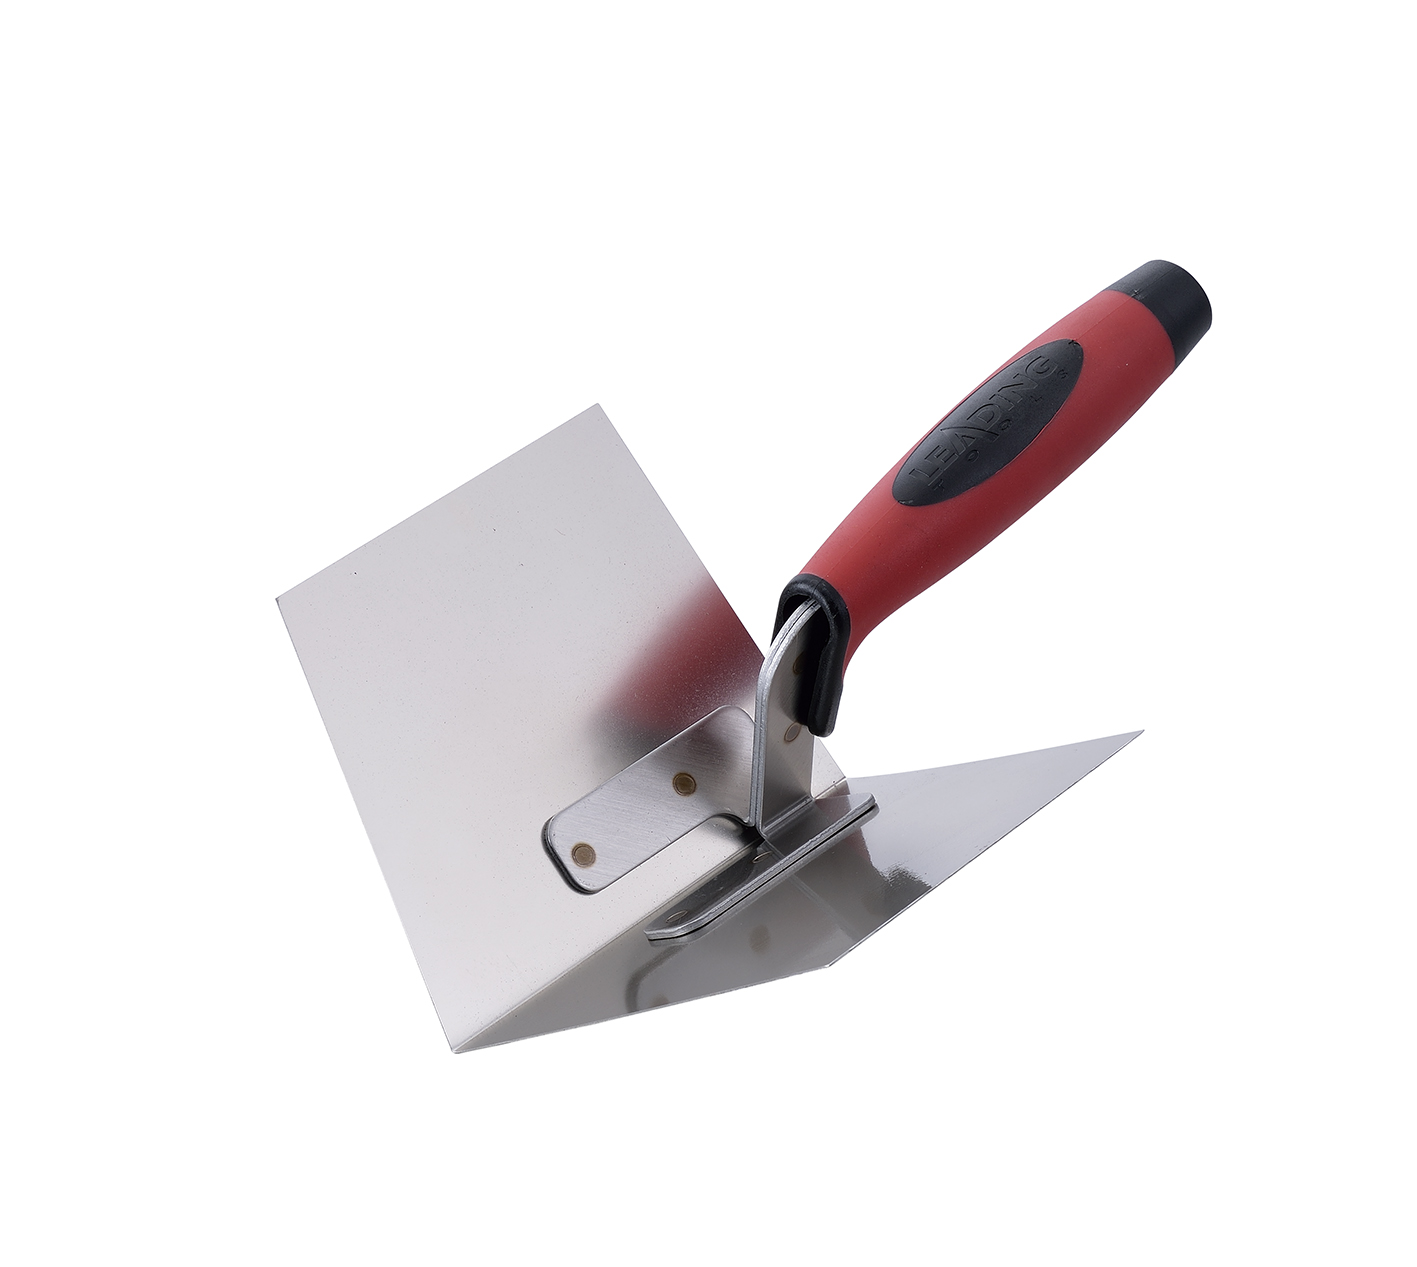
Inside Corner Trowel
Product Description
Inside Corner Trowel
Art. Nr: 300255 — 4" × 5" (102 × 127 mm; 1" = 25.4 mm)
The Inside Corner Trowel is a hand finishing tool whose blade is folded to a 90° internal angle so that both faces bear on the two wall surfaces of a re-entrant corner at the same time. The corner is shaped in one pass, along the corner line, instead of being built up one face at a time with a flat knife.
It is used to bed and smooth joint compound over paper tape in drywall inside corners, and to form and true the 90° internal angle in plaster, render and stucco. The defining detail of the tool class is that the handle sits at the centre of the 90° bend, so that hand pressure is transferred equally into both faces and the corner does not skew.
Leading Tools lists this tool in the Corner group under the heading Inside Corner, specified in Stainless Steel, as 300255 at 4" × 5". The blade is folded stainless on a riveted mounting bracket carrying a red and black two-tone soft-grip handle.
For narrower inside corners, see the Inside Corner Trowel — 80 / 108 mm page (300255-80, 300255-108). The outside-corner counterpart, 300265 (4" × 5"), sits in the same group.
The 4" × 5" blade is a general-purpose size for wall and ceiling inside corners.
An internal corner is where two planes meet and where structural movement, shrinkage and moisture all concentrate. It cracks, it collects water, and it is the line the eye follows down the room, so a wavy corner is visible from across the space even when the flat wall is perfect. The tool establishes the corner line geometrically instead of relying on the operator's freehand steadiness over a 2.4 m run.
With a flat taping knife, an internal corner is finished one face at a time, and the standard trade sequence for drywall is three days: day one to bed the tape, day two to coat one side, day three to coat the other side once the first has dried hard enough to run the knife against.
A corner trowel works both faces at once, which is where the labour saving is. It also avoids the specific failure the two-knife method risks: dragging a not-yet-set second side into the first.
Stainless resists corrosion in wet cement and gypsum compound, needs no protective coating that can be scratched through, and cleans down to a smooth face so that compound releases instead of dragging.
| Situation | Use 300255? | Timing / condition |
|---|---|---|
| Drywall internal angle, bedding paper tape | Yes | With the first coat of joint compound, tape creased and set into about 1/8" of compound |
| Drywall internal angle, second and third coats | Yes | The corner trowel coats both faces at once; the alternative trade method coats one side per day against the dried opposite side |
| Plaster / render internal angle | Yes, but wait | Apply after the coat has firmed up and a thumb leaves a clear impression; used too early it presses a trench into the angle |
| Multi-coat plaster (brown and finish coats) | Yes | Tool each of these coats when it reaches its own correct stage, not when the coat underneath is ready |
| External stucco internal angles | Yes | |
| Concrete corner touch-up after form removal | Yes, limited | For thin repair coats and cleaning up the corner line; the corner itself was formed by the formwork |
| Very tight or narrow angles | No: use 300255-80 or 300255-108 | Whenever both faces of the 4" × 5" head cannot lie flat on both walls |
| External / protruding corners | No: use 300265 | Wrong fold direction |
| Step | Action | What to watch |
|---|---|---|
| 1: Confirm the material is ready | The angle should be firm enough to hold the tool's shape but still workable. Wait until the coat has firmed up before bringing the corner trowel to it. A thumb pressed into the surface beside the corner should leave a clear impression without sticking. | Too early and the tool presses a trench into the angle; too late and the material tears or crumbles |
| 2: Fill the angle first | The angle must already be filled with compound, plaster or render. The trowel refines and profiles material; it does not fill a void. Any corner bead must be fully embedded, and both adjacent faces should be flat and at the same stage. | A void behind the pass will show as a hairline gap along the corner line |
| 3: Load the angle if the material is stiff | Some drywall crews run a 3" roller along the angle to load compound into it before bringing in the corner trowel | Rolling first is what makes a single-pass corner possible in stiff mud |
| 4: Position the tool | Set the tool at the top of a wall-to-wall corner, or at one end of a short run. Both faces in simultaneous contact; the inner fold sitting exactly on the corner line. Tilt the tool roughly 30° off the wall plane so the corner line stays visible ahead of the fold. | If only one face is bearing, the corner will come out skewed |
| 5: Draw the tool along the corner | One smooth continuous stroke over the full length. Equal pressure on both faces; constant tilt angle; do not stop mid-pass. | Unequal pressure skews the corner; changing tilt leaves a step in the line |
| 6: Inspect | Look for a clean continuous 90° line, no voids along the fold, no material squeezed out either side, surfaces flush with the adjacent walls. | Squeeze-out means too much material or a surface still too wet |
| 7: Repeat per coat | Deep fills and multi-coat systems need one pass per tooled coat, with each coat allowed to set before the next. | Do not try to build the full angle in one heavy pass |
The trade-standard sequence for an internal drywall angle runs over three days: day one, spread roughly 1/8" of compound into the angle, fold the paper tape along its crease, set it into the compound and press it home with a knife held at about 45°, pressing every 24" rather than in one continuous drag; day two, coat one side of the angle, running the blade against the dried opposite side; day three, coat the remaining side the same way.
The corner trowel changes this by finishing both faces in a single pass. Some crews combine both: roller-load the angle, corner-trowel it, then knife-finish the feathered edges.
In wet plaster the timing constraint is stricter than in drywall compound. Wait until the coat has firmed up and a thumb leaves a clear impression before bringing the corner trowel to the angle, because a pass into soft material leaves a pressed-in trench along the angle. Expect to find the right stage for your mix on the first job.
In a three-coat system the angle is tooled on the brown coat and the finish coat, each at its own correct stage, not when the underlying coat happens to be ready, since each coat has its own set timing:
In cast concrete the internal corner is formed by the formwork, not by a trowel. After form removal, 300255 is used to touch up minor defects at the corner, to lay a thin repair or skim coat into an internal angle that will remain visible, and to cut a clean corner line in block or masonry walls that are being rendered. The tool does not create the corner in concrete; it makes an existing corner presentable.
An internal angle in a shower, bathroom or external stucco wall is a primary water entry path. Tooling alone does not make an inside corner watertight; apply the waterproof membrane over the angle before the finish coat.
Where a frame meets a plastered reveal, the internal angle runs the full height of the frame and any wander in it is directly visible against the straight frame edge. Run the tool the full height in one continuous stroke where the height is within comfortable reach; where it is not, work in two passes, overlapping the join and feathering it while the compound is still wet. Where the reveal is too tight for a 5" face, see the Inside Corner Trowel — 80 / 108 mm page (300255-80, 300255-108).
Q1. The finished corner is not square, it comes out skewed. Why?
A. Either the fold on the tool has been deformed, or pressure was uneven between the two faces. Inspect the fold first; if it is true, the fault is technique, and the fix is deliberate equal pressure through the handle, which is mounted at the centre of the bend for exactly that reason.
Q2. The tool digs a trench into the angle, material squeezes out, or there are gaps along the corner. What should I do?
A. The coat is usually too soft or too wet, so wait until it has firmed up before tooling. Take excess material off with a knife first. If there are gaps along the corner line, the angle was not fully filled before the pass: the trowel shapes material, it does not fill, so refill the angle and re-tool.
Q3. The corner edge comes out rough or jagged.
A. The inner fold is probably nicked or burred. Dress it with a fine file, and replace the tool if the angle itself has moved.
Q4. When do I need a smaller inside corner trowel?
A. 300255 (4" × 5") is the general-purpose tool for full wall and ceiling corners.
Where corners are too tight or narrow for the 4" × 5" head to lie flat on both faces, such as reveals, niches and service risers, see the Inside Corner Trowel — 80 / 108 mm page (300255-80, 300255-108). For protruding corners you also need Outside Corner 300265, which is folded the other way.
Q5. Rust stains appeared on the wall beside the corner. Is the tool at fault?
A. 300255 is stainless steel, so the tool itself should not bleed iron. Check whether a carbon-steel tool was used on the same angle, or whether the blade picked up iron contamination from being stored against carbon-steel tools. Once iron staining has set into plaster it is generally permanent.
| Art. Nr | Blade size (imperial) | Blade size (metric) | Material | Handle |
|---|---|---|---|---|
| 300255 | 4" × 5" | 102 × 127 mm | Stainless steel | Red/black two-tone soft-grip on riveted steel bracket |
Metric values are converted at 1" = 25.4 mm; the nominal figures are imperial only.
The blade is a single stainless sheet folded to a 90° internal angle:
| Art. Nr | Size | Choose it when |
|---|---|---|
| 300255 | 4" × 5" (102 × 127 mm) | Standard wall-to-wall and wall-to-ceiling internal angles, full room heights, open corners with clear access on both faces. This is the general-purpose size. |
The deciding factor is whether both faces of the 4" × 5" head can lie flat on the two walls at once. If they cannot, 300255 cannot produce a true corner there; for those corners, see the Inside Corner Trowel — 80 / 108 mm page (300255-80, 300255-108).
| Factor | 4" × 5" assessment |
|---|---|
| Corner coverage per pass | Moderate: suits most residential and commercial wall corners |
| Precision | Good: a face short enough to keep in contact with a slightly out-of-true wall, long enough to average out local waviness |
| Manoeuvrability | Good: works overhead at wall-to-ceiling angles and down full wall heights without the head fouling the adjacent surface |
| General use | Wall-to-wall and wall-to-ceiling inside corners with clear access on both faces |
| Feature | Inside Corner 300255 | Outside Corner 300265 |
|---|---|---|
| Corner type | Internal / re-entrant 90° angle | External / protruding 90° angle |
| Blade fold | Folded inward; faces enclose the corner | Folded outward; faces wrap the corner |
| Working action | Forms the angle by compacting material into the corner | Forms the angle by compressing material over the corner |
| Direction | Drawn along the corner, normally top to bottom | Drawn along the corner, normally top to bottom |
| Result | Recessed corner line | Raised / protruding corner line |
| Typical failure mode addressed | Cracking from structural movement; water collecting in the angle | Impact damage and chipping of the exposed arris |
| Size / material | 4" × 5", stainless steel | 4" × 5", stainless steel |
They are complements, not alternatives. Most rooms need both.
| Corner trowel (300255) | Wide taping knife, two-sided method | |
|---|---|---|
| Faces per pass | Both at once | One |
| Typical drywall sequence | Bed tape, then coat the angle in fewer visits | Three days: bed tape, coat side one, coat side two against the dried first side |
| Skill dependency | Lower: the fold holds the geometry | Higher: the corner line is freehand |
| Risk if used too early | Presses a trench into a soft angle; wait until the coat has firmed | Lower: the knife can be re-worked |
If the buyer's crew is already committed to the two-knife method, the corner trowel will not displace it. If the buyer is training crews, hanging high volumes of repetitive corners, or wants consistency independent of the individual finisher, the corner trowel is where the value sits.
Art-number reference for the Inside Corner Trowel 300255 (for 300255-80 and 300255-108, see the Inside Corner Trowel — 80 / 108 mm page):
| Art. Nr | Nominal size | Metric | Material | Handle |
|---|---|---|---|---|
| 300255 | 4" × 5" | 102 × 127 mm | Stainless steel | Red/black two-tone soft-grip on riveted bracket |
Related product in the same group (external angle, sold separately, not an Inside Corner art number):
| Art. Nr | Size | Metric | Material | Handle |
|---|---|---|---|---|
| 300265 | 4" × 5" | 102 × 127 mm | Stainless steel | Red/black two-tone soft-grip on riveted bracket |
Inside Corner Trowel
Art. Nr: 300255 — 4" × 5" (102 × 127 mm; 1" = 25.4 mm)
The Inside Corner Trowel is a hand finishing tool whose blade is folded to a 90° internal angle so that both faces bear on the two wall surfaces of a re-entrant corner at the same time. The corner is shaped in one pass, along the corner line, instead of being built up one face at a time with a flat knife.
It is used to bed and smooth joint compound over paper tape in drywall inside corners, and to form and true the 90° internal angle in plaster, render and stucco. The defining detail of the tool class is that the handle sits at the centre of the 90° bend, so that hand pressure is transferred equally into both faces and the corner does not skew.
Leading Tools lists this tool in the Corner group under the heading Inside Corner, specified in Stainless Steel, as 300255 at 4" × 5". The blade is folded stainless on a riveted mounting bracket carrying a red and black two-tone soft-grip handle.
For narrower inside corners, see the Inside Corner Trowel — 80 / 108 mm page (300255-80, 300255-108). The outside-corner counterpart, 300265 (4" × 5"), sits in the same group.
The 4" × 5" blade is a general-purpose size for wall and ceiling inside corners.
An internal corner is where two planes meet and where structural movement, shrinkage and moisture all concentrate. It cracks, it collects water, and it is the line the eye follows down the room, so a wavy corner is visible from across the space even when the flat wall is perfect. The tool establishes the corner line geometrically instead of relying on the operator's freehand steadiness over a 2.4 m run.
With a flat taping knife, an internal corner is finished one face at a time, and the standard trade sequence for drywall is three days: day one to bed the tape, day two to coat one side, day three to coat the other side once the first has dried hard enough to run the knife against.
A corner trowel works both faces at once, which is where the labour saving is. It also avoids the specific failure the two-knife method risks: dragging a not-yet-set second side into the first.
Stainless resists corrosion in wet cement and gypsum compound, needs no protective coating that can be scratched through, and cleans down to a smooth face so that compound releases instead of dragging.
| Situation | Use 300255? | Timing / condition |
|---|---|---|
| Drywall internal angle, bedding paper tape | Yes | With the first coat of joint compound, tape creased and set into about 1/8" of compound |
| Drywall internal angle, second and third coats | Yes | The corner trowel coats both faces at once; the alternative trade method coats one side per day against the dried opposite side |
| Plaster / render internal angle | Yes, but wait | Apply after the coat has firmed up and a thumb leaves a clear impression; used too early it presses a trench into the angle |
| Multi-coat plaster (brown and finish coats) | Yes | Tool each of these coats when it reaches its own correct stage, not when the coat underneath is ready |
| External stucco internal angles | Yes | |
| Concrete corner touch-up after form removal | Yes, limited | For thin repair coats and cleaning up the corner line; the corner itself was formed by the formwork |
| Very tight or narrow angles | No: use 300255-80 or 300255-108 | Whenever both faces of the 4" × 5" head cannot lie flat on both walls |
| External / protruding corners | No: use 300265 | Wrong fold direction |
| Step | Action | What to watch |
|---|---|---|
| 1: Confirm the material is ready | The angle should be firm enough to hold the tool's shape but still workable. Wait until the coat has firmed up before bringing the corner trowel to it. A thumb pressed into the surface beside the corner should leave a clear impression without sticking. | Too early and the tool presses a trench into the angle; too late and the material tears or crumbles |
| 2: Fill the angle first | The angle must already be filled with compound, plaster or render. The trowel refines and profiles material; it does not fill a void. Any corner bead must be fully embedded, and both adjacent faces should be flat and at the same stage. | A void behind the pass will show as a hairline gap along the corner line |
| 3: Load the angle if the material is stiff | Some drywall crews run a 3" roller along the angle to load compound into it before bringing in the corner trowel | Rolling first is what makes a single-pass corner possible in stiff mud |
| 4: Position the tool | Set the tool at the top of a wall-to-wall corner, or at one end of a short run. Both faces in simultaneous contact; the inner fold sitting exactly on the corner line. Tilt the tool roughly 30° off the wall plane so the corner line stays visible ahead of the fold. | If only one face is bearing, the corner will come out skewed |
| 5: Draw the tool along the corner | One smooth continuous stroke over the full length. Equal pressure on both faces; constant tilt angle; do not stop mid-pass. | Unequal pressure skews the corner; changing tilt leaves a step in the line |
| 6: Inspect | Look for a clean continuous 90° line, no voids along the fold, no material squeezed out either side, surfaces flush with the adjacent walls. | Squeeze-out means too much material or a surface still too wet |
| 7: Repeat per coat | Deep fills and multi-coat systems need one pass per tooled coat, with each coat allowed to set before the next. | Do not try to build the full angle in one heavy pass |
The trade-standard sequence for an internal drywall angle runs over three days: day one, spread roughly 1/8" of compound into the angle, fold the paper tape along its crease, set it into the compound and press it home with a knife held at about 45°, pressing every 24" rather than in one continuous drag; day two, coat one side of the angle, running the blade against the dried opposite side; day three, coat the remaining side the same way.
The corner trowel changes this by finishing both faces in a single pass. Some crews combine both: roller-load the angle, corner-trowel it, then knife-finish the feathered edges.
In wet plaster the timing constraint is stricter than in drywall compound. Wait until the coat has firmed up and a thumb leaves a clear impression before bringing the corner trowel to the angle, because a pass into soft material leaves a pressed-in trench along the angle. Expect to find the right stage for your mix on the first job.
In a three-coat system the angle is tooled on the brown coat and the finish coat, each at its own correct stage, not when the underlying coat happens to be ready, since each coat has its own set timing:
In cast concrete the internal corner is formed by the formwork, not by a trowel. After form removal, 300255 is used to touch up minor defects at the corner, to lay a thin repair or skim coat into an internal angle that will remain visible, and to cut a clean corner line in block or masonry walls that are being rendered. The tool does not create the corner in concrete; it makes an existing corner presentable.
An internal angle in a shower, bathroom or external stucco wall is a primary water entry path. Tooling alone does not make an inside corner watertight; apply the waterproof membrane over the angle before the finish coat.
Where a frame meets a plastered reveal, the internal angle runs the full height of the frame and any wander in it is directly visible against the straight frame edge. Run the tool the full height in one continuous stroke where the height is within comfortable reach; where it is not, work in two passes, overlapping the join and feathering it while the compound is still wet. Where the reveal is too tight for a 5" face, see the Inside Corner Trowel — 80 / 108 mm page (300255-80, 300255-108).
Q1. The finished corner is not square, it comes out skewed. Why?
A. Either the fold on the tool has been deformed, or pressure was uneven between the two faces. Inspect the fold first; if it is true, the fault is technique, and the fix is deliberate equal pressure through the handle, which is mounted at the centre of the bend for exactly that reason.
Q2. The tool digs a trench into the angle, material squeezes out, or there are gaps along the corner. What should I do?
A. The coat is usually too soft or too wet, so wait until it has firmed up before tooling. Take excess material off with a knife first. If there are gaps along the corner line, the angle was not fully filled before the pass: the trowel shapes material, it does not fill, so refill the angle and re-tool.
Q3. The corner edge comes out rough or jagged.
A. The inner fold is probably nicked or burred. Dress it with a fine file, and replace the tool if the angle itself has moved.
Q4. When do I need a smaller inside corner trowel?
A. 300255 (4" × 5") is the general-purpose tool for full wall and ceiling corners.
Where corners are too tight or narrow for the 4" × 5" head to lie flat on both faces, such as reveals, niches and service risers, see the Inside Corner Trowel — 80 / 108 mm page (300255-80, 300255-108). For protruding corners you also need Outside Corner 300265, which is folded the other way.
Q5. Rust stains appeared on the wall beside the corner. Is the tool at fault?
A. 300255 is stainless steel, so the tool itself should not bleed iron. Check whether a carbon-steel tool was used on the same angle, or whether the blade picked up iron contamination from being stored against carbon-steel tools. Once iron staining has set into plaster it is generally permanent.
| Art. Nr | Blade size (imperial) | Blade size (metric) | Material | Handle |
|---|---|---|---|---|
| 300255 | 4" × 5" | 102 × 127 mm | Stainless steel | Red/black two-tone soft-grip on riveted steel bracket |
Metric values are converted at 1" = 25.4 mm; the nominal figures are imperial only.
The blade is a single stainless sheet folded to a 90° internal angle:
| Art. Nr | Size | Choose it when |
|---|---|---|
| 300255 | 4" × 5" (102 × 127 mm) | Standard wall-to-wall and wall-to-ceiling internal angles, full room heights, open corners with clear access on both faces. This is the general-purpose size. |
The deciding factor is whether both faces of the 4" × 5" head can lie flat on the two walls at once. If they cannot, 300255 cannot produce a true corner there; for those corners, see the Inside Corner Trowel — 80 / 108 mm page (300255-80, 300255-108).
| Factor | 4" × 5" assessment |
|---|---|
| Corner coverage per pass | Moderate: suits most residential and commercial wall corners |
| Precision | Good: a face short enough to keep in contact with a slightly out-of-true wall, long enough to average out local waviness |
| Manoeuvrability | Good: works overhead at wall-to-ceiling angles and down full wall heights without the head fouling the adjacent surface |
| General use | Wall-to-wall and wall-to-ceiling inside corners with clear access on both faces |
| Feature | Inside Corner 300255 | Outside Corner 300265 |
|---|---|---|
| Corner type | Internal / re-entrant 90° angle | External / protruding 90° angle |
| Blade fold | Folded inward; faces enclose the corner | Folded outward; faces wrap the corner |
| Working action | Forms the angle by compacting material into the corner | Forms the angle by compressing material over the corner |
| Direction | Drawn along the corner, normally top to bottom | Drawn along the corner, normally top to bottom |
| Result | Recessed corner line | Raised / protruding corner line |
| Typical failure mode addressed | Cracking from structural movement; water collecting in the angle | Impact damage and chipping of the exposed arris |
| Size / material | 4" × 5", stainless steel | 4" × 5", stainless steel |
They are complements, not alternatives. Most rooms need both.
| Corner trowel (300255) | Wide taping knife, two-sided method | |
|---|---|---|
| Faces per pass | Both at once | One |
| Typical drywall sequence | Bed tape, then coat the angle in fewer visits | Three days: bed tape, coat side one, coat side two against the dried first side |
| Skill dependency | Lower: the fold holds the geometry | Higher: the corner line is freehand |
| Risk if used too early | Presses a trench into a soft angle; wait until the coat has firmed | Lower: the knife can be re-worked |
If the buyer's crew is already committed to the two-knife method, the corner trowel will not displace it. If the buyer is training crews, hanging high volumes of repetitive corners, or wants consistency independent of the individual finisher, the corner trowel is where the value sits.
Art-number reference for the Inside Corner Trowel 300255 (for 300255-80 and 300255-108, see the Inside Corner Trowel — 80 / 108 mm page):
| Art. Nr | Nominal size | Metric | Material | Handle |
|---|---|---|---|---|
| 300255 | 4" × 5" | 102 × 127 mm | Stainless steel | Red/black two-tone soft-grip on riveted bracket |
Related product in the same group (external angle, sold separately, not an Inside Corner art number):
| Art. Nr | Size | Metric | Material | Handle |
|---|---|---|---|---|
| 300265 | 4" × 5" | 102 × 127 mm | Stainless steel | Red/black two-tone soft-grip on riveted bracket |

In compliance with EU personal data protection laws, we are committed to protecting and providing you with control over your personal data. By clicking "Accept All", you allow us to place cookies to enhance your experience on this site, help us analyze site performance and usage, and enable us to deliver relevant marketing content. You can manage your cookie settings below. By clicking "Agree" you agree to the current settings. For more information, please visit the Privacy Statement.
This website uses cookies
In compliance with EU personal data protection laws, we are committed to protecting your personal data and providing you with control over it. By clicking "Agree", you allow us to place cookies to improve your experience on this site, help us analyze site performance and usage, and allow us to deliver relevant marketing content.
By clicking "Only necessary" you allow us to place only necessary cookies. The website cannot function without these cookies and you cannot switch them off on your system. These cookies are typically set only in response to an action you perform (i.e. a service request), such as setting privacy preferences, logging in, or filling in a form. You can set your browser to block or prompt you for these cookies, but this may prevent some site features from working.



