
Copyright 2026 © Leading Tools Industrial Co., Ltd.
All Rights Reserved. Website Design by Awakening Design
CATALOG TYPE
Product Categories
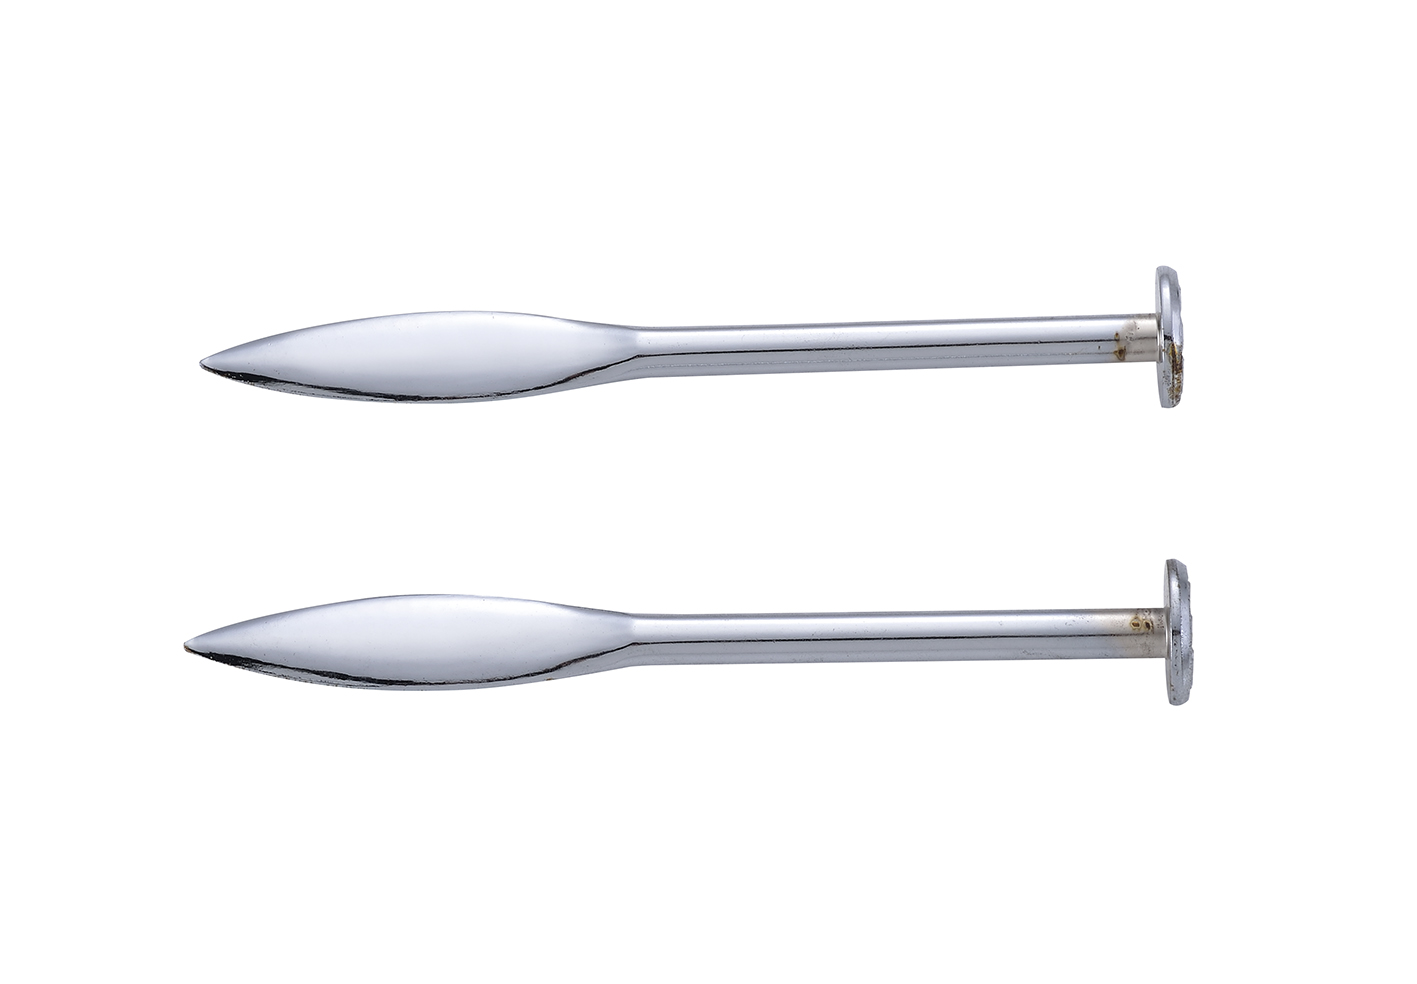
Line Pin
Product Description
Line Pin — Art. Nr 301002 — Size 6".
One art number, one size. This product has a single entry: 301002, size 6". There is no diameter option, no second length, and no handle code. Anything a buyer asks for under "Line Pin" is this one item.
What the tool is. A line pin is a steel pin that is pushed or tapped into a mortar joint so that a mason's line (the taut string that sets the top edge of a brick course) can be anchored and tensioned against it. Two pins, one at each end of the run, plus a line are the complete system. The pin is not a fastener and is not left in the wall: it is set, the course is laid to the line, and the pin is then pulled and moved up one course.
It solves the one problem a corner block cannot. Corner blocks, the plastic or wooden blocks that hook a line over a finished quoin, need a built corner to hook onto. At the start of a wall there isn't one.
Line pins are the tool for exactly that stage: the first course off the foundation, or the middle of a long run where there is no corner within reach, because the pin creates its own anchor by going into the wet mortar joint. In practice the two tools are used together across a job, not as substitutes: pins for the early courses, blocks once the corner is three or four courses up and the mortar has taken its initial set.
A 6" pin gives you shank to hold and depth to bury. The 6" length gives more shank in the hand when you push it home, and more length available to bury in the joint before the line wrap reaches the wall face. That matters where the mortar is soft and a shallow-set pin would pull.
The steel is the whole product. With no handle and no moving parts, the only things that can fail on a line pin are a bent shank and a blunt point. A pin that bends is scrap, because the bend puts the point and the line wrap out of the same plane and the course walks off line over its length.
Keep it dry and lightly oiled. A line pin lives in wet mortar and then goes into a bag or a bucket. Wipe it dry after use and store it with a thin film of oil.
A pin does not get in the way of the trowel. The pin sits inside the joint and projects only a short stub. There is nothing standing proud of the wall face to catch a trowel or a brick as the course is laid.
| Stage of work | Use a line pin? | Notes |
|---|---|---|
| First course of brickwork off the footing | Yes | No corner exists yet for a block to grip |
| Mid-run on a long wall | Yes | Provides an anchor where no corner is in reach |
| Each subsequent course | Yes, pull the pin and move it up one course | The pin is reset course by course, never left in |
| Once corners are up and set | Usually switch to corner blocks | Faster course-by-course transfer |
| Repointing | Yes, into the joint being worked |
| Step | Action | Check before moving on |
|---|---|---|
| 1 | Push the pin into the bed joint of the course you are working, positioned so that the line, when wrapped, runs exactly along the top arris of that course | The line height, not the pin height, is what is being set |
| 2 | Set the second pin at the opposite end of the run, at the same course height | Both pins level; check with a level or by measuring up from the datum |
| 3 | Wrap the line around the first pin, run it to the far pin and wrap it off there | The wrap sits against the head, not free to slide up the shank |
| 4 | Tension the line until it is taut with no visible sag | Sight along the line; sag is what puts a belly in the course |
| 5 | Lay the course to the line: do not let the brick touch the line | Tap each brick so its front arris sits a hair back from the line, roughly 1/32" |
| 6 | When the course is complete, pull both pins, move them up one course and repeat | Fill the pin holes as you go |
The pin's grip comes from the mortar closing around the buried blade, so the joint has to still be workable.
Push the point in with hand pressure first and only tap if it will not enter; a pin that has to be hammered hard is usually going into mortar that has already set, and the joint face will spall rather than accept the pin. If the pin will not seat, move along a course or a joint and try again rather than forcing it. When you tap, use a brick hammer or a mallet on the flat head, not a heavy engineer's hammer that will mushroom the head over the shank.
On a normal wall the two tools hand over to each other. Pins carry the line for the first course or two while the leads are being built; once the quoins are up three or four courses and the mortar has taken an initial set, most masons switch to corner blocks, which slide up the built corner without disturbing any joint. Keep both in the bag: a corner that has to be rebuilt or a mid-run datum on a long wall will put you back on pins the same day.
When raking out and repointing an existing wall, the pin goes into a joint that is already open, so it disturbs nothing that was not going to be re-filled anyway. Use light line tension on soft historic lime mortar; the mortar will not hold a pin under the tension a modern cement joint tolerates.
Q1. What is a line pin for, and how many do I need?
A. It anchors and tensions a mason's line so a course of brick or block can be laid straight and level to that line. You need two, one at each end of the run; two pins and a line make the complete system.
Q2. Is a line pin the same thing as a corner block?
A. No. A corner block hooks over a corner that is already built, while a line pin makes its own anchor by going into a mortar joint, which is why it works at the first course when no corner exists yet. Most masons carry both and switch to blocks once the corners are three or four courses up.
Q3. How long is the pin?
A. 301002 is 6" (152 mm) long, which gives shank to push against and length to bury in the joint. This is the only size offered.
Q4. The pin pulls out of the joint, or will not go in at all. What is wrong?
A. If it pulls out, the mortar is usually too soft or the pin is not buried far enough, so set it deeper, move to a firmer joint or reduce the line tension. If it will not go in, the mortar has cured: a line pin is a tool for fresh mortar, so choose an open or freshly filled joint instead of forcing the pin and spalling the joint face.
Q5. The line sags, or my courses drift even though the line is tight. What should I check?
A. For sag, re-tension first; if it returns, add an intermediate anchor point rather than pulling harder, because over-tensioning is what pulls pins out of fresh mortar. For drift, check that the bricks are not touching the line: if each brick is laid hard against the string, the line is pushed out and the wall bellies, so the front edge should sit a fraction back from the line.
| Field | Value |
|---|---|
| Product name | Line Pin |
| Art. Nr | 301002 |
| Size | 6" (152 mm) |
| Material | Please contact sales |
| Number of variants | 1 (no diameter, length or handle options) |
| Selling unit | 1 pc per art number |
| Feature | Appearance | Why it matters |
|---|---|---|
| Point style | Flattened, leaf-shaped spear point tapering to a sharp tip | Enters a green mortar joint and wedges |
| Shank | Round, tapering from the point section toward the head | Gives the line something round to wrap on and the hand something to push against |
| Head | Flat disc head at the top of the shank | Stops the line wrap riding off the end and gives a hammer a flat striking face |
| Finish | Bright, reflective surface as shown in the catalog photo | ; |
| Construction | One piece, no joints visible | ; |
| Situation | Right tool | Why |
|---|---|---|
| First course off the foundation, no corner built yet | Line pin (301002) | There is no quoin for a corner block to grip; the pin makes its own anchor in the bed joint |
| Mid-run datum needed on a long wall between two corners | Line pin (301002) | Gives an intermediate anchor point where no built corner is within reach |
| Corner is built three or four courses up and the mortar has set | Corner block or line block | Faster to move up course by course; no joint disturbance |
| Repointing an existing wall | Line pin, set into the joint being repointed | The joint is already open; nothing new is disturbed |
| Fully cured, hard mortar with no open joint | Neither: look for an open or freshly filled joint | A pin needs a joint it can enter; forcing one damages the joint face |
| Item | Why |
|---|---|
| Mason's line / builder's line (nylon or polyester) | The pin does nothing on its own; the line is the datum. |
| Corner blocks or line blocks | The complementary tool once the quoins are up; both get used on the same job |
There is one article number for the Line Pin.
| Art. Nr | Size | Type | Construction | Handle |
|---|---|---|---|---|
| 301002 | 6" (152 mm) | Line pin (mason's line pin) | One-piece steel pin, bright surface | None, the pin is the whole tool |
Line Pin — Art. Nr 301002 — Size 6".
One art number, one size. This product has a single entry: 301002, size 6". There is no diameter option, no second length, and no handle code. Anything a buyer asks for under "Line Pin" is this one item.
What the tool is. A line pin is a steel pin that is pushed or tapped into a mortar joint so that a mason's line (the taut string that sets the top edge of a brick course) can be anchored and tensioned against it. Two pins, one at each end of the run, plus a line are the complete system. The pin is not a fastener and is not left in the wall: it is set, the course is laid to the line, and the pin is then pulled and moved up one course.
It solves the one problem a corner block cannot. Corner blocks, the plastic or wooden blocks that hook a line over a finished quoin, need a built corner to hook onto. At the start of a wall there isn't one.
Line pins are the tool for exactly that stage: the first course off the foundation, or the middle of a long run where there is no corner within reach, because the pin creates its own anchor by going into the wet mortar joint. In practice the two tools are used together across a job, not as substitutes: pins for the early courses, blocks once the corner is three or four courses up and the mortar has taken its initial set.
A 6" pin gives you shank to hold and depth to bury. The 6" length gives more shank in the hand when you push it home, and more length available to bury in the joint before the line wrap reaches the wall face. That matters where the mortar is soft and a shallow-set pin would pull.
The steel is the whole product. With no handle and no moving parts, the only things that can fail on a line pin are a bent shank and a blunt point. A pin that bends is scrap, because the bend puts the point and the line wrap out of the same plane and the course walks off line over its length.
Keep it dry and lightly oiled. A line pin lives in wet mortar and then goes into a bag or a bucket. Wipe it dry after use and store it with a thin film of oil.
A pin does not get in the way of the trowel. The pin sits inside the joint and projects only a short stub. There is nothing standing proud of the wall face to catch a trowel or a brick as the course is laid.
| Stage of work | Use a line pin? | Notes |
|---|---|---|
| First course of brickwork off the footing | Yes | No corner exists yet for a block to grip |
| Mid-run on a long wall | Yes | Provides an anchor where no corner is in reach |
| Each subsequent course | Yes, pull the pin and move it up one course | The pin is reset course by course, never left in |
| Once corners are up and set | Usually switch to corner blocks | Faster course-by-course transfer |
| Repointing | Yes, into the joint being worked |
| Step | Action | Check before moving on |
|---|---|---|
| 1 | Push the pin into the bed joint of the course you are working, positioned so that the line, when wrapped, runs exactly along the top arris of that course | The line height, not the pin height, is what is being set |
| 2 | Set the second pin at the opposite end of the run, at the same course height | Both pins level; check with a level or by measuring up from the datum |
| 3 | Wrap the line around the first pin, run it to the far pin and wrap it off there | The wrap sits against the head, not free to slide up the shank |
| 4 | Tension the line until it is taut with no visible sag | Sight along the line; sag is what puts a belly in the course |
| 5 | Lay the course to the line: do not let the brick touch the line | Tap each brick so its front arris sits a hair back from the line, roughly 1/32" |
| 6 | When the course is complete, pull both pins, move them up one course and repeat | Fill the pin holes as you go |
The pin's grip comes from the mortar closing around the buried blade, so the joint has to still be workable.
Push the point in with hand pressure first and only tap if it will not enter; a pin that has to be hammered hard is usually going into mortar that has already set, and the joint face will spall rather than accept the pin. If the pin will not seat, move along a course or a joint and try again rather than forcing it. When you tap, use a brick hammer or a mallet on the flat head, not a heavy engineer's hammer that will mushroom the head over the shank.
On a normal wall the two tools hand over to each other. Pins carry the line for the first course or two while the leads are being built; once the quoins are up three or four courses and the mortar has taken an initial set, most masons switch to corner blocks, which slide up the built corner without disturbing any joint. Keep both in the bag: a corner that has to be rebuilt or a mid-run datum on a long wall will put you back on pins the same day.
When raking out and repointing an existing wall, the pin goes into a joint that is already open, so it disturbs nothing that was not going to be re-filled anyway. Use light line tension on soft historic lime mortar; the mortar will not hold a pin under the tension a modern cement joint tolerates.
Q1. What is a line pin for, and how many do I need?
A. It anchors and tensions a mason's line so a course of brick or block can be laid straight and level to that line. You need two, one at each end of the run; two pins and a line make the complete system.
Q2. Is a line pin the same thing as a corner block?
A. No. A corner block hooks over a corner that is already built, while a line pin makes its own anchor by going into a mortar joint, which is why it works at the first course when no corner exists yet. Most masons carry both and switch to blocks once the corners are three or four courses up.
Q3. How long is the pin?
A. 301002 is 6" (152 mm) long, which gives shank to push against and length to bury in the joint. This is the only size offered.
Q4. The pin pulls out of the joint, or will not go in at all. What is wrong?
A. If it pulls out, the mortar is usually too soft or the pin is not buried far enough, so set it deeper, move to a firmer joint or reduce the line tension. If it will not go in, the mortar has cured: a line pin is a tool for fresh mortar, so choose an open or freshly filled joint instead of forcing the pin and spalling the joint face.
Q5. The line sags, or my courses drift even though the line is tight. What should I check?
A. For sag, re-tension first; if it returns, add an intermediate anchor point rather than pulling harder, because over-tensioning is what pulls pins out of fresh mortar. For drift, check that the bricks are not touching the line: if each brick is laid hard against the string, the line is pushed out and the wall bellies, so the front edge should sit a fraction back from the line.
| Field | Value |
|---|---|
| Product name | Line Pin |
| Art. Nr | 301002 |
| Size | 6" (152 mm) |
| Material | Please contact sales |
| Number of variants | 1 (no diameter, length or handle options) |
| Selling unit | 1 pc per art number |
| Feature | Appearance | Why it matters |
|---|---|---|
| Point style | Flattened, leaf-shaped spear point tapering to a sharp tip | Enters a green mortar joint and wedges |
| Shank | Round, tapering from the point section toward the head | Gives the line something round to wrap on and the hand something to push against |
| Head | Flat disc head at the top of the shank | Stops the line wrap riding off the end and gives a hammer a flat striking face |
| Finish | Bright, reflective surface as shown in the catalog photo | ; |
| Construction | One piece, no joints visible | ; |
| Situation | Right tool | Why |
|---|---|---|
| First course off the foundation, no corner built yet | Line pin (301002) | There is no quoin for a corner block to grip; the pin makes its own anchor in the bed joint |
| Mid-run datum needed on a long wall between two corners | Line pin (301002) | Gives an intermediate anchor point where no built corner is within reach |
| Corner is built three or four courses up and the mortar has set | Corner block or line block | Faster to move up course by course; no joint disturbance |
| Repointing an existing wall | Line pin, set into the joint being repointed | The joint is already open; nothing new is disturbed |
| Fully cured, hard mortar with no open joint | Neither: look for an open or freshly filled joint | A pin needs a joint it can enter; forcing one damages the joint face |
| Item | Why |
|---|---|
| Mason's line / builder's line (nylon or polyester) | The pin does nothing on its own; the line is the datum. |
| Corner blocks or line blocks | The complementary tool once the quoins are up; both get used on the same job |
There is one article number for the Line Pin.
| Art. Nr | Size | Type | Construction | Handle |
|---|---|---|---|---|
| 301002 | 6" (152 mm) | Line pin (mason's line pin) | One-piece steel pin, bright surface | None, the pin is the whole tool |

In compliance with EU personal data protection laws, we are committed to protecting and providing you with control over your personal data. By clicking "Accept All", you allow us to place cookies to enhance your experience on this site, help us analyze site performance and usage, and enable us to deliver relevant marketing content. You can manage your cookie settings below. By clicking "Agree" you agree to the current settings. For more information, please visit the Privacy Statement.
This website uses cookies
In compliance with EU personal data protection laws, we are committed to protecting your personal data and providing you with control over it. By clicking "Agree", you allow us to place cookies to improve your experience on this site, help us analyze site performance and usage, and allow us to deliver relevant marketing content.
By clicking "Only necessary" you allow us to place only necessary cookies. The website cannot function without these cookies and you cannot switch them off on your system. These cookies are typically set only in response to an action you perform (i.e. a service request), such as setting privacy preferences, logging in, or filling in a form. You can set your browser to block or prompt you for these cookies, but this may prevent some site features from working.



