
Copyright 2026 © Leading Tools Industrial Co., Ltd.
All Rights Reserved. Website Design by Awakening Design
CATALOG TYPE
Product Categories
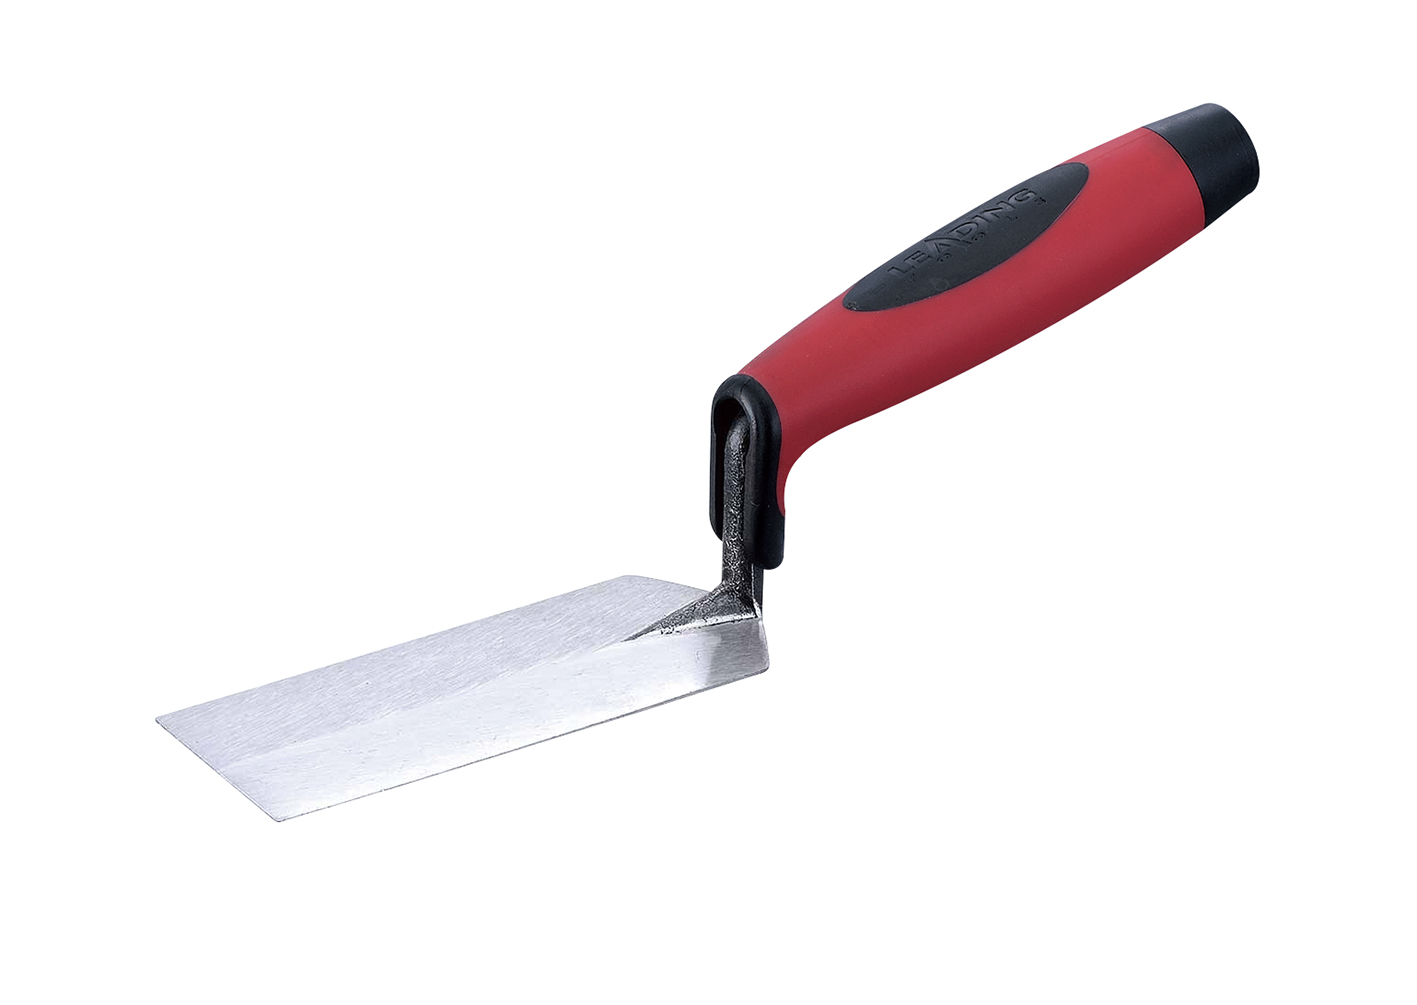
Margin Trowel — Forged High Carbon Steel
Product Description
Product name: Margin Trowel
Construction line: Forged in One-piece High Carbon Steel
Product family: Brick Trowel
Companion line: Margin Trowel, CO2 Welding Carbon Steel — art. 144721, 145721, 146721, 148721, in the identical four sizes
Art. Nr (four sizes):
| ART. NR | Size | Blade width | Blade length |
|---|---|---|---|
| 044721 | 1-1/2" x 5" | 1-1/2" (38 mm) | 5" (127 mm) |
| 045721 | 2" x 5" | 2" (51 mm) | 5" (127 mm) |
| 046721 | 2" x 6" | 2" (51 mm) | 6" (152 mm) |
| 048721 | 2" x 8" | 2" (51 mm) | 8" (203 mm) |
Sizes are stated as width x length. So "2" x 8"" here is a blade 2 inches wide and 8 inches long, not an 8-inch-wide blade.
Other handles can be fitted on request: contact Leading Tools sales.
| Tool | Blade shape | What it is for | Why it is not this |
|---|---|---|---|
| Margin trowel (this product) | Narrow rectangular, flat end | Mortar, thin-set and grout in confined spaces and corners | ; |
| Gauging trowel (art. 054721 ff.) | Rounded-nose triangular blade | Scooping and gauging material out of a tub | Different blade shape entirely; the neighbouring line in the Leading Tools range |
| Pointing trowel (art. 024721 ff.) | Narrow triangular, pointed toe | Picking up small amounts of mortar, patching and detail work | Pointed toe, not a flat end |
| Tuck pointing trowel (art. 070721 ff.) | Very narrow flat strip, 3/16"–1" wide | Packing mortar into a raked joint of matching width | Far narrower; sized by joint width, not by working face |
| Notched trowel | Rectangular with toothed edges | Combing a ridged thin-set bed | Sized by notch depth against tile size, a completely separate selection logic |
Product type. Margin trowel: a narrow, flat-ended precision trowel, listed in the Brick Trowel family.
One-piece construction. Blade, shank, and tang come out of one piece of steel, so there is no joint between blade and neck. Leading Tools offers both constructions side by side so that the buyer can put the forged version where duty is heaviest.
Access instead of volume. The tool is defined by working in tight spaces and corners where a large trowel cannot reach. That is what the customer is actually buying: the ability to place material under a countertop lip, along a wall return, or into a narrow strip without touching the surfaces either side.
One tool, three operations. The flat end does the fetching, the flat face does the spreading, and the same flat face pulled backwards does the finishing. The sequence is one continuous motion: dip the blade, scrape the material into the crack, then drag to smooth it flush. This makes the margin trowel a useful repair trowel.
Carbon steel. This line is carbon steel, which must be dried and thinly oiled after use, or it rusts.
A size for each trade. The 1-1/2" x 5" is a tile and grout tool; the 2" x 8" is a masonry and render tool.
Soft grip as standard. All four sizes ship with the soft grip. This suits a tool used for long detail sessions.
Primary uses. Back-buttering tile; mixing and lifting small quantities of thin-set or grout; grouting confined corners such as under countertops; scooping material out of a bucket and cleaning the bucket down; spreading thin-coat render and stucco in narrow spaces; filling cracks and dragging joints smooth in general repair work; filling wide masonry joints.
| Situation | Use the margin trowel because |
|---|---|
| Working into an internal corner or against a wall return | The flat end reaches the corner; a pointed trowel leaves it hollow |
| Grouting under a countertop lip or behind a fixture | Access is the constraint, not throughput |
| Back-buttering tile or thin brick | The narrow flat face applies an even coat on the tile back without going over the edge |
| Lifting a set tile to check adhesive coverage | The flat end slides under the tile edge |
| Mixing a small batch of thin-set or grout | Blade is stiff enough to work a small quantity in a bucket or on a board |
| Scooping material out of a bucket, and cleaning the bucket down | The flat blade and flat end follow the bucket wall |
| Spreading thin-coat render / stucco / EIFS base in a narrow space | The narrow blade works in tight spaces |
| Filling a crack in a patch repair and dragging it smooth | Fetch, fill and finish in one continuous motion |
| Filling a wide masonry joint | A full-size trowel cannot control the placement |
| Trimming squeeze-out from a narrow joint | The straight blade edge cuts material off flush |
| Laying bricks | Do not: a margin trowel cannot carry a bed of mortar; use a brick trowel |
| Combing a ridged thin-set bed | Do not: that is a notched trowel job, selected by tile size and notch depth |
| Step | Action | Notes |
|---|---|---|
| 1 | Wet the blade before first use of the day and knock off the water | Damp steel releases fresh mortar and thin-set more cleanly |
| 2 | Dip the blade into the material | Take a small load; the tool is not a scoop shovel |
| 3 | Bring the blade to the work and scrape the material into the crack, joint, or onto the tile back | Keep the blade nearly flat to the surface for spreading, more upright for packing |
| 4 | Press to compact | For joints and cracks, work the material in rather than laying it on the surface: voids left now show up as failures later |
| 5 | Drag the flat of the blade across the finished surface to smooth and level it | This is the finishing pass; the same face that spread the material also strikes it off |
| 6 | Strike excess off flush using the long edge of the blade | Use the edge, not the corner, to avoid gouging the adjacent face |
| 7 | Clean off residue before it sets, on the blade and on the finished face | Material is far easier to remove wet than cured |
| 8 | Wash, dry, and oil at the end of the session | Non-negotiable for high carbon steel |
Grip: hold the handle with the fingers close to the neck, as with any trowel, so the hand is over the load and the blade does not tip.
The margin trowel is a tile setter's constant companion, and its jobs run across the whole installation, not just one stage.
Mix the batch: a margin trowel is stiff and narrow enough to work a small quantity of thin-set or grout to consistency in a bucket, without hauling out a mixer for a few tiles. Load out: scoop the material from the bucket, following the wall of the bucket with the flat blade so the material is lifted rather than pushed around.
Back-butter: lay a coat of thin-set onto the back of the tile with the flat face, keeping the coat inside the tile edge so it does not squeeze out into the grout joint when the tile is pressed home. Check coverage: after a tile is set, it can be lifted with the flat end of the blade to inspect the transfer on the back. Clean up: cut and lift squeeze-out out of the joints with the blade edge before it cures, and scrape the bucket down at the end of the batch.
For thin brick and brick cladding, the same routine applies.
Grout in an open field goes in with a float. Grout under a countertop lip, in the internal angle where a wall meets a splashback, or behind a fixture does not: the float cannot present its face to the joint.
Work in short lengths. Load a small amount of grout on the blade, press it into the joint with the flat of the blade, and pull the blade along the joint to strike it flush. Because the blade end is flat, it can be pushed right into the corner. Clean the adjacent faces as you go: grout haze is much easier to remove before it sets.
This is a typical use: dip the blade in the mix, scrape the material into the crack, and drag the blade to smooth it flush: one tool, one continuous motion.
The tool also covers the wide-joint case that a pointing trowel struggles with: a margin trowel suits tight spaces and the filling of wide joints. For a repair, the practical sequence is: rake out and clean the failed material; damp the substrate if the mix requires it; load a small amount on the blade; pack it in with the blade held more upright; strike off flush with the long edge; and finish with a flat drag when the material has taken its initial set.
The longer 046721 (2" x 6") and 048721 (2" x 8") are the sizes for this work: the extra blade length spans a longer run of joint per pass and keeps the knuckles clear of the wall.
In the exterior insulation and thin-coat render trades, the margin trowel can be used for mixing and spreading thin-coat mortars in narrow spaces.
The work here is detail work around the edges of a system: terminations at windows and doors, mesh laps in a tight corner, base-coat repairs where the field trowel cannot get a flat face on the wall. Use the flat of the blade to feather the coat out to nothing at the edge of the repair, and keep the blade clean between passes: thin-coat mortars build up quickly and a loaded blade drags.
Q1. What sizes does the forged margin trowel come in, and which one should a tile setter buy first?
There are four: 044721 = 1-1/2" x 5", 045721 = 2" x 5", 046721 = 2" x 6", 048721 = 2" x 8", with width given first and length second. A tile setter can start with 2" x 5" (045721), which covers mixing, back-buttering (spreading a thin coat of adhesive on the tile back), coverage checks and corner grouting.
Q2. What is it used for?
Its role is reaching tight spaces and corners where a large trowel cannot go. It is also a standard tool for lifting a tile to check adhesive coverage (the flat end slides under the tile edge), scooping material out of the bucket and cleaning the bucket down at the end of the batch. On a flat surface it can trim squeeze-out and scrape cured residue.
Q3. What should I not use it for?
Do not use it to lay bricks, because the blade cannot carry a bed of mortar; laying is a brick trowel's job, and the two are used together. For chipping hardened mortar off masonry or cutting metal, use a chisel instead. Do not pry with it either, because prying puts a permanent bend in a flat blade, and a bent blade cannot finish flat.
Q4. How is it different from the CO2 welded version (144721)?
The forged version (044721) is made in one piece, so there is no weld between blade and shank; the welded version has one. Sizes, blade material and handle are otherwise the same across the two lines.
Q5. How do I stop it from rusting?
This line is high carbon steel, chosen for edge and feel rather than corrosion resistance. Clean it with water and a stiff brush right after use, dry it thoroughly, apply a thin film of tool oil, and store it dry. A stainless tool has high corrosion resistance and lower maintenance, but chlorinated water, coastal air or prolonged soaking can still cause rust spots, so rinse with clean water and dry after use.
The blade is a flat rectangle with a flat working end and uniform width along its length. Three properties do the work:
| Attribute | Specification |
|---|---|
| Handle type | Soft grip |
| Handle code | BF21 |
| Fitted to | All four sizes, 044721 / 045721 / 046721 / 048721 |
| Other handles | Available on request: contact Leading Tools sales |
Soft grip is not a cosmetic choice on this tool. A margin trowel is held for long continuous stretches during grouting, back-buttering, and patch repair, and it is used with wet hands.
The shank is a short, upright riser between the blade and the handle: enough offset to keep the knuckles clear of the working surface, but not the S-curved swan-neck geometry.
| Forged in One-piece (044721 / 045721 / 046721 / 048721) | CO2 Welded (144721 / 145721 / 146721 / 148721) | |
|---|---|---|
| Blade / shank junction | Forged in one piece | CO2 welding |
| Sizes offered | 1-1/2"x5", 2"x5", 2"x6", 2"x8" | Identical four sizes |
| Blade material and finish | Carbon steel, polished | Carbon steel |
| Handle | Soft grip, BF21 | Soft grip, BF21 |
| Where to specify it | Daily professional use; heavier working loads | General use and occasional use |
| Attribute | Margin Trowel (this product) | Brick / laying trowel | Notched trowel | Tuck pointing trowel |
|---|---|---|---|---|
| Blade shape | Narrow rectangle, flat end | Wide triangle, pointed | Rectangle with toothed edges | Very narrow flat strip |
| Typical size | 1-1/2"–2" wide x 5"–8" long | 3"–4" wide x 9"–12" long | Sized by notch depth | 3/16"–1" wide |
| Selected by | Working face and access clearance | Bricklaying speed and hand size | Tile size and warpage | Existing joint width |
| Material carried per pass | Small, controlled | Large | Combed bed | Ribbon into a joint |
| Fails at | Laying bricks: insufficient capacity | Corners, gaps, tile backs | Corners and internal angles | Anything wider than the joint it matches |
One selection error is common enough to call out. Trowel-size tables that map trowel size to tile size are notched trowel tables: they specify notch depth against tile dimension and warpage. They do not apply to a margin trowel, which is chosen by the width of the space it has to work in, not by the tile it is working on.
| ART. NR | Size | Choose it when | Typical trade |
|---|---|---|---|
| 044721 | 1-1/2" x 5" | The tightest working spaces: grouting into internal corners, cutting squeeze-out from narrow joints, working against a fixture edge. The narrowest of the four and the one to hold when the constraint is clearance, not throughput | Tile setting, grouting, small repairs |
| 045721 | 2" x 5" | General-purpose size. Short enough for control, wide enough to spread | Tile setting, general repair |
| 046721 | 2" x 6" | Longer reach at the same width, for back-buttering larger tiles and for spreading over a longer run without lifting. | Tile, thin brick, render patching |
| 048721 | 2" x 8" | Maximum reach and material throughput of the four: deeper cavities, longer joints, and bucket work where the extra length keeps the knuckles out of the material | Masonry repair, render, stucco, bucket handling |
Rule of thumb. Choose by the narrowest clearance the tool has to enter, then take the longest blade that still fits: length buys reach and material throughput at no cost in access, whereas width is what actually gets blocked.
Specify 044721 / 045721 / 046721 / 048721 (forged) when the tool is in daily professional hands and gets heavier working loads. Specify 144721 / 145721 / 146721 / 148721 (CO2 welded) for general and occasional use. Both lines carry the same blade material, same soft grip handle, and the same four sizes, so the decision is about the blade-to-shank junction.
Leading Tools' margin trowel line is carbon steel in both constructions. If a customer specifically asks for stainless, note the trade-off:
All four art numbers in this line. Sizes are given as width x length.
| ART. NR | Size | Blade width | Blade length | Blade shape | Blade material & finish | Construction | Handle |
|---|---|---|---|---|---|---|---|
| 044721 | 1-1/2" x 5" | 1-1/2" / 38 mm | 5" / 127 mm | Rectangular, flat end | High carbon steel, polished | Forged in one piece | Soft grip, BF21 |
| 045721 | 2" x 5" | 2" / 51 mm | 5" / 127 mm | Rectangular, flat end | High carbon steel, polished | Forged in one piece | Soft grip, BF21 |
| 046721 | 2" x 6" | 2" / 51 mm | 6" / 152 mm | Rectangular, flat end | High carbon steel, polished | Forged in one piece | Soft grip, BF21 |
| 048721 | 2" x 8" | 2" / 51 mm | 8" / 203 mm | Rectangular, flat end | High carbon steel, polished | Forged in one piece | Soft grip, BF21 |
Cross-reference: CO2 welded equivalents:
| Forged art. nr | CO2 welded art. nr | Size |
|---|---|---|
| 044721 | 144721 | 1-1/2" x 5" |
| 045721 | 145721 | 2" x 5" |
| 046721 | 146721 | 2" x 6" |
| 048721 | 148721 | 2" x 8" |
Metric conversions are calculated at 1" = 25.4 mm and rounded to the nearest millimetre; the sizes themselves are specified in imperial only.
High carbon steel will rust if it is put away wet. Everything below follows from that.
After every session, without exception:
Wear gloves when handling abrasive materials or cleaning chemicals during this routine.
If material has already cured on the blade: remove it with a plastic scraper or a stiff nylon brush, and do not leave the blade soaking for long periods. Do not use a wire brush or wire wheel: it scratches the blade surface. Do not use a chisel or a hammer against the blade to knock hardened material off; that is how a flat blade acquires a permanent bend.
If rust has already formed: remove it with a fine abrasive pad, dry, and re-oil immediately; acid cleaners are not recommended. Light surface rust is cosmetic; pitting is not, because a pitted blade drags material and no longer finishes cleanly.
Blade flatness. The value of this tool is a flat face and a straight edge. Check the blade against a known flat surface occasionally. A blade that has taken a permanent bend cannot be straightened reliably and should be replaced.
Soft grip handle. Clean cured splashes off the grip with warm water and mild soap. Inspect for splits, hardening, or looseness at the neck, and replace the tool if the grip is separating from the tang.
Stainless alternative. A stainless margin trowel has high corrosion resistance and needs less maintenance, but it should still be rinsed with clean water and dried after use.
Product name: Margin Trowel
Construction line: Forged in One-piece High Carbon Steel
Product family: Brick Trowel
Companion line: Margin Trowel, CO2 Welding Carbon Steel — art. 144721, 145721, 146721, 148721, in the identical four sizes
Art. Nr (four sizes):
| ART. NR | Size | Blade width | Blade length |
|---|---|---|---|
| 044721 | 1-1/2" x 5" | 1-1/2" (38 mm) | 5" (127 mm) |
| 045721 | 2" x 5" | 2" (51 mm) | 5" (127 mm) |
| 046721 | 2" x 6" | 2" (51 mm) | 6" (152 mm) |
| 048721 | 2" x 8" | 2" (51 mm) | 8" (203 mm) |
Sizes are stated as width x length. So "2" x 8"" here is a blade 2 inches wide and 8 inches long, not an 8-inch-wide blade.
Other handles can be fitted on request: contact Leading Tools sales.
| Tool | Blade shape | What it is for | Why it is not this |
|---|---|---|---|
| Margin trowel (this product) | Narrow rectangular, flat end | Mortar, thin-set and grout in confined spaces and corners | ; |
| Gauging trowel (art. 054721 ff.) | Rounded-nose triangular blade | Scooping and gauging material out of a tub | Different blade shape entirely; the neighbouring line in the Leading Tools range |
| Pointing trowel (art. 024721 ff.) | Narrow triangular, pointed toe | Picking up small amounts of mortar, patching and detail work | Pointed toe, not a flat end |
| Tuck pointing trowel (art. 070721 ff.) | Very narrow flat strip, 3/16"–1" wide | Packing mortar into a raked joint of matching width | Far narrower; sized by joint width, not by working face |
| Notched trowel | Rectangular with toothed edges | Combing a ridged thin-set bed | Sized by notch depth against tile size, a completely separate selection logic |
Product type. Margin trowel: a narrow, flat-ended precision trowel, listed in the Brick Trowel family.
One-piece construction. Blade, shank, and tang come out of one piece of steel, so there is no joint between blade and neck. Leading Tools offers both constructions side by side so that the buyer can put the forged version where duty is heaviest.
Access instead of volume. The tool is defined by working in tight spaces and corners where a large trowel cannot reach. That is what the customer is actually buying: the ability to place material under a countertop lip, along a wall return, or into a narrow strip without touching the surfaces either side.
One tool, three operations. The flat end does the fetching, the flat face does the spreading, and the same flat face pulled backwards does the finishing. The sequence is one continuous motion: dip the blade, scrape the material into the crack, then drag to smooth it flush. This makes the margin trowel a useful repair trowel.
Carbon steel. This line is carbon steel, which must be dried and thinly oiled after use, or it rusts.
A size for each trade. The 1-1/2" x 5" is a tile and grout tool; the 2" x 8" is a masonry and render tool.
Soft grip as standard. All four sizes ship with the soft grip. This suits a tool used for long detail sessions.
Primary uses. Back-buttering tile; mixing and lifting small quantities of thin-set or grout; grouting confined corners such as under countertops; scooping material out of a bucket and cleaning the bucket down; spreading thin-coat render and stucco in narrow spaces; filling cracks and dragging joints smooth in general repair work; filling wide masonry joints.
| Situation | Use the margin trowel because |
|---|---|
| Working into an internal corner or against a wall return | The flat end reaches the corner; a pointed trowel leaves it hollow |
| Grouting under a countertop lip or behind a fixture | Access is the constraint, not throughput |
| Back-buttering tile or thin brick | The narrow flat face applies an even coat on the tile back without going over the edge |
| Lifting a set tile to check adhesive coverage | The flat end slides under the tile edge |
| Mixing a small batch of thin-set or grout | Blade is stiff enough to work a small quantity in a bucket or on a board |
| Scooping material out of a bucket, and cleaning the bucket down | The flat blade and flat end follow the bucket wall |
| Spreading thin-coat render / stucco / EIFS base in a narrow space | The narrow blade works in tight spaces |
| Filling a crack in a patch repair and dragging it smooth | Fetch, fill and finish in one continuous motion |
| Filling a wide masonry joint | A full-size trowel cannot control the placement |
| Trimming squeeze-out from a narrow joint | The straight blade edge cuts material off flush |
| Laying bricks | Do not: a margin trowel cannot carry a bed of mortar; use a brick trowel |
| Combing a ridged thin-set bed | Do not: that is a notched trowel job, selected by tile size and notch depth |
| Step | Action | Notes |
|---|---|---|
| 1 | Wet the blade before first use of the day and knock off the water | Damp steel releases fresh mortar and thin-set more cleanly |
| 2 | Dip the blade into the material | Take a small load; the tool is not a scoop shovel |
| 3 | Bring the blade to the work and scrape the material into the crack, joint, or onto the tile back | Keep the blade nearly flat to the surface for spreading, more upright for packing |
| 4 | Press to compact | For joints and cracks, work the material in rather than laying it on the surface: voids left now show up as failures later |
| 5 | Drag the flat of the blade across the finished surface to smooth and level it | This is the finishing pass; the same face that spread the material also strikes it off |
| 6 | Strike excess off flush using the long edge of the blade | Use the edge, not the corner, to avoid gouging the adjacent face |
| 7 | Clean off residue before it sets, on the blade and on the finished face | Material is far easier to remove wet than cured |
| 8 | Wash, dry, and oil at the end of the session | Non-negotiable for high carbon steel |
Grip: hold the handle with the fingers close to the neck, as with any trowel, so the hand is over the load and the blade does not tip.
The margin trowel is a tile setter's constant companion, and its jobs run across the whole installation, not just one stage.
Mix the batch: a margin trowel is stiff and narrow enough to work a small quantity of thin-set or grout to consistency in a bucket, without hauling out a mixer for a few tiles. Load out: scoop the material from the bucket, following the wall of the bucket with the flat blade so the material is lifted rather than pushed around.
Back-butter: lay a coat of thin-set onto the back of the tile with the flat face, keeping the coat inside the tile edge so it does not squeeze out into the grout joint when the tile is pressed home. Check coverage: after a tile is set, it can be lifted with the flat end of the blade to inspect the transfer on the back. Clean up: cut and lift squeeze-out out of the joints with the blade edge before it cures, and scrape the bucket down at the end of the batch.
For thin brick and brick cladding, the same routine applies.
Grout in an open field goes in with a float. Grout under a countertop lip, in the internal angle where a wall meets a splashback, or behind a fixture does not: the float cannot present its face to the joint.
Work in short lengths. Load a small amount of grout on the blade, press it into the joint with the flat of the blade, and pull the blade along the joint to strike it flush. Because the blade end is flat, it can be pushed right into the corner. Clean the adjacent faces as you go: grout haze is much easier to remove before it sets.
This is a typical use: dip the blade in the mix, scrape the material into the crack, and drag the blade to smooth it flush: one tool, one continuous motion.
The tool also covers the wide-joint case that a pointing trowel struggles with: a margin trowel suits tight spaces and the filling of wide joints. For a repair, the practical sequence is: rake out and clean the failed material; damp the substrate if the mix requires it; load a small amount on the blade; pack it in with the blade held more upright; strike off flush with the long edge; and finish with a flat drag when the material has taken its initial set.
The longer 046721 (2" x 6") and 048721 (2" x 8") are the sizes for this work: the extra blade length spans a longer run of joint per pass and keeps the knuckles clear of the wall.
In the exterior insulation and thin-coat render trades, the margin trowel can be used for mixing and spreading thin-coat mortars in narrow spaces.
The work here is detail work around the edges of a system: terminations at windows and doors, mesh laps in a tight corner, base-coat repairs where the field trowel cannot get a flat face on the wall. Use the flat of the blade to feather the coat out to nothing at the edge of the repair, and keep the blade clean between passes: thin-coat mortars build up quickly and a loaded blade drags.
Q1. What sizes does the forged margin trowel come in, and which one should a tile setter buy first?
There are four: 044721 = 1-1/2" x 5", 045721 = 2" x 5", 046721 = 2" x 6", 048721 = 2" x 8", with width given first and length second. A tile setter can start with 2" x 5" (045721), which covers mixing, back-buttering (spreading a thin coat of adhesive on the tile back), coverage checks and corner grouting.
Q2. What is it used for?
Its role is reaching tight spaces and corners where a large trowel cannot go. It is also a standard tool for lifting a tile to check adhesive coverage (the flat end slides under the tile edge), scooping material out of the bucket and cleaning the bucket down at the end of the batch. On a flat surface it can trim squeeze-out and scrape cured residue.
Q3. What should I not use it for?
Do not use it to lay bricks, because the blade cannot carry a bed of mortar; laying is a brick trowel's job, and the two are used together. For chipping hardened mortar off masonry or cutting metal, use a chisel instead. Do not pry with it either, because prying puts a permanent bend in a flat blade, and a bent blade cannot finish flat.
Q4. How is it different from the CO2 welded version (144721)?
The forged version (044721) is made in one piece, so there is no weld between blade and shank; the welded version has one. Sizes, blade material and handle are otherwise the same across the two lines.
Q5. How do I stop it from rusting?
This line is high carbon steel, chosen for edge and feel rather than corrosion resistance. Clean it with water and a stiff brush right after use, dry it thoroughly, apply a thin film of tool oil, and store it dry. A stainless tool has high corrosion resistance and lower maintenance, but chlorinated water, coastal air or prolonged soaking can still cause rust spots, so rinse with clean water and dry after use.
The blade is a flat rectangle with a flat working end and uniform width along its length. Three properties do the work:
| Attribute | Specification |
|---|---|
| Handle type | Soft grip |
| Handle code | BF21 |
| Fitted to | All four sizes, 044721 / 045721 / 046721 / 048721 |
| Other handles | Available on request: contact Leading Tools sales |
Soft grip is not a cosmetic choice on this tool. A margin trowel is held for long continuous stretches during grouting, back-buttering, and patch repair, and it is used with wet hands.
The shank is a short, upright riser between the blade and the handle: enough offset to keep the knuckles clear of the working surface, but not the S-curved swan-neck geometry.
| Forged in One-piece (044721 / 045721 / 046721 / 048721) | CO2 Welded (144721 / 145721 / 146721 / 148721) | |
|---|---|---|
| Blade / shank junction | Forged in one piece | CO2 welding |
| Sizes offered | 1-1/2"x5", 2"x5", 2"x6", 2"x8" | Identical four sizes |
| Blade material and finish | Carbon steel, polished | Carbon steel |
| Handle | Soft grip, BF21 | Soft grip, BF21 |
| Where to specify it | Daily professional use; heavier working loads | General use and occasional use |
| Attribute | Margin Trowel (this product) | Brick / laying trowel | Notched trowel | Tuck pointing trowel |
|---|---|---|---|---|
| Blade shape | Narrow rectangle, flat end | Wide triangle, pointed | Rectangle with toothed edges | Very narrow flat strip |
| Typical size | 1-1/2"–2" wide x 5"–8" long | 3"–4" wide x 9"–12" long | Sized by notch depth | 3/16"–1" wide |
| Selected by | Working face and access clearance | Bricklaying speed and hand size | Tile size and warpage | Existing joint width |
| Material carried per pass | Small, controlled | Large | Combed bed | Ribbon into a joint |
| Fails at | Laying bricks: insufficient capacity | Corners, gaps, tile backs | Corners and internal angles | Anything wider than the joint it matches |
One selection error is common enough to call out. Trowel-size tables that map trowel size to tile size are notched trowel tables: they specify notch depth against tile dimension and warpage. They do not apply to a margin trowel, which is chosen by the width of the space it has to work in, not by the tile it is working on.
| ART. NR | Size | Choose it when | Typical trade |
|---|---|---|---|
| 044721 | 1-1/2" x 5" | The tightest working spaces: grouting into internal corners, cutting squeeze-out from narrow joints, working against a fixture edge. The narrowest of the four and the one to hold when the constraint is clearance, not throughput | Tile setting, grouting, small repairs |
| 045721 | 2" x 5" | General-purpose size. Short enough for control, wide enough to spread | Tile setting, general repair |
| 046721 | 2" x 6" | Longer reach at the same width, for back-buttering larger tiles and for spreading over a longer run without lifting. | Tile, thin brick, render patching |
| 048721 | 2" x 8" | Maximum reach and material throughput of the four: deeper cavities, longer joints, and bucket work where the extra length keeps the knuckles out of the material | Masonry repair, render, stucco, bucket handling |
Rule of thumb. Choose by the narrowest clearance the tool has to enter, then take the longest blade that still fits: length buys reach and material throughput at no cost in access, whereas width is what actually gets blocked.
Specify 044721 / 045721 / 046721 / 048721 (forged) when the tool is in daily professional hands and gets heavier working loads. Specify 144721 / 145721 / 146721 / 148721 (CO2 welded) for general and occasional use. Both lines carry the same blade material, same soft grip handle, and the same four sizes, so the decision is about the blade-to-shank junction.
Leading Tools' margin trowel line is carbon steel in both constructions. If a customer specifically asks for stainless, note the trade-off:
All four art numbers in this line. Sizes are given as width x length.
| ART. NR | Size | Blade width | Blade length | Blade shape | Blade material & finish | Construction | Handle |
|---|---|---|---|---|---|---|---|
| 044721 | 1-1/2" x 5" | 1-1/2" / 38 mm | 5" / 127 mm | Rectangular, flat end | High carbon steel, polished | Forged in one piece | Soft grip, BF21 |
| 045721 | 2" x 5" | 2" / 51 mm | 5" / 127 mm | Rectangular, flat end | High carbon steel, polished | Forged in one piece | Soft grip, BF21 |
| 046721 | 2" x 6" | 2" / 51 mm | 6" / 152 mm | Rectangular, flat end | High carbon steel, polished | Forged in one piece | Soft grip, BF21 |
| 048721 | 2" x 8" | 2" / 51 mm | 8" / 203 mm | Rectangular, flat end | High carbon steel, polished | Forged in one piece | Soft grip, BF21 |
Cross-reference: CO2 welded equivalents:
| Forged art. nr | CO2 welded art. nr | Size |
|---|---|---|
| 044721 | 144721 | 1-1/2" x 5" |
| 045721 | 145721 | 2" x 5" |
| 046721 | 146721 | 2" x 6" |
| 048721 | 148721 | 2" x 8" |
Metric conversions are calculated at 1" = 25.4 mm and rounded to the nearest millimetre; the sizes themselves are specified in imperial only.
High carbon steel will rust if it is put away wet. Everything below follows from that.
After every session, without exception:
Wear gloves when handling abrasive materials or cleaning chemicals during this routine.
If material has already cured on the blade: remove it with a plastic scraper or a stiff nylon brush, and do not leave the blade soaking for long periods. Do not use a wire brush or wire wheel: it scratches the blade surface. Do not use a chisel or a hammer against the blade to knock hardened material off; that is how a flat blade acquires a permanent bend.
If rust has already formed: remove it with a fine abrasive pad, dry, and re-oil immediately; acid cleaners are not recommended. Light surface rust is cosmetic; pitting is not, because a pitted blade drags material and no longer finishes cleanly.
Blade flatness. The value of this tool is a flat face and a straight edge. Check the blade against a known flat surface occasionally. A blade that has taken a permanent bend cannot be straightened reliably and should be replaced.
Soft grip handle. Clean cured splashes off the grip with warm water and mild soap. Inspect for splits, hardening, or looseness at the neck, and replace the tool if the grip is separating from the tang.
Stainless alternative. A stainless margin trowel has high corrosion resistance and needs less maintenance, but it should still be rinsed with clean water and dried after use.

In compliance with EU personal data protection laws, we are committed to protecting and providing you with control over your personal data. By clicking "Accept All", you allow us to place cookies to enhance your experience on this site, help us analyze site performance and usage, and enable us to deliver relevant marketing content. You can manage your cookie settings below. By clicking "Agree" you agree to the current settings. For more information, please visit the Privacy Statement.
This website uses cookies
In compliance with EU personal data protection laws, we are committed to protecting your personal data and providing you with control over it. By clicking "Agree", you allow us to place cookies to improve your experience on this site, help us analyze site performance and usage, and allow us to deliver relevant marketing content.
By clicking "Only necessary" you allow us to place only necessary cookies. The website cannot function without these cookies and you cannot switch them off on your system. These cookies are typically set only in response to an action you perform (i.e. a service request), such as setting privacy preferences, logging in, or filling in a form. You can set your browser to block or prompt you for these cookies, but this may prevent some site features from working.



