
Copyright 2026 © Leading Tools Industrial Co., Ltd.
All Rights Reserved. Website Design by Awakening Design
CATALOG TYPE
Product Categories
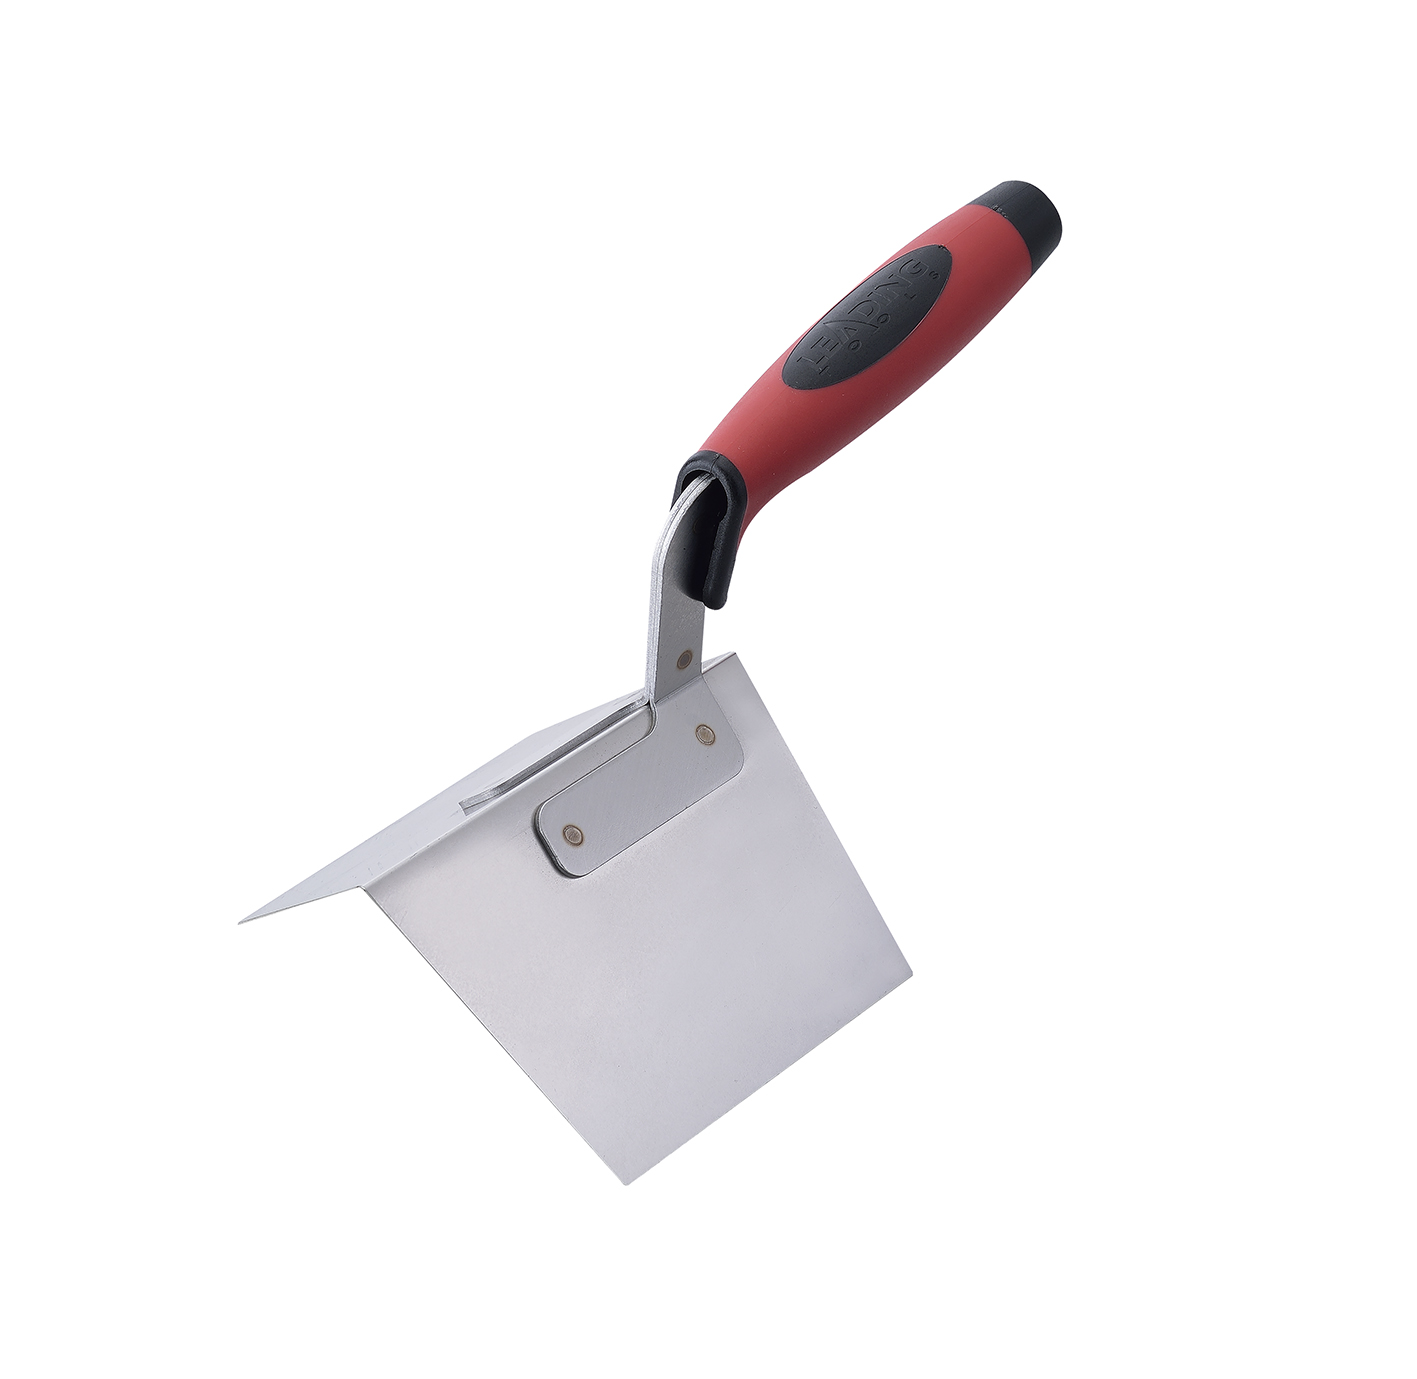
Outside Corner Trowel
Product Description
Outside Corner — stainless steel external corner trowel
Art. Nr: 300265 — blade 4" × 5" (approx. 102 × 127 mm; 1" = 25.4 mm)
The tool forms and finishes the external (protruding) 90° arris where two rendered, plastered or drywall surfaces meet: a room's outside corner, a return around a column, a parapet edge, a soffit nose, a window or door reveal that projects rather than recedes. It is the mirror opposite of the Inside Corner trowel in the same range (300255), and the two are not interchangeable in either direction.
| Property | What it buys the finisher |
|---|---|
| Corrosion resistance | High corrosion resistance and low upkeep; chlorinated water, coastal air or prolonged soaking can still cause rust spots, so rinse with clean water and dry after use. |
| Less rust staining | Matters on light-colored plaster, white-cement stucco and decorative concrete: a rust stain at the arris bleeds into the finish and cannot be cleaned out, only cut out. |
| Edge stability | The external vertex holds its geometry; a deformed vertex is the one defect on this tool that cannot be filed back to specification. |
In a standard three-coat drywall system the external corner is worked as follows:
| Coat | Tool | What happens at the corner |
|---|---|---|
| First (embed) | Taping knife / corner roller | Corner bead is set and its flanges are embedded; not the outside corner trowel's job. |
| Second (fill) | Outside Corner 300265 | The corner profile is built out over the bead and the flanges are covered. |
| Finish | Outside Corner 300265 | Final pass for a clean, sharp arris and feathered flanks. |
The complete corner-bead sequence in the trade is: seat the bead with a corner roller, load the flanges with a 4" knife, then form and compress with the outside corner trowel.
| Condition | Use 300265? | Why |
|---|---|---|
| Compound / plaster workable but no longer flowing | Yes | Firm enough to hold the profile, still workable |
| Material still wet and slick | No, wait | The tool squeezes material out past the arris and leaves ridges |
| Material already stiffened past workable | No | The vertex skids and scores instead of cutting; re-wet or accept and re-coat |
| First (tape / bead embed) coat | No | Use a taping knife and corner roller |
| Second and finish coats over corner bead | Yes | The tool's intended position in the sequence |
| Render / stucco brown coat and finish coat | Yes | Standard external-corner practice in plaster and render |
| Veneer (two-coat) plaster, after each coat | Yes | Timing is tighter than in three-coat work because veneer sets fast |
| Dressing a repaired cast-concrete arris | Yes, after a thin repair compound is applied | The vertex re-establishes a clean line on the patch |
| Step | Action | Check before moving on |
|---|---|---|
| 1 | Confirm readiness. Check that the material is workable but no longer flowing; this depends on the material and site conditions. Too wet and it squeezes out; too stiff and the vertex scores the surface. | The material holds its shape and does not stick to the tool |
| 2 | Prepare the corner. Corner bead fully embedded, flanges covered, bead straight; gaps between bead and substrate filled; both flanks flat and at the same stage. | Sight down the bead: it must be straight before you tool |
| 3 | Seat the tool at the top of the corner. Both faces bearing on their own wall plane at the same time; vertex aligned on the arris. | Rock the tool gently: both faces should contact, not one |
| 4 | Set the angle: about 10–15° between blade and wall surface. Too flat and the tool skates; too steep and the leading edge scores a groove. | The vertex stays on the arris line |
| 5 | Keep the pull square. Do not let the tool wander left or right of the arris: even a 3–5° skew unloads one wing and overloads the other. | The vertex tracks the bead, not the flat |
| 6 | Load both wings equally. Pressure comes from the heel of the hand and body weight, not from the fingers. Uneven load produces a skewed corner and a ridge on one flank. | Both flanks come out flat, no ridge on either |
| 7 | Pull in one continuous stroke, top to bottom (or bottom to top, following the direction the material was laid on). Do not stop mid-pass. | No witness line anywhere on the arris |
| 8 | Lift straight off at the end. Do not drag the vertex across the floor, base or return. | The last 100 mm of arris is as clean as the first |
| 9 | Inspect. A correct external corner is a clean, straight, consistent 90° line with no voids, no squeeze-out past the arris, and both flanks flush with the corner. | If not, go to step 10 |
| 10 | Correct on a second pass, not immediately. Let the material firm slightly and pass again. Re-tooling wet material squeezes it out and creates ridges. |
Build in thin coats. Keep each coat thin; let it dry and lightly sand before the next, rather than trying to build the full profile in one pass.
Timing discipline. Do not tool the corner too early: an early pass presses a hollow into the arris. The usual sequence is to straighten and flatten the corner on the second coat first, tool it once it has firmed, and take a final light pass before the finish is closed up.
| Factor | Metal corner bead | Paper-faced corner bead |
|---|---|---|
| Impact resistance | Higher | Moderate |
| Rust potential | Possible in damp conditions | Lower |
| Finishing | Flanges are covered with compound | Paper facing already includes the tape; embed it in compound |
| Outside Corner tool use | Standard, from the second coat on | Standard, from the second coat on |
| Best for | High-traffic areas and exterior work | Interior, lower-traffic areas |
Whichever bead is used, 300265 enters the job at the same point: after the bead is set and embedded, on the fill and finish coats.
External corners on a rendered façade take direct weather and direct impact, so the corner detail carries more of the building's durability than its area suggests.
On cast-in-place concrete, the external corner is formed by the formwork, not by a trowel. After the forms are struck, minor chips and irregularities at the arris can be filled with a thin repair mortar or patching compound and then dressed to a clean profile with 300265 while the repair is workable but no longer flowing. The tool re-establishes the line; it cannot rebuild a badly spalled corner, which needs formed or edge-bead repair.
Q1. The finished corner edge is rough or jagged. What went wrong?
A. The external 90° vertex of the tool is nicked or burred, and the damage is being printed into every pass. Inspect the vertex, dress light burrs with a fine-cut file, and replace the tool if the edge is deformed rather than merely burred.
Q2. The corner comes out rounded, or it is skewed instead of a true 90°.
A. Rounded usually means the vertex is worn, or too much pressure is driving the tool into the material instead of drawing it along. Skewed means the two wings are not carrying equal load, so press from the heel of the hand and body weight onto both faces at once, not from the fingers onto one. Hold the blade at about 10–15° to the wall on both sides.
Q3. Material squeezes out past the corner, or the tool sticks and tears the surface.
A. The material is too wet or there is too much of it. Remove the excess, wait until the material is workable but no longer flowing before tooling, and clean both faces and the inner throat.
Q4. The corner chips after it cures. What should I do differently?
A. Either no corner bead was used, or the bead was not covered with enough compound; an external edge in bare compound has almost no impact resistance. Set and embed the bead first with a corner roller and a taping knife, then bring 300265 in on the fill and finish coats, building in thin coats.
Q5. Can one tool do both inside and outside corners?
A. No, because the V turns the opposite way. Use Inside Corner 300255 for internal angles and Outside Corner 300265 for external ones, both 4" × 5" stainless steel; 300265 also works on exterior render.
| Item | 300265 |
|---|---|
| Art. Nr | 300265 |
| Blade size | 4" × 5" |
| Metric equivalent | approx. 102 × 127 mm |
| Material | Stainless steel |
| Handle | Red/black two-tone comfort grip |
Red and black two-tone soft comfort grip.
Leading Tools carries both tools at the same 4" × 5" size, in the same stainless steel, with the same handle. The only difference is which way the V turns, and that difference decides the whole purchase.
| Outside Corner 300265 | Inside Corner 300255 | |
|---|---|---|
| Corner type | External (protruding) 90° arris | Internal (re-entrant) 90° angle |
| Blade orientation | Faces turn outward; the vertex wraps over the arris | Faces turn inward; the vertex points away from the operator |
| What the vertex does | Compresses and forms material over the exposed arris | Cuts the internal line and compacts material into the angle |
| Typical failure it addresses | Impact chipping of the exposed arris | Cracking and water entry at the re-entrant angle |
| Corner bead involved? | Almost always: the bead is what makes the arris straight and impact-resistant | Usually tape only |
| Nominal size | 4" × 5" | 4" × 5" |
| Smaller siblings in the range | None | 300255-80 (60 × 80 mm), 300255-108 (38 × 108 mm) |
| Situation on site | Tool |
|---|---|
| Two walls meeting at a room's external angle | Outside Corner 300265 |
| Column, pier or chimney breast return | Outside Corner 300265 |
| Wall meeting a soffit edge, fascia nose or parapet top (external angle) | Outside Corner 300265 |
| Projecting window or door reveal / rendered external corner of a building | Outside Corner 300265 |
| Two walls meeting at a room's internal angle | Inside Corner 300255 |
| Wall meeting ceiling (internal angle) | Inside Corner 300255 |
| Tight reveal or service riser, internal angle | Inside Corner 300255-80 / 300255-108 |
| Free-standing formed concrete arris | Concrete Edger 300100 / 300101 |
The rule is simply: two surfaces forming a protruding angle take the external corner tool; two surfaces forming a recessed angle take the internal corner tool. Most plastering and drywall crews carry both; a crew that carries only one will improvise the other badly.
| Factor | 4" × 5" assessment |
|---|---|
| Coverage per face | 4" of face gives enough reach to feather compound onto the flat without a separate knife pass on most work |
| Pull length | 5" (127 mm) of blade in the pull direction, which keeps the number of stops per corner low |
| Precision | Good; large enough to bridge minor irregularities in the bead line rather than following them |
| Maneuverability | Good on full wall height; too large to seat cleanly on very short returns |
| Pull technique | Pull the full corner height in one continuous stroke where possible; each stop can leave a witness line on the arris. |
Complete art-number and size reference for the Leading Tools Outside Corner range.
| Art. Nr | Size | Metric equivalent | Material | Handle |
|---|---|---|---|---|
| 300265 | 4" × 5" | approx. 102 × 127 mm | Stainless Steel | Red/black two-tone comfort grip |
One art number is listed for Outside Corner. For completeness, the related corner tools in the same group are:
| Art. Nr | Product | Size | Material |
|---|---|---|---|
| 300255 | Inside Corner | 4" × 5" | Stainless Steel |
| 300255-80 | Inside Corner | 60 mm × 80 mm | Stainless Steel |
| 300255-108 | Inside Corner | 38 mm × 108 mm | Stainless Steel |
The external 90° edge is the part of this tool that determines output quality.
Before each use, confirm the handle is tight on its stem and the grip surface is not split or worn. A handle that turns on its stem makes equal two-wing pressure impossible.
Outside Corner — stainless steel external corner trowel
Art. Nr: 300265 — blade 4" × 5" (approx. 102 × 127 mm; 1" = 25.4 mm)
The tool forms and finishes the external (protruding) 90° arris where two rendered, plastered or drywall surfaces meet: a room's outside corner, a return around a column, a parapet edge, a soffit nose, a window or door reveal that projects rather than recedes. It is the mirror opposite of the Inside Corner trowel in the same range (300255), and the two are not interchangeable in either direction.
| Property | What it buys the finisher |
|---|---|
| Corrosion resistance | High corrosion resistance and low upkeep; chlorinated water, coastal air or prolonged soaking can still cause rust spots, so rinse with clean water and dry after use. |
| Less rust staining | Matters on light-colored plaster, white-cement stucco and decorative concrete: a rust stain at the arris bleeds into the finish and cannot be cleaned out, only cut out. |
| Edge stability | The external vertex holds its geometry; a deformed vertex is the one defect on this tool that cannot be filed back to specification. |
In a standard three-coat drywall system the external corner is worked as follows:
| Coat | Tool | What happens at the corner |
|---|---|---|
| First (embed) | Taping knife / corner roller | Corner bead is set and its flanges are embedded; not the outside corner trowel's job. |
| Second (fill) | Outside Corner 300265 | The corner profile is built out over the bead and the flanges are covered. |
| Finish | Outside Corner 300265 | Final pass for a clean, sharp arris and feathered flanks. |
The complete corner-bead sequence in the trade is: seat the bead with a corner roller, load the flanges with a 4" knife, then form and compress with the outside corner trowel.
| Condition | Use 300265? | Why |
|---|---|---|
| Compound / plaster workable but no longer flowing | Yes | Firm enough to hold the profile, still workable |
| Material still wet and slick | No, wait | The tool squeezes material out past the arris and leaves ridges |
| Material already stiffened past workable | No | The vertex skids and scores instead of cutting; re-wet or accept and re-coat |
| First (tape / bead embed) coat | No | Use a taping knife and corner roller |
| Second and finish coats over corner bead | Yes | The tool's intended position in the sequence |
| Render / stucco brown coat and finish coat | Yes | Standard external-corner practice in plaster and render |
| Veneer (two-coat) plaster, after each coat | Yes | Timing is tighter than in three-coat work because veneer sets fast |
| Dressing a repaired cast-concrete arris | Yes, after a thin repair compound is applied | The vertex re-establishes a clean line on the patch |
| Step | Action | Check before moving on |
|---|---|---|
| 1 | Confirm readiness. Check that the material is workable but no longer flowing; this depends on the material and site conditions. Too wet and it squeezes out; too stiff and the vertex scores the surface. | The material holds its shape and does not stick to the tool |
| 2 | Prepare the corner. Corner bead fully embedded, flanges covered, bead straight; gaps between bead and substrate filled; both flanks flat and at the same stage. | Sight down the bead: it must be straight before you tool |
| 3 | Seat the tool at the top of the corner. Both faces bearing on their own wall plane at the same time; vertex aligned on the arris. | Rock the tool gently: both faces should contact, not one |
| 4 | Set the angle: about 10–15° between blade and wall surface. Too flat and the tool skates; too steep and the leading edge scores a groove. | The vertex stays on the arris line |
| 5 | Keep the pull square. Do not let the tool wander left or right of the arris: even a 3–5° skew unloads one wing and overloads the other. | The vertex tracks the bead, not the flat |
| 6 | Load both wings equally. Pressure comes from the heel of the hand and body weight, not from the fingers. Uneven load produces a skewed corner and a ridge on one flank. | Both flanks come out flat, no ridge on either |
| 7 | Pull in one continuous stroke, top to bottom (or bottom to top, following the direction the material was laid on). Do not stop mid-pass. | No witness line anywhere on the arris |
| 8 | Lift straight off at the end. Do not drag the vertex across the floor, base or return. | The last 100 mm of arris is as clean as the first |
| 9 | Inspect. A correct external corner is a clean, straight, consistent 90° line with no voids, no squeeze-out past the arris, and both flanks flush with the corner. | If not, go to step 10 |
| 10 | Correct on a second pass, not immediately. Let the material firm slightly and pass again. Re-tooling wet material squeezes it out and creates ridges. |
Build in thin coats. Keep each coat thin; let it dry and lightly sand before the next, rather than trying to build the full profile in one pass.
Timing discipline. Do not tool the corner too early: an early pass presses a hollow into the arris. The usual sequence is to straighten and flatten the corner on the second coat first, tool it once it has firmed, and take a final light pass before the finish is closed up.
| Factor | Metal corner bead | Paper-faced corner bead |
|---|---|---|
| Impact resistance | Higher | Moderate |
| Rust potential | Possible in damp conditions | Lower |
| Finishing | Flanges are covered with compound | Paper facing already includes the tape; embed it in compound |
| Outside Corner tool use | Standard, from the second coat on | Standard, from the second coat on |
| Best for | High-traffic areas and exterior work | Interior, lower-traffic areas |
Whichever bead is used, 300265 enters the job at the same point: after the bead is set and embedded, on the fill and finish coats.
External corners on a rendered façade take direct weather and direct impact, so the corner detail carries more of the building's durability than its area suggests.
On cast-in-place concrete, the external corner is formed by the formwork, not by a trowel. After the forms are struck, minor chips and irregularities at the arris can be filled with a thin repair mortar or patching compound and then dressed to a clean profile with 300265 while the repair is workable but no longer flowing. The tool re-establishes the line; it cannot rebuild a badly spalled corner, which needs formed or edge-bead repair.
Q1. The finished corner edge is rough or jagged. What went wrong?
A. The external 90° vertex of the tool is nicked or burred, and the damage is being printed into every pass. Inspect the vertex, dress light burrs with a fine-cut file, and replace the tool if the edge is deformed rather than merely burred.
Q2. The corner comes out rounded, or it is skewed instead of a true 90°.
A. Rounded usually means the vertex is worn, or too much pressure is driving the tool into the material instead of drawing it along. Skewed means the two wings are not carrying equal load, so press from the heel of the hand and body weight onto both faces at once, not from the fingers onto one. Hold the blade at about 10–15° to the wall on both sides.
Q3. Material squeezes out past the corner, or the tool sticks and tears the surface.
A. The material is too wet or there is too much of it. Remove the excess, wait until the material is workable but no longer flowing before tooling, and clean both faces and the inner throat.
Q4. The corner chips after it cures. What should I do differently?
A. Either no corner bead was used, or the bead was not covered with enough compound; an external edge in bare compound has almost no impact resistance. Set and embed the bead first with a corner roller and a taping knife, then bring 300265 in on the fill and finish coats, building in thin coats.
Q5. Can one tool do both inside and outside corners?
A. No, because the V turns the opposite way. Use Inside Corner 300255 for internal angles and Outside Corner 300265 for external ones, both 4" × 5" stainless steel; 300265 also works on exterior render.
| Item | 300265 |
|---|---|
| Art. Nr | 300265 |
| Blade size | 4" × 5" |
| Metric equivalent | approx. 102 × 127 mm |
| Material | Stainless steel |
| Handle | Red/black two-tone comfort grip |
Red and black two-tone soft comfort grip.
Leading Tools carries both tools at the same 4" × 5" size, in the same stainless steel, with the same handle. The only difference is which way the V turns, and that difference decides the whole purchase.
| Outside Corner 300265 | Inside Corner 300255 | |
|---|---|---|
| Corner type | External (protruding) 90° arris | Internal (re-entrant) 90° angle |
| Blade orientation | Faces turn outward; the vertex wraps over the arris | Faces turn inward; the vertex points away from the operator |
| What the vertex does | Compresses and forms material over the exposed arris | Cuts the internal line and compacts material into the angle |
| Typical failure it addresses | Impact chipping of the exposed arris | Cracking and water entry at the re-entrant angle |
| Corner bead involved? | Almost always: the bead is what makes the arris straight and impact-resistant | Usually tape only |
| Nominal size | 4" × 5" | 4" × 5" |
| Smaller siblings in the range | None | 300255-80 (60 × 80 mm), 300255-108 (38 × 108 mm) |
| Situation on site | Tool |
|---|---|
| Two walls meeting at a room's external angle | Outside Corner 300265 |
| Column, pier or chimney breast return | Outside Corner 300265 |
| Wall meeting a soffit edge, fascia nose or parapet top (external angle) | Outside Corner 300265 |
| Projecting window or door reveal / rendered external corner of a building | Outside Corner 300265 |
| Two walls meeting at a room's internal angle | Inside Corner 300255 |
| Wall meeting ceiling (internal angle) | Inside Corner 300255 |
| Tight reveal or service riser, internal angle | Inside Corner 300255-80 / 300255-108 |
| Free-standing formed concrete arris | Concrete Edger 300100 / 300101 |
The rule is simply: two surfaces forming a protruding angle take the external corner tool; two surfaces forming a recessed angle take the internal corner tool. Most plastering and drywall crews carry both; a crew that carries only one will improvise the other badly.
| Factor | 4" × 5" assessment |
|---|---|
| Coverage per face | 4" of face gives enough reach to feather compound onto the flat without a separate knife pass on most work |
| Pull length | 5" (127 mm) of blade in the pull direction, which keeps the number of stops per corner low |
| Precision | Good; large enough to bridge minor irregularities in the bead line rather than following them |
| Maneuverability | Good on full wall height; too large to seat cleanly on very short returns |
| Pull technique | Pull the full corner height in one continuous stroke where possible; each stop can leave a witness line on the arris. |
Complete art-number and size reference for the Leading Tools Outside Corner range.
| Art. Nr | Size | Metric equivalent | Material | Handle |
|---|---|---|---|---|
| 300265 | 4" × 5" | approx. 102 × 127 mm | Stainless Steel | Red/black two-tone comfort grip |
One art number is listed for Outside Corner. For completeness, the related corner tools in the same group are:
| Art. Nr | Product | Size | Material |
|---|---|---|---|
| 300255 | Inside Corner | 4" × 5" | Stainless Steel |
| 300255-80 | Inside Corner | 60 mm × 80 mm | Stainless Steel |
| 300255-108 | Inside Corner | 38 mm × 108 mm | Stainless Steel |
The external 90° edge is the part of this tool that determines output quality.
Before each use, confirm the handle is tight on its stem and the grip surface is not split or worn. A handle that turns on its stem makes equal two-wing pressure impossible.

In compliance with EU personal data protection laws, we are committed to protecting and providing you with control over your personal data. By clicking "Accept All", you allow us to place cookies to enhance your experience on this site, help us analyze site performance and usage, and enable us to deliver relevant marketing content. You can manage your cookie settings below. By clicking "Agree" you agree to the current settings. For more information, please visit the Privacy Statement.
This website uses cookies
In compliance with EU personal data protection laws, we are committed to protecting your personal data and providing you with control over it. By clicking "Agree", you allow us to place cookies to improve your experience on this site, help us analyze site performance and usage, and allow us to deliver relevant marketing content.
By clicking "Only necessary" you allow us to place only necessary cookies. The website cannot function without these cookies and you cannot switch them off on your system. These cookies are typically set only in response to an action you perform (i.e. a service request), such as setting privacy preferences, logging in, or filling in a form. You can set your browser to block or prompt you for these cookies, but this may prevent some site features from working.



