
Copyright 2026 © Leading Tools Industrial Co., Ltd.
All Rights Reserved. Website Design by Awakening Design
CATALOG TYPE
Product Categories
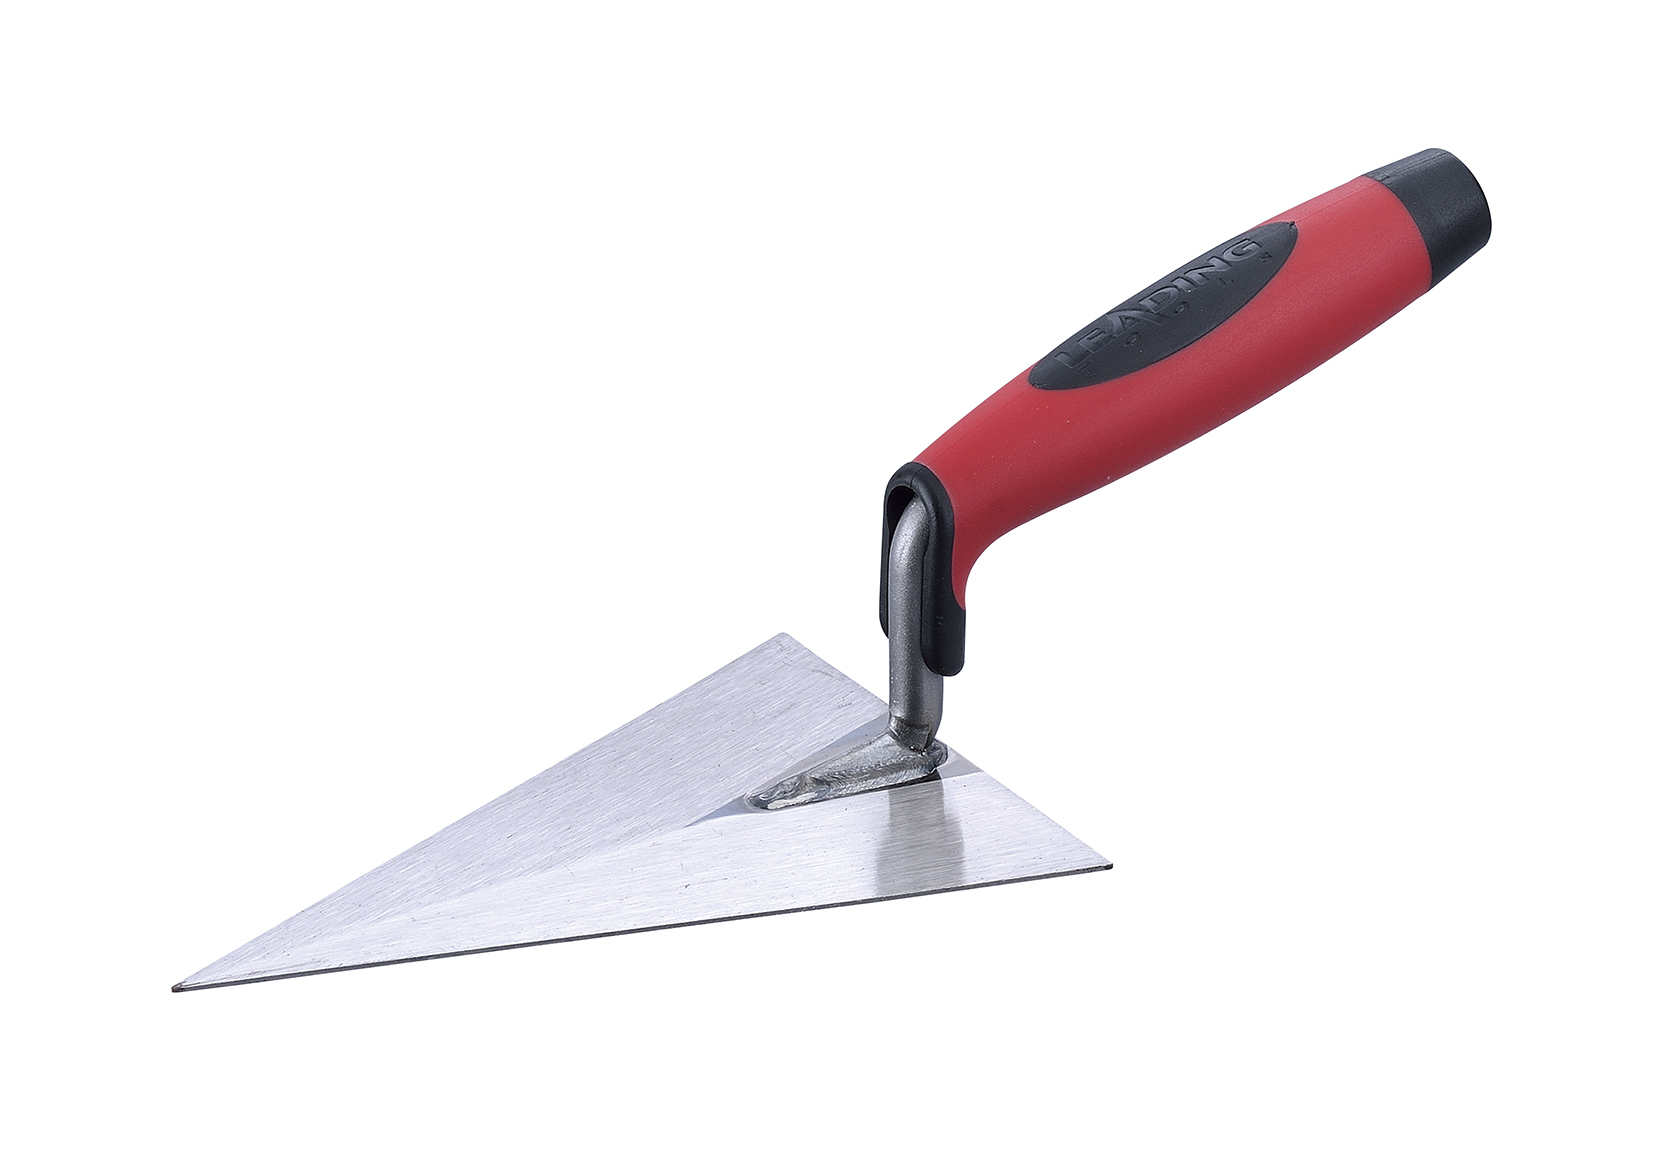
Pointed Triangle Trowel — CO2 Welded Carbon Steel
Product Description
Product name: Pointed Triangle Trowel
Construction line: CO2 Welded Carbon Steel
Art. Nr (three blade sizes): 281621 (120 mm), 282621 (140 mm), 283621 (160 mm).
These three art numbers are one product family in one blade pattern. They differ only in blade size. Related products in the range include the Triangle Trowel (260604), Heart Trowel CO2 (263604) and Heart Trowel Spot Welded Stainless Steel (263304).
The tool has a flat delta (triangular) blade running to a single sharp point at the toe, a short cranked shank welded to the blade heel, and a soft-grip handle (BF21).
Leading Tools carries a second line also titled "Pointed Triangle Trowel / CO2 Welded Carbon Steel", with art numbers 892621 (120 mm) and 893621 (140 mm) and a different blade shape (see the catalog). The sizes overlap 281621 (120 mm) and 282621 (140 mm).
| Product line | Art. Nr | Sizes |
|---|---|---|
| Pointed Triangle Trowel — CO2 Welded Carbon Steel | 281621 / 282621 / 283621 | 120 / 140 / 160 mm |
| Pointed Triangle Trowel — Spot Welded Stainless Steel | 281821 / 282821 / 283821 | 120 / 140 / 160 mm |
| Pointed Triangle Trowel — CO2 Welded Carbon Steel (different blade shape) | 892621 / 893621 | 120 / 140 mm |
The blade is flat and triangular: widest at the heel where the shank foot is welded on, tapering in a straight line on both sides, and terminating in one sharp point at the toe. There is no rounded nose, no square toe and no notching. This is the geometric difference from the Triangle Trowel (260604) in the same range, whose blade is rounded. The point is the working feature, used for internal corners and fine detail.
The heel section is wide enough to hold a small working charge of mortar, so the operator is not reloading after every placement. The blade picks up the mortar and carries it to the edge of the joint; pressing and compacting it into the joint is done with a Tuck Pointing Trowel or a Brick Jointer.
Because the blade narrows continuously, the amount of steel in contact with the work reduces the further forward you go. The operator changes the effective width of the tool simply by changing where along the blade the material is worked, so one blade can be used for both fine detail and wider areas without swapping tools.
The line designation states CO2 Welded Carbon Steel. Carbon steel blades cost less, but they must be wiped dry and thinly oiled after use, or they will rust.
The blade and the shank are separate components joined by CO2 welding; this is a fabricated assembly, not a one-piece forging. It is meant for light mortar handling, patching and detail work; do not use it to lever, pry, cut or strike.
The handle is the BF21 soft grip. Other handles can be fitted on request; contact Leading Tools sales.
120, 140 and 160 mm, approximately 4.7, 5.5 and 6.3 in.
The normal masonry sequence is bulk placement with a large trowel, then a smaller tool for detail work. The Pointed Triangle Trowel is that smaller tool: it picks up a small amount of mortar, patches and repairs small areas, and carries mortar to the edge of the joint. Pressing the mortar into the joint and compacting it is the job of a Tuck Pointing Trowel or a Brick Jointer.
For patching, repairs and small rebuilds, a small amount of mortar can be picked up and placed precisely without loading the adjacent brick faces. Repointing itself, pressing mortar deep into a raked joint, is done with a Tuck Pointing Trowel or a Brick Jointer.
The triangular blade is the shape for corners and narrow faces, including detail rendering and repair work. The point can start a line of material directly in the vertex of a corner.
The European Margin Trowel and this tool are often bought together and are frequently confused. The distinction is clear: the margin trowel's trapezoidal blade with a square toe is for filling corners, smoothing and patching, while this trowel's point is for precise placement of small amounts of mortar. The blade shapes are different, the applications overlap but they are not one tool.
| Situation | Use this tool? | Why |
|---|---|---|
| Picking up small amounts of mortar; patching and small rebuilds | Yes, primary use | The blade picks up a small charge and places it precisely without loading the surrounding faces |
| Repairs and detail rendering / plastering after bulk placement | Yes | The usual sequence is a big trowel to place, then this trowel for detail and small areas |
| Carrying mortar to the edge of the joint | Yes | The wide heel carries a working charge to the joint |
| Pressing and compacting mortar into the joint (repointing) | No, use a Tuck Pointing Trowel or a Brick Jointer | Those are the tools made to press mortar into the joint and compact it |
| Internal corners, reveals and confined faces | Yes | The triangular blade is specifically the shape for corners and narrow faces |
| Curved and arch work | Yes | The point follows a tight radius without the toe fishtailing, while the wide heel still carries material |
| Laying brick and carrying bulk mortar | No, use a brick trowel | Philadelphia and London pattern blades exist for mortar pickup and bulk placement |
| Combing adhesive for tiling | No, use a notch trowel | This blade is flat and unnotched |
| Levering, prying, chipping, striking | Never | Not designed for these loads |
| Step | Action | Note |
|---|---|---|
| 1 | Grip the handle with four fingers wrapped around the body and the thumb pressed on top of the handle, not extended down toward the blade | Keeps the thumb out of the mortar zone and improves balance and control |
| 2 | Load a small charge of mortar onto the heel half of the blade | Mortar should be stiff enough to hold its shape on the blade |
| 3 | Hold the blade at a shallow angle to the work (about 30°) | A steep angle makes the point dig in |
| 4 | Place the mortar on the patch or detail area, or carry it to the edge of the joint | To press and compact mortar into the joint, change to a Tuck Pointing Trowel or a Brick Jointer |
| 5 | Draw the tool toward you, letting the two side edges ride on the masonry faces | Pushing the point into material risks damaging the tip and gives less control |
| 6 | Smooth the patch or detail area so it matches the surrounding work | |
| 7 | Clean the blade before the mortar sets, several times during the working day | Mortar build-up weakens the blade-to-handle junction and can eventually cause failure |
Patching is the core application. The damaged area is cleaned back to sound material and dampened as the mix requires; a small amount of mortar is then picked up and placed with the trowel and smoothed to match the adjacent work.
The value of the pointed blade here is selective access: material goes only where it is needed without loading the brick faces around it. Repointing, pressing mortar deep into raked joints, is done with a Tuck Pointing Trowel or a Brick Jointer; this trowel carries the mortar to the edge of the joint.
For lime mortar work, work more slowly and clean the blade far more often. Mortar residue holds water against the steel, so a carbon steel blade used in lime needs cleaning and oiling more frequently than one used in cement mortar.
The point lets a line of material be started in the vertex of an internal corner rather than worked in from the side. The delta face then distributes the material against the flanking surfaces. The triangular blade is the correct shape for corners and confined faces, including detail rendering and repair.
Choose the 120 mm (281621) where access is genuinely restricted: behind pipework, in deeply recessed joints, in ornamental stonework, because the smaller blade is easier to manoeuvre without fouling the surrounding surfaces.
The pointed toe can follow a tight radius without the toe dragging, and the taper means the operator changes effective width by changing where along the blade the material is worked. Hold the trowel at a shallow angle to the curved surface and let the two side edges of the delta ride on the adjacent masonry faces so they smooth those surfaces at the same time.
Q1. What is this tool actually for?
A: Picking up small amounts of mortar, patching and small rebuilds, repairs, detail rendering and plastering, and carrying mortar to the edge of the joint. It is also used for corners and confined faces.
It does not press and compact mortar into the joint: that is done with a Tuck Pointing Trowel or a Brick Jointer. It is not a bricklaying trowel; Philadelphia and London pattern blades exist for mortar pickup and bulk placement.
Q2. Which of the three sizes should I order?
A: 140 mm (282621) is the most versatile. Take 120 mm (281621) for restricted access and fine detail, and 160 mm (283621) for larger patches and larger curved work.
Q3. Carbon steel or stainless?
A: Carbon steel (this line) rusts if it is not dried and oiled after use; stainless has high corrosion resistance and needs less maintenance.
Buy this line for daily trade use by someone who maintains their tools, and the Spot Welded Stainless Steel sister line for occasional use, wet environments or lime mortar work. Use this tool for patching and detail work, never for levering, prying or striking.
Q4. How do I keep it clean and prevent rust, and why is mortar not releasing?
A: Clean and fully dry the blade after every use, apply a light protective oil before storage with particular attention to the point, and oil more often in damp conditions; clean several times per working day, because mortar accumulation weakens the junction between blade and handle.
If mortar does not release cleanly, the usual causes are oil, silicone or curing compound on the blade face, an over-plasticized mix, or a new blade that has not yet bedded in: wash it with detergent, work it through mortar for several passes and adjust the mix. If rust keeps recurring, switch to the stainless sister line.
Q5. When should I stop using it or replace it?
A: If the blade feels loose at the weld, stop using the tool; the weld cannot be reliably repaired in the field. If the point is bent or significantly deformed, replace the tool, because it compromises precise placement; a light burr can be dressed with a fine stone, but do not change the blade shape.
In plan view the blade is a delta with three defining zones:
Together those give a tool that is directional (the point can be aimed and driven into tight spaces), stable when loaded (the wide heel picks up and carries mortar), and progressively finer toward the tip (contact area falls as you work forward).
| Blade family | Plan-view shape | Toe profile | Primary role | Sizes in the Leading Tools range |
|---|---|---|---|---|
| Philadelphia | Parallelogram, deep square heel | Curved sides to a point | Standard bricklaying, mortar pickup and direction; carries more mortar | Brick Trowel range |
| London (wide / narrow) | Tapered parallelogram, rounded heel | Sharp pointed toe | Precision brick placement; mortar sits further forward | Brick Trowel range |
| European Margin | Trapezoid | Square toe | Filling corners, smoothing and patching | 30–120 mm |
| Tongue | Long tapered tongue / feather | Rounded nose | Rendering and patching in confined runs | 120–180 mm |
| Triangle Trowel | Triangle / delta | Rounded (260604) | Picking up and spreading mortar for bricklaying and general plastering | 160 mm (260604), 220 mm (810101) |
| Heart Trowel | Heart / kidney | Rounded | Curved and shaped surface work | 160 mm (263604 / 263304) |
| Pointed Triangle Trowel | Triangle / delta | Sharp pointed toe | Picking up small amounts of mortar, patching, repairs, detail work, corners | 120 / 140 / 160 mm |
The Pointed Triangle Trowel occupies a specific niche: the triangular spreading face of the Triangle Trowel family combined with the pointed-toe precision of a brick trowel, in a narrower and more specialized form.
This line is built as CO2 Welded Carbon Steel, the same fabrication route used across the Leading Tools Brick Trowel CO2 welded families.
What CO2 welding means in this context: the blade and the shank are separate components joined by CO2 welding.
Practical implications:
| Aspect | Detail |
|---|---|
| Structural continuity | Blade and shank joined by weld, not a seamless forging |
| Joint area | Welded transition visible at the blade-shank junction |
Soft-grip handle, BF21. Other handles can be fitted on request; contact Leading Tools sales.
| Attribute | Specification |
|---|---|
| Product name | Pointed Triangle Trowel |
| Article numbers | 281621 (120 mm), 282621 (140 mm), 283621 (160 mm) |
| Blade pattern | Pointed triangle (delta plan view), single sharp pointed toe |
| Blade construction | CO2 welding, blade and shank assembled as separate parts |
| Blade material | Carbon steel |
| Blade toe profile | Sharp pointed toe |
| Blade sizes | 120 mm, 140 mm, 160 mm (≈ 4.7 / 5.5 / 6.3 in at 1 in = 25.4 mm) |
| Sizes available | 3 |
| Handle type | Soft-grip handle, BF21 |
| Shank | Standard cranked shank |
| ART.NR | Size | Best for | Consideration |
|---|---|---|---|
| 281621 | 120 mm (≈ 4.7 in) | Fine detail work, tight radii, small repairs and patching, work in restricted access | Smallest mortar charge, so more frequent reloading; the size for confined spaces and small mortar transfers |
| 282621 | 140 mm (≈ 5.5 in) | General small-area patching and detail work, medium arch and curved work | The most versatile of the three |
| 283621 | 160 mm (≈ 6.3 in) | Larger patches, larger curved work, wider detail areas | Same size as the Triangle Trowel 260604 in the same range; the largest of the three |
| Application | Recommended size |
|---|---|
| Fine detail, small repairs, restricted access | 120 mm (281621) |
| General patching and detail work, curved and arch work | 140 mm (282621) |
| Larger patches, larger curved soffits, wider detail areas | 160 mm (283621) |
| CO2 Welded Carbon Steel — 281621–283621 | Spot Welded Stainless Steel — 281821–283821 | |
|---|---|---|
| Corrosion behaviour | Will rust if stored wet or with mortar residue on it; needs drying and oiling after every use | High corrosion resistance and low maintenance; chlorinated water, coastal air or prolonged soaking can still cause rust spots, so rinse with clean water and dry after use |
| Who should buy it | Daily trade users who will maintain the tool | Occasional users, wet environments, lime mortar work |
Practical guidance: if the tool goes into a van and comes out every day in the hands of someone who cleans and oils it, carbon steel is suitable. If it will be used intermittently, left in a damp bag, or used in lime mortar work, buy the stainless sister line instead.
This tool is for light work: picking up and placing small amounts of mortar for patching and detail work. Do not use it to lever, pry, cut or strike.
| Product | ART.NR | Blade pattern | Construction |
|---|---|---|---|
| Triangle Trowel | 260604, 810101 | Triangle | CO2 Welded Carbon Steel |
| Heart Trowel | 263604 | Heart / kidney | CO2 Welded Carbon Steel |
| Heart Trowel | 263304 | Heart / kidney | Spot Welded Stainless Steel |
| Tongue Trowel | 251621–254621 | Tongue / feather | CO2 Welded Carbon Steel |
| European Margin Trowel | 243621–248621, 240621, 242621 | Trapezoid, square toe | CO2 Welded Carbon Steel |
| Pointed Triangle Trowel | 281821–283821 | Triangle, sharp pointed toe | Spot Welded Stainless Steel |
| Pointed Triangle Trowel | 892621, 893621 | Triangle, sharp pointed toe | CO2 Welded Carbon Steel, different blade shape (see the catalog) |
All three art numbers of this product.
| ART.NR | Size | Blade material | Construction | Handle type |
|---|---|---|---|---|
| 281621 | 120 mm (≈ 4.7 in) | Carbon steel | CO2 welded | Soft grip, BF21 |
| 282621 | 140 mm (≈ 5.5 in) | Carbon steel | CO2 welded | Soft grip, BF21 |
| 283621 | 160 mm (≈ 6.3 in) | Carbon steel | CO2 welded | Soft grip, BF21 |
Imperial figures above are converted at 1 in = 25.4 mm.
A carbon steel trowel blade will rust if it is not dried and oiled, and it needs more frequent maintenance than a stainless one.
The moulded soft-grip handle needs very little maintenance:
The blade and shank are joined by a weld, so the joint deserves specific periodic attention. Do not lever or strike with the blade.
Check for hairline cracks, separation, or corrosion concentrated at the joint. A trowel with a suspected weld failure should be taken out of service immediately; the joint cannot be reliably repaired in the field.
Product name: Pointed Triangle Trowel
Construction line: CO2 Welded Carbon Steel
Art. Nr (three blade sizes): 281621 (120 mm), 282621 (140 mm), 283621 (160 mm).
These three art numbers are one product family in one blade pattern. They differ only in blade size. Related products in the range include the Triangle Trowel (260604), Heart Trowel CO2 (263604) and Heart Trowel Spot Welded Stainless Steel (263304).
The tool has a flat delta (triangular) blade running to a single sharp point at the toe, a short cranked shank welded to the blade heel, and a soft-grip handle (BF21).
Leading Tools carries a second line also titled "Pointed Triangle Trowel / CO2 Welded Carbon Steel", with art numbers 892621 (120 mm) and 893621 (140 mm) and a different blade shape (see the catalog). The sizes overlap 281621 (120 mm) and 282621 (140 mm).
| Product line | Art. Nr | Sizes |
|---|---|---|
| Pointed Triangle Trowel — CO2 Welded Carbon Steel | 281621 / 282621 / 283621 | 120 / 140 / 160 mm |
| Pointed Triangle Trowel — Spot Welded Stainless Steel | 281821 / 282821 / 283821 | 120 / 140 / 160 mm |
| Pointed Triangle Trowel — CO2 Welded Carbon Steel (different blade shape) | 892621 / 893621 | 120 / 140 mm |
The blade is flat and triangular: widest at the heel where the shank foot is welded on, tapering in a straight line on both sides, and terminating in one sharp point at the toe. There is no rounded nose, no square toe and no notching. This is the geometric difference from the Triangle Trowel (260604) in the same range, whose blade is rounded. The point is the working feature, used for internal corners and fine detail.
The heel section is wide enough to hold a small working charge of mortar, so the operator is not reloading after every placement. The blade picks up the mortar and carries it to the edge of the joint; pressing and compacting it into the joint is done with a Tuck Pointing Trowel or a Brick Jointer.
Because the blade narrows continuously, the amount of steel in contact with the work reduces the further forward you go. The operator changes the effective width of the tool simply by changing where along the blade the material is worked, so one blade can be used for both fine detail and wider areas without swapping tools.
The line designation states CO2 Welded Carbon Steel. Carbon steel blades cost less, but they must be wiped dry and thinly oiled after use, or they will rust.
The blade and the shank are separate components joined by CO2 welding; this is a fabricated assembly, not a one-piece forging. It is meant for light mortar handling, patching and detail work; do not use it to lever, pry, cut or strike.
The handle is the BF21 soft grip. Other handles can be fitted on request; contact Leading Tools sales.
120, 140 and 160 mm, approximately 4.7, 5.5 and 6.3 in.
The normal masonry sequence is bulk placement with a large trowel, then a smaller tool for detail work. The Pointed Triangle Trowel is that smaller tool: it picks up a small amount of mortar, patches and repairs small areas, and carries mortar to the edge of the joint. Pressing the mortar into the joint and compacting it is the job of a Tuck Pointing Trowel or a Brick Jointer.
For patching, repairs and small rebuilds, a small amount of mortar can be picked up and placed precisely without loading the adjacent brick faces. Repointing itself, pressing mortar deep into a raked joint, is done with a Tuck Pointing Trowel or a Brick Jointer.
The triangular blade is the shape for corners and narrow faces, including detail rendering and repair work. The point can start a line of material directly in the vertex of a corner.
The European Margin Trowel and this tool are often bought together and are frequently confused. The distinction is clear: the margin trowel's trapezoidal blade with a square toe is for filling corners, smoothing and patching, while this trowel's point is for precise placement of small amounts of mortar. The blade shapes are different, the applications overlap but they are not one tool.
| Situation | Use this tool? | Why |
|---|---|---|
| Picking up small amounts of mortar; patching and small rebuilds | Yes, primary use | The blade picks up a small charge and places it precisely without loading the surrounding faces |
| Repairs and detail rendering / plastering after bulk placement | Yes | The usual sequence is a big trowel to place, then this trowel for detail and small areas |
| Carrying mortar to the edge of the joint | Yes | The wide heel carries a working charge to the joint |
| Pressing and compacting mortar into the joint (repointing) | No, use a Tuck Pointing Trowel or a Brick Jointer | Those are the tools made to press mortar into the joint and compact it |
| Internal corners, reveals and confined faces | Yes | The triangular blade is specifically the shape for corners and narrow faces |
| Curved and arch work | Yes | The point follows a tight radius without the toe fishtailing, while the wide heel still carries material |
| Laying brick and carrying bulk mortar | No, use a brick trowel | Philadelphia and London pattern blades exist for mortar pickup and bulk placement |
| Combing adhesive for tiling | No, use a notch trowel | This blade is flat and unnotched |
| Levering, prying, chipping, striking | Never | Not designed for these loads |
| Step | Action | Note |
|---|---|---|
| 1 | Grip the handle with four fingers wrapped around the body and the thumb pressed on top of the handle, not extended down toward the blade | Keeps the thumb out of the mortar zone and improves balance and control |
| 2 | Load a small charge of mortar onto the heel half of the blade | Mortar should be stiff enough to hold its shape on the blade |
| 3 | Hold the blade at a shallow angle to the work (about 30°) | A steep angle makes the point dig in |
| 4 | Place the mortar on the patch or detail area, or carry it to the edge of the joint | To press and compact mortar into the joint, change to a Tuck Pointing Trowel or a Brick Jointer |
| 5 | Draw the tool toward you, letting the two side edges ride on the masonry faces | Pushing the point into material risks damaging the tip and gives less control |
| 6 | Smooth the patch or detail area so it matches the surrounding work | |
| 7 | Clean the blade before the mortar sets, several times during the working day | Mortar build-up weakens the blade-to-handle junction and can eventually cause failure |
Patching is the core application. The damaged area is cleaned back to sound material and dampened as the mix requires; a small amount of mortar is then picked up and placed with the trowel and smoothed to match the adjacent work.
The value of the pointed blade here is selective access: material goes only where it is needed without loading the brick faces around it. Repointing, pressing mortar deep into raked joints, is done with a Tuck Pointing Trowel or a Brick Jointer; this trowel carries the mortar to the edge of the joint.
For lime mortar work, work more slowly and clean the blade far more often. Mortar residue holds water against the steel, so a carbon steel blade used in lime needs cleaning and oiling more frequently than one used in cement mortar.
The point lets a line of material be started in the vertex of an internal corner rather than worked in from the side. The delta face then distributes the material against the flanking surfaces. The triangular blade is the correct shape for corners and confined faces, including detail rendering and repair.
Choose the 120 mm (281621) where access is genuinely restricted: behind pipework, in deeply recessed joints, in ornamental stonework, because the smaller blade is easier to manoeuvre without fouling the surrounding surfaces.
The pointed toe can follow a tight radius without the toe dragging, and the taper means the operator changes effective width by changing where along the blade the material is worked. Hold the trowel at a shallow angle to the curved surface and let the two side edges of the delta ride on the adjacent masonry faces so they smooth those surfaces at the same time.
Q1. What is this tool actually for?
A: Picking up small amounts of mortar, patching and small rebuilds, repairs, detail rendering and plastering, and carrying mortar to the edge of the joint. It is also used for corners and confined faces.
It does not press and compact mortar into the joint: that is done with a Tuck Pointing Trowel or a Brick Jointer. It is not a bricklaying trowel; Philadelphia and London pattern blades exist for mortar pickup and bulk placement.
Q2. Which of the three sizes should I order?
A: 140 mm (282621) is the most versatile. Take 120 mm (281621) for restricted access and fine detail, and 160 mm (283621) for larger patches and larger curved work.
Q3. Carbon steel or stainless?
A: Carbon steel (this line) rusts if it is not dried and oiled after use; stainless has high corrosion resistance and needs less maintenance.
Buy this line for daily trade use by someone who maintains their tools, and the Spot Welded Stainless Steel sister line for occasional use, wet environments or lime mortar work. Use this tool for patching and detail work, never for levering, prying or striking.
Q4. How do I keep it clean and prevent rust, and why is mortar not releasing?
A: Clean and fully dry the blade after every use, apply a light protective oil before storage with particular attention to the point, and oil more often in damp conditions; clean several times per working day, because mortar accumulation weakens the junction between blade and handle.
If mortar does not release cleanly, the usual causes are oil, silicone or curing compound on the blade face, an over-plasticized mix, or a new blade that has not yet bedded in: wash it with detergent, work it through mortar for several passes and adjust the mix. If rust keeps recurring, switch to the stainless sister line.
Q5. When should I stop using it or replace it?
A: If the blade feels loose at the weld, stop using the tool; the weld cannot be reliably repaired in the field. If the point is bent or significantly deformed, replace the tool, because it compromises precise placement; a light burr can be dressed with a fine stone, but do not change the blade shape.
In plan view the blade is a delta with three defining zones:
Together those give a tool that is directional (the point can be aimed and driven into tight spaces), stable when loaded (the wide heel picks up and carries mortar), and progressively finer toward the tip (contact area falls as you work forward).
| Blade family | Plan-view shape | Toe profile | Primary role | Sizes in the Leading Tools range |
|---|---|---|---|---|
| Philadelphia | Parallelogram, deep square heel | Curved sides to a point | Standard bricklaying, mortar pickup and direction; carries more mortar | Brick Trowel range |
| London (wide / narrow) | Tapered parallelogram, rounded heel | Sharp pointed toe | Precision brick placement; mortar sits further forward | Brick Trowel range |
| European Margin | Trapezoid | Square toe | Filling corners, smoothing and patching | 30–120 mm |
| Tongue | Long tapered tongue / feather | Rounded nose | Rendering and patching in confined runs | 120–180 mm |
| Triangle Trowel | Triangle / delta | Rounded (260604) | Picking up and spreading mortar for bricklaying and general plastering | 160 mm (260604), 220 mm (810101) |
| Heart Trowel | Heart / kidney | Rounded | Curved and shaped surface work | 160 mm (263604 / 263304) |
| Pointed Triangle Trowel | Triangle / delta | Sharp pointed toe | Picking up small amounts of mortar, patching, repairs, detail work, corners | 120 / 140 / 160 mm |
The Pointed Triangle Trowel occupies a specific niche: the triangular spreading face of the Triangle Trowel family combined with the pointed-toe precision of a brick trowel, in a narrower and more specialized form.
This line is built as CO2 Welded Carbon Steel, the same fabrication route used across the Leading Tools Brick Trowel CO2 welded families.
What CO2 welding means in this context: the blade and the shank are separate components joined by CO2 welding.
Practical implications:
| Aspect | Detail |
|---|---|
| Structural continuity | Blade and shank joined by weld, not a seamless forging |
| Joint area | Welded transition visible at the blade-shank junction |
Soft-grip handle, BF21. Other handles can be fitted on request; contact Leading Tools sales.
| Attribute | Specification |
|---|---|
| Product name | Pointed Triangle Trowel |
| Article numbers | 281621 (120 mm), 282621 (140 mm), 283621 (160 mm) |
| Blade pattern | Pointed triangle (delta plan view), single sharp pointed toe |
| Blade construction | CO2 welding, blade and shank assembled as separate parts |
| Blade material | Carbon steel |
| Blade toe profile | Sharp pointed toe |
| Blade sizes | 120 mm, 140 mm, 160 mm (≈ 4.7 / 5.5 / 6.3 in at 1 in = 25.4 mm) |
| Sizes available | 3 |
| Handle type | Soft-grip handle, BF21 |
| Shank | Standard cranked shank |
| ART.NR | Size | Best for | Consideration |
|---|---|---|---|
| 281621 | 120 mm (≈ 4.7 in) | Fine detail work, tight radii, small repairs and patching, work in restricted access | Smallest mortar charge, so more frequent reloading; the size for confined spaces and small mortar transfers |
| 282621 | 140 mm (≈ 5.5 in) | General small-area patching and detail work, medium arch and curved work | The most versatile of the three |
| 283621 | 160 mm (≈ 6.3 in) | Larger patches, larger curved work, wider detail areas | Same size as the Triangle Trowel 260604 in the same range; the largest of the three |
| Application | Recommended size |
|---|---|
| Fine detail, small repairs, restricted access | 120 mm (281621) |
| General patching and detail work, curved and arch work | 140 mm (282621) |
| Larger patches, larger curved soffits, wider detail areas | 160 mm (283621) |
| CO2 Welded Carbon Steel — 281621–283621 | Spot Welded Stainless Steel — 281821–283821 | |
|---|---|---|
| Corrosion behaviour | Will rust if stored wet or with mortar residue on it; needs drying and oiling after every use | High corrosion resistance and low maintenance; chlorinated water, coastal air or prolonged soaking can still cause rust spots, so rinse with clean water and dry after use |
| Who should buy it | Daily trade users who will maintain the tool | Occasional users, wet environments, lime mortar work |
Practical guidance: if the tool goes into a van and comes out every day in the hands of someone who cleans and oils it, carbon steel is suitable. If it will be used intermittently, left in a damp bag, or used in lime mortar work, buy the stainless sister line instead.
This tool is for light work: picking up and placing small amounts of mortar for patching and detail work. Do not use it to lever, pry, cut or strike.
| Product | ART.NR | Blade pattern | Construction |
|---|---|---|---|
| Triangle Trowel | 260604, 810101 | Triangle | CO2 Welded Carbon Steel |
| Heart Trowel | 263604 | Heart / kidney | CO2 Welded Carbon Steel |
| Heart Trowel | 263304 | Heart / kidney | Spot Welded Stainless Steel |
| Tongue Trowel | 251621–254621 | Tongue / feather | CO2 Welded Carbon Steel |
| European Margin Trowel | 243621–248621, 240621, 242621 | Trapezoid, square toe | CO2 Welded Carbon Steel |
| Pointed Triangle Trowel | 281821–283821 | Triangle, sharp pointed toe | Spot Welded Stainless Steel |
| Pointed Triangle Trowel | 892621, 893621 | Triangle, sharp pointed toe | CO2 Welded Carbon Steel, different blade shape (see the catalog) |
All three art numbers of this product.
| ART.NR | Size | Blade material | Construction | Handle type |
|---|---|---|---|---|
| 281621 | 120 mm (≈ 4.7 in) | Carbon steel | CO2 welded | Soft grip, BF21 |
| 282621 | 140 mm (≈ 5.5 in) | Carbon steel | CO2 welded | Soft grip, BF21 |
| 283621 | 160 mm (≈ 6.3 in) | Carbon steel | CO2 welded | Soft grip, BF21 |
Imperial figures above are converted at 1 in = 25.4 mm.
A carbon steel trowel blade will rust if it is not dried and oiled, and it needs more frequent maintenance than a stainless one.
The moulded soft-grip handle needs very little maintenance:
The blade and shank are joined by a weld, so the joint deserves specific periodic attention. Do not lever or strike with the blade.
Check for hairline cracks, separation, or corrosion concentrated at the joint. A trowel with a suspected weld failure should be taken out of service immediately; the joint cannot be reliably repaired in the field.

In compliance with EU personal data protection laws, we are committed to protecting and providing you with control over your personal data. By clicking "Accept All", you allow us to place cookies to enhance your experience on this site, help us analyze site performance and usage, and enable us to deliver relevant marketing content. You can manage your cookie settings below. By clicking "Agree" you agree to the current settings. For more information, please visit the Privacy Statement.
This website uses cookies
In compliance with EU personal data protection laws, we are committed to protecting your personal data and providing you with control over it. By clicking "Agree", you allow us to place cookies to improve your experience on this site, help us analyze site performance and usage, and allow us to deliver relevant marketing content.
By clicking "Only necessary" you allow us to place only necessary cookies. The website cannot function without these cookies and you cannot switch them off on your system. These cookies are typically set only in response to an action you perform (i.e. a service request), such as setting privacy preferences, logging in, or filling in a form. You can set your browser to block or prompt you for these cookies, but this may prevent some site features from working.



