
Copyright 2026 © Leading Tools Industrial Co., Ltd.
All Rights Reserved. Website Design by Awakening Design
CATALOG TYPE
Product Categories
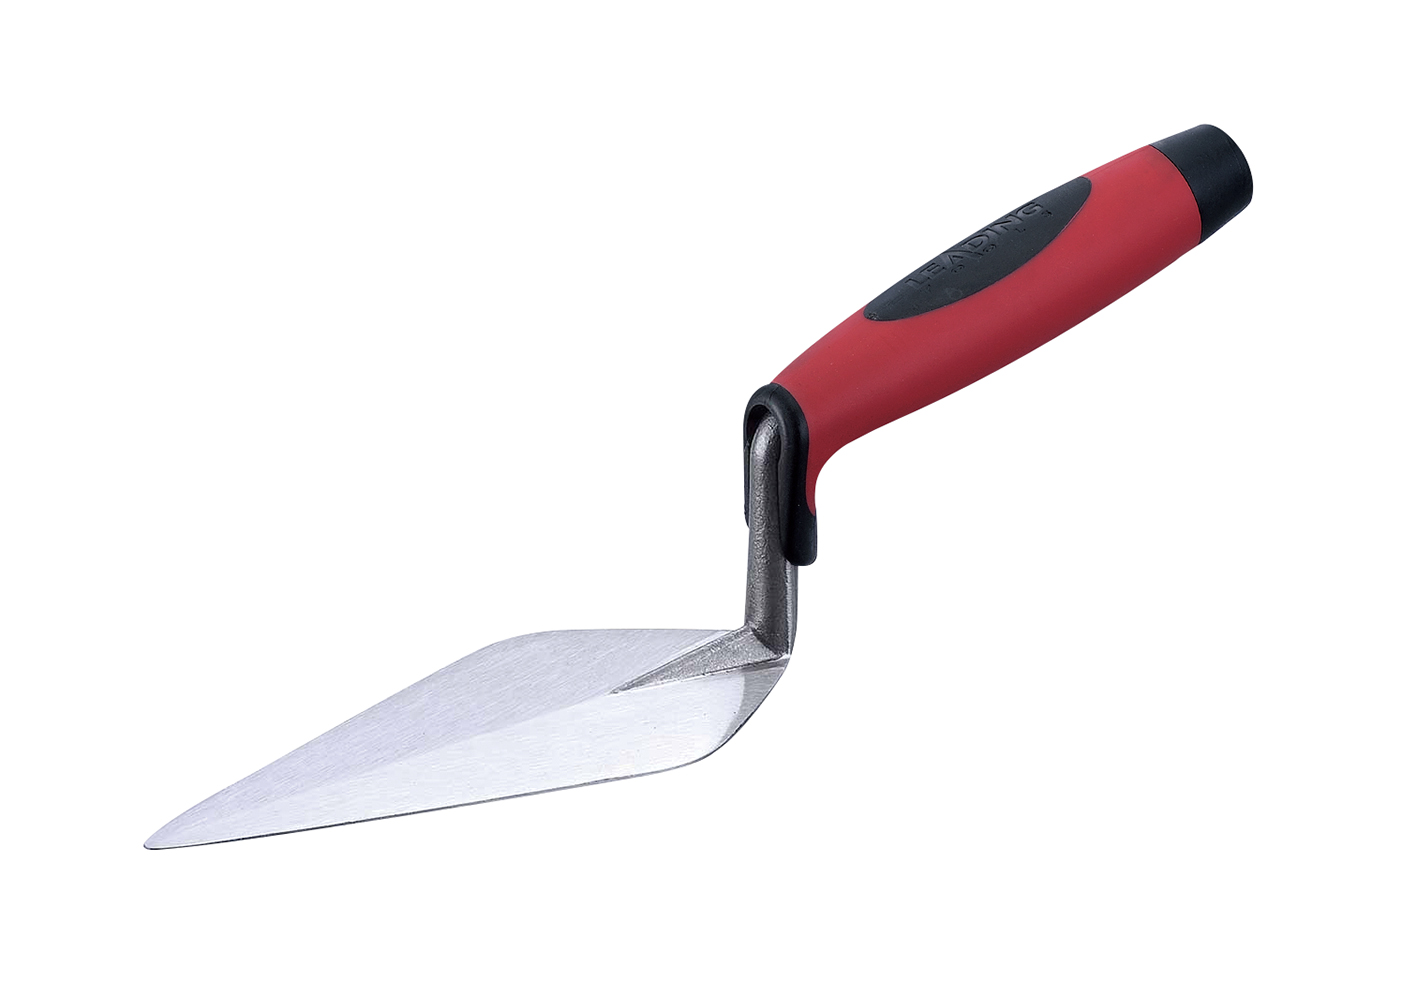
Pointing Trowel — CO2 Welded Carbon Steel, 4"–7"
Product Description
Construction line: CO2 Welding Carbon Steel
Art. Nr and sizes: 124721 (4"), 125721 (5"), 126721 (6"), 127721 (7")
The four art numbers 124721–127721 are one product family in four blade lengths, 4" through 7", sold on a soft grip handle. They are the CO2-welded companion to the forged Pointing Trowel line, size for size.
| Line | Construction | Art. Nr | Sizes |
|---|---|---|---|
| Pointing Trowel | Forged in One-piece High Carbon Steel | 024721, 025721, 026721, 027721 | 4", 5", 6", 7" |
| This product | CO2 Welding Carbon Steel | 124721, 125721, 126721, 127721 | 4", 5", 6", 7" |
| Pointing Trowel (metric) | CO2 Welding Carbon Steel | 292621, 293621 | 140 mm, 160 mm |
| Pointing Trowel (metric, stainless) | Spot Welding Stainless Steel | 292821, 293821 | 140 mm, 160 mm |
The four sizes in this line are the CO2 counterparts of the forged 024721–027721, size for size. Buyers who want the same blade shape in one-piece forged construction can choose the forged line; buyers who want a metric-specified blade, or a stainless blade, can choose the metric lines. The metric trowels are a different product from this one.
A pointing trowel is a smaller version of the brick trowel, used for picking up small amounts of mortar, patching and small rebuilds, repairs, detail rendering/plastering, and carrying mortar to the edge of the joint. The brick trowel lays and spreads mortar beds; the pointing trowel handles small quantities and detail work.
Pressing mortar into the joint and compacting it is done with a Tuck Pointing Trowel or a Brick Jointer. That division of labor is the reason the blade is narrow and comes in 4"–7" lengths rather than the 9"–12" of a laying trowel.
A closely related but distinct tool is the Tuck Pointing Trowel, whose blade is only 3/16"–1" (4–25 mm) wide and is used specifically for setting mortar into a joint, removing mortar, and filling and shaping it. The Leading Tools 124721–127721 line is a pointing trowel, not a Tuck Pointing Trowel; for very narrow joints that need compacting, order a Tuck Pointing Trowel.
It handles small amounts of mortar where a laying trowel cannot. The narrow blade picks up a small amount of mortar and carries it to the edge of the joint instead of bridging across onto the brick face. That is the whole functional argument for owning a pointing trowel alongside a brick trowel: the brick trowel is the tool that carries and spreads mortar beds, the pointing trowel is the tool for patching, repairs, detail work and small quantities of mortar.
The pointed toe controls placement. The blade narrows to a point at the nose, so mortar can be aimed at a precise point, such as a corner or the edge of a joint, rather than spread across an area. A narrow pointed blade places mortar accurately and works out tight areas.
It suits small repair and rebuild work, which is where most pointing trowels are actually used. The typical jobs are patching and small rebuilds, repairs, detail rendering/plastering, and carrying mortar to the edge of the joint on exposed-brick renovation work. All of these are low-volume, high-precision tasks where the tool's control matters more than the mortar it can carry.
It carries the mortar; other tools pack it. In stone paving worked by the dry pointing method, the pointing trowel carries small amounts of mortar to the edge of the joint; pressing it home, filling to roughly 1/4" proud of the joint face and striking off after about 30 minutes, is done with a Tuck Pointing Trowel or a Brick Jointer.
Soft grip handle on every size. All four art numbers carry the BF21 soft grip, so the range does not force a buyer to accept a bare wood handle on the small sizes.
| Situation | Use this trowel? | Notes |
|---|---|---|
| Patching and repairing weathered or crumbling brickwork | Yes, primary use | Carry small amounts of mortar to the repair; packing the joint itself is done with a Tuck Pointing Trowel or Brick Jointer |
| Detail work on newly laid brickwork | Yes | Picking up small amounts of mortar and carrying them to the joint is a standard use; striking the joint is done with a Brick Jointer |
| Small-area patch repairs in brick or block | Yes | Standard use |
| Exposed-brick renovation work | Yes | Standard use |
| Dry pointing of stone paving | Yes, to carry mortar to the joint | Mortar carried to the joint edge with the pointing trowel; pressed home with a Tuck Pointing Trowel or Brick Jointer |
| Reaching into corners and narrow gaps | Yes | The pointed toe is what makes this possible |
| Laying and spreading full mortar beds | No, use a brick trowel | The pointing trowel is the smaller repair-and-detail tool |
| Very narrow joints that need compacting | No, use a Tuck Pointing Trowel | Different tool class, 3/16"–1" blade widths |
| Repeated heavy tapping, or prying with the blade tip | No, use the forged line for heavy daily use | Do not use the blade tip to pry; the forged one-piece construction is the better fit for heavier working loads |
| Scraping cured mortar off a brick face | No | Scraping across the face leaves a cement film that is very hard to remove |
| Step | Action |
|---|---|
| 1 | Mix the mortar and test the consistency: cut it, and it should hold its shape like marzipan. Too wet and it slumps; too dry and it crumbles |
| 2 | Work in bands: about 2–3 courses high and roughly one meter wide at a time, so the mortar can be finished before it stiffens |
| 3 | Place mortar at the perpends (the vertical cross joints) first, then at the bed joints (horizontal) |
| 4 | Load a small ribbon of mortar onto the blade, far less than a brick trowel load, and carry it to the joint on the flat of the blade |
| 5 | Place the mortar at the edge of the joint from the face of the brick. Pressing it home to the full depth of the joint, with no voids behind, is done with a Tuck Pointing Trowel or a Brick Jointer |
| 6 | For deep joints, place in several passes rather than trying to fill the depth in one pass |
| 7 | Wait roughly 20–30 minutes and test hardness with thumb pressure before shaping the joint |
| 8 | Shape the joint with a jointer to the standard concave "bucket handle" profile: the pointing trowel is the delivery tool, the jointer is the finishing tool |
| 9 | About 30 minutes after finishing, brush the surplus off lightly with a soft brush. Do not scrape the brick face with the trowel |
a) Repointing weathered joints. Existing joints are raked out to sound mortar first, then refilled. The narrow blade lets the mason work one joint at a time without disturbing the surrounding masonry, carrying small amounts of mortar to the raked joint. Filling the joint to full depth, and compacting it so that it is not just face-pointed over a hollow, is done with a Tuck Pointing Trowel or a Brick Jointer, as described in the technique table above.
b) Finishing joints on new brickwork. On newly laid work the joints are struck while the mortar is still green. Because the mortar is fresh, the technique is less about compaction and more about placing a consistent quantity along the joint and leaving a uniform surface for the jointer. A 6" blade suits this because it carries enough mortar to keep a rhythm without becoming unwieldy at the work.
c) Dry pointing stone paving. In this method the joint is filled with a stiff mix rather than a pourable grout.
Mortar is picked up on a brick trowel; the pointing trowel carries small amounts to the edge of the joint, and the mortar is pressed home with a Tuck Pointing Trowel or a Brick Jointer, deliberately overfilled to about 1/4" proud of the surface, and struck off flush after about 30 minutes. For the small-quantity feeding the pointing trowel does here, the 4" and 5" blades are usually more controllable than the 7".
d) Patch and localized repair. When a small area of brickwork is made good: an isolated damaged brick replaced, a spall filled, the pointing trowel deposits a precise quantity of mortar into an irregular gap without the operator having to work over the surrounding sound masonry. Because the gaps left by a removed brick are rarely square, the pointed toe is doing most of the work of getting mortar behind and around the repair piece.
e) Corner and tight-space work. Anywhere lateral clearance is restricted: between closely spaced units, in narrow piers, around fixtures, at wall returns, the narrow blade and pointed toe give access that a wider or flat-ended blade does not. This is the use case the narrow blade is made for: placing mortar at a precise point and working out tight areas.
The single most useful field test is the marzipan test in the technique table above: cut the mortar and see whether it holds its shape. Mortar that is too wet slumps out of the joint and smears; mortar that is too dry crumbles and will not compact.
Two mistakes come up repeatedly. The first is focusing on the choice of trowel when the mortar mix is the variable that actually determines the result. The second is scraping surplus mortar off the brick face with the trowel instead of brushing it off after it has stiffened; scraping smears a thin cement film across the face which is very difficult to remove once it has cured.
Q1. Is this the same tool as the forged Pointing Trowel?
A. It has the same blade geometry and the same four sizes, but a different construction. The forged line (024721–027721) is made from one piece of high carbon steel, while this line (124721–127721) has the blade welded to the shank. For sustained heavy daily use choose the forged line; for occasional and general work this line does the same job.
Q2. Which size should a first-time buyer order?
A. 126721, the 6". It is a general-purpose pointing trowel size, with 4"–5" for fine detail work.
Q3. Can I use it to lay brick, and do I need a Tuck Pointing Trowel as well?
A. No, it cannot replace a brick trowel: a pointing trowel is a smaller version meant for picking up small amounts of mortar, patching, repairs and carrying mortar to the edge of the joint, so for laying use a Leading Tools brick trowel in a 9"–12" size. To press mortar into the joint and compact it you need a Tuck Pointing Trowel (3/16"–1" blade) or a Brick Jointer; this pointing trowel supplies the mortar.
Q4. How do I keep it from rusting and sticking to mortar?
A. Carbon steel has to be kept continuously dry: dry the blade completely before oiling it, store it somewhere dry rather than in a damp tool bag, and do not leave it soaking in water.
If mortar sticks, check that the mix holds its shape like marzipan, and clean and oil a rough or rusty blade. The stainless pointing trowels (292821, 293821) have a lower maintenance burden, but chlorinated water, coastal air or prolonged soaking can still cause rust spots, so rinse with clean water and dry after use.
Q5. There is a hairline crack at the weld. Can it be re-welded?
A. No, take the tool out of service and replace it. If your crew uses pointing trowels heavily every day, consider the forged 024721–027721 line.
"CO2 Welding Carbon Steel" describes a tool whose blade and shank are joined by CO2 welding. This is the opposite of the forged line, where the same blade shape is described as "Forged in One-piece High Carbon Steel" and the blade, shank and tang are one piece.
Forged trowels are made from a single piece of high carbon steel. In the welded construction, the blade and shank are joined by CO2 welding. The forged line suits daily professional use and heavier working loads; the CO2 welded line suits occasional and general work such as detail, finishing and patching. Keep the weld area clean and dry (see Care & Maintenance below).
| Structural feature | CO2 Welded (this product) | Forged Pointing Trowel |
|---|---|---|
| Construction line | CO2 Welding Carbon Steel | Forged in One-piece High Carbon Steel |
| Art. Nr | 124721 / 125721 / 126721 / 127721 | 024721 / 025721 / 026721 / 027721 |
| Sizes offered | 4", 5", 6", 7" | 4", 5", 6", 7" |
| Blade-shank junction | CO2 welded joint | No junction |
| Suited to | Detail, finishing and patching; occasional and general site use | Daily professional use; heavier working loads |
| Geometric feature | Detail |
|---|---|
| Blade shape | Narrow, elongated, tapering toward a point at the toe |
| Blade length | 4"–7" (102–178 mm), four sizes |
| Toe | Point-nosed: the blade narrows to a point |
| Blade finish | Polished carbon steel |
What the pointed toe buys the user, in the order it matters on site: mortar can be placed at a precise point rather than spread across an area; small amounts of mortar can be handled without pushing the surrounding material out of shape; the taper lets the operator control the angle of approach; and it reaches into internal corners and irregular gaps that a flat-ended margin trowel cannot reach cleanly.
| Attribute | Specification |
|---|---|
| Product name | Pointing Trowel, CO2 welded |
| Construction | CO2 Welding Carbon Steel |
| Art. Nr | 124721, 125721, 126721, 127721 |
| Blade lengths | 4", 5", 6", 7" (102, 127, 152, 178 mm) |
| Blade material | Carbon steel, polished blade |
| Shank | Carbon steel shank, joined to the blade by CO2 welding |
| Handle | Soft grip, BF21 |
| Other handles | Can be fitted on request; contact Leading Tools sales. |
| Surface finish | Polished blade face |
| Forged equivalent, same geometry and sizes | 024721 / 025721 / 026721 / 027721 |
| Metric equivalent, CO2 welded | 292621 (140 mm), 293621 (160 mm) |
| Stainless equivalent, metric | 292821 (140 mm), 293821 (160 mm) |
The two steels differ mainly in corrosion resistance and maintenance.
| Property | Carbon steel (this line) | Stainless steel (292821 / 293821) |
|---|---|---|
| Corrosion behavior | Rust-prone; must be kept dry and oiled | High corrosion resistance; chlorinated water, coastal air or prolonged soaking can still cause rust spots |
| Maintenance burden | Higher: clean, dry and oil after every use | Lower: rinse with clean water and dry after use |
| Practical recommendation | Site crews with a maintenance routine; general contract work | Users who prefer a lower maintenance burden |
Because Leading Tools offers both, the choice depends mainly on how the tool will be stored and maintained.
| ART. Nr | Size | Metric equivalent | Where it fits |
|---|---|---|---|
| 124721 | 4" | 102 mm | Fine detail work only; the shortest blade, maximum control, minimum mortar per pass |
| 125721 | 5" | 127 mm | Detail and finishing work; still in the fine-work band |
| 126721 | 6" | 152 mm | General-purpose size for pointing |
| 127721 | 7" | 178 mm | Longest reach and most coverage per pass |
By type of work. Blades of 4"–5" are in the fine-detail band and 6" is a general-purpose size. 124721 and 125721 are detail tools, 126721 is a general-purpose size, and 127721 gives the longest reach.
By joint width. Standard modern brickwork joints run about 3/8"–1/2" (10–13 mm), and any blade in this range can reach them. Below roughly 3/8": heritage work, tight repair joints, narrow-format brick: the shorter, narrower blades give better control; for very narrow joints that need compacting, use a Tuck Pointing Trowel (3/16"–1" blade) rather than a pointing trowel.
By operator. An apprentice is best started on the 4", because it forces the shorter, more controlled stroke that good pointing requires. A working professional will normally run a 5" or 6", and a restoration or deep-joint specialist will want the 7". This lines up with the size bands above: 4"–5" is the fine-detail size and 6" the general-purpose size.
| Condition | Choose CO2 welded (124721–127721) | Choose forged (024721–027721) |
|---|---|---|
| Usage intensity | Occasional or light-to-moderate use | Daily professional use |
| Type of work | Detail, finishing, patching: controlled forces | Heavier working loads |
| Fleet policy | Consumable tool, replaced on wear | Long-life tool, kept and maintained |
In one line: if the trowel is in a professional's hand every day and has heavier working loads, specify the forged line; if it comes out for patching, repair and detail work, the welded line does the same job.
| If the customer needs to… | Specify | Why |
|---|---|---|
| Lay and spread mortar beds for brick or block | A Leading Tools brick trowel, 9"–12" | The pointing trowel is the smaller repair-and-detail tool, not a laying tool |
| Pick up small amounts of mortar for patching, repairs and detail work; carry mortar to the edge of a joint | This line, 124721–127721 | The core use of the pointing trowel |
| Press mortar into the joint and compact it | Tuck Pointing Trowel or Brick Jointer | The tools made for packing and tooling the joint |
| Work very narrow joints that need compacting | Tuck Pointing Trowel, 3/16"–1" (4–25 mm) blade | A separate tool class with its own blade widths |
| Work to metric joint specifications | Pointing Trowel 292621 (140 mm) / 293621 (160 mm) | Metric-specified sizes for metric drawings |
| Want a stainless blade with a lower maintenance burden | Pointing Trowel stainless 292821 / 293821 | High corrosion resistance, low maintenance; rinse with clean water and dry after use |
| Cut a flat margin against a straight edge, clean out a corner | Margin Trowel 144721, 145721, 146721, 148721 (CO2) | Flat-ended blade; a different tool from the point-nosed pointing trowel |
All four art numbers, listed individually.
| ART. Nr | Size | Blade construction | Blade material and finish | Handle |
|---|---|---|---|---|
| 124721 | 4" (102 mm) | CO2 Welding Carbon Steel | Carbon steel, polished | Soft grip BF21 |
| 125721 | 5" (127 mm) | CO2 Welding Carbon Steel | Carbon steel, polished | Soft grip BF21 |
| 126721 | 6" (152 mm) | CO2 Welding Carbon Steel | Carbon steel, polished | Soft grip BF21 |
| 127721 | 7" (178 mm) | CO2 Welding Carbon Steel | Carbon steel, polished | Soft grip BF21 |
| Attribute | Specification |
|---|---|
| Number of sizes | 4 |
| Size span | 4"–7" (102–178 mm) |
| Size increment | 1" (approx. 25 mm) |
| Blade pattern | Narrow elongated blade with a pointed toe |
| Construction | CO2 Welding Carbon Steel |
| Blade material | Carbon steel, polished |
| Handle across all four sizes | Soft grip BF21 |
| Forged equivalent | 024721 (4"), 025721 (5"), 026721 (6"), 027721 (7") |
Carbon steel and fresh mortar are a bad combination: mortar left on the blade holds moisture against the steel and the blade is not corrosion-resistant, so the tool has to be cleaned the same day it is used.
- Remove dried mortar with a plastic scraper or a nylon brush; do not use a wire brush or wire wheel, which scratch the blade surface.
Because this line is a welded fabrication, check the weld area every time the tool is cleaned:
- Brush mortar out of the recess around the weld bead rather than leaving it packed there; it holds moisture against the joint.
- Look at the weld bead for rust, pitting or any hairline separation.
- Oil the weld junction and the shank as well as the blade face.
- If a crack appears at the weld, take the tool out of service. Do not attempt to re-weld it; replace the tool.
| Storage condition | Recommended action |
|---|---|
| Overnight, in use again next day | Dry completely; a light film of tool oil on the blade; store dry |
| Weekly or seasonal | Clean thoroughly; oil the blade, the shank and the weld area; store dry |
| Long-term (weeks or months) | Clean; oil generously; wrap the blade to keep moisture off it |
| Site where drying and oiling are hard to do | A stainless blade (292821 / 293821) has a lower maintenance burden, but chlorinated water, coastal air or prolonged soaking can still cause rust spots; rinse with clean water and dry after use |
The pointed toe is the functional part of the blade; once it is bent, chipped or rounded off, the precision that justifies the tool is gone.
- Dress minor burrs on the edge lightly with a fine mill file, following the original factory bevel. Do not re-profile the toe.
- A bent toe can sometimes be straightened once; a cracked one cannot, and the tool should be replaced.
All four art numbers carry the BF21 soft grip, so wood-handle maintenance does not apply to this line.
| Handle | Maintenance |
|---|---|
| Soft grip BF21 | Wash with mild soap and water; inspect for cuts, tears or hardening; replace the tool if the grip is damaged |
| Handle / shank junction | Check for any movement between handle and shank; a handle that has started to turn on the shank should be taken out of service |
Construction line: CO2 Welding Carbon Steel
Art. Nr and sizes: 124721 (4"), 125721 (5"), 126721 (6"), 127721 (7")
The four art numbers 124721–127721 are one product family in four blade lengths, 4" through 7", sold on a soft grip handle. They are the CO2-welded companion to the forged Pointing Trowel line, size for size.
| Line | Construction | Art. Nr | Sizes |
|---|---|---|---|
| Pointing Trowel | Forged in One-piece High Carbon Steel | 024721, 025721, 026721, 027721 | 4", 5", 6", 7" |
| This product | CO2 Welding Carbon Steel | 124721, 125721, 126721, 127721 | 4", 5", 6", 7" |
| Pointing Trowel (metric) | CO2 Welding Carbon Steel | 292621, 293621 | 140 mm, 160 mm |
| Pointing Trowel (metric, stainless) | Spot Welding Stainless Steel | 292821, 293821 | 140 mm, 160 mm |
The four sizes in this line are the CO2 counterparts of the forged 024721–027721, size for size. Buyers who want the same blade shape in one-piece forged construction can choose the forged line; buyers who want a metric-specified blade, or a stainless blade, can choose the metric lines. The metric trowels are a different product from this one.
A pointing trowel is a smaller version of the brick trowel, used for picking up small amounts of mortar, patching and small rebuilds, repairs, detail rendering/plastering, and carrying mortar to the edge of the joint. The brick trowel lays and spreads mortar beds; the pointing trowel handles small quantities and detail work.
Pressing mortar into the joint and compacting it is done with a Tuck Pointing Trowel or a Brick Jointer. That division of labor is the reason the blade is narrow and comes in 4"–7" lengths rather than the 9"–12" of a laying trowel.
A closely related but distinct tool is the Tuck Pointing Trowel, whose blade is only 3/16"–1" (4–25 mm) wide and is used specifically for setting mortar into a joint, removing mortar, and filling and shaping it. The Leading Tools 124721–127721 line is a pointing trowel, not a Tuck Pointing Trowel; for very narrow joints that need compacting, order a Tuck Pointing Trowel.
It handles small amounts of mortar where a laying trowel cannot. The narrow blade picks up a small amount of mortar and carries it to the edge of the joint instead of bridging across onto the brick face. That is the whole functional argument for owning a pointing trowel alongside a brick trowel: the brick trowel is the tool that carries and spreads mortar beds, the pointing trowel is the tool for patching, repairs, detail work and small quantities of mortar.
The pointed toe controls placement. The blade narrows to a point at the nose, so mortar can be aimed at a precise point, such as a corner or the edge of a joint, rather than spread across an area. A narrow pointed blade places mortar accurately and works out tight areas.
It suits small repair and rebuild work, which is where most pointing trowels are actually used. The typical jobs are patching and small rebuilds, repairs, detail rendering/plastering, and carrying mortar to the edge of the joint on exposed-brick renovation work. All of these are low-volume, high-precision tasks where the tool's control matters more than the mortar it can carry.
It carries the mortar; other tools pack it. In stone paving worked by the dry pointing method, the pointing trowel carries small amounts of mortar to the edge of the joint; pressing it home, filling to roughly 1/4" proud of the joint face and striking off after about 30 minutes, is done with a Tuck Pointing Trowel or a Brick Jointer.
Soft grip handle on every size. All four art numbers carry the BF21 soft grip, so the range does not force a buyer to accept a bare wood handle on the small sizes.
| Situation | Use this trowel? | Notes |
|---|---|---|
| Patching and repairing weathered or crumbling brickwork | Yes, primary use | Carry small amounts of mortar to the repair; packing the joint itself is done with a Tuck Pointing Trowel or Brick Jointer |
| Detail work on newly laid brickwork | Yes | Picking up small amounts of mortar and carrying them to the joint is a standard use; striking the joint is done with a Brick Jointer |
| Small-area patch repairs in brick or block | Yes | Standard use |
| Exposed-brick renovation work | Yes | Standard use |
| Dry pointing of stone paving | Yes, to carry mortar to the joint | Mortar carried to the joint edge with the pointing trowel; pressed home with a Tuck Pointing Trowel or Brick Jointer |
| Reaching into corners and narrow gaps | Yes | The pointed toe is what makes this possible |
| Laying and spreading full mortar beds | No, use a brick trowel | The pointing trowel is the smaller repair-and-detail tool |
| Very narrow joints that need compacting | No, use a Tuck Pointing Trowel | Different tool class, 3/16"–1" blade widths |
| Repeated heavy tapping, or prying with the blade tip | No, use the forged line for heavy daily use | Do not use the blade tip to pry; the forged one-piece construction is the better fit for heavier working loads |
| Scraping cured mortar off a brick face | No | Scraping across the face leaves a cement film that is very hard to remove |
| Step | Action |
|---|---|
| 1 | Mix the mortar and test the consistency: cut it, and it should hold its shape like marzipan. Too wet and it slumps; too dry and it crumbles |
| 2 | Work in bands: about 2–3 courses high and roughly one meter wide at a time, so the mortar can be finished before it stiffens |
| 3 | Place mortar at the perpends (the vertical cross joints) first, then at the bed joints (horizontal) |
| 4 | Load a small ribbon of mortar onto the blade, far less than a brick trowel load, and carry it to the joint on the flat of the blade |
| 5 | Place the mortar at the edge of the joint from the face of the brick. Pressing it home to the full depth of the joint, with no voids behind, is done with a Tuck Pointing Trowel or a Brick Jointer |
| 6 | For deep joints, place in several passes rather than trying to fill the depth in one pass |
| 7 | Wait roughly 20–30 minutes and test hardness with thumb pressure before shaping the joint |
| 8 | Shape the joint with a jointer to the standard concave "bucket handle" profile: the pointing trowel is the delivery tool, the jointer is the finishing tool |
| 9 | About 30 minutes after finishing, brush the surplus off lightly with a soft brush. Do not scrape the brick face with the trowel |
a) Repointing weathered joints. Existing joints are raked out to sound mortar first, then refilled. The narrow blade lets the mason work one joint at a time without disturbing the surrounding masonry, carrying small amounts of mortar to the raked joint. Filling the joint to full depth, and compacting it so that it is not just face-pointed over a hollow, is done with a Tuck Pointing Trowel or a Brick Jointer, as described in the technique table above.
b) Finishing joints on new brickwork. On newly laid work the joints are struck while the mortar is still green. Because the mortar is fresh, the technique is less about compaction and more about placing a consistent quantity along the joint and leaving a uniform surface for the jointer. A 6" blade suits this because it carries enough mortar to keep a rhythm without becoming unwieldy at the work.
c) Dry pointing stone paving. In this method the joint is filled with a stiff mix rather than a pourable grout.
Mortar is picked up on a brick trowel; the pointing trowel carries small amounts to the edge of the joint, and the mortar is pressed home with a Tuck Pointing Trowel or a Brick Jointer, deliberately overfilled to about 1/4" proud of the surface, and struck off flush after about 30 minutes. For the small-quantity feeding the pointing trowel does here, the 4" and 5" blades are usually more controllable than the 7".
d) Patch and localized repair. When a small area of brickwork is made good: an isolated damaged brick replaced, a spall filled, the pointing trowel deposits a precise quantity of mortar into an irregular gap without the operator having to work over the surrounding sound masonry. Because the gaps left by a removed brick are rarely square, the pointed toe is doing most of the work of getting mortar behind and around the repair piece.
e) Corner and tight-space work. Anywhere lateral clearance is restricted: between closely spaced units, in narrow piers, around fixtures, at wall returns, the narrow blade and pointed toe give access that a wider or flat-ended blade does not. This is the use case the narrow blade is made for: placing mortar at a precise point and working out tight areas.
The single most useful field test is the marzipan test in the technique table above: cut the mortar and see whether it holds its shape. Mortar that is too wet slumps out of the joint and smears; mortar that is too dry crumbles and will not compact.
Two mistakes come up repeatedly. The first is focusing on the choice of trowel when the mortar mix is the variable that actually determines the result. The second is scraping surplus mortar off the brick face with the trowel instead of brushing it off after it has stiffened; scraping smears a thin cement film across the face which is very difficult to remove once it has cured.
Q1. Is this the same tool as the forged Pointing Trowel?
A. It has the same blade geometry and the same four sizes, but a different construction. The forged line (024721–027721) is made from one piece of high carbon steel, while this line (124721–127721) has the blade welded to the shank. For sustained heavy daily use choose the forged line; for occasional and general work this line does the same job.
Q2. Which size should a first-time buyer order?
A. 126721, the 6". It is a general-purpose pointing trowel size, with 4"–5" for fine detail work.
Q3. Can I use it to lay brick, and do I need a Tuck Pointing Trowel as well?
A. No, it cannot replace a brick trowel: a pointing trowel is a smaller version meant for picking up small amounts of mortar, patching, repairs and carrying mortar to the edge of the joint, so for laying use a Leading Tools brick trowel in a 9"–12" size. To press mortar into the joint and compact it you need a Tuck Pointing Trowel (3/16"–1" blade) or a Brick Jointer; this pointing trowel supplies the mortar.
Q4. How do I keep it from rusting and sticking to mortar?
A. Carbon steel has to be kept continuously dry: dry the blade completely before oiling it, store it somewhere dry rather than in a damp tool bag, and do not leave it soaking in water.
If mortar sticks, check that the mix holds its shape like marzipan, and clean and oil a rough or rusty blade. The stainless pointing trowels (292821, 293821) have a lower maintenance burden, but chlorinated water, coastal air or prolonged soaking can still cause rust spots, so rinse with clean water and dry after use.
Q5. There is a hairline crack at the weld. Can it be re-welded?
A. No, take the tool out of service and replace it. If your crew uses pointing trowels heavily every day, consider the forged 024721–027721 line.
"CO2 Welding Carbon Steel" describes a tool whose blade and shank are joined by CO2 welding. This is the opposite of the forged line, where the same blade shape is described as "Forged in One-piece High Carbon Steel" and the blade, shank and tang are one piece.
Forged trowels are made from a single piece of high carbon steel. In the welded construction, the blade and shank are joined by CO2 welding. The forged line suits daily professional use and heavier working loads; the CO2 welded line suits occasional and general work such as detail, finishing and patching. Keep the weld area clean and dry (see Care & Maintenance below).
| Structural feature | CO2 Welded (this product) | Forged Pointing Trowel |
|---|---|---|
| Construction line | CO2 Welding Carbon Steel | Forged in One-piece High Carbon Steel |
| Art. Nr | 124721 / 125721 / 126721 / 127721 | 024721 / 025721 / 026721 / 027721 |
| Sizes offered | 4", 5", 6", 7" | 4", 5", 6", 7" |
| Blade-shank junction | CO2 welded joint | No junction |
| Suited to | Detail, finishing and patching; occasional and general site use | Daily professional use; heavier working loads |
| Geometric feature | Detail |
|---|---|
| Blade shape | Narrow, elongated, tapering toward a point at the toe |
| Blade length | 4"–7" (102–178 mm), four sizes |
| Toe | Point-nosed: the blade narrows to a point |
| Blade finish | Polished carbon steel |
What the pointed toe buys the user, in the order it matters on site: mortar can be placed at a precise point rather than spread across an area; small amounts of mortar can be handled without pushing the surrounding material out of shape; the taper lets the operator control the angle of approach; and it reaches into internal corners and irregular gaps that a flat-ended margin trowel cannot reach cleanly.
| Attribute | Specification |
|---|---|
| Product name | Pointing Trowel, CO2 welded |
| Construction | CO2 Welding Carbon Steel |
| Art. Nr | 124721, 125721, 126721, 127721 |
| Blade lengths | 4", 5", 6", 7" (102, 127, 152, 178 mm) |
| Blade material | Carbon steel, polished blade |
| Shank | Carbon steel shank, joined to the blade by CO2 welding |
| Handle | Soft grip, BF21 |
| Other handles | Can be fitted on request; contact Leading Tools sales. |
| Surface finish | Polished blade face |
| Forged equivalent, same geometry and sizes | 024721 / 025721 / 026721 / 027721 |
| Metric equivalent, CO2 welded | 292621 (140 mm), 293621 (160 mm) |
| Stainless equivalent, metric | 292821 (140 mm), 293821 (160 mm) |
The two steels differ mainly in corrosion resistance and maintenance.
| Property | Carbon steel (this line) | Stainless steel (292821 / 293821) |
|---|---|---|
| Corrosion behavior | Rust-prone; must be kept dry and oiled | High corrosion resistance; chlorinated water, coastal air or prolonged soaking can still cause rust spots |
| Maintenance burden | Higher: clean, dry and oil after every use | Lower: rinse with clean water and dry after use |
| Practical recommendation | Site crews with a maintenance routine; general contract work | Users who prefer a lower maintenance burden |
Because Leading Tools offers both, the choice depends mainly on how the tool will be stored and maintained.
| ART. Nr | Size | Metric equivalent | Where it fits |
|---|---|---|---|
| 124721 | 4" | 102 mm | Fine detail work only; the shortest blade, maximum control, minimum mortar per pass |
| 125721 | 5" | 127 mm | Detail and finishing work; still in the fine-work band |
| 126721 | 6" | 152 mm | General-purpose size for pointing |
| 127721 | 7" | 178 mm | Longest reach and most coverage per pass |
By type of work. Blades of 4"–5" are in the fine-detail band and 6" is a general-purpose size. 124721 and 125721 are detail tools, 126721 is a general-purpose size, and 127721 gives the longest reach.
By joint width. Standard modern brickwork joints run about 3/8"–1/2" (10–13 mm), and any blade in this range can reach them. Below roughly 3/8": heritage work, tight repair joints, narrow-format brick: the shorter, narrower blades give better control; for very narrow joints that need compacting, use a Tuck Pointing Trowel (3/16"–1" blade) rather than a pointing trowel.
By operator. An apprentice is best started on the 4", because it forces the shorter, more controlled stroke that good pointing requires. A working professional will normally run a 5" or 6", and a restoration or deep-joint specialist will want the 7". This lines up with the size bands above: 4"–5" is the fine-detail size and 6" the general-purpose size.
| Condition | Choose CO2 welded (124721–127721) | Choose forged (024721–027721) |
|---|---|---|
| Usage intensity | Occasional or light-to-moderate use | Daily professional use |
| Type of work | Detail, finishing, patching: controlled forces | Heavier working loads |
| Fleet policy | Consumable tool, replaced on wear | Long-life tool, kept and maintained |
In one line: if the trowel is in a professional's hand every day and has heavier working loads, specify the forged line; if it comes out for patching, repair and detail work, the welded line does the same job.
| If the customer needs to… | Specify | Why |
|---|---|---|
| Lay and spread mortar beds for brick or block | A Leading Tools brick trowel, 9"–12" | The pointing trowel is the smaller repair-and-detail tool, not a laying tool |
| Pick up small amounts of mortar for patching, repairs and detail work; carry mortar to the edge of a joint | This line, 124721–127721 | The core use of the pointing trowel |
| Press mortar into the joint and compact it | Tuck Pointing Trowel or Brick Jointer | The tools made for packing and tooling the joint |
| Work very narrow joints that need compacting | Tuck Pointing Trowel, 3/16"–1" (4–25 mm) blade | A separate tool class with its own blade widths |
| Work to metric joint specifications | Pointing Trowel 292621 (140 mm) / 293621 (160 mm) | Metric-specified sizes for metric drawings |
| Want a stainless blade with a lower maintenance burden | Pointing Trowel stainless 292821 / 293821 | High corrosion resistance, low maintenance; rinse with clean water and dry after use |
| Cut a flat margin against a straight edge, clean out a corner | Margin Trowel 144721, 145721, 146721, 148721 (CO2) | Flat-ended blade; a different tool from the point-nosed pointing trowel |
All four art numbers, listed individually.
| ART. Nr | Size | Blade construction | Blade material and finish | Handle |
|---|---|---|---|---|
| 124721 | 4" (102 mm) | CO2 Welding Carbon Steel | Carbon steel, polished | Soft grip BF21 |
| 125721 | 5" (127 mm) | CO2 Welding Carbon Steel | Carbon steel, polished | Soft grip BF21 |
| 126721 | 6" (152 mm) | CO2 Welding Carbon Steel | Carbon steel, polished | Soft grip BF21 |
| 127721 | 7" (178 mm) | CO2 Welding Carbon Steel | Carbon steel, polished | Soft grip BF21 |
| Attribute | Specification |
|---|---|
| Number of sizes | 4 |
| Size span | 4"–7" (102–178 mm) |
| Size increment | 1" (approx. 25 mm) |
| Blade pattern | Narrow elongated blade with a pointed toe |
| Construction | CO2 Welding Carbon Steel |
| Blade material | Carbon steel, polished |
| Handle across all four sizes | Soft grip BF21 |
| Forged equivalent | 024721 (4"), 025721 (5"), 026721 (6"), 027721 (7") |
Carbon steel and fresh mortar are a bad combination: mortar left on the blade holds moisture against the steel and the blade is not corrosion-resistant, so the tool has to be cleaned the same day it is used.
- Remove dried mortar with a plastic scraper or a nylon brush; do not use a wire brush or wire wheel, which scratch the blade surface.
Because this line is a welded fabrication, check the weld area every time the tool is cleaned:
- Brush mortar out of the recess around the weld bead rather than leaving it packed there; it holds moisture against the joint.
- Look at the weld bead for rust, pitting or any hairline separation.
- Oil the weld junction and the shank as well as the blade face.
- If a crack appears at the weld, take the tool out of service. Do not attempt to re-weld it; replace the tool.
| Storage condition | Recommended action |
|---|---|
| Overnight, in use again next day | Dry completely; a light film of tool oil on the blade; store dry |
| Weekly or seasonal | Clean thoroughly; oil the blade, the shank and the weld area; store dry |
| Long-term (weeks or months) | Clean; oil generously; wrap the blade to keep moisture off it |
| Site where drying and oiling are hard to do | A stainless blade (292821 / 293821) has a lower maintenance burden, but chlorinated water, coastal air or prolonged soaking can still cause rust spots; rinse with clean water and dry after use |
The pointed toe is the functional part of the blade; once it is bent, chipped or rounded off, the precision that justifies the tool is gone.
- Dress minor burrs on the edge lightly with a fine mill file, following the original factory bevel. Do not re-profile the toe.
- A bent toe can sometimes be straightened once; a cracked one cannot, and the tool should be replaced.
All four art numbers carry the BF21 soft grip, so wood-handle maintenance does not apply to this line.
| Handle | Maintenance |
|---|---|
| Soft grip BF21 | Wash with mild soap and water; inspect for cuts, tears or hardening; replace the tool if the grip is damaged |
| Handle / shank junction | Check for any movement between handle and shank; a handle that has started to turn on the shank should be taken out of service |

In compliance with EU personal data protection laws, we are committed to protecting and providing you with control over your personal data. By clicking "Accept All", you allow us to place cookies to enhance your experience on this site, help us analyze site performance and usage, and enable us to deliver relevant marketing content. You can manage your cookie settings below. By clicking "Agree" you agree to the current settings. For more information, please visit the Privacy Statement.
This website uses cookies
In compliance with EU personal data protection laws, we are committed to protecting your personal data and providing you with control over it. By clicking "Agree", you allow us to place cookies to improve your experience on this site, help us analyze site performance and usage, and allow us to deliver relevant marketing content.
By clicking "Only necessary" you allow us to place only necessary cookies. The website cannot function without these cookies and you cannot switch them off on your system. These cookies are typically set only in response to an action you perform (i.e. a service request), such as setting privacy preferences, logging in, or filling in a form. You can set your browser to block or prompt you for these cookies, but this may prevent some site features from working.



