
Copyright 2026 © Leading Tools Industrial Co., Ltd.
All Rights Reserved. Website Design by Awakening Design
CATALOG TYPE
Product Categories
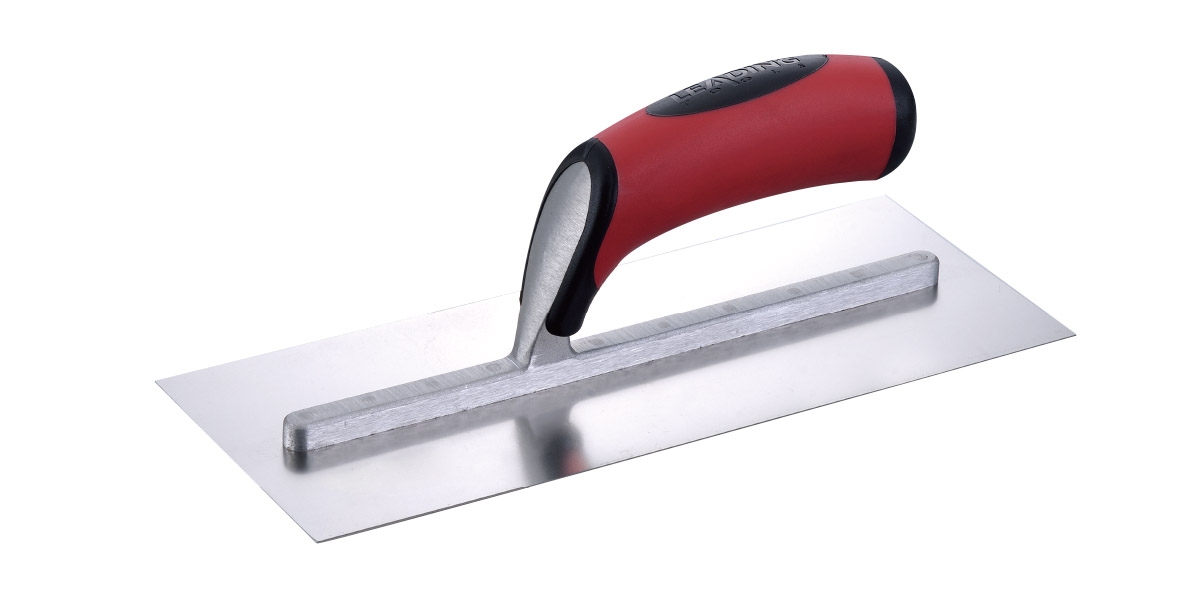
Premium Plaster Trowel
Product Description
Premium Plaster Trowel — Art. Nr 431821
| Item | Value |
|---|---|
| Product name | Premium Plaster Trowel |
| Art. Nr | 431821 |
| Blade size | 3" x 11" (76 mm x 279 mm) |
| Product family | Plaster Trowel range |
| Series positioning | "PLASTER TROWEL — Professional Tools" |
| Construction | Mount Riveted, over-rivets set through the shank and blade |
| Blade materials offered in this series | Carbon steel and stainless steel |
| Blade material of the art numbers listed here | Stainless steel |
| Handle | F21 large California-style soft-grip TPR handle, oil and water resistant |
| Shank | Tempered aluminum alloy |
| Edge | Pre-Worn Edge, broken-in edges |
| Sizes in the series | 15 art numbers, 3"–4-3/4" wide x 9-1/2"–18" long |
431821 is the smallest member of a 15-size rectangular plastering and finishing trowel family built on one construction: an aluminum shank riveted through to the blade, carrying a large soft-grip handle.
This shape is called a plastering trowel, a finishing trowel or a skim trowel more or less interchangeably, because the same tool lays material on and closes the surface; only the working angle changes. Buyers therefore do not choose between these three tools; they choose a width, a length and a blade metal, which is what the Selection Guide and Full Size Reference below answer.
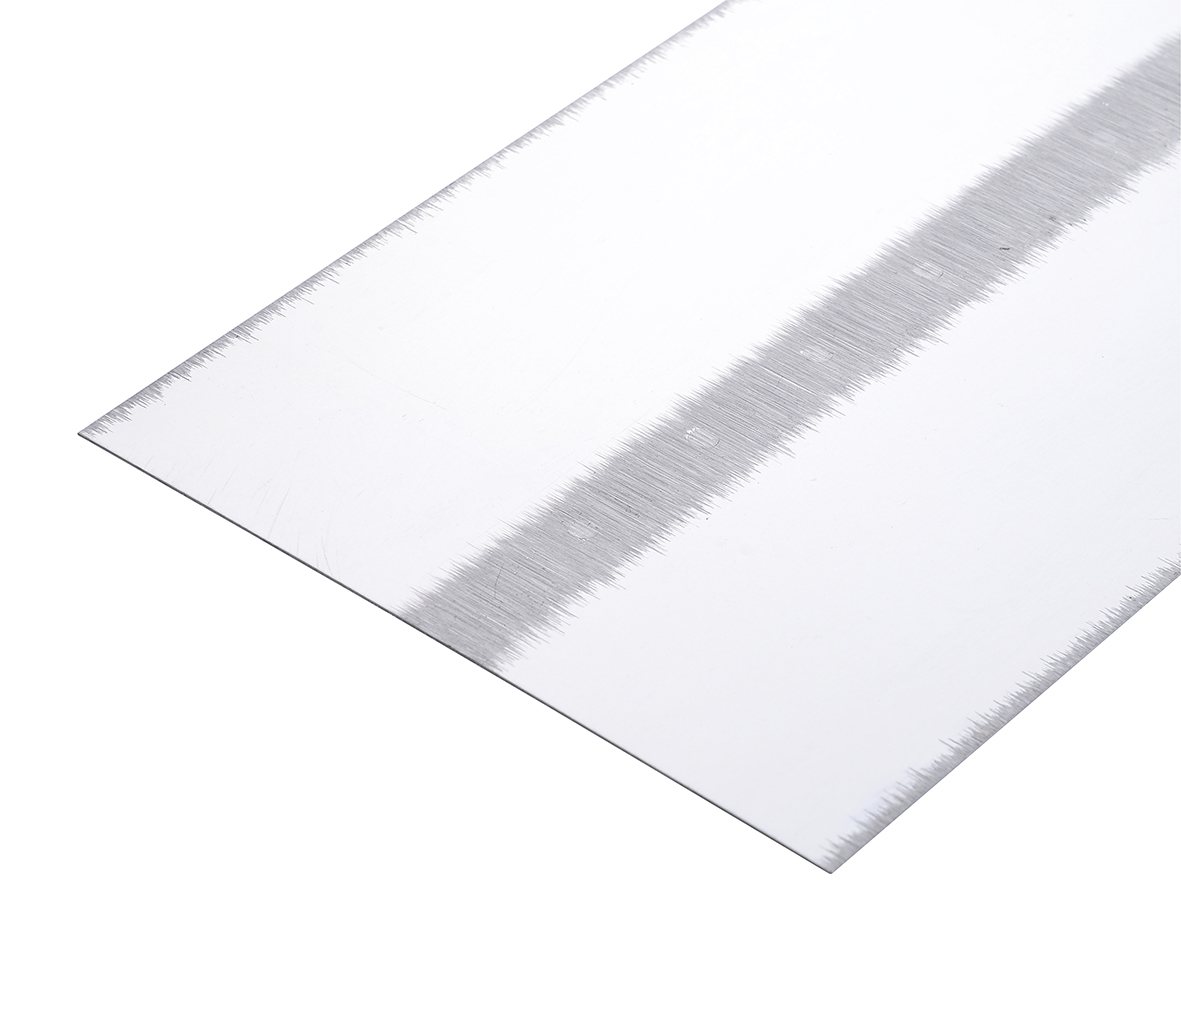
The edges are broken in before the tool ships. A brand-new trowel with sharp factory edges cuts tramlines into fresh plaster, which is why experienced plasterers spend around ten minutes rounding the corners and easing the edges of a new blade with 400-grit aluminum oxide paper before it goes on a wall. Leading Tools supplies this blade with a Pre-Worn Edge, so the tool can go straight onto a finish coat instead of being reworked on the bench.
The art numbers listed here have a stainless steel blade. Stainless has high corrosion resistance and low maintenance, and is the standard choice for gypsum skim because it leaves no oxidation marks on a white finish. Chlorinated water, coastal air or prolonged soaking can still cause rust spots, so rinse with clean water and dry after use.
Four widths and four lengths off one platform. A crew can standardize on one handle, one shank and one rivet system and still put a 3" x 11" trowel in a window reveal and a 4-3/4" x 18" trowel on an open wall. Nothing about balance or grip changes when the operator swaps size, which matters when the same person moves between patch work and full walls in a day.
An aluminum shank instead of a steel one. The shank is tempered aluminum alloy, so the weight added above the blade is low. On a finishing pass the tool is being steered at 5–12° with fingertip pressure; every gram carried high above the blade is felt in the wrist over a full day.
Over-riveted mounting is inspectable. The rivets pass through shank and blade and are set over for holding power. A mechanical joint that is starting to work loose shows lateral movement before it fails, so a supervisor can pull a tool out of service on a visible symptom rather than after a spoiled wall.
A soft-grip TPR handle, oil and water resistant. The F21 handle is an oil and water resistant TPR soft grip, and an ergonomic soft grip is a good choice for long sessions because it reduces wrist fatigue.
A carbon steel route exists for buyers who want it. Carbon steel and stainless steel are both available in this series; contact us for the art number of a carbon steel build. Carbon steel blades cost less, but must be wiped dry and given a thin coat of tool oil after use, or they will rust.
| Stage | What the trowel does | Working angle |
|---|---|---|
| Laying on / base coat | Carries material off the hawk and pushes it onto the wall | About 30°, blade lifted away from the wall so material can feed off it |
| Flattening / leveling | Compresses and levels the applied coat, cuts off high spots | About 15–20° |
| Closing / polishing | Closes the surface and brings up the final texture or sheen | About 5–12°, with a damp blade |
The angle sequence above is basic to plastering. The same trowel performs all three stages; nothing changes except the angle and the pressure.
| Step | Action | Detail |
|---|---|---|
| 1 | Prepare the substrate | Dampen porous backgrounds; use a bonding agent on smooth concrete |
| 2 | Load the blade | Take material off the hawk with the long edge and fold it onto the blade face |
| 3 | Lay on | Push material onto the wall at about 30°, working upward, with even pressure across the whole blade |
| 4 | Flatten | Drop to 15–20° and level the coat, removing ridges and pulling off excess |
| 5 | Wait for the thumb test | Press the surface with a thumb: it should take a light damp mark without material coming away on the skin |
| 6 | First closing pass | 10–15°, light pressure, closing surface porosity |
| 7 | Final passes | 5–12°, minimal pressure, blade wetted with a damp brush; work in sets of roughly three passes |
| 8 | Stop in time | Do not keep polishing after the surface has closed; an over-burnished plaster face is glassy and will not take paint properly |
Two habits separate a flat wall from a wavy one. Use the entire blade face rather than pressing on one corner, because localized pressure produces uneven thickness. And keep the passes continuous: when laying on, drag upward at roughly 30°, then bring the blade closer to the wall to shear off the surface grain.
Gypsum skim is a main application for this tool shape, and stainless is the right blade for it because carbon steel can mark a white gypsum face. Work the wall in three stages as the material sets: wet, half-set and set, roughly three passes at each stage, wetting the blade with a brush on the last stage.
Work areas small enough that you can complete each stage before the plaster moves past it. The 3" x 11" (431821) size is the reveal and patch tool in this system; the 4-1/2" x 14" (464821) is the wall tool.
For a multi-coat render system, apply the scratch coat with a 4-1/2" or 4-3/4" width, then key it horizontally with a scratcher or nail board before it sets. Apply the next coat once the scratch coat has reached the firmness specified by the material manufacturer, and level it with the flat face of the trowel. Mist spray in hot or windy conditions to prevent rapid moisture loss.
Decorative thin-coat systems are burnished rather than floated: each coat is compressed with the blade held almost flat until a sheen appears. A stainless blade is the right choice here for the same reason as gypsum; it does not transfer iron marks onto a pigmented or pale finish. In the finishing stage the steel blade smooths out irregularities, removes surplus material and works small amounts of material back into hollows.
A new trowel that still has factory-sharp corners will score lines into a finish coat. The fix is about ten minutes with 400-grit aluminum oxide paper, rounding the four corners and easing the working edges before the tool goes on a wall. This blade is supplied with the edges already broken in, so the step should be short or unnecessary; check the corners against a fingernail before the first finish coat and ease anything that catches.
For bedding tape and filling joints in plasterboard, the 3" and 4" widths are the practical sizes; wider blades bridge the recess and leave the joint proud. Build the joint in thin passes and feather each pass wider than the last. This is a secondary use for this tool; a dedicated taping knife is the primary tool for the bedding stage.
Q: Is this a plastering trowel, a finishing trowel or a skim trowel?
A: All three names describe this tool. The terms are interchangeable, because the same rectangular blade lays material on and closes the surface. Only the working angle changes.
Q: What angle should I hold it at?
A: About 30° when laying material on, 15–20° when flattening, and 5–12° on the closing passes.
Q: Should I buy carbon steel or stainless?
A: Choose stainless for gypsum skim coats, wet areas or sites where tools get hosed down.
It has high corrosion resistance, needs no oiling and leaves no marks on a white finish; chlorinated water, coastal air or prolonged soaking can still cause rust spots, so rinse with clean water and dry after use. Choose carbon steel only if you will dry and oil the blade after every use; contact sales for the art number. The art numbers listed here are the stainless build.
Q: Which size should a first-time buyer take?
A: 11" if the work is patching, reveals and ceilings; 14" if it is walls. 14" is a common general-purpose size for walls, and short blades are easier for learners to keep flat.
Q: Why does my new trowel leave lines in the finish?
A: Usually sharp factory corners and edges. Rounding the corners and easing the edges with 400-grit sandpaper takes around ten minutes. This blade ships with the edges already broken in, so check the corners first.
| Property | Detail |
|---|---|
| Blade shape | Rectangular, square corners |
| Blade size (431821) | 3" x 11" — 76 mm x 279 mm |
| Carbon steel build | Different art number; contact sales |
| Blade material of the listed art numbers | Stainless steel |
| Blade finish | Cross-ground, transparent electro-deposition |
| Edge | Pre-Worn Edge / broken-in edges |
| Construction | Mount Riveted; over-rivets through aluminum shank and blade |
| Property | Detail |
|---|---|
| Handle model | F21 |
| Handle type | Large California-style soft-grip handle |
| Grip material | TPR |
| Shank | Tempered aluminum alloy |
| Mount | Over-riveted through shank and blade |
Carbon steel blades and other handles are available on request: contact us.
| Blade Width | Primary Use |
|---|---|
| 3" (76 mm) | Reveals, window sills, patch repair, feathering out into an existing surface, narrow returns |
| 4" (102 mm) | Small walls, patch repairs, tight-access work such as behind pipework |
| 4-1/2" (114 mm) | General-purpose width |
| 4-3/4" (121 mm) | Large open wall areas where coverage per pass matters |
| Blade Length | Primary Use |
|---|---|
| 11" (279 mm) | Precision work, small areas, ceilings; also the length recommended to learners because a short blade is easier to keep flat |
| 14" (356 mm) | A common general-purpose length for walls |
| 16" (406 mm) | Long continuous passes on open walls; needs a practiced flat stroke |
| 18" (457 mm) | Large areas only; the longer the blade, the harder it is to avoid rocking it |
Common finishing trowel lengths are 11", 13", 14" and 16". This family covers 11", 14", 16" and 18"; there is no 13".
| Property | Carbon Steel | Stainless Steel |
|---|---|---|
| Corrosion resistance | Rusts if left wet; wipe dry and oil after use | High corrosion resistance and low maintenance; no oiling needed. Chlorinated water, coastal air or prolonged soaking can still cause rust spots, so rinse with clean water and dry after use |
| Gypsum skim / white finishes | Can leave oxidation marks on a white gypsum finish | Preferred for gypsum skim; leaves the finish clean |
| Daily maintenance | Clean, dry, light oil film | Clean and dry |
| Best for | Buyers who dry and oil their tools after every use | Wet-area work, gypsum skim, sites where tools are hosed down |
All 15 art numbers in the Premium Plaster Trowel series.
| Art. Nr | Blade Size (W x L) | Blade Size (mm) | Blade Material | Handle |
|---|---|---|---|---|
| 431821 | 3" x 11" | 76 x 279 | Stainless steel | F21 soft grip |
| 434821 | 3" x 14" | 76 x 356 | Stainless steel | F21 soft grip |
| 436821 | 3" x 16" | 76 x 406 | Stainless steel | F21 soft grip |
| 441821 | 4" x 9-1/2" | 102 x 241 | Stainless steel | F21 soft grip |
| 444821 | 4" x 14" | 102 x 356 | Stainless steel | F21 soft grip |
| 446821 | 4" x 16" | 102 x 406 | Stainless steel | F21 soft grip |
| 448821 | 4" x 18" | 102 x 457 | Stainless steel | F21 soft grip |
| 461821 | 4-1/2" x 11" | 114 x 279 | Stainless steel | F21 soft grip |
| 464821 | 4-1/2" x 14" | 114 x 356 | Stainless steel | F21 soft grip |
| 466821 | 4-1/2" x 16" | 114 x 406 | Stainless steel | F21 soft grip |
| 468821 | 4-1/2" x 18" | 114 x 457 | Stainless steel | F21 soft grip |
| 470821 | 4-3/4" x 11" | 121 x 279 | Stainless steel | F21 soft grip |
| 474821 | 4-3/4" x 14" | 121 x 356 | Stainless steel | F21 soft grip |
| 476821 | 4-3/4" x 16" | 121 x 406 | Stainless steel | F21 soft grip |
| 478821 | 4-3/4" x 18" | 121 x 457 | Stainless steel | F21 soft grip |
Note: the 3" width is offered in 11", 14" and 16" only; there is no 3" x 18". Carbon steel builds of the same sizes are available on request: contact us.
Premium Plaster Trowel — Art. Nr 431821
| Item | Value |
|---|---|
| Product name | Premium Plaster Trowel |
| Art. Nr | 431821 |
| Blade size | 3" x 11" (76 mm x 279 mm) |
| Product family | Plaster Trowel range |
| Series positioning | "PLASTER TROWEL — Professional Tools" |
| Construction | Mount Riveted, over-rivets set through the shank and blade |
| Blade materials offered in this series | Carbon steel and stainless steel |
| Blade material of the art numbers listed here | Stainless steel |
| Handle | F21 large California-style soft-grip TPR handle, oil and water resistant |
| Shank | Tempered aluminum alloy |
| Edge | Pre-Worn Edge, broken-in edges |
| Sizes in the series | 15 art numbers, 3"–4-3/4" wide x 9-1/2"–18" long |
431821 is the smallest member of a 15-size rectangular plastering and finishing trowel family built on one construction: an aluminum shank riveted through to the blade, carrying a large soft-grip handle.
This shape is called a plastering trowel, a finishing trowel or a skim trowel more or less interchangeably, because the same tool lays material on and closes the surface; only the working angle changes. Buyers therefore do not choose between these three tools; they choose a width, a length and a blade metal, which is what the Selection Guide and Full Size Reference below answer.
The edges are broken in before the tool ships. A brand-new trowel with sharp factory edges cuts tramlines into fresh plaster, which is why experienced plasterers spend around ten minutes rounding the corners and easing the edges of a new blade with 400-grit aluminum oxide paper before it goes on a wall. Leading Tools supplies this blade with a Pre-Worn Edge, so the tool can go straight onto a finish coat instead of being reworked on the bench.
The art numbers listed here have a stainless steel blade. Stainless has high corrosion resistance and low maintenance, and is the standard choice for gypsum skim because it leaves no oxidation marks on a white finish. Chlorinated water, coastal air or prolonged soaking can still cause rust spots, so rinse with clean water and dry after use.
Four widths and four lengths off one platform. A crew can standardize on one handle, one shank and one rivet system and still put a 3" x 11" trowel in a window reveal and a 4-3/4" x 18" trowel on an open wall. Nothing about balance or grip changes when the operator swaps size, which matters when the same person moves between patch work and full walls in a day.
An aluminum shank instead of a steel one. The shank is tempered aluminum alloy, so the weight added above the blade is low. On a finishing pass the tool is being steered at 5–12° with fingertip pressure; every gram carried high above the blade is felt in the wrist over a full day.
Over-riveted mounting is inspectable. The rivets pass through shank and blade and are set over for holding power. A mechanical joint that is starting to work loose shows lateral movement before it fails, so a supervisor can pull a tool out of service on a visible symptom rather than after a spoiled wall.
A soft-grip TPR handle, oil and water resistant. The F21 handle is an oil and water resistant TPR soft grip, and an ergonomic soft grip is a good choice for long sessions because it reduces wrist fatigue.
A carbon steel route exists for buyers who want it. Carbon steel and stainless steel are both available in this series; contact us for the art number of a carbon steel build. Carbon steel blades cost less, but must be wiped dry and given a thin coat of tool oil after use, or they will rust.
| Stage | What the trowel does | Working angle |
|---|---|---|
| Laying on / base coat | Carries material off the hawk and pushes it onto the wall | About 30°, blade lifted away from the wall so material can feed off it |
| Flattening / leveling | Compresses and levels the applied coat, cuts off high spots | About 15–20° |
| Closing / polishing | Closes the surface and brings up the final texture or sheen | About 5–12°, with a damp blade |
The angle sequence above is basic to plastering. The same trowel performs all three stages; nothing changes except the angle and the pressure.
| Step | Action | Detail |
|---|---|---|
| 1 | Prepare the substrate | Dampen porous backgrounds; use a bonding agent on smooth concrete |
| 2 | Load the blade | Take material off the hawk with the long edge and fold it onto the blade face |
| 3 | Lay on | Push material onto the wall at about 30°, working upward, with even pressure across the whole blade |
| 4 | Flatten | Drop to 15–20° and level the coat, removing ridges and pulling off excess |
| 5 | Wait for the thumb test | Press the surface with a thumb: it should take a light damp mark without material coming away on the skin |
| 6 | First closing pass | 10–15°, light pressure, closing surface porosity |
| 7 | Final passes | 5–12°, minimal pressure, blade wetted with a damp brush; work in sets of roughly three passes |
| 8 | Stop in time | Do not keep polishing after the surface has closed; an over-burnished plaster face is glassy and will not take paint properly |
Two habits separate a flat wall from a wavy one. Use the entire blade face rather than pressing on one corner, because localized pressure produces uneven thickness. And keep the passes continuous: when laying on, drag upward at roughly 30°, then bring the blade closer to the wall to shear off the surface grain.
Gypsum skim is a main application for this tool shape, and stainless is the right blade for it because carbon steel can mark a white gypsum face. Work the wall in three stages as the material sets: wet, half-set and set, roughly three passes at each stage, wetting the blade with a brush on the last stage.
Work areas small enough that you can complete each stage before the plaster moves past it. The 3" x 11" (431821) size is the reveal and patch tool in this system; the 4-1/2" x 14" (464821) is the wall tool.
For a multi-coat render system, apply the scratch coat with a 4-1/2" or 4-3/4" width, then key it horizontally with a scratcher or nail board before it sets. Apply the next coat once the scratch coat has reached the firmness specified by the material manufacturer, and level it with the flat face of the trowel. Mist spray in hot or windy conditions to prevent rapid moisture loss.
Decorative thin-coat systems are burnished rather than floated: each coat is compressed with the blade held almost flat until a sheen appears. A stainless blade is the right choice here for the same reason as gypsum; it does not transfer iron marks onto a pigmented or pale finish. In the finishing stage the steel blade smooths out irregularities, removes surplus material and works small amounts of material back into hollows.
A new trowel that still has factory-sharp corners will score lines into a finish coat. The fix is about ten minutes with 400-grit aluminum oxide paper, rounding the four corners and easing the working edges before the tool goes on a wall. This blade is supplied with the edges already broken in, so the step should be short or unnecessary; check the corners against a fingernail before the first finish coat and ease anything that catches.
For bedding tape and filling joints in plasterboard, the 3" and 4" widths are the practical sizes; wider blades bridge the recess and leave the joint proud. Build the joint in thin passes and feather each pass wider than the last. This is a secondary use for this tool; a dedicated taping knife is the primary tool for the bedding stage.
Q: Is this a plastering trowel, a finishing trowel or a skim trowel?
A: All three names describe this tool. The terms are interchangeable, because the same rectangular blade lays material on and closes the surface. Only the working angle changes.
Q: What angle should I hold it at?
A: About 30° when laying material on, 15–20° when flattening, and 5–12° on the closing passes.
Q: Should I buy carbon steel or stainless?
A: Choose stainless for gypsum skim coats, wet areas or sites where tools get hosed down.
It has high corrosion resistance, needs no oiling and leaves no marks on a white finish; chlorinated water, coastal air or prolonged soaking can still cause rust spots, so rinse with clean water and dry after use. Choose carbon steel only if you will dry and oil the blade after every use; contact sales for the art number. The art numbers listed here are the stainless build.
Q: Which size should a first-time buyer take?
A: 11" if the work is patching, reveals and ceilings; 14" if it is walls. 14" is a common general-purpose size for walls, and short blades are easier for learners to keep flat.
Q: Why does my new trowel leave lines in the finish?
A: Usually sharp factory corners and edges. Rounding the corners and easing the edges with 400-grit sandpaper takes around ten minutes. This blade ships with the edges already broken in, so check the corners first.
| Property | Detail |
|---|---|
| Blade shape | Rectangular, square corners |
| Blade size (431821) | 3" x 11" — 76 mm x 279 mm |
| Carbon steel build | Different art number; contact sales |
| Blade material of the listed art numbers | Stainless steel |
| Blade finish | Cross-ground, transparent electro-deposition |
| Edge | Pre-Worn Edge / broken-in edges |
| Construction | Mount Riveted; over-rivets through aluminum shank and blade |
| Property | Detail |
|---|---|
| Handle model | F21 |
| Handle type | Large California-style soft-grip handle |
| Grip material | TPR |
| Shank | Tempered aluminum alloy |
| Mount | Over-riveted through shank and blade |
Carbon steel blades and other handles are available on request: contact us.
| Blade Width | Primary Use |
|---|---|
| 3" (76 mm) | Reveals, window sills, patch repair, feathering out into an existing surface, narrow returns |
| 4" (102 mm) | Small walls, patch repairs, tight-access work such as behind pipework |
| 4-1/2" (114 mm) | General-purpose width |
| 4-3/4" (121 mm) | Large open wall areas where coverage per pass matters |
| Blade Length | Primary Use |
|---|---|
| 11" (279 mm) | Precision work, small areas, ceilings; also the length recommended to learners because a short blade is easier to keep flat |
| 14" (356 mm) | A common general-purpose length for walls |
| 16" (406 mm) | Long continuous passes on open walls; needs a practiced flat stroke |
| 18" (457 mm) | Large areas only; the longer the blade, the harder it is to avoid rocking it |
Common finishing trowel lengths are 11", 13", 14" and 16". This family covers 11", 14", 16" and 18"; there is no 13".
| Property | Carbon Steel | Stainless Steel |
|---|---|---|
| Corrosion resistance | Rusts if left wet; wipe dry and oil after use | High corrosion resistance and low maintenance; no oiling needed. Chlorinated water, coastal air or prolonged soaking can still cause rust spots, so rinse with clean water and dry after use |
| Gypsum skim / white finishes | Can leave oxidation marks on a white gypsum finish | Preferred for gypsum skim; leaves the finish clean |
| Daily maintenance | Clean, dry, light oil film | Clean and dry |
| Best for | Buyers who dry and oil their tools after every use | Wet-area work, gypsum skim, sites where tools are hosed down |
All 15 art numbers in the Premium Plaster Trowel series.
| Art. Nr | Blade Size (W x L) | Blade Size (mm) | Blade Material | Handle |
|---|---|---|---|---|
| 431821 | 3" x 11" | 76 x 279 | Stainless steel | F21 soft grip |
| 434821 | 3" x 14" | 76 x 356 | Stainless steel | F21 soft grip |
| 436821 | 3" x 16" | 76 x 406 | Stainless steel | F21 soft grip |
| 441821 | 4" x 9-1/2" | 102 x 241 | Stainless steel | F21 soft grip |
| 444821 | 4" x 14" | 102 x 356 | Stainless steel | F21 soft grip |
| 446821 | 4" x 16" | 102 x 406 | Stainless steel | F21 soft grip |
| 448821 | 4" x 18" | 102 x 457 | Stainless steel | F21 soft grip |
| 461821 | 4-1/2" x 11" | 114 x 279 | Stainless steel | F21 soft grip |
| 464821 | 4-1/2" x 14" | 114 x 356 | Stainless steel | F21 soft grip |
| 466821 | 4-1/2" x 16" | 114 x 406 | Stainless steel | F21 soft grip |
| 468821 | 4-1/2" x 18" | 114 x 457 | Stainless steel | F21 soft grip |
| 470821 | 4-3/4" x 11" | 121 x 279 | Stainless steel | F21 soft grip |
| 474821 | 4-3/4" x 14" | 121 x 356 | Stainless steel | F21 soft grip |
| 476821 | 4-3/4" x 16" | 121 x 406 | Stainless steel | F21 soft grip |
| 478821 | 4-3/4" x 18" | 121 x 457 | Stainless steel | F21 soft grip |
Note: the 3" width is offered in 11", 14" and 16" only; there is no 3" x 18". Carbon steel builds of the same sizes are available on request: contact us.

In compliance with EU personal data protection laws, we are committed to protecting and providing you with control over your personal data. By clicking "Accept All", you allow us to place cookies to enhance your experience on this site, help us analyze site performance and usage, and enable us to deliver relevant marketing content. You can manage your cookie settings below. By clicking "Agree" you agree to the current settings. For more information, please visit the Privacy Statement.
This website uses cookies
In compliance with EU personal data protection laws, we are committed to protecting your personal data and providing you with control over it. By clicking "Agree", you allow us to place cookies to improve your experience on this site, help us analyze site performance and usage, and allow us to deliver relevant marketing content.
By clicking "Only necessary" you allow us to place only necessary cookies. The website cannot function without these cookies and you cannot switch them off on your system. These cookies are typically set only in response to an action you perform (i.e. a service request), such as setting privacy preferences, logging in, or filling in a form. You can set your browser to block or prompt you for these cookies, but this may prevent some site features from working.



