
Copyright 2026 © Leading Tools Industrial Co., Ltd.
All Rights Reserved. Website Design by Awakening Design
CATALOG TYPE
Product Categories
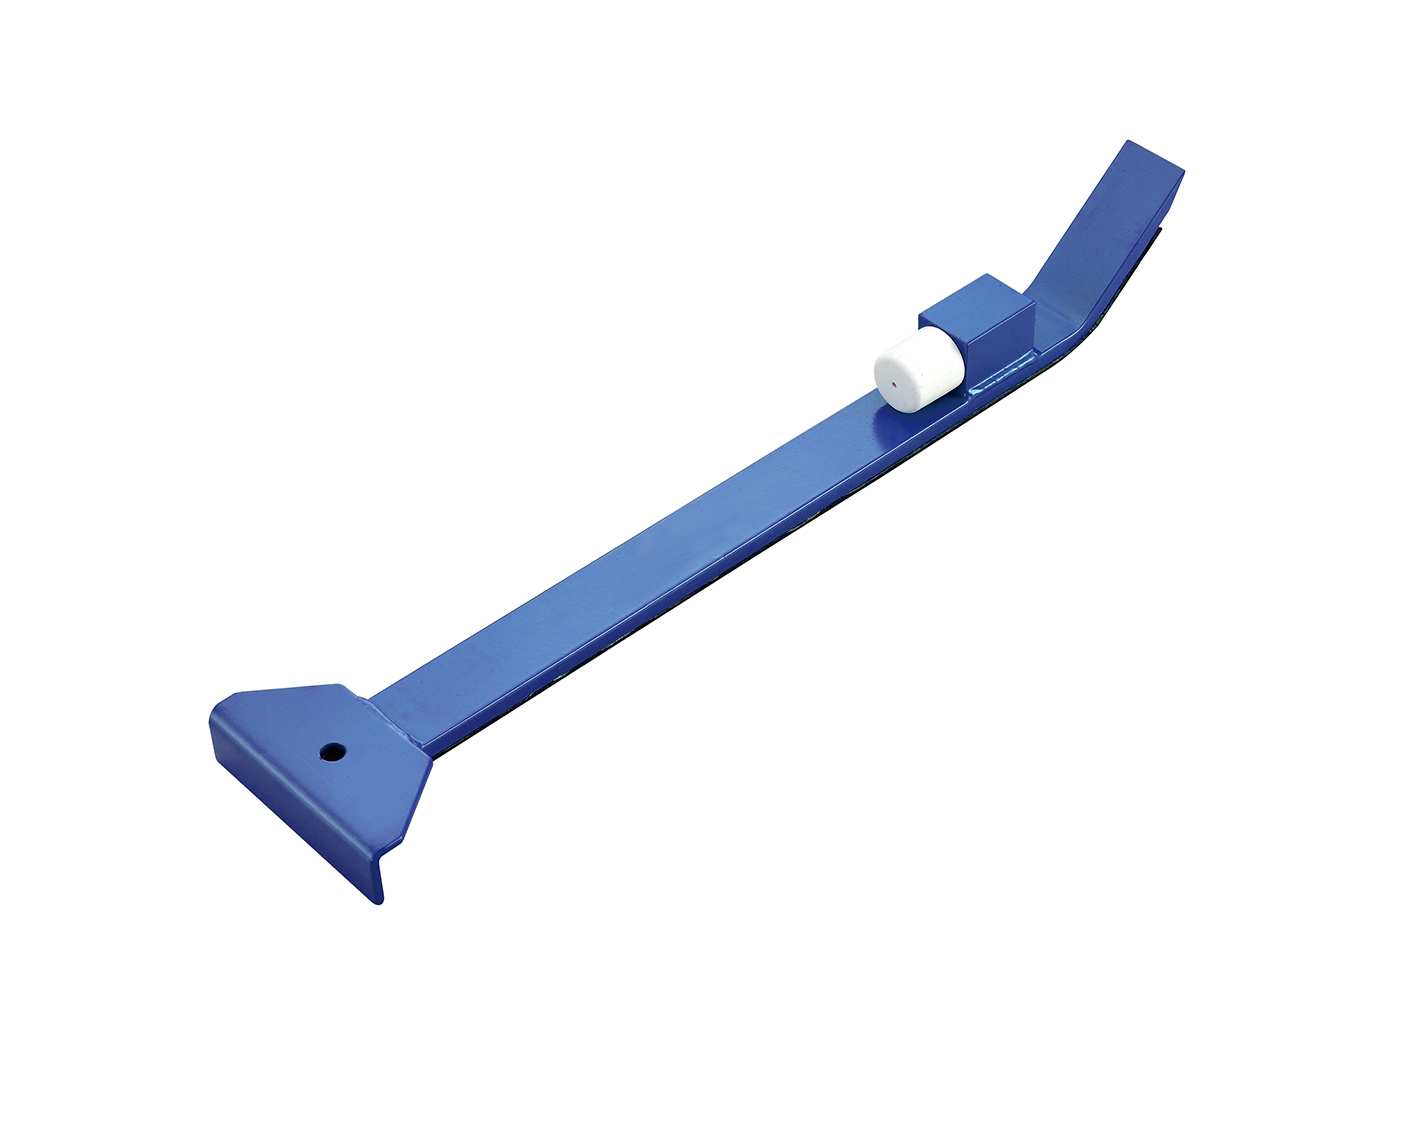
Pro Floor Pull Bar
Product Description
Pro Floor Pull Bar — Art. Nr 350003, 9 × 38 × 530 mm (0.35" × 1.5" × 20.9")
The Pro Floor Pull Bar is Leading Tools' heavy-duty flooring pull bar, part of the Builder Tools range and the heavy-duty partner to the DIY Floor Pull Bar 350002. It is a blue painted flat steel bar with a bent, splayed foot lip at one end (pierced with a through hole), a narrower upturned lip at the opposite end, and a white plastic part set at the bend near that upturned end.
This product belongs to the flooring pull bar family: the tool a floor fitter hooks over the last board of a floating floor and taps to close the tongue-and-groove joint where there is no room to swing a mallet at a tapping block. The size 9 × 38 × 530 mm is thickness x width x overall length. The DIY Floor Pull Bar 350002 (4 × 75 × 300 mm) is the same tool type in a lighter, shorter, wider gauge: the pair is a standard/heavy-duty set.
The tool is also known as a laminate pull bar, last-board puller or pulling iron.
At 530 mm, 350003 is the longer of the two pull bars in the range, and its 9 mm section resists bending under repeated blows.
A real tool for the one job a tapping block cannot do. Across the middle of a room a fitter closes joints with a tapping block and a mallet. At the wall, under a radiator, beneath a kitchen plinth and around door casings there is no room to place a block on the far side and swing.
That is the pull bar's entire reason to exist: the tapping block covers the middle of the room, the pull bar covers the edges. A buyer who stocks tapping blocks and not pull bars has a hole in the range.
A longer bar for professional use. Against the 300 mm DIY Floor Pull Bar in the same range, 350003 gives roughly 1.8x the bar length, which makes it easier to hold flat and square to the board along a longer run.
A white plastic part at the bend. The bar carries a white plastic part at the bend near the upturned lip. Contact sales for details of its function.
A 9 mm bar resists bending. A pull bar fails by bending, and once it is bent it no longer transmits force cleanly along its length. At 9 mm the 350003 bar is more than twice as thick as the 4 mm DIY Floor Pull Bar and resists bending better.
Two different working ends means two different jobs from one bar. The broad splayed foot end gives a larger surface to strike. The narrower upturned lip reaches into tighter gaps.
Who buys this tool
| Buyer | Why |
|---|---|
| Flooring contractors (laminate, SPC/LVP, engineered) | Wall rows, radiator gaps, door casings: daily use |
| Parquet and solid-timber fitters | Closing long, heavy boards where a light bar flexes |
| Flooring tool distributors and builders' merchants | Standard line item |
| DIY chains (as the upgrade SKU) | 350003 is the "pro" tier above 350002 in a two-tier planogram |
| Situation | Use the pull bar? | Notes |
|---|---|---|
| Middle of the room, open floor | No, use a tapping block | The tapping block covers open areas; the pull bar is for edges |
| Last row against the wall | Yes | No room to place a block on the far side and swing a mallet |
| Under a radiator or pipe | Yes | Classic pull bar application |
| Under a kitchen plinth or cabinet toe kick | Yes | Confined vertical clearance |
| Around door casings and thresholds | Yes | Board must be drawn in horizontally, not tapped from the side |
| Long solid-timber boards that will not pull up tight | Yes, heavy-duty bar | 350003 is the heavy-duty bar in the range |
| Step | Action | Watch for |
|---|---|---|
| 1 | Measure the gap between the last laid row and the wall, subtract the expansion gap specified by the flooring manufacturer and cut the final board to that width | Do not forget the expansion gap |
| 2 | Angle the board into the tongue-and-groove of the previous row and lay it down | The joint should be engaged but not yet closed |
| 3 | Slide the upturned lip of the bar over the wall-side edge of the board so it hooks the board end; lay the bar flat on the floor, parallel with the board run | The bar must lie flat; do not strike a bar that is bridging in mid-air |
| 4 | Place a thin packer or an offcut of flooring between the bar and the wall | This absorbs the blow and protects the wall and skirting |
| 5 | Strike the wide end of the bar with a rubber or soft-faced mallet, using several moderate blows rather than one heavy one, watching the joint close as you go | Do not hit a plain steel bar with a steel hammer unless the model has a reinforced striking head |
| 6 | Stop when the joint clicks home and the seam is closed; remove the bar | An over-driven board pushes the whole row out of line |
| 7 | Check the expansion gap is still there and will be covered by the skirting or scotia | Keep the gap and hide it under the trim |
This is the primary use. The final row is cut to width, angled into the previous row's groove, then drawn tight with the bar because the wall leaves no space to work from the far side.
Always keep the packer between bar and wall; the blow that closes the joint is also a blow that would otherwise land on plasterboard or skirting. Work along the board in short steps, moving the bar every 300–400 mm rather than trying to close the whole board length from one position, so the board draws in evenly rather than skewing.
Heavy solid boards need more force to pull up tight. With 350003, deliver that force through more blows rather than heavier ones, and consider a soft packer at the board edge as well as at the wall to avoid bruising the board end grain.
These are the situations that justify buying the tool at all. Use the narrower upturned lip end where vertical clearance is tight, keep the bar flat against the floor, and lighten the blows: a board that has to be persuaded through a restricted gap is also a board that can be split at the tongue if it is driven hard.
Q: What is the difference between this and a tapping block?
A: They are used at different stages of the same job. The tapping block is used across open floor, where you can place it on the far side of the board and swing a mallet, while the pull bar is used at the wall, under radiators and at door casings, where there is no room to do that.
Q: How should I strike it, and how do I protect the wall and floor?
A: Use a rubber or soft-faced mallet with several moderate blows rather than one hard one; steel hammers are only for bars built with a reinforced striking head. Put a thin packer or a flooring offcut between the bar and the wall to protect the wall face and skirting, and on a finished floor put a scrap of board or ply under the bar.
Q: The bar keeps slipping off the board edge, or it has bent. What should I do?
A: Slipping usually means the bar is not lying flat or the lip is not fully hooked over the board end: lay the bar flat on the floor, parallel with the board run, and seat the lip fully before striking. A bent bar should be replaced, not straightened, because it no longer transmits the blow cleanly; if a 350003 bends in normal use, check that the bar is lying flat when struck and that a steel hammer is not being used on it.
Q: Should I buy 350003 or 350002?
A: 350003 for professional work: it is 530 mm long against 300 mm, and 9 mm thick against 4 mm, which means a longer bar that is easier to hold square and much more resistance to bending. 350002 for light DIY work in small rooms, where the shorter bar is easier to handle.
| Model | Size (Thickness x Width x Overall Length) | Imperial equivalent |
|---|---|---|
| 350003 | 9 × 38 × 530 mm | 0.35" × 1.5" × 20.9" |
| Item | Detail |
|---|---|
| Product name | Pro Floor Pull Bar |
| Article number | 350003 |
| Size | 9 × 38 × 530 mm (0.35" × 1.5" × 20.9") |
| Dimension convention | Thickness x width x overall length |
| Tool type | Flooring pull bar |
| Body | One-piece flat steel bar, bent, blue painted |
| End A | Broad splayed foot lip with through hole |
| End B | Narrower upturned lip |
| White plastic part | At the bend near the upturned lip |
| Product line | Builder Tools |
Both article numbers are in the Leading Tools range and both are flat steel bars of the same tool family, in a heavy-duty and a light-duty grade.
| Feature | Pro Floor Pull Bar 350003 | DIY Floor Pull Bar 350002 |
|---|---|---|
| Bar thickness | 9 mm | 4 mm |
| Bar width | 38 mm | 75 mm |
| Overall length | 530 mm | 300 mm |
| White plastic part at the bend | Yes | None |
| End profile | Splayed foot lip with through hole at one end; upturned lip at the other | Lips bent at both ends; elongated slot in the body |
| Body form | Bent bar, narrow section | Flat plate, wide section |
| Resistance to bending | Higher (9 mm stock) | Lower (4 mm stock) |
| Intended tier | Professional / heavy-duty | DIY / light-duty |
| Job | Recommended | Why |
|---|---|---|
| Laminate and SPC/LVP, last row against the wall | 350003 | Longer bar, easier to hold flat and square to the board |
| Engineered and solid timber, long heavy boards | 350003 | The thicker 9 mm bar resists bending better than the 4 mm bar |
| Under radiators, kitchen plinths, door casings | 350003, upturned lip end | The narrow lip reaches gaps a wide plate cannot |
| Light DIY LVP in a small room | 350002 | Shorter bar is enough, and easier to handle in tight rooms |
Complete art-number and size reference below.
| Art. Nr | Size (Thickness x Width x Overall Length) | Body | Working ends | White plastic part |
|---|---|---|---|---|
| 350003 | 9 × 38 × 530 mm | Blue painted flat steel bar, bent | Splayed foot lip with through hole; upturned lip | At the bend near the upturned lip |
| Art. Nr | Product name | Size (Thickness x Width x Overall Length) | Relationship |
|---|---|---|---|
| 350002 | DIY Floor Pull Bar | 4 × 75 × 300 mm | Light-duty partner to 350003, same tool family |
Pro Floor Pull Bar — Art. Nr 350003, 9 × 38 × 530 mm (0.35" × 1.5" × 20.9")
The Pro Floor Pull Bar is Leading Tools' heavy-duty flooring pull bar, part of the Builder Tools range and the heavy-duty partner to the DIY Floor Pull Bar 350002. It is a blue painted flat steel bar with a bent, splayed foot lip at one end (pierced with a through hole), a narrower upturned lip at the opposite end, and a white plastic part set at the bend near that upturned end.
This product belongs to the flooring pull bar family: the tool a floor fitter hooks over the last board of a floating floor and taps to close the tongue-and-groove joint where there is no room to swing a mallet at a tapping block. The size 9 × 38 × 530 mm is thickness x width x overall length. The DIY Floor Pull Bar 350002 (4 × 75 × 300 mm) is the same tool type in a lighter, shorter, wider gauge: the pair is a standard/heavy-duty set.
The tool is also known as a laminate pull bar, last-board puller or pulling iron.
At 530 mm, 350003 is the longer of the two pull bars in the range, and its 9 mm section resists bending under repeated blows.
A real tool for the one job a tapping block cannot do. Across the middle of a room a fitter closes joints with a tapping block and a mallet. At the wall, under a radiator, beneath a kitchen plinth and around door casings there is no room to place a block on the far side and swing.
That is the pull bar's entire reason to exist: the tapping block covers the middle of the room, the pull bar covers the edges. A buyer who stocks tapping blocks and not pull bars has a hole in the range.
A longer bar for professional use. Against the 300 mm DIY Floor Pull Bar in the same range, 350003 gives roughly 1.8x the bar length, which makes it easier to hold flat and square to the board along a longer run.
A white plastic part at the bend. The bar carries a white plastic part at the bend near the upturned lip. Contact sales for details of its function.
A 9 mm bar resists bending. A pull bar fails by bending, and once it is bent it no longer transmits force cleanly along its length. At 9 mm the 350003 bar is more than twice as thick as the 4 mm DIY Floor Pull Bar and resists bending better.
Two different working ends means two different jobs from one bar. The broad splayed foot end gives a larger surface to strike. The narrower upturned lip reaches into tighter gaps.
Who buys this tool
| Buyer | Why |
|---|---|
| Flooring contractors (laminate, SPC/LVP, engineered) | Wall rows, radiator gaps, door casings: daily use |
| Parquet and solid-timber fitters | Closing long, heavy boards where a light bar flexes |
| Flooring tool distributors and builders' merchants | Standard line item |
| DIY chains (as the upgrade SKU) | 350003 is the "pro" tier above 350002 in a two-tier planogram |
| Situation | Use the pull bar? | Notes |
|---|---|---|
| Middle of the room, open floor | No, use a tapping block | The tapping block covers open areas; the pull bar is for edges |
| Last row against the wall | Yes | No room to place a block on the far side and swing a mallet |
| Under a radiator or pipe | Yes | Classic pull bar application |
| Under a kitchen plinth or cabinet toe kick | Yes | Confined vertical clearance |
| Around door casings and thresholds | Yes | Board must be drawn in horizontally, not tapped from the side |
| Long solid-timber boards that will not pull up tight | Yes, heavy-duty bar | 350003 is the heavy-duty bar in the range |
| Step | Action | Watch for |
|---|---|---|
| 1 | Measure the gap between the last laid row and the wall, subtract the expansion gap specified by the flooring manufacturer and cut the final board to that width | Do not forget the expansion gap |
| 2 | Angle the board into the tongue-and-groove of the previous row and lay it down | The joint should be engaged but not yet closed |
| 3 | Slide the upturned lip of the bar over the wall-side edge of the board so it hooks the board end; lay the bar flat on the floor, parallel with the board run | The bar must lie flat; do not strike a bar that is bridging in mid-air |
| 4 | Place a thin packer or an offcut of flooring between the bar and the wall | This absorbs the blow and protects the wall and skirting |
| 5 | Strike the wide end of the bar with a rubber or soft-faced mallet, using several moderate blows rather than one heavy one, watching the joint close as you go | Do not hit a plain steel bar with a steel hammer unless the model has a reinforced striking head |
| 6 | Stop when the joint clicks home and the seam is closed; remove the bar | An over-driven board pushes the whole row out of line |
| 7 | Check the expansion gap is still there and will be covered by the skirting or scotia | Keep the gap and hide it under the trim |
This is the primary use. The final row is cut to width, angled into the previous row's groove, then drawn tight with the bar because the wall leaves no space to work from the far side.
Always keep the packer between bar and wall; the blow that closes the joint is also a blow that would otherwise land on plasterboard or skirting. Work along the board in short steps, moving the bar every 300–400 mm rather than trying to close the whole board length from one position, so the board draws in evenly rather than skewing.
Heavy solid boards need more force to pull up tight. With 350003, deliver that force through more blows rather than heavier ones, and consider a soft packer at the board edge as well as at the wall to avoid bruising the board end grain.
These are the situations that justify buying the tool at all. Use the narrower upturned lip end where vertical clearance is tight, keep the bar flat against the floor, and lighten the blows: a board that has to be persuaded through a restricted gap is also a board that can be split at the tongue if it is driven hard.
Q: What is the difference between this and a tapping block?
A: They are used at different stages of the same job. The tapping block is used across open floor, where you can place it on the far side of the board and swing a mallet, while the pull bar is used at the wall, under radiators and at door casings, where there is no room to do that.
Q: How should I strike it, and how do I protect the wall and floor?
A: Use a rubber or soft-faced mallet with several moderate blows rather than one hard one; steel hammers are only for bars built with a reinforced striking head. Put a thin packer or a flooring offcut between the bar and the wall to protect the wall face and skirting, and on a finished floor put a scrap of board or ply under the bar.
Q: The bar keeps slipping off the board edge, or it has bent. What should I do?
A: Slipping usually means the bar is not lying flat or the lip is not fully hooked over the board end: lay the bar flat on the floor, parallel with the board run, and seat the lip fully before striking. A bent bar should be replaced, not straightened, because it no longer transmits the blow cleanly; if a 350003 bends in normal use, check that the bar is lying flat when struck and that a steel hammer is not being used on it.
Q: Should I buy 350003 or 350002?
A: 350003 for professional work: it is 530 mm long against 300 mm, and 9 mm thick against 4 mm, which means a longer bar that is easier to hold square and much more resistance to bending. 350002 for light DIY work in small rooms, where the shorter bar is easier to handle.
| Model | Size (Thickness x Width x Overall Length) | Imperial equivalent |
|---|---|---|
| 350003 | 9 × 38 × 530 mm | 0.35" × 1.5" × 20.9" |
| Item | Detail |
|---|---|
| Product name | Pro Floor Pull Bar |
| Article number | 350003 |
| Size | 9 × 38 × 530 mm (0.35" × 1.5" × 20.9") |
| Dimension convention | Thickness x width x overall length |
| Tool type | Flooring pull bar |
| Body | One-piece flat steel bar, bent, blue painted |
| End A | Broad splayed foot lip with through hole |
| End B | Narrower upturned lip |
| White plastic part | At the bend near the upturned lip |
| Product line | Builder Tools |
Both article numbers are in the Leading Tools range and both are flat steel bars of the same tool family, in a heavy-duty and a light-duty grade.
| Feature | Pro Floor Pull Bar 350003 | DIY Floor Pull Bar 350002 |
|---|---|---|
| Bar thickness | 9 mm | 4 mm |
| Bar width | 38 mm | 75 mm |
| Overall length | 530 mm | 300 mm |
| White plastic part at the bend | Yes | None |
| End profile | Splayed foot lip with through hole at one end; upturned lip at the other | Lips bent at both ends; elongated slot in the body |
| Body form | Bent bar, narrow section | Flat plate, wide section |
| Resistance to bending | Higher (9 mm stock) | Lower (4 mm stock) |
| Intended tier | Professional / heavy-duty | DIY / light-duty |
| Job | Recommended | Why |
|---|---|---|
| Laminate and SPC/LVP, last row against the wall | 350003 | Longer bar, easier to hold flat and square to the board |
| Engineered and solid timber, long heavy boards | 350003 | The thicker 9 mm bar resists bending better than the 4 mm bar |
| Under radiators, kitchen plinths, door casings | 350003, upturned lip end | The narrow lip reaches gaps a wide plate cannot |
| Light DIY LVP in a small room | 350002 | Shorter bar is enough, and easier to handle in tight rooms |
Complete art-number and size reference below.
| Art. Nr | Size (Thickness x Width x Overall Length) | Body | Working ends | White plastic part |
|---|---|---|---|---|
| 350003 | 9 × 38 × 530 mm | Blue painted flat steel bar, bent | Splayed foot lip with through hole; upturned lip | At the bend near the upturned lip |
| Art. Nr | Product name | Size (Thickness x Width x Overall Length) | Relationship |
|---|---|---|---|
| 350002 | DIY Floor Pull Bar | 4 × 75 × 300 mm | Light-duty partner to 350003, same tool family |

In compliance with EU personal data protection laws, we are committed to protecting and providing you with control over your personal data. By clicking "Accept All", you allow us to place cookies to enhance your experience on this site, help us analyze site performance and usage, and enable us to deliver relevant marketing content. You can manage your cookie settings below. By clicking "Agree" you agree to the current settings. For more information, please visit the Privacy Statement.
This website uses cookies
In compliance with EU personal data protection laws, we are committed to protecting your personal data and providing you with control over it. By clicking "Agree", you allow us to place cookies to improve your experience on this site, help us analyze site performance and usage, and allow us to deliver relevant marketing content.
By clicking "Only necessary" you allow us to place only necessary cookies. The website cannot function without these cookies and you cannot switch them off on your system. These cookies are typically set only in response to an action you perform (i.e. a service request), such as setting privacy preferences, logging in, or filling in a form. You can set your browser to block or prompt you for these cookies, but this may prevent some site features from working.



