
Copyright 2026 © Leading Tools Industrial Co., Ltd.
All Rights Reserved. Website Design by Awakening Design
CATALOG TYPE
Product Categories
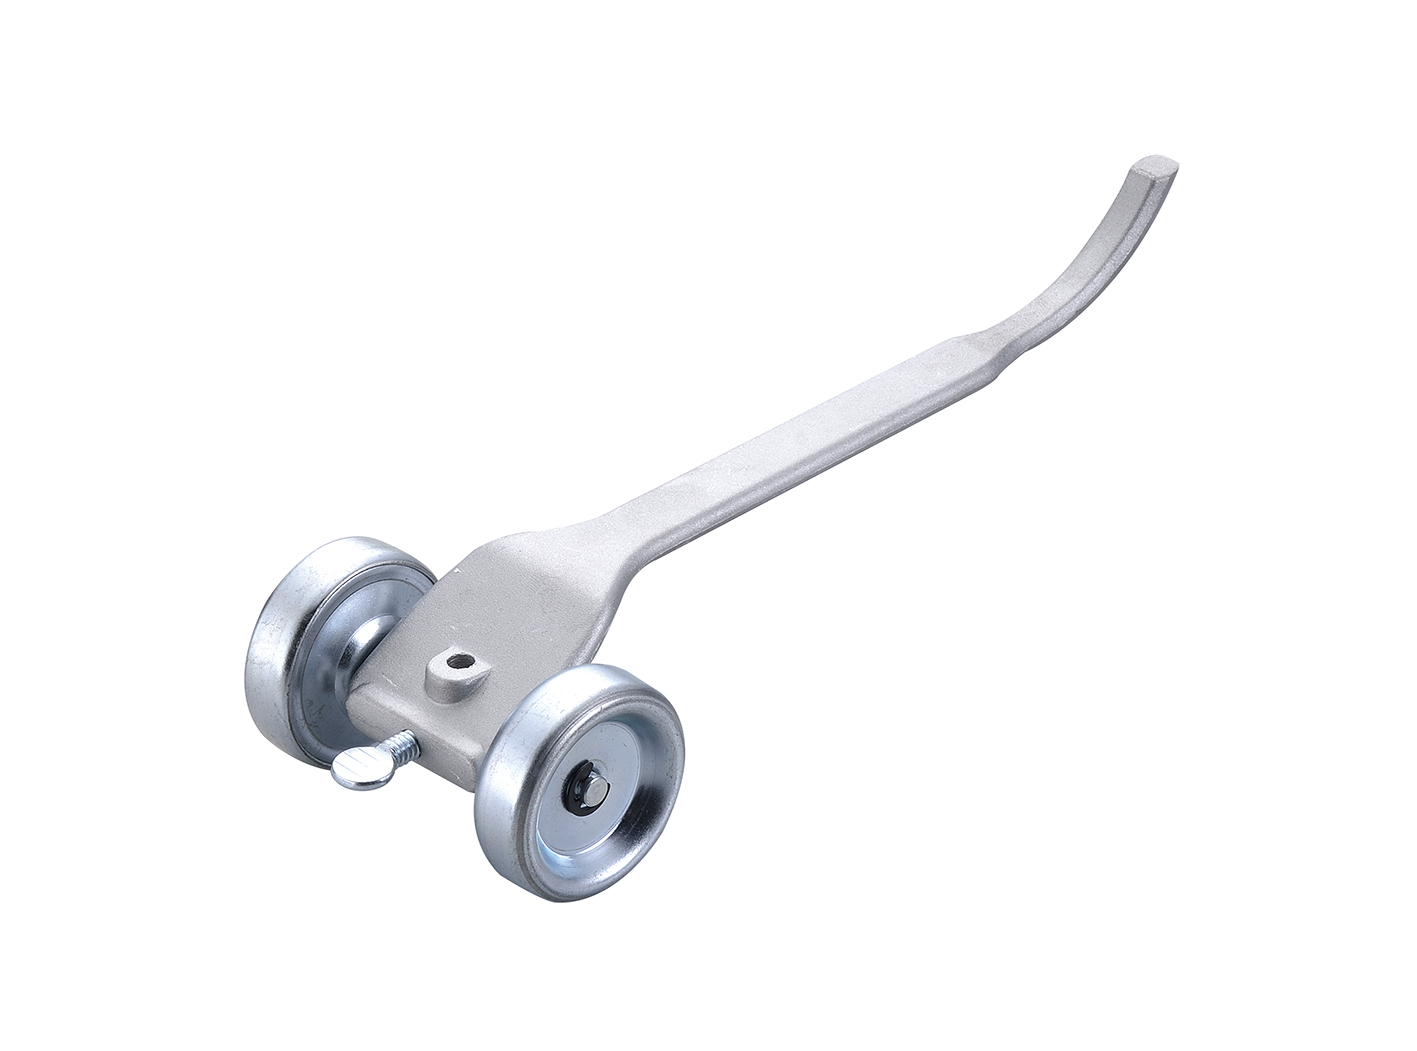
Skate Wheel Mortar Raker
Product Description
Skate Wheel Mortar Raker
Art. Nr: 301110
Size: 7"
A two-wheel mortar joint raker for brick and block work. It does two jobs: cutting old, loose or deteriorated mortar out of existing joints so the wall can be repointed, and cutting a raked (recessed) joint profile on newly laid work where that profile is specified.
Depth consistency is mechanical, not manual. The single most useful property of this pattern is that the depth reference surface is the brick face, not the mason's wrist.
A hand raker or a screwdriver-and-line method reproduces depth only as well as the operator can hold it; here the wheels bridge the joint and hold the pin at a fixed projection for the length of the run. On a long course of facing brick, that is the difference between a joint line that reads straight from ten meters away and one that does not.
Less fatigue on long runs. The tool rolls rather than being dragged, so the effort is push force rather than sustained downward pressure. This matters most on large facades and long retaining walls, where the same joint has to be worked for many meters without the depth drifting.
Staged depth control instead of one deep pass. Because the projection is adjustable, the working method is to start shallow and step the pin deeper over successive passes until the joint reaches the specified depth. That avoids the tool snatching on hard aggregate and avoids over-cutting a joint you cannot put back.
Correct positioning against a jointer. A raker and a jointer are opposite operations, and buying one when you needed the other is easy to do. A raker removes mortar and leaves a recessed, uncompacted joint face.
A convex or V jointer compresses mortar into the joint, and compaction is what produces the profiles that best resist water penetration. On a repointing job you generally need both: this tool to cut the old mortar out, a convex or V jointer to tool the new mortar in.
| Situation | Use 301110? | Why |
|---|---|---|
| Old mortar to be cut out before repointing | Yes, primary application | The tool's stated purpose is clearing loose or deteriorated mortar, paint and residue from existing joints |
| Raked profile specified on new brickwork, sheltered or interior | Yes | The wheels hold a constant profile depth along the course |
| Raked profile proposed on an exterior wall exposed to driving rain | Review the specification first | Raked joints are not recommended on exterior walls. |
| New mortar to be compacted and finished | No, use a convex or V jointer | Compacted concave, V and grapevine profiles are the ones that best resist water penetration |
| New mortar past thumbprint-hard (raked profile on new work) | No | No thumb impression means the new mortar is too hard to rake cleanly. This test does not apply to old mortar being cut out before repointing. |
| Concrete block (CMU) joints | Case by case | The wheels track on the relatively flat block face, but block joints are often wider than brick joints, and a deeply recessed block joint may not suit the wheel diameter. Trial one panel before committing. |
| Heritage brickwork in lime mortar | Yes, with a trial area | Lime mortar is softer than Portland cement mortar, so the timing and pin setting differ; test a small area first. |
| Step | Action | Watch for |
|---|---|---|
| 1 | Check the mortar. On newly laid work, press a thumb into the mortar (thumbprint-hard test): a clear impression with no mortar sticking to the thumb means the joint is ready to be raked. Old, hardened mortar being cut out before repointing is expected to be hard and is not judged by this test. | New work: mortar sticking to the thumb = still too soft, wait; no impression at all = too hard to rake cleanly. Old mortar: try a short section first; if the pin will not cut it, or the brick face is uneven, use a hand tool or a powered mortar saw. |
| 2 | Inspect the tool. Confirm both wheels rotate freely and without wobble, and that the pin is straight, undamaged and firmly clamped. | A wheel that binds makes the tool skid and lose depth reference. |
| 3 | Set the pin projection. Slacken the adjusting screw, set the pin to a shallow projection below the wheel line, and re-tighten. | Set shallow for the first pass: you can always go deeper, you cannot put mortar back. |
| 4 | Position the tool. Place both wheels on the brick faces flanking the joint, never in the joint, with the pin centered in the mortar. | If a wheel drops into the joint the depth reference is lost and the tool will wander. |
| 5 | Cut with the head end of the pin. Work with the headed end of the pin bearing on the mortar, not the point. | Leading with the point digs in and snatches. |
| 6 | Roll the tool along the joint in a smooth, continuous motion from one end of the course to the other. | Do not pause mid-joint; a pause under load leaves a depth mark. |
| 7 | Step the depth up in stages. Re-set the pin deeper and repeat the pass until the joint reaches the specified depth, rather than reaching full depth in one pass. | Hard aggregate in the mortar is the usual reason a single deep pass snatches. |
| 8 | Cut the vertical (perpend) joints first, then the horizontal (bed) joints. | Debris from the vertical joints then does not fall into horizontal joints already cut. Follow the site specification if it states an order. |
| 9 | Brush out. Clear loose mortar debris from the cut joints with a stiff brush once the surface is hard enough to take it without smearing. | Brushing while the mortar is still soft smears the face of the brick. |
A raked joint is an appearance detail, not a weathering detail.
Raked joints are not recommended for exterior walls: the way the profile is formed does not compact the outer face of the mortar, and it leaves a horizontal ledge that collects water and can saturate the brickwork.
Where water penetration resistance governs, the profiles rated best are concave, V and grapevine, all of which are tooled, that is, compacted, rather than raked.
What this means for how you use 301110:
This is the application the wheeled design exists for. On a long facade or retaining wall the joint has to be cut to the same depth for many meters, and the wheels supply that reference mechanically instead of asking the operator to hold it.
Work one full course at a time rather than jumping between courses, so that any change in mortar hardness across the wall shows up as a difference you can correct rather than as scattered depth variation. On repointing work, the depth you cut sets how much new mortar can be packed back in, so agree the depth before starting and set the pin once.
For heritage brickwork, matching the original joint profile and depth is the whole point of the exercise, and a fixed pin setting reproduces that depth consistently across a patch repair so the new work does not read as a different joint.
Lime mortar, common in heritage work, is softer than Portland cement mortar, so the timing and pin setting differ; always test a small, inconspicuous area first and re-check the pin setting on the actual mortar rather than assuming settings carry over from cement work. Note that on heritage exterior work the specification, not this tool, decides the final profile: if the original was a struck or weathered joint, this tool is used to cut the old mortar out and a jointer forms the finish.
Landscape brickwork is fully exposed, which makes the profile decision above more important, not less: raking a boundary wall in a wet climate builds in a water-collecting ledge on every bed joint. Where a raked look is nevertheless specified, the wheels let the same depth be run along a low retaining wall quickly, and the rolling action works on both vertical faces and the horizontal joints of paved work.
CMU walls with mortar joints can be raked with this tool: the block face is flat enough for the wheels to track on, and the pin cuts block-bed mortar the same way it cuts brick-bed mortar.
The caution is geometry rather than material: block joints are often wider and more deeply recessed than brick joints, and the wheel diameter may not clear a deeply recessed joint. Confirm the pin reaches the required depth with the wheels still bearing on the block face, and trial one panel before committing to a wall.
Q: Is "7"" the blade width?
A: No. 301110 has no blade: the cutting part is a single adjustable pin between two wheels. The 7" is the tool's nominal size, not a blade width.
Q: Are raked joints good for weatherproofing in rainy climates?
A: No. Raked joints are not recommended on exterior walls, because the profile leaves the mortar face uncompacted and forms a horizontal ledge that collects water and can saturate the brickwork. Where resisting rain matters, use concave, V or grapevine profiles, tooled with a jointer.
Q: What is the difference between this and a jointer?
A: They do opposite jobs. This tool removes mortar and leaves a recessed, uncompacted joint face, while a jointer presses mortar into the joint and produces the compacted profiles. Most repointing jobs need both tools.
Q: When is new mortar ready to rake?
A: On new work, use the thumb test. A clear thumb impression with no mortar sticking to the thumb means it is ready; mortar sticking means it is still too soft.
If new mortar crumbles or takes no impression at all it has gone too hard, so do not force this tool and switch to a hand tool or a powered mortar saw for that section. Old mortar being cut out before repointing is already hard: try a short section first, and use a hand tool or a powered mortar saw if the pin will not cut it.
Q: The groove depth is uneven, or the tool keeps drifting off the joint. What is wrong?
A: Both wheels must ride on the brick faces either side of the joint with the pin centered in the mortar; a wheel running in the joint loses the depth reference.
Also check that the pin has not slipped in its clamp (re-check the adjusting screw), and clean mortar debris from around the wheel axles, with a drop of light machine oil if a wheel binds. Where the brick face is too irregular for the wheels to track, use a hand tool instead.
| Model | Size | Size in mm |
|---|---|---|
| 301110 | 7" | ≈178 mm |
The 7" is the tool's nominal size. It is not a blade width; the tool has no blade. See Full Size Reference below.
Wheeled base. Two wheels mounted at the base of the tool roll along the brick face and give the tool its tracking. Two wheels are mounted side by side on the body, one on each side of the joint, with the cutting pin between them.
Cutting pin (not a blade). The cutting element is an adjustable pin held between the wheels, projecting down into the mortar joint. It wears with use; contact sales for replacement pins. The working end is the head end of the pin, not the point.
Depth adjustment. The pin projection below the wheel line is set by a screw in the body, so the rake depth is a setting rather than a fixed tool dimension.
Wheel guidance. The wheels ride on the brick surface flanking the joint and never in the joint, which is what keeps the pin at a constant depth.
Handle. The handle is a one-piece curved metal handle extending from the wheel body. The curve lifts the operator's hand clear of the wall face while the wheels are on the brick.
Joint profile produced. The tool cuts a raked (recessed) joint, one of the recognized mortar joint finishes, used for its shadow line on exposed brickwork. It is an appearance profile, not a weathering profile: see "The Limits of a Raked Joint" under How to Use below before specifying it on an exterior wall.
Body material. Metal body and metal wheels (contact sales to confirm material).
These are not alternatives for the same job; they are the two halves of a repointing job. The comparison below is about raking work specifically: cutting mortar out of a joint to a set depth.
| Criterion | Skate Wheel Mortar Raker (301110) | Traditional hand tools (hand raker / jointer) |
|---|---|---|
| Depth reference | The brick face, via the wheels, mechanical | The operator's hand, variable |
| Depth along a long course | Constant once the pin is set | Depends on sustained operator control |
| Operator effort on long runs | Rolling push force | Sustained downward pressure |
| Tight corners, returns, short courses | Limited, the wheelbase needs brick face either side of the joint | Good, works anywhere a hand fits |
| Irregular or protruding brickwork | Poor, the wheels need a reasonably flat face to track on | Good |
| Compacting new mortar | Not its function, a raker removes mortar | A convex or V jointer compacts mortar; the compacted profiles are the ones that best resist water penetration |
| Adjustable depth | Yes, by screw | Fixed by tool geometry |
There is one article number under Skate Wheel Mortar Raker. The complete reference is below.
| Art. Nr | Size | Size in mm | Material | Handle |
|---|---|---|---|---|
| 301110 | 7" | ≈178 mm | Metal body and wheels (contact sales to confirm material) | One-piece curved metal handle |
What "7"" refers to. The 7" is the tool's nominal size. The tool has two wheels, one adjustable pin between them with an adjusting screw, and a curved handle; there is no 7" wide blade on it, so "7"" is not a blade width.
Work inside the tooling window on new work. New mortar that has gone past thumbprint-hard is too hard to rake cleanly, and forcing the tool is the point at which cutting stops and damage starts. Re-run the thumb test at each wall rather than assuming yesterday's timing. On old mortar, trial a short section first.
Bear on the head of the pin, not the point. This is a tool-life item as much as a technique item: the head end is the working end.
Take material off in stages. Working from a shallow setting toward the final depth, rather than one deep pass, is the correct method for this pattern and is what keeps the pin from snatching on aggregate.
Check the pin and its clamping before each use. The pin wears with use; check it is straight, not mushroomed, and locked at the projection you set. When it will no longer hold a clean cut, contact sales about a replacement pin rather than compensating with pressure.
Check the wheels before each use. Both wheels should rotate freely and run true without wobble; a wheel that binds turns the tool from a rolling reference into a dragging one.
Clean after each use. Remove mortar dust and debris from the wheels, the wheel axles and the pin housing before the residue sets. Set mortar packed around an axle is the usual cause of a wheel that will no longer turn.
Lubrication. If a wheel binds after cleaning, a drop of light machine oil on the axle restores free rotation. Wipe off the excess; oil left on the tool collects mortar dust.
Storage. Store dry, with the pin retracted or protected so it is not bent by other tools in the same box. Dry the tool before storage rather than leaving it wet from washing down.
Skate Wheel Mortar Raker
Art. Nr: 301110
Size: 7"
A two-wheel mortar joint raker for brick and block work. It does two jobs: cutting old, loose or deteriorated mortar out of existing joints so the wall can be repointed, and cutting a raked (recessed) joint profile on newly laid work where that profile is specified.
Depth consistency is mechanical, not manual. The single most useful property of this pattern is that the depth reference surface is the brick face, not the mason's wrist.
A hand raker or a screwdriver-and-line method reproduces depth only as well as the operator can hold it; here the wheels bridge the joint and hold the pin at a fixed projection for the length of the run. On a long course of facing brick, that is the difference between a joint line that reads straight from ten meters away and one that does not.
Less fatigue on long runs. The tool rolls rather than being dragged, so the effort is push force rather than sustained downward pressure. This matters most on large facades and long retaining walls, where the same joint has to be worked for many meters without the depth drifting.
Staged depth control instead of one deep pass. Because the projection is adjustable, the working method is to start shallow and step the pin deeper over successive passes until the joint reaches the specified depth. That avoids the tool snatching on hard aggregate and avoids over-cutting a joint you cannot put back.
Correct positioning against a jointer. A raker and a jointer are opposite operations, and buying one when you needed the other is easy to do. A raker removes mortar and leaves a recessed, uncompacted joint face.
A convex or V jointer compresses mortar into the joint, and compaction is what produces the profiles that best resist water penetration. On a repointing job you generally need both: this tool to cut the old mortar out, a convex or V jointer to tool the new mortar in.
| Situation | Use 301110? | Why |
|---|---|---|
| Old mortar to be cut out before repointing | Yes, primary application | The tool's stated purpose is clearing loose or deteriorated mortar, paint and residue from existing joints |
| Raked profile specified on new brickwork, sheltered or interior | Yes | The wheels hold a constant profile depth along the course |
| Raked profile proposed on an exterior wall exposed to driving rain | Review the specification first | Raked joints are not recommended on exterior walls. |
| New mortar to be compacted and finished | No, use a convex or V jointer | Compacted concave, V and grapevine profiles are the ones that best resist water penetration |
| New mortar past thumbprint-hard (raked profile on new work) | No | No thumb impression means the new mortar is too hard to rake cleanly. This test does not apply to old mortar being cut out before repointing. |
| Concrete block (CMU) joints | Case by case | The wheels track on the relatively flat block face, but block joints are often wider than brick joints, and a deeply recessed block joint may not suit the wheel diameter. Trial one panel before committing. |
| Heritage brickwork in lime mortar | Yes, with a trial area | Lime mortar is softer than Portland cement mortar, so the timing and pin setting differ; test a small area first. |
| Step | Action | Watch for |
|---|---|---|
| 1 | Check the mortar. On newly laid work, press a thumb into the mortar (thumbprint-hard test): a clear impression with no mortar sticking to the thumb means the joint is ready to be raked. Old, hardened mortar being cut out before repointing is expected to be hard and is not judged by this test. | New work: mortar sticking to the thumb = still too soft, wait; no impression at all = too hard to rake cleanly. Old mortar: try a short section first; if the pin will not cut it, or the brick face is uneven, use a hand tool or a powered mortar saw. |
| 2 | Inspect the tool. Confirm both wheels rotate freely and without wobble, and that the pin is straight, undamaged and firmly clamped. | A wheel that binds makes the tool skid and lose depth reference. |
| 3 | Set the pin projection. Slacken the adjusting screw, set the pin to a shallow projection below the wheel line, and re-tighten. | Set shallow for the first pass: you can always go deeper, you cannot put mortar back. |
| 4 | Position the tool. Place both wheels on the brick faces flanking the joint, never in the joint, with the pin centered in the mortar. | If a wheel drops into the joint the depth reference is lost and the tool will wander. |
| 5 | Cut with the head end of the pin. Work with the headed end of the pin bearing on the mortar, not the point. | Leading with the point digs in and snatches. |
| 6 | Roll the tool along the joint in a smooth, continuous motion from one end of the course to the other. | Do not pause mid-joint; a pause under load leaves a depth mark. |
| 7 | Step the depth up in stages. Re-set the pin deeper and repeat the pass until the joint reaches the specified depth, rather than reaching full depth in one pass. | Hard aggregate in the mortar is the usual reason a single deep pass snatches. |
| 8 | Cut the vertical (perpend) joints first, then the horizontal (bed) joints. | Debris from the vertical joints then does not fall into horizontal joints already cut. Follow the site specification if it states an order. |
| 9 | Brush out. Clear loose mortar debris from the cut joints with a stiff brush once the surface is hard enough to take it without smearing. | Brushing while the mortar is still soft smears the face of the brick. |
A raked joint is an appearance detail, not a weathering detail.
Raked joints are not recommended for exterior walls: the way the profile is formed does not compact the outer face of the mortar, and it leaves a horizontal ledge that collects water and can saturate the brickwork.
Where water penetration resistance governs, the profiles rated best are concave, V and grapevine, all of which are tooled, that is, compacted, rather than raked.
What this means for how you use 301110:
This is the application the wheeled design exists for. On a long facade or retaining wall the joint has to be cut to the same depth for many meters, and the wheels supply that reference mechanically instead of asking the operator to hold it.
Work one full course at a time rather than jumping between courses, so that any change in mortar hardness across the wall shows up as a difference you can correct rather than as scattered depth variation. On repointing work, the depth you cut sets how much new mortar can be packed back in, so agree the depth before starting and set the pin once.
For heritage brickwork, matching the original joint profile and depth is the whole point of the exercise, and a fixed pin setting reproduces that depth consistently across a patch repair so the new work does not read as a different joint.
Lime mortar, common in heritage work, is softer than Portland cement mortar, so the timing and pin setting differ; always test a small, inconspicuous area first and re-check the pin setting on the actual mortar rather than assuming settings carry over from cement work. Note that on heritage exterior work the specification, not this tool, decides the final profile: if the original was a struck or weathered joint, this tool is used to cut the old mortar out and a jointer forms the finish.
Landscape brickwork is fully exposed, which makes the profile decision above more important, not less: raking a boundary wall in a wet climate builds in a water-collecting ledge on every bed joint. Where a raked look is nevertheless specified, the wheels let the same depth be run along a low retaining wall quickly, and the rolling action works on both vertical faces and the horizontal joints of paved work.
CMU walls with mortar joints can be raked with this tool: the block face is flat enough for the wheels to track on, and the pin cuts block-bed mortar the same way it cuts brick-bed mortar.
The caution is geometry rather than material: block joints are often wider and more deeply recessed than brick joints, and the wheel diameter may not clear a deeply recessed joint. Confirm the pin reaches the required depth with the wheels still bearing on the block face, and trial one panel before committing to a wall.
Q: Is "7"" the blade width?
A: No. 301110 has no blade: the cutting part is a single adjustable pin between two wheels. The 7" is the tool's nominal size, not a blade width.
Q: Are raked joints good for weatherproofing in rainy climates?
A: No. Raked joints are not recommended on exterior walls, because the profile leaves the mortar face uncompacted and forms a horizontal ledge that collects water and can saturate the brickwork. Where resisting rain matters, use concave, V or grapevine profiles, tooled with a jointer.
Q: What is the difference between this and a jointer?
A: They do opposite jobs. This tool removes mortar and leaves a recessed, uncompacted joint face, while a jointer presses mortar into the joint and produces the compacted profiles. Most repointing jobs need both tools.
Q: When is new mortar ready to rake?
A: On new work, use the thumb test. A clear thumb impression with no mortar sticking to the thumb means it is ready; mortar sticking means it is still too soft.
If new mortar crumbles or takes no impression at all it has gone too hard, so do not force this tool and switch to a hand tool or a powered mortar saw for that section. Old mortar being cut out before repointing is already hard: try a short section first, and use a hand tool or a powered mortar saw if the pin will not cut it.
Q: The groove depth is uneven, or the tool keeps drifting off the joint. What is wrong?
A: Both wheels must ride on the brick faces either side of the joint with the pin centered in the mortar; a wheel running in the joint loses the depth reference.
Also check that the pin has not slipped in its clamp (re-check the adjusting screw), and clean mortar debris from around the wheel axles, with a drop of light machine oil if a wheel binds. Where the brick face is too irregular for the wheels to track, use a hand tool instead.
| Model | Size | Size in mm |
|---|---|---|
| 301110 | 7" | ≈178 mm |
The 7" is the tool's nominal size. It is not a blade width; the tool has no blade. See Full Size Reference below.
Wheeled base. Two wheels mounted at the base of the tool roll along the brick face and give the tool its tracking. Two wheels are mounted side by side on the body, one on each side of the joint, with the cutting pin between them.
Cutting pin (not a blade). The cutting element is an adjustable pin held between the wheels, projecting down into the mortar joint. It wears with use; contact sales for replacement pins. The working end is the head end of the pin, not the point.
Depth adjustment. The pin projection below the wheel line is set by a screw in the body, so the rake depth is a setting rather than a fixed tool dimension.
Wheel guidance. The wheels ride on the brick surface flanking the joint and never in the joint, which is what keeps the pin at a constant depth.
Handle. The handle is a one-piece curved metal handle extending from the wheel body. The curve lifts the operator's hand clear of the wall face while the wheels are on the brick.
Joint profile produced. The tool cuts a raked (recessed) joint, one of the recognized mortar joint finishes, used for its shadow line on exposed brickwork. It is an appearance profile, not a weathering profile: see "The Limits of a Raked Joint" under How to Use below before specifying it on an exterior wall.
Body material. Metal body and metal wheels (contact sales to confirm material).
These are not alternatives for the same job; they are the two halves of a repointing job. The comparison below is about raking work specifically: cutting mortar out of a joint to a set depth.
| Criterion | Skate Wheel Mortar Raker (301110) | Traditional hand tools (hand raker / jointer) |
|---|---|---|
| Depth reference | The brick face, via the wheels, mechanical | The operator's hand, variable |
| Depth along a long course | Constant once the pin is set | Depends on sustained operator control |
| Operator effort on long runs | Rolling push force | Sustained downward pressure |
| Tight corners, returns, short courses | Limited, the wheelbase needs brick face either side of the joint | Good, works anywhere a hand fits |
| Irregular or protruding brickwork | Poor, the wheels need a reasonably flat face to track on | Good |
| Compacting new mortar | Not its function, a raker removes mortar | A convex or V jointer compacts mortar; the compacted profiles are the ones that best resist water penetration |
| Adjustable depth | Yes, by screw | Fixed by tool geometry |
There is one article number under Skate Wheel Mortar Raker. The complete reference is below.
| Art. Nr | Size | Size in mm | Material | Handle |
|---|---|---|---|---|
| 301110 | 7" | ≈178 mm | Metal body and wheels (contact sales to confirm material) | One-piece curved metal handle |
What "7"" refers to. The 7" is the tool's nominal size. The tool has two wheels, one adjustable pin between them with an adjusting screw, and a curved handle; there is no 7" wide blade on it, so "7"" is not a blade width.
Work inside the tooling window on new work. New mortar that has gone past thumbprint-hard is too hard to rake cleanly, and forcing the tool is the point at which cutting stops and damage starts. Re-run the thumb test at each wall rather than assuming yesterday's timing. On old mortar, trial a short section first.
Bear on the head of the pin, not the point. This is a tool-life item as much as a technique item: the head end is the working end.
Take material off in stages. Working from a shallow setting toward the final depth, rather than one deep pass, is the correct method for this pattern and is what keeps the pin from snatching on aggregate.
Check the pin and its clamping before each use. The pin wears with use; check it is straight, not mushroomed, and locked at the projection you set. When it will no longer hold a clean cut, contact sales about a replacement pin rather than compensating with pressure.
Check the wheels before each use. Both wheels should rotate freely and run true without wobble; a wheel that binds turns the tool from a rolling reference into a dragging one.
Clean after each use. Remove mortar dust and debris from the wheels, the wheel axles and the pin housing before the residue sets. Set mortar packed around an axle is the usual cause of a wheel that will no longer turn.
Lubrication. If a wheel binds after cleaning, a drop of light machine oil on the axle restores free rotation. Wipe off the excess; oil left on the tool collects mortar dust.
Storage. Store dry, with the pin retracted or protected so it is not bent by other tools in the same box. Dry the tool before storage rather than leaving it wet from washing down.

In compliance with EU personal data protection laws, we are committed to protecting and providing you with control over your personal data. By clicking "Accept All", you allow us to place cookies to enhance your experience on this site, help us analyze site performance and usage, and enable us to deliver relevant marketing content. You can manage your cookie settings below. By clicking "Agree" you agree to the current settings. For more information, please visit the Privacy Statement.
This website uses cookies
In compliance with EU personal data protection laws, we are committed to protecting your personal data and providing you with control over it. By clicking "Agree", you allow us to place cookies to improve your experience on this site, help us analyze site performance and usage, and allow us to deliver relevant marketing content.
By clicking "Only necessary" you allow us to place only necessary cookies. The website cannot function without these cookies and you cannot switch them off on your system. These cookies are typically set only in response to an action you perform (i.e. a service request), such as setting privacy preferences, logging in, or filling in a form. You can set your browser to block or prompt you for these cookies, but this may prevent some site features from working.



