
Copyright 2026 © Leading Tools Industrial Co., Ltd.
All Rights Reserved. Website Design by Awakening Design
CATALOG TYPE
Product Categories
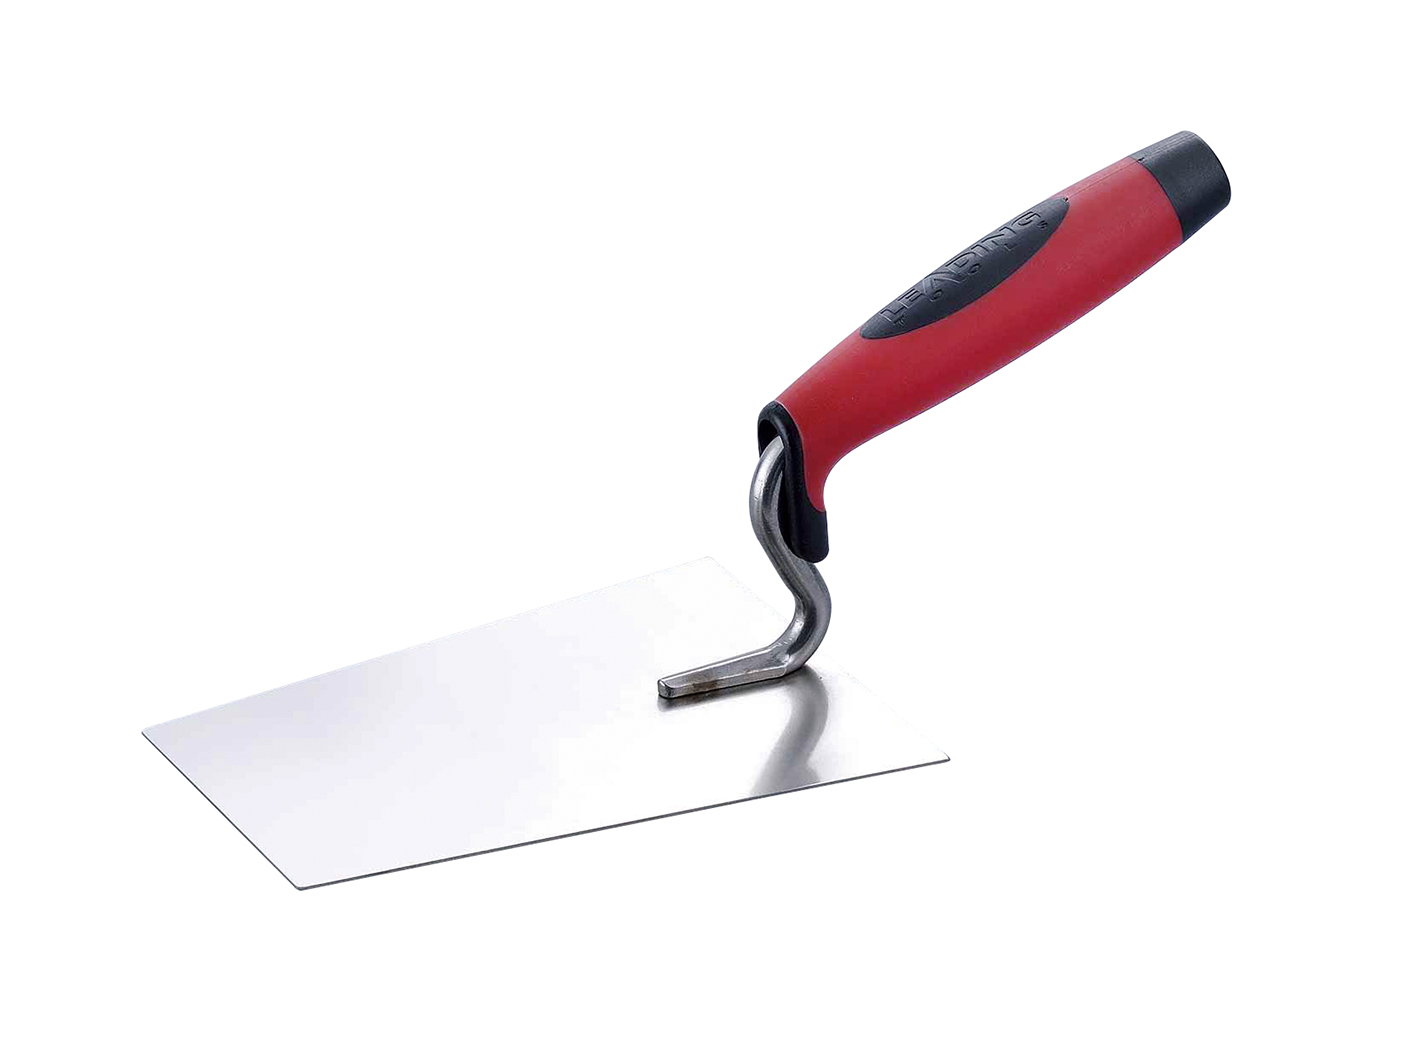
Square Front Trowel — Spot Welded Stainless Steel
Product Description
| Item | Detail |
|---|---|
| Product name | Square Front Trowel |
| Product line | Spot Welded Stainless Steel |
| Art. Nr (this series) | 802821, 803821, 804821, 805821, 806821, 807821: six art numbers, one pattern |
| Sizes | 140 mm, 160 mm, 180 mm, 200 mm, 220 mm, 240 mm (5.5" to 9.5", 1" = 25.4 mm) |
| Blade material | Stainless steel, designated "Spot Welded Stainless Steel" |
| Construction | Spot welded blade-to-shank joint |
| Handle | Soft-grip handle (BF21) on a cranked (offset) shank |
| Series | Brick Trowel range, Square Front pattern |
The Square Front Trowel is a brick-trowel-format trowel with a flat, straight leading edge instead of the pointed or leaf-shaped nose of a conventional brick trowel.
The blade is a broad quadrilateral panel carried on a cranked shank, so the handle sits well above the working plane and the whole flat face can be driven forward into a mortar bead. It is bought for one reason: to place and level a mortar bed of even thickness across a wide unit, rather than to pick up, sling and spread mortar the way a pointed brick trowel does.
Two naming cautions matter for anyone sourcing this tool. First, "square-end trowel" usually means a concrete finishing trowel, a flat blade with a straight handle and no crank, which is a different tool class from this brick-trowel-format product. Second, the "Philadelphia pattern" brick trowel is defined by a square heel (the end nearest the handle) combined with a still-tapered, pointed front; that is not the same feature as the square front of this product, and the two are not interchangeable.
Six sizes cover the range from precision jointing work up to full-width bed laying. The nominal size is the blade length. All six share the same blade material, the same spot-welded construction and the same handle format, so a distributor stocking the range is stocking one product with six working widths, not six different tools.
Even bed thickness without lateral displacement. A pointed brick trowel delivers mortar by dragging and sweeping: the point makes first contact and the curved blade throws the material sideways.
A square front delivers by pushing: the entire flat leading edge contacts and advances the bead at the same instant, so the bed moves forward rather than outward. Where the specification is a uniform bed depth across a wide unit, that is the functional difference the buyer is paying for.
Made for wide units, not for face brick. Square-ended trowel geometry carries more mortar and is better suited to concrete block work than to laying brick, where a pointed pattern is quicker on the sling. If a crew is laying face brick all day, this is the wrong tool and a Philadelphia or London pattern from the Leading Tools range is the right one; if the crew is bedding block or large panels, this is the right one.
A flat face that doubles as a spreading and back-buttering blade. Back-buttering large-format tile is done with the flat side of a trowel after the substrate has been combed with a notched blade; the flat pass is what raises coverage and prevents hollow spots under big panels. A square front blade gives a large, uninterrupted flat area with a straight edge to strike from, which is exactly the geometry that job wants.
Stainless where the material is aggressive to steel. Mortar left on a wet carbon blade holds moisture against the steel and promotes rust and pitting; a stainless blade has high corrosion resistance and a lower risk of rust staining than carbon steel in white or light-colored mortar, grout and pointing.
Chlorinated water, coastal air or prolonged soaking can still cause rust spots, so rinse with clean water and dry after use. Stainless is also a sensible choice where the tool is washed often and stored damp, which is normal on paving work.
One handle format across the range. Because the six art numbers share a handle and shank format, a user moving from the 160 mm to the 220 mm keeps the same grip geometry and only changes blade area.
| Situation | Use the Square Front? | Why |
|---|---|---|
| Laying a mortar bed across a concrete block | Yes | Square-ended geometry carries more mortar and suits block rather than brick |
| Laying face brick at production speed | No | A pointed pattern is faster on the sling; use the Philadelphia or London patterns in the Leading Tools range |
| Back-buttering a large-format tile | Yes | The flat side of a trowel is the standard tool for back-buttering after combing the substrate |
| Combing an adhesive bed to a set thickness | No | This blade has no notches; a notched trowel sets the bed thickness |
| Finishing a concrete slab surface | No | That is a float / finishing trowel job, a different tool class |
| Step | Action | Detail |
|---|---|---|
| 1 | Prepare the substrate | Clean off debris and laitance; do not wet concrete masonry units, and pre-wet only high-absorption clay brick where the applicable standard calls for it |
| 2 | Mix to a bedding consistency | The mortar should hold its shape but still spread: stiff enough not to slump off the blade under the push |
| 3 | Load the blade | Pick up a bead along the length of the blade rather than a lump at the front; the square end lets the whole edge take load evenly |
| 4 | Set the blade flat and push forward | Keep the blade plane parallel to the bedding surface and drive the square edge straight ahead: the whole front edge advances the bead as one body |
| 5 | Strike off with the side edge | Draw the blade back with a straight side edge riding the course to level the bed to an even thickness |
| 6 | Place the unit and check | Set the unit into the fresh bed immediately, then check level and alignment before the mortar stiffens |
| 7 | Dress the head joint | Butter the end of the next unit, or use a jointer to close and shape the vertical joint |
| 8 | Wash the blade before the mortar sets | Rinse the blade and the weld area before the mortar dries on the tool |
Directionality. This trowel is directional: the square end leads. Working with the heel forward turns a pushing tool into a dragging one and produces exactly the uneven, ridged bed the pattern exists to avoid.
This is the primary application. The case for a square-ended trowel on block work is mortar capacity: a square end holds noticeably more mortar per pick-up than a pointed blade of the same length, which is why square-ended patterns suit block rather than laying brick.
Working sequence: lay the bead along the shell of the course, push the square edge forward so the bed advances as one body over the full length of the unit, strike the bed level with a side edge, then set the block and check. Size selection: match the blade length to the bedding face rather than to the block's overall dimension, and drop one size if the bed is being laid on the shell only.
Back-buttering is a two-tool operation and this trowel is the second tool. The substrate is first combed with a notched trowel to set bed thickness; then a thin, even skim of the same adhesive is applied to the back of the tile with the flat side of a trowel before the tile is placed.
The purpose is coverage: eliminating the hollow spots that occur under large panels when only the substrate is combed. For very large panels the flat pass is what makes the difference between partial and near-full contact.
Where this product fits: it gives a large uninterrupted flat face with a straight edge to strike the skim from, and it is stainless, with a lower risk of rust marks in light thin-set or grout than carbon steel. Note that this is the flat-side function common to any flat trowel: it is not a feature unique to this pattern. The 180–220 mm sizes (804821–806821) suit large panels; a smaller blade means more passes per tile.
Q1. Is this the same as a Philadelphia pattern brick trowel, or a US "square-end trowel"?
No to both. The Philadelphia pattern is defined by a square heel (the end nearest the handle) with a tapered, pointed front, while this product is square at the front, the working end. "Square-end trowel" most often means a concrete finishing trowel, a flat blade with an in-line handle and no crank, whereas this is a brick-trowel-format tool with a cranked shank and a raised handle.
Q2. What jobs is it good for, and what should I not use it for?
It can lay face brick, but you will be slower than with a pointed trowel: square-ended geometry carries more mortar and suits block work, while a pointed pattern is faster for laying brick, so use the pointed patterns in the Leading Tools range for face brick. It cannot comb tile adhesive, because it has no notches to meter bed thickness; comb the substrate with a notched trowel, then use this flat blade to back-butter the tile (spread adhesive on its back).
Q3. Which size should I start with?
804821 (180 mm) is the most generally useful. Go down to 802821–803821 for jointing and confined spaces, and go up to 806821–807821 when bed area per pass is what governs the day's output. If your wrist gets sore on the 220 and 240 mm, drop to a smaller size.
Q4. Why stainless rather than carbon steel, and why is there rust-colored staining on the blade?
The jobs this pattern is bought for involve light-colored mortars, constant washing and wet storage, where a carbon blade rusts and can stain the work.
The art numbers listed for this pattern are stainless steel; for a carbon steel version, contact Leading Tools sales. Stainless has high corrosion resistance and low maintenance, but chlorinated water, coastal air or prolonged soaking can still cause rust spots. Rust-colored staining on a stainless blade is normally iron contamination from a steel wire brush, a carbon steel tool stored against it, or dried mortar deposits, not the stainless itself corroding, so clean it off and stop using steel brushes on the blade.
Q5. The bed comes out wavy, the blade wobbles at the shank, or the blade bent. What now?
A wavy, ridged bed usually means the blade is not held flat to the bedding plane or the mortar is too wet to hold a struck surface, so stiffen the mix and use a flat-angle delivery without leading with the heel.
Play at the shank means the spot-welded joint has loosened; it cannot be safely repaired in the field, so retire the tool. A blade that bent under heavy mortar has been loaded past its flex limit, most often on the largest sizes with a heavy mix, and it cannot be trued back to a flat plane, so stiffen the mortar or drop a size.
| Art. Nr | Blade size | Material | Construction | Handle type |
|---|---|---|---|---|
| 802821 | 140 mm (5.5") | Stainless steel | Spot welding | Soft grip, BF21 |
| 803821 | 160 mm (6.3") | Stainless steel | Spot welding | Soft grip, BF21 |
| 804821 | 180 mm (7.1") | Stainless steel | Spot welding | Soft grip, BF21 |
| 805821 | 200 mm (7.9") | Stainless steel | Spot welding | Soft grip, BF21 |
| 806821 | 220 mm (8.7") | Stainless steel | Spot welding | Soft grip, BF21 |
| 807821 | 240 mm (9.5") | Stainless steel | Spot welding | Soft grip, BF21 |
Overall shape. The blade is a broad flat panel, close to rectangular, with a straight leading edge and straight sides that narrow only slightly toward the heel where the shank lands.
Front edge. Flat and square across the full blade width, a continuous pushing surface with no point to initiate contact and no curve to shed material sideways. This is the defining feature of the pattern and the reason for the product name.
Sides. Straight and close to parallel over most of the blade length. Because they are straight, they can be used as screed edges: drawing the blade back along the run strikes the bed to a level line.
Heel and shank landing. The junction of blade and shank is the primary load-bearing area of the tool. In forward pushing, the operator's force is transmitted through this joint into the blade in shear.
How this differs from the other Leading Tools brick trowel patterns. Philadelphia pattern trowels are defined by a square heel with a tapered, pointed front: square at the handle end, not at the working end. London pattern trowels have a rounded heel and a pointed front. The Square Front is square at the working end, which is a different feature entirely; this product is not a Philadelphia pattern.
The blade and the shank are separate parts joined by spot welding.
| Property | Detail |
|---|---|
| Handle type | Soft grip, BF21 |
| Shank | Cranked / offset shank raising the handle above the blade plane |
| Purpose of the crank | Keeps the knuckles clear of the laid course and puts the wrist behind the push rather than above it |
| Other handles | Can be fitted on request: contact Leading Tools sales |
| Feature | Square Front Trowel (802821–807821) | Pointed brick trowel (Philadelphia / London) |
|---|---|---|
| Working-end shape | Flat, square edge | Tapered / leaf point |
| Heel shape | Square-ended panel | Square heel (Philadelphia) or rounded heel (London) |
| Primary motion | Straight push | Sling, sweep and spread |
| Mortar distribution | Advances the bead forward as one body | Spreads laterally from the point |
| Best for | Block beds, back-buttering | General bricklaying and face brick |
| Material in the Leading Tools range | Stainless steel (art numbers listed) | Carbon steel (forged or CO2 welded) |
The geometric difference is fundamental: a pointed trowel initiates mortar contact at one point and works outward, while a square front contacts the whole bead simultaneously and works forward. That makes the Square Front the tool of choice when the goal is uniform bed thickness without lateral material displacement.
| Project | Recommended art numbers | Rationale |
|---|---|---|
| Concrete block (CMU) bed joints, standard-width units | 802821–804821 (140–180 mm) | Blade slightly narrower than the unit face keeps the bed inside the shell and stays controllable |
| Concrete block bed joints, wide or architectural units | 805821–807821 (200–240 mm) | More bed laid per pass on a wide face |
| Large-format tile back-buttering | 804821–806821 (180–220 mm) | Large flat face covers a big tile back in few passes; back-buttering with the flat side is the standard method for large panels |
| User | Recommendation | Rationale |
|---|---|---|
| DIY / homeowner | 803821 (160 mm) | Manageable blade area, low load on the wrist, covers small block jobs |
| Professional mason, block focus | 804821–805821 (180–200 mm) | Best balance of coverage per pass and control |
| Tile setters handling large panels | 804821–806821 (180–220 mm) | Enough flat face to butter a large tile back in one or two passes |
| Restoration and fine detail work | 802821–803821 (140–160 mm) | Small blade for controlled placement in and around existing work |
| Industrial / high-volume bedding | 807821 (240 mm) | Largest blade in the range, maximum coverage per pass |
| Art. Nr | Size | Where it sits in the range |
|---|---|---|
| 802821 | 140 mm (5.5") | Smallest; tight spaces, fine detail |
| 803821 | 160 mm (6.3") | Entry professional size |
| 804821 | 180 mm (7.1") | The most generally useful size in the range |
| 805821 | 200 mm (7.9") | Block bed work |
| 806821 | 220 mm (8.7") | Large bed area, wide units |
| 807821 | 240 mm (9.5") | Largest; maximum coverage per pass |
Complete art-number reference for the series.
| Art. Nr | Size (mm) | Size (in) | Blade material | Construction | Handle |
|---|---|---|---|---|---|
| 802821 | 140 mm | 5.5" | Stainless steel | Spot welding | Soft grip, BF21 |
| 803821 | 160 mm | 6.3" | Stainless steel | Spot welding | Soft grip, BF21 |
| 804821 | 180 mm | 7.1" | Stainless steel | Spot welding | Soft grip, BF21 |
| 805821 | 200 mm | 7.9" | Stainless steel | Spot welding | Soft grip, BF21 |
| 806821 | 220 mm | 8.7" | Stainless steel | Spot welding | Soft grip, BF21 |
| 807821 | 240 mm | 9.5" | Stainless steel | Spot welding | Soft grip, BF21 |
Six art numbers in the series. Inch figures are conversions of the nominal millimeter sizes at 1" = 25.4 mm; the millimeter value is the specification.
| Item | Detail |
|---|---|
| Product name | Square Front Trowel |
| Product line | Spot Welded Stainless Steel |
| Art. Nr (this series) | 802821, 803821, 804821, 805821, 806821, 807821: six art numbers, one pattern |
| Sizes | 140 mm, 160 mm, 180 mm, 200 mm, 220 mm, 240 mm (5.5" to 9.5", 1" = 25.4 mm) |
| Blade material | Stainless steel, designated "Spot Welded Stainless Steel" |
| Construction | Spot welded blade-to-shank joint |
| Handle | Soft-grip handle (BF21) on a cranked (offset) shank |
| Series | Brick Trowel range, Square Front pattern |
The Square Front Trowel is a brick-trowel-format trowel with a flat, straight leading edge instead of the pointed or leaf-shaped nose of a conventional brick trowel.
The blade is a broad quadrilateral panel carried on a cranked shank, so the handle sits well above the working plane and the whole flat face can be driven forward into a mortar bead. It is bought for one reason: to place and level a mortar bed of even thickness across a wide unit, rather than to pick up, sling and spread mortar the way a pointed brick trowel does.
Two naming cautions matter for anyone sourcing this tool. First, "square-end trowel" usually means a concrete finishing trowel, a flat blade with a straight handle and no crank, which is a different tool class from this brick-trowel-format product. Second, the "Philadelphia pattern" brick trowel is defined by a square heel (the end nearest the handle) combined with a still-tapered, pointed front; that is not the same feature as the square front of this product, and the two are not interchangeable.
Six sizes cover the range from precision jointing work up to full-width bed laying. The nominal size is the blade length. All six share the same blade material, the same spot-welded construction and the same handle format, so a distributor stocking the range is stocking one product with six working widths, not six different tools.
Even bed thickness without lateral displacement. A pointed brick trowel delivers mortar by dragging and sweeping: the point makes first contact and the curved blade throws the material sideways.
A square front delivers by pushing: the entire flat leading edge contacts and advances the bead at the same instant, so the bed moves forward rather than outward. Where the specification is a uniform bed depth across a wide unit, that is the functional difference the buyer is paying for.
Made for wide units, not for face brick. Square-ended trowel geometry carries more mortar and is better suited to concrete block work than to laying brick, where a pointed pattern is quicker on the sling. If a crew is laying face brick all day, this is the wrong tool and a Philadelphia or London pattern from the Leading Tools range is the right one; if the crew is bedding block or large panels, this is the right one.
A flat face that doubles as a spreading and back-buttering blade. Back-buttering large-format tile is done with the flat side of a trowel after the substrate has been combed with a notched blade; the flat pass is what raises coverage and prevents hollow spots under big panels. A square front blade gives a large, uninterrupted flat area with a straight edge to strike from, which is exactly the geometry that job wants.
Stainless where the material is aggressive to steel. Mortar left on a wet carbon blade holds moisture against the steel and promotes rust and pitting; a stainless blade has high corrosion resistance and a lower risk of rust staining than carbon steel in white or light-colored mortar, grout and pointing.
Chlorinated water, coastal air or prolonged soaking can still cause rust spots, so rinse with clean water and dry after use. Stainless is also a sensible choice where the tool is washed often and stored damp, which is normal on paving work.
One handle format across the range. Because the six art numbers share a handle and shank format, a user moving from the 160 mm to the 220 mm keeps the same grip geometry and only changes blade area.
| Situation | Use the Square Front? | Why |
|---|---|---|
| Laying a mortar bed across a concrete block | Yes | Square-ended geometry carries more mortar and suits block rather than brick |
| Laying face brick at production speed | No | A pointed pattern is faster on the sling; use the Philadelphia or London patterns in the Leading Tools range |
| Back-buttering a large-format tile | Yes | The flat side of a trowel is the standard tool for back-buttering after combing the substrate |
| Combing an adhesive bed to a set thickness | No | This blade has no notches; a notched trowel sets the bed thickness |
| Finishing a concrete slab surface | No | That is a float / finishing trowel job, a different tool class |
| Step | Action | Detail |
|---|---|---|
| 1 | Prepare the substrate | Clean off debris and laitance; do not wet concrete masonry units, and pre-wet only high-absorption clay brick where the applicable standard calls for it |
| 2 | Mix to a bedding consistency | The mortar should hold its shape but still spread: stiff enough not to slump off the blade under the push |
| 3 | Load the blade | Pick up a bead along the length of the blade rather than a lump at the front; the square end lets the whole edge take load evenly |
| 4 | Set the blade flat and push forward | Keep the blade plane parallel to the bedding surface and drive the square edge straight ahead: the whole front edge advances the bead as one body |
| 5 | Strike off with the side edge | Draw the blade back with a straight side edge riding the course to level the bed to an even thickness |
| 6 | Place the unit and check | Set the unit into the fresh bed immediately, then check level and alignment before the mortar stiffens |
| 7 | Dress the head joint | Butter the end of the next unit, or use a jointer to close and shape the vertical joint |
| 8 | Wash the blade before the mortar sets | Rinse the blade and the weld area before the mortar dries on the tool |
Directionality. This trowel is directional: the square end leads. Working with the heel forward turns a pushing tool into a dragging one and produces exactly the uneven, ridged bed the pattern exists to avoid.
This is the primary application. The case for a square-ended trowel on block work is mortar capacity: a square end holds noticeably more mortar per pick-up than a pointed blade of the same length, which is why square-ended patterns suit block rather than laying brick.
Working sequence: lay the bead along the shell of the course, push the square edge forward so the bed advances as one body over the full length of the unit, strike the bed level with a side edge, then set the block and check. Size selection: match the blade length to the bedding face rather than to the block's overall dimension, and drop one size if the bed is being laid on the shell only.
Back-buttering is a two-tool operation and this trowel is the second tool. The substrate is first combed with a notched trowel to set bed thickness; then a thin, even skim of the same adhesive is applied to the back of the tile with the flat side of a trowel before the tile is placed.
The purpose is coverage: eliminating the hollow spots that occur under large panels when only the substrate is combed. For very large panels the flat pass is what makes the difference between partial and near-full contact.
Where this product fits: it gives a large uninterrupted flat face with a straight edge to strike the skim from, and it is stainless, with a lower risk of rust marks in light thin-set or grout than carbon steel. Note that this is the flat-side function common to any flat trowel: it is not a feature unique to this pattern. The 180–220 mm sizes (804821–806821) suit large panels; a smaller blade means more passes per tile.
Q1. Is this the same as a Philadelphia pattern brick trowel, or a US "square-end trowel"?
No to both. The Philadelphia pattern is defined by a square heel (the end nearest the handle) with a tapered, pointed front, while this product is square at the front, the working end. "Square-end trowel" most often means a concrete finishing trowel, a flat blade with an in-line handle and no crank, whereas this is a brick-trowel-format tool with a cranked shank and a raised handle.
Q2. What jobs is it good for, and what should I not use it for?
It can lay face brick, but you will be slower than with a pointed trowel: square-ended geometry carries more mortar and suits block work, while a pointed pattern is faster for laying brick, so use the pointed patterns in the Leading Tools range for face brick. It cannot comb tile adhesive, because it has no notches to meter bed thickness; comb the substrate with a notched trowel, then use this flat blade to back-butter the tile (spread adhesive on its back).
Q3. Which size should I start with?
804821 (180 mm) is the most generally useful. Go down to 802821–803821 for jointing and confined spaces, and go up to 806821–807821 when bed area per pass is what governs the day's output. If your wrist gets sore on the 220 and 240 mm, drop to a smaller size.
Q4. Why stainless rather than carbon steel, and why is there rust-colored staining on the blade?
The jobs this pattern is bought for involve light-colored mortars, constant washing and wet storage, where a carbon blade rusts and can stain the work.
The art numbers listed for this pattern are stainless steel; for a carbon steel version, contact Leading Tools sales. Stainless has high corrosion resistance and low maintenance, but chlorinated water, coastal air or prolonged soaking can still cause rust spots. Rust-colored staining on a stainless blade is normally iron contamination from a steel wire brush, a carbon steel tool stored against it, or dried mortar deposits, not the stainless itself corroding, so clean it off and stop using steel brushes on the blade.
Q5. The bed comes out wavy, the blade wobbles at the shank, or the blade bent. What now?
A wavy, ridged bed usually means the blade is not held flat to the bedding plane or the mortar is too wet to hold a struck surface, so stiffen the mix and use a flat-angle delivery without leading with the heel.
Play at the shank means the spot-welded joint has loosened; it cannot be safely repaired in the field, so retire the tool. A blade that bent under heavy mortar has been loaded past its flex limit, most often on the largest sizes with a heavy mix, and it cannot be trued back to a flat plane, so stiffen the mortar or drop a size.
| Art. Nr | Blade size | Material | Construction | Handle type |
|---|---|---|---|---|
| 802821 | 140 mm (5.5") | Stainless steel | Spot welding | Soft grip, BF21 |
| 803821 | 160 mm (6.3") | Stainless steel | Spot welding | Soft grip, BF21 |
| 804821 | 180 mm (7.1") | Stainless steel | Spot welding | Soft grip, BF21 |
| 805821 | 200 mm (7.9") | Stainless steel | Spot welding | Soft grip, BF21 |
| 806821 | 220 mm (8.7") | Stainless steel | Spot welding | Soft grip, BF21 |
| 807821 | 240 mm (9.5") | Stainless steel | Spot welding | Soft grip, BF21 |
Overall shape. The blade is a broad flat panel, close to rectangular, with a straight leading edge and straight sides that narrow only slightly toward the heel where the shank lands.
Front edge. Flat and square across the full blade width, a continuous pushing surface with no point to initiate contact and no curve to shed material sideways. This is the defining feature of the pattern and the reason for the product name.
Sides. Straight and close to parallel over most of the blade length. Because they are straight, they can be used as screed edges: drawing the blade back along the run strikes the bed to a level line.
Heel and shank landing. The junction of blade and shank is the primary load-bearing area of the tool. In forward pushing, the operator's force is transmitted through this joint into the blade in shear.
How this differs from the other Leading Tools brick trowel patterns. Philadelphia pattern trowels are defined by a square heel with a tapered, pointed front: square at the handle end, not at the working end. London pattern trowels have a rounded heel and a pointed front. The Square Front is square at the working end, which is a different feature entirely; this product is not a Philadelphia pattern.
The blade and the shank are separate parts joined by spot welding.
| Property | Detail |
|---|---|
| Handle type | Soft grip, BF21 |
| Shank | Cranked / offset shank raising the handle above the blade plane |
| Purpose of the crank | Keeps the knuckles clear of the laid course and puts the wrist behind the push rather than above it |
| Other handles | Can be fitted on request: contact Leading Tools sales |
| Feature | Square Front Trowel (802821–807821) | Pointed brick trowel (Philadelphia / London) |
|---|---|---|
| Working-end shape | Flat, square edge | Tapered / leaf point |
| Heel shape | Square-ended panel | Square heel (Philadelphia) or rounded heel (London) |
| Primary motion | Straight push | Sling, sweep and spread |
| Mortar distribution | Advances the bead forward as one body | Spreads laterally from the point |
| Best for | Block beds, back-buttering | General bricklaying and face brick |
| Material in the Leading Tools range | Stainless steel (art numbers listed) | Carbon steel (forged or CO2 welded) |
The geometric difference is fundamental: a pointed trowel initiates mortar contact at one point and works outward, while a square front contacts the whole bead simultaneously and works forward. That makes the Square Front the tool of choice when the goal is uniform bed thickness without lateral material displacement.
| Project | Recommended art numbers | Rationale |
|---|---|---|
| Concrete block (CMU) bed joints, standard-width units | 802821–804821 (140–180 mm) | Blade slightly narrower than the unit face keeps the bed inside the shell and stays controllable |
| Concrete block bed joints, wide or architectural units | 805821–807821 (200–240 mm) | More bed laid per pass on a wide face |
| Large-format tile back-buttering | 804821–806821 (180–220 mm) | Large flat face covers a big tile back in few passes; back-buttering with the flat side is the standard method for large panels |
| User | Recommendation | Rationale |
|---|---|---|
| DIY / homeowner | 803821 (160 mm) | Manageable blade area, low load on the wrist, covers small block jobs |
| Professional mason, block focus | 804821–805821 (180–200 mm) | Best balance of coverage per pass and control |
| Tile setters handling large panels | 804821–806821 (180–220 mm) | Enough flat face to butter a large tile back in one or two passes |
| Restoration and fine detail work | 802821–803821 (140–160 mm) | Small blade for controlled placement in and around existing work |
| Industrial / high-volume bedding | 807821 (240 mm) | Largest blade in the range, maximum coverage per pass |
| Art. Nr | Size | Where it sits in the range |
|---|---|---|
| 802821 | 140 mm (5.5") | Smallest; tight spaces, fine detail |
| 803821 | 160 mm (6.3") | Entry professional size |
| 804821 | 180 mm (7.1") | The most generally useful size in the range |
| 805821 | 200 mm (7.9") | Block bed work |
| 806821 | 220 mm (8.7") | Large bed area, wide units |
| 807821 | 240 mm (9.5") | Largest; maximum coverage per pass |
Complete art-number reference for the series.
| Art. Nr | Size (mm) | Size (in) | Blade material | Construction | Handle |
|---|---|---|---|---|---|
| 802821 | 140 mm | 5.5" | Stainless steel | Spot welding | Soft grip, BF21 |
| 803821 | 160 mm | 6.3" | Stainless steel | Spot welding | Soft grip, BF21 |
| 804821 | 180 mm | 7.1" | Stainless steel | Spot welding | Soft grip, BF21 |
| 805821 | 200 mm | 7.9" | Stainless steel | Spot welding | Soft grip, BF21 |
| 806821 | 220 mm | 8.7" | Stainless steel | Spot welding | Soft grip, BF21 |
| 807821 | 240 mm | 9.5" | Stainless steel | Spot welding | Soft grip, BF21 |
Six art numbers in the series. Inch figures are conversions of the nominal millimeter sizes at 1" = 25.4 mm; the millimeter value is the specification.

In compliance with EU personal data protection laws, we are committed to protecting and providing you with control over your personal data. By clicking "Accept All", you allow us to place cookies to enhance your experience on this site, help us analyze site performance and usage, and enable us to deliver relevant marketing content. You can manage your cookie settings below. By clicking "Agree" you agree to the current settings. For more information, please visit the Privacy Statement.
This website uses cookies
In compliance with EU personal data protection laws, we are committed to protecting your personal data and providing you with control over it. By clicking "Agree", you allow us to place cookies to improve your experience on this site, help us analyze site performance and usage, and allow us to deliver relevant marketing content.
By clicking "Only necessary" you allow us to place only necessary cookies. The website cannot function without these cookies and you cannot switch them off on your system. These cookies are typically set only in response to an action you perform (i.e. a service request), such as setting privacy preferences, logging in, or filling in a form. You can set your browser to block or prompt you for these cookies, but this may prevent some site features from working.



