
Copyright 2026 © Leading Tools Industrial Co., Ltd.
All Rights Reserved. Website Design by Awakening Design
CATALOG TYPE
Product Categories
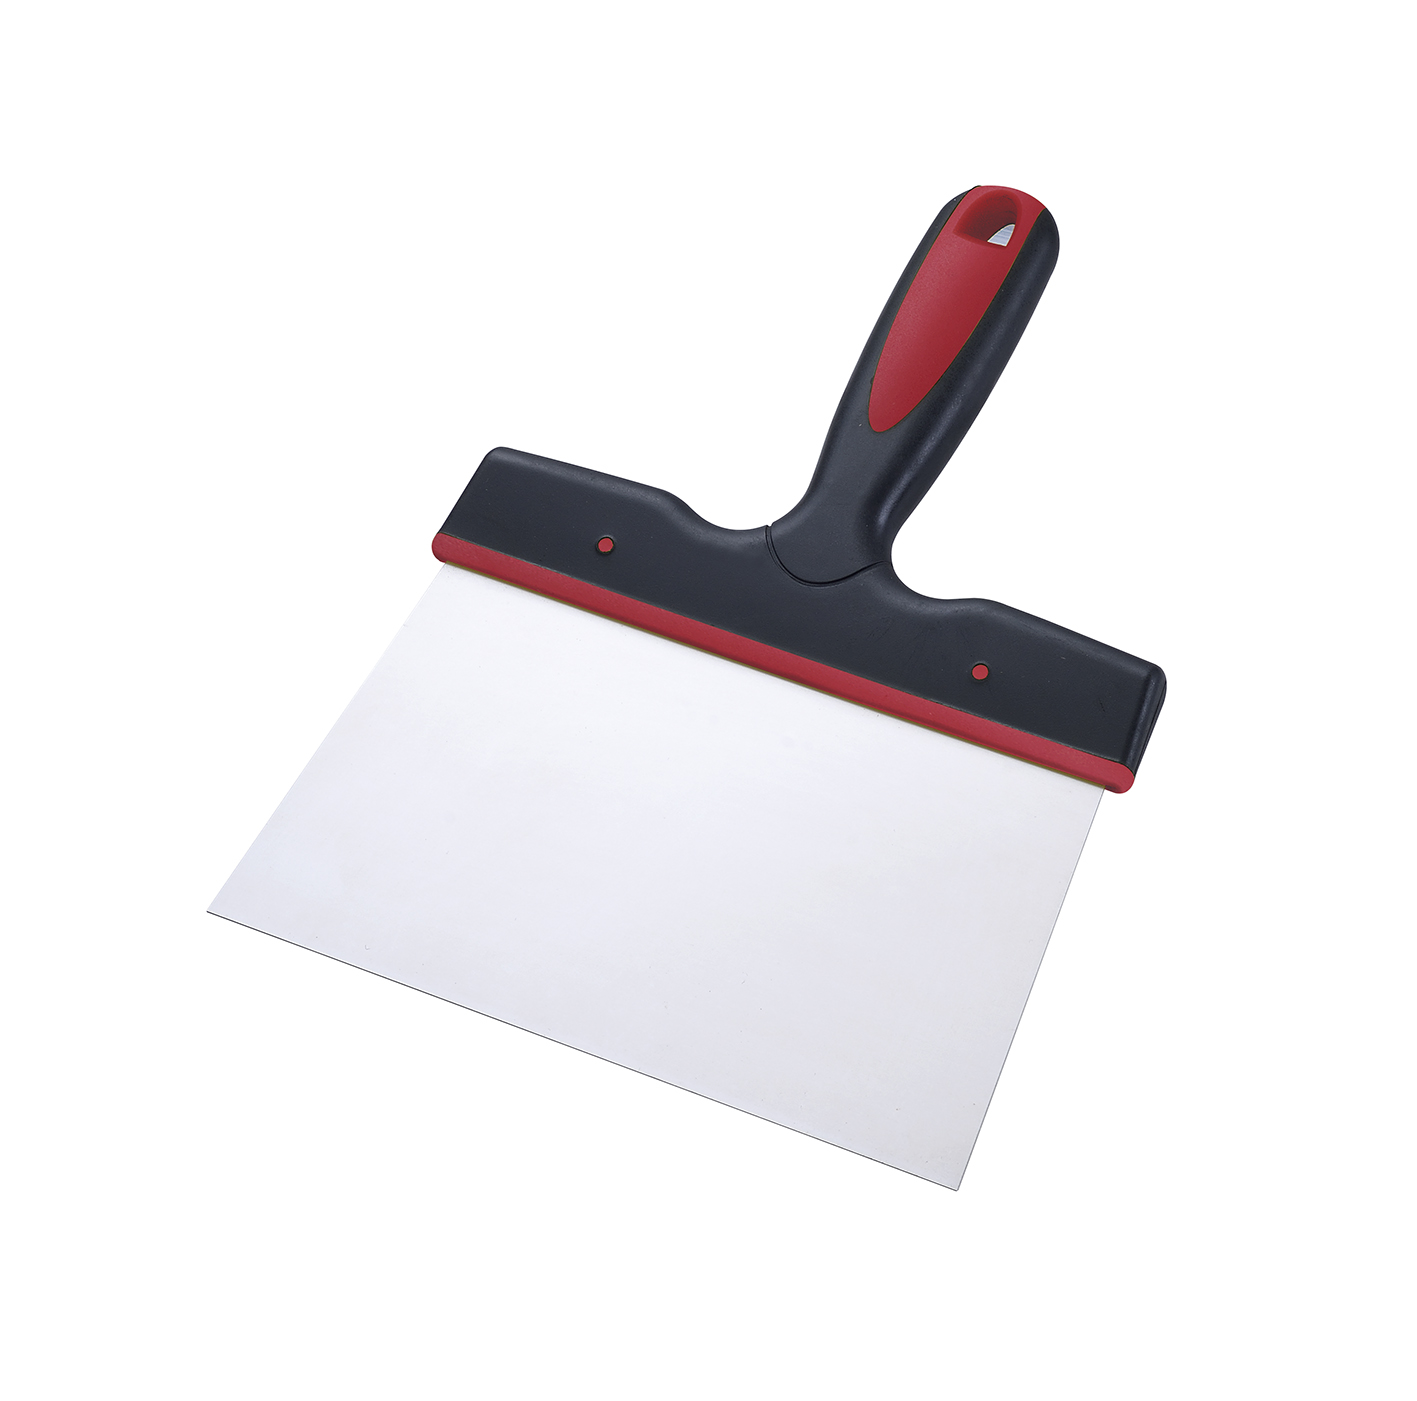
Taping Knife — Stainless Steel, 120–220 mm
Product Description
Product name: Taping Knife, Stainless Steel
Series art numbers: 310812, 310814, 310816, 310818, 310820, 310822: six metric sizes, one blade material, one handle type.
This is Leading Tools' metric stainless steel taping knife series: a rectangular stainless blade with a straight, square working edge, clamped along its top edge into a plastic mount, secured by two rivets, and carrying a two-tone soft-grip handle with a hanging hole. The handle sits across the back of the blade rather than in line with it, so the operator's palm loads pressure directly over the blade face.
What the tool does. A taping knife spreads joint compound over plasterboard joints, beds paper or mesh tape into the first coat, and levels and feathers each successive coat until the joint disappears into the board face. A putty knife at 3/4–3 in is a different tool for scraping and small fills, not a substitute.
What makes this series different from the other two Leading Tools taping knife series. All three Leading Tools taping knife series share the straight, square edge, but the proportions differ. The 3108xx blades are marked 120mm x 120mm up to 220mm x 120mm.
The 3168xx stainless and 3166xx blue carbon steel series in the Leading Tools range are marked in inches (8–14 in), with a reinforcing spine and an in-line handle. This series is used for filling and surfacing wall areas; Leading Tools lists it under Scraper rather than under a drywall-joint heading. For long drywall joints, see 316808–316814.
Buyer profile. This series suits the buyer who fills, surfaces and scrapes rather than one who runs three-coat drywall joints all day: painters and decorators doing filler work and surface preparation, plasterers doing patch and skim repairs, maintenance crews, and distributors serving metric-spec buyers. Contractors whose main task is running long drywall joints and feathering wide finish coats will get more out of the longer 3168xx stainless blades elsewhere in the Leading Tools range.
Carbon and blue steel blades have to be washed, dried and oiled at the end of every shift or they rust. Stainless needs no oiling: it has high corrosion resistance and low upkeep, though chlorinated water, coastal air or prolonged soaking can still cause rust spots, so rinse with clean water and dry after use. If the tool is shared between operators, left in a van, used on wet trades, or handed to someone who will not oil it, stainless is the material that survives that treatment.
This series steps 120, 140, 160, 180, 200, 220: 20 mm, roughly 3/4 in, per step. For a distributor that means being able to answer "I need something between my 6 in and my 8 in" with an actual product, and for a finisher it means the blade width can be matched to the patch rather than the patch worked around the blade.
A straight edge puts the whole working edge in contact with a flat surface, which is what levelling and feathering need. It also has no crevice at the tip to clean out and no point to snag paper tape. A known limitation: a square corner will not reach into an internal angle tighter than 90°, for example where a sloping ceiling meets a wall, and finishers who need that buy a dedicated corner tool.
All six models share blade material, handle type and mounting. A finisher moving from the 140 mm to the 200 mm is changing only the size: pressure and hand position transfer directly.
Where the specification, the drawings, the mud pan and the accessories are all in millimetres, a tool marked in inches creates friction on every order and every job sheet. This series is metric end to end.
| Task | Recommended size | Notes |
|---|---|---|
| Filling holes and dents | 310812 / 310814 | Press filler in, then strike off level with the same blade |
| Smoothing and levelling a filled area | 310814 / 310816 | Blade held flat, even pressure, single direction per pass |
| Applying filler over an area | 310816 / 310818 | Load the blade face, lay the material on, then level |
| Levelling a whole surface | 310820 / 310822 | Widest blade, fewest passes, largest reservoir |
| Bedding tape into a plasterboard joint | 310812 / 310814 | Narrow blade; squeeze out the excess without pulling the tape |
| Second and later coats over a joint | 310816 / 310818 | Each coat wider than the last |
| Scraping old paint, paper residue, adhesive | 310812 / 310814 | Narrow blades; expect edge wear |
| Step | Action | Why |
|---|---|---|
| 1 | Grip with the thumb hooked around the handle and the remaining fingers pressed on the back of the blade | Spreads pressure evenly across the whole blade instead of concentrating it under the handle |
| 2 | Work with two knives: a narrow one to lift material from the pan and load the blade, a wider one to lay it on the wall | The standard two-knife method; it keeps the working blade clean |
| 3 | Load the blade face with compound, spread across the width you intend to use | An unevenly loaded blade deposits an uneven band |
| 4 | Bring the blade flat against the surface and pull in one direction: horizontal or vertical, but consistent within the pass | Changing direction mid-pass leaves a step |
| 5 | Keep pressure even from one end of the blade to the other | Uneven pressure is the most common cause of tracks and ridges |
| 6 | For the levelling pass, reduce the blade angle toward the surface and lighten the pressure | A shallower angle spreads and thins; a steeper angle removes |
| 7 | Let each coat dry before the next; make each successive coat wider than the last | This is what makes the repair disappear rather than show as a raised patch |
| 8 | Scrape the blade clean on the edge of the pan between loads | Dried compound on the edge is what makes a blade drag and tear |
On blade angle. A blade held close to flat spreads material; a blade held steeply scrapes it off. That single variable is what turns the same tool from a filling knife into a scraper, so decide which you are doing before the stroke, not during it.
This is the core use for the deep-blade pattern. Take a narrow blade (310812 or 310814) to press filler into holes and dents and strike them off flush. Let it dry.
Then take a wide blade (310820 or 310822) loaded across its full edge and lay a thin, even coat over the whole area in consistent passes, overlapping each pass by about a third of the blade width. Finish with a levelling pass at a shallower angle and lighter pressure. These four operations, filling, smoothing, applying filler and surfacing, are the standard sequence for this tool, and they are the reason two widths are better than one.
Remodel and repair work is small-area, precision work in confined spaces, often around fittings and frames. Use 310812 through 310816: the narrow blades reach into the space and give the control needed to match the existing surface.
Wider blades are actively unhelpful here: a 220 mm edge cannot be kept flat in a 200 mm gap, and forcing it loads the blade and the handle in a way neither is designed for. Stainless earns its place in occupied buildings for a second reason: far less risk of rust staining a finished surface.
The series can run plasterboard joints and the smaller sizes are the right widths for bedding tape. Work the usual sequence: a narrow blade to bed the tape and cover screw heads, then successively wider blades over successively wider bands. This series stops at 220 mm; for the wide finishing pass, the 316808–316814 series in the Leading Tools range is the right tool and this one is the backup.
Leading Tools groups this series under Scraper, and the narrow sizes will take off old paint, wallpaper residue and adhesive. Two cautions. First, use the narrow sizes: wide blades are harder to keep flat under scraping pressure. Second, scraping is what dulls and chips an edge, so keep a dedicated knife for it rather than blunting the blade you finish with.
Q1. What does the Size designation mean, and which size should I buy if I can only buy one?
Sizes are marked as in the catalog: 310812 is 120mm x 120mm and 310822 is 220mm x 120mm; the first figure changes from 120 to 220 mm and the second stays at 120 mm.
Contact Leading Tools sales if you need to know which dimension each figure denotes. If you can only buy one, take 310816 (160 mm), wide enough for general patch and filling work and narrow enough to stay controllable, though standard trade instruction is to keep two widths and alternate, a narrow one to load and detail and a wide one to lay on and level.
Q2. Is this a drywall taping knife or a filling knife / scraper?
Leading Tools groups it under Scraper; it is used for filling and surfacing. If you need a dedicated drywall joint knife, take 316808–316814 from the Leading Tools range.
Q3. Do I need to oil a stainless blade, and is stainless better than blue carbon steel?
No oiling is needed, which is the reason to buy stainless rather than carbon or blue steel: carbon-steel blades have to be washed, dried and oiled at the end of every shift or they rust.
You still have to rinse the compound off with clean water and dry the blade: stainless has high corrosion resistance and low upkeep, but chlorinated water, coastal air or prolonged soaking can still cause rust spots, and dried compound ruins the edge for the next job. Choose stainless for shared tools, damp sites and crews that will not oil, and blue carbon steel for the operator who already has the cleaning habit.
Q4. The blade drags and tears the compound, or I get lines and ridges at the edge of every pass. What is wrong?
Dragging and tearing is almost always the edge: dried compound stuck along it, a nick from scraping over a fastener or corner bead, or a rolled edge.
Clean the edge, inspect it against the light, and retire a chipped blade from finishing work to scraping duty. Lines and ridges usually come from uneven pressure across the blade, a blade angle that is too steep so it cuts rather than spreads, or corners sitting hard on the wall.
Q5. Can I get into the corner where a sloping ceiling meets the wall, and does the edge need sharpening?
Not with a square corner, no: a square-cornered blade cannot follow an internal angle tighter than 90°, which is the known limitation of the pattern, and finishers use a dedicated corner tool. A filling blade's edge is meant to be clean and straight rather than knife-sharp, so it does not need sharpening the way a cutting blade does; a rolled edge can usually be brought back with a fine stone.
| Item | Specification |
|---|---|
| Blade material | Stainless Steel |
| Blade edge profile | Straight, square edge; square corners; rectangular blade |
| Size (as marked) | 120mm x 120mm to 220mm x 120mm; first figure 120 / 140 / 160 / 180 / 200 / 220 mm, second figure 120 mm on all six models |
| Blade mount | Blade clamped along its top edge into a plastic mount |
| Rivets | Two rivets through the mount |
On corrosion. High corrosion resistance and low upkeep; chlorinated water, coastal air or prolonged soaking can still cause rust spots, so rinse with clean water and dry after use. Do not leave the blade sitting in wet compound either; see Storage under Care & Maintenance.
| Item | Specification |
|---|---|
| Handle type | Two-tone soft-grip |
| Handle orientation | Mounted across the back of the blade, perpendicular to the working edge |
| Hanging hole | Present, moulded through the top of the handle |
| Art. Nr | Size | Material | Handle |
|---|---|---|---|
| 310812 | 120mm x 120mm (first figure ≈ 4.7 in) | Stainless Steel | Two-tone soft-grip, hanging hole |
| 310814 | 140mm x 120mm (first figure ≈ 5.5 in) | Stainless Steel | Two-tone soft-grip, hanging hole |
| 310816 | 160mm x 120mm (first figure ≈ 6.3 in) | Stainless Steel | Two-tone soft-grip, hanging hole |
| 310818 | 180mm x 120mm (first figure ≈ 7.1 in) | Stainless Steel | Two-tone soft-grip, hanging hole |
| 310820 | 200mm x 120mm (first figure ≈ 7.9 in) | Stainless Steel | Two-tone soft-grip, hanging hole |
| 310822 | 220mm x 120mm (first figure ≈ 8.7 in) | Stainless Steel | Two-tone soft-grip, hanging hole |
Inch figures are conversions at 1 in = 25.4 mm and are given for reference only; the specification is metric.
| Design aspect | 310812–310822 Stainless (this series) | 316808–316814 Stainless | 316608–316614 Blue Carbon Steel |
|---|---|---|---|
| Blade proportion | Marked 120mm x 120mm to 220mm x 120mm | Marked in inches, with a reinforcing spine along the top edge | Marked in inches |
| Edge profile | Straight, square | Straight, square | Straight, square |
| Handle | Soft-grip across the blade back | Soft-grip in line with the blade | Soft-grip in line with the blade |
| Sizing | Metric, 120–220 mm in 20 mm steps | Imperial, 8 / 10 / 12 / 14 in | Imperial, 8 / 10 / 12 / 14 in |
| Corrosion resistance | High, no oiling routine required | High, no oiling routine required | Must be dried and oiled after use |
| Best at | Filling, surfacing, patch repair, scraping | Bedding tape and feathering long drywall joints | The same joint work, where blade feel outweighs maintenance |
All three Leading Tools taping knife series carry a straight, square blade.
Blade width is the first decision, and the trade-off is always the same: a wider blade covers more per stroke and levels a longer span, but it is heavier, harder to keep flat, and less controllable in a confined space. The standard advice is to own two widths and alternate rather than force one blade to do everything: a narrow knife for the first pass and getting into tight work, a wide one for the later passes over a broad surface.
| Job | Primary size | Second knife | Why |
|---|---|---|---|
| Detail filling: screw heads, small dents, around boxes and frames | 310812 (120 mm) | 310816 (160 mm) | Smallest footprint, easiest to keep off the surrounding surface |
| General patch repair and remodel work | 310814 (140 mm) or 310816 (160 mm) | 310812 (120 mm) for detail | Covers a typical patch in one or two passes without becoming unwieldy |
| Bedding tape into a first coat | 310812 (120 mm) or 310814 (140 mm) | : | A narrow blade is the usual choice for the bedding pass |
| Levelling and building coats over a joint | 310816 (160 mm) or 310818 (180 mm) | 310814 (140 mm) | Mid-width is the usual second-coat choice |
| Broad surface filling and levelling | 310820 (200 mm) or 310822 (220 mm) | 310818 (180 mm) | Widest edge, fewest passes, largest compound reservoir |
| Overhead and ceiling work | 310818 (180 mm) or 310820 (200 mm) | : | Wider covers more per stroke, so fewer overhead passes |
| Scraping old paint, wallpaper residue and adhesive | 310812 (120 mm) or 310814 (140 mm) | : | Use a narrow blade for scraping |
| Damp or shared-tool conditions, any task | Any 3108xx model | : | Stainless needs no oiling routine; rinse with clean water and dry after use |
| Buyer stocking one size only | 310816 (160 mm) | : | Mid-ladder; covers detail and general filling acceptably |
| Professional daily use | Own three: 310812 / 310816 / 310820 | Fill in as the work demands | Two-knife working is the standard recommendation; three covers detail, general and broad work |
Both are stainless, both are straight-edged, and both are in the Leading Tools range, so this is a live choice for a buyer, not a theoretical one.
Choose 310812–310822 when the work is filling, surfacing, patch repair and scraping rather than running long drywall joints; when the customer needs a fine 20 mm size ladder; when the specification and the accessories are metric; or when the maximum width needed is 220 mm or less.
Choose 316808–316814 when the work is drywall joint finishing at scale: a long shallow blade with a reinforcing spine and an in-line handle is the pattern built for drawing along a joint and feathering a wide finish coat, and the range reaches 14 in (356 mm) where this series stops at 220 mm. If the buyer is stocking in inches, that is also the series that matches their existing kit.
The blue carbon steel series (316608–316614) is the other blade material Leading Tools offers.
Choose stainless (this series) when the tool will be shared, transported in a damp van, used on wet trades, or handed to operators who will not run an end-of-shift oiling routine; when compound will sit on or around the blade for a while; and when "wipe it and put it away" is the required maintenance standard.
Choose blue carbon steel when the operator already has a cleaning and oiling habit.
Complete art-number reference for the series.
| Art. Nr | Size | Blade material | Edge profile | Handle |
|---|---|---|---|---|
| 310812 | 120mm x 120mm (first figure ≈ 4.7 in) | Stainless Steel | Straight, square | Two-tone soft-grip, hanging hole |
| 310814 | 140mm x 120mm (first figure ≈ 5.5 in) | Stainless Steel | Straight, square | Two-tone soft-grip, hanging hole |
| 310816 | 160mm x 120mm (first figure ≈ 6.3 in) | Stainless Steel | Straight, square | Two-tone soft-grip, hanging hole |
| 310818 | 180mm x 120mm (first figure ≈ 7.1 in) | Stainless Steel | Straight, square | Two-tone soft-grip, hanging hole |
| 310820 | 200mm x 120mm (first figure ≈ 7.9 in) | Stainless Steel | Straight, square | Two-tone soft-grip, hanging hole |
| 310822 | 220mm x 120mm (first figure ≈ 8.7 in) | Stainless Steel | Straight, square | Two-tone soft-grip, hanging hole |
Related Leading Tools series, for buyers comparing across the range:
| Art. Nr | Size | Material | Series |
|---|---|---|---|
| 316808 / 316810 / 316812 / 316814 | 8" / 10" / 12" / 14" | Stainless Steel | Long-bladed stainless taping knife |
| 316608 / 316610 / 316612 / 316614 | 8" / 10" / 12" / 14" | Blue Carbon Steel | Long-bladed blue carbon steel taping knife |
High corrosion resistance and low upkeep; chlorinated water, coastal air or prolonged soaking can still cause rust spots, so rinse with clean water and dry after use. Low upkeep is not the same as no cleaning: dried compound on the edge is what makes a blade drag and tear on the next job.
| Situation | Recommendation | Reason |
|---|---|---|
| Workshop or store | Hang by the moulded hanging hole, or lay flat | Keeps the edge off other tools and keeps the blade flat |
| Tool bag | Guard or sleeve over the edge | Protects the edge, and protects whoever reaches into the bag |
| Overnight in a mud pan | Take it out, wash and dry it | Compound left to set on the blade ruins the edge for the next job, and long soaking can still cause rust spots |
| Vehicle transport | Secured and padded, blade not loaded against anything | Prevents edge chips and blade distortion |
| Long-term storage | Clean, dry, stored flat or hanging | Prevents distortion and edge damage |
Wave deformation. On large stainless taping knives, repeated heavy pressure in one direction can put a permanent ripple in the edge. Prevent it by varying stroke direction and storing the blade flat or hanging.
Product name: Taping Knife, Stainless Steel
Series art numbers: 310812, 310814, 310816, 310818, 310820, 310822: six metric sizes, one blade material, one handle type.
This is Leading Tools' metric stainless steel taping knife series: a rectangular stainless blade with a straight, square working edge, clamped along its top edge into a plastic mount, secured by two rivets, and carrying a two-tone soft-grip handle with a hanging hole. The handle sits across the back of the blade rather than in line with it, so the operator's palm loads pressure directly over the blade face.
What the tool does. A taping knife spreads joint compound over plasterboard joints, beds paper or mesh tape into the first coat, and levels and feathers each successive coat until the joint disappears into the board face. A putty knife at 3/4–3 in is a different tool for scraping and small fills, not a substitute.
What makes this series different from the other two Leading Tools taping knife series. All three Leading Tools taping knife series share the straight, square edge, but the proportions differ. The 3108xx blades are marked 120mm x 120mm up to 220mm x 120mm.
The 3168xx stainless and 3166xx blue carbon steel series in the Leading Tools range are marked in inches (8–14 in), with a reinforcing spine and an in-line handle. This series is used for filling and surfacing wall areas; Leading Tools lists it under Scraper rather than under a drywall-joint heading. For long drywall joints, see 316808–316814.
Buyer profile. This series suits the buyer who fills, surfaces and scrapes rather than one who runs three-coat drywall joints all day: painters and decorators doing filler work and surface preparation, plasterers doing patch and skim repairs, maintenance crews, and distributors serving metric-spec buyers. Contractors whose main task is running long drywall joints and feathering wide finish coats will get more out of the longer 3168xx stainless blades elsewhere in the Leading Tools range.
Carbon and blue steel blades have to be washed, dried and oiled at the end of every shift or they rust. Stainless needs no oiling: it has high corrosion resistance and low upkeep, though chlorinated water, coastal air or prolonged soaking can still cause rust spots, so rinse with clean water and dry after use. If the tool is shared between operators, left in a van, used on wet trades, or handed to someone who will not oil it, stainless is the material that survives that treatment.
This series steps 120, 140, 160, 180, 200, 220: 20 mm, roughly 3/4 in, per step. For a distributor that means being able to answer "I need something between my 6 in and my 8 in" with an actual product, and for a finisher it means the blade width can be matched to the patch rather than the patch worked around the blade.
A straight edge puts the whole working edge in contact with a flat surface, which is what levelling and feathering need. It also has no crevice at the tip to clean out and no point to snag paper tape. A known limitation: a square corner will not reach into an internal angle tighter than 90°, for example where a sloping ceiling meets a wall, and finishers who need that buy a dedicated corner tool.
All six models share blade material, handle type and mounting. A finisher moving from the 140 mm to the 200 mm is changing only the size: pressure and hand position transfer directly.
Where the specification, the drawings, the mud pan and the accessories are all in millimetres, a tool marked in inches creates friction on every order and every job sheet. This series is metric end to end.
| Task | Recommended size | Notes |
|---|---|---|
| Filling holes and dents | 310812 / 310814 | Press filler in, then strike off level with the same blade |
| Smoothing and levelling a filled area | 310814 / 310816 | Blade held flat, even pressure, single direction per pass |
| Applying filler over an area | 310816 / 310818 | Load the blade face, lay the material on, then level |
| Levelling a whole surface | 310820 / 310822 | Widest blade, fewest passes, largest reservoir |
| Bedding tape into a plasterboard joint | 310812 / 310814 | Narrow blade; squeeze out the excess without pulling the tape |
| Second and later coats over a joint | 310816 / 310818 | Each coat wider than the last |
| Scraping old paint, paper residue, adhesive | 310812 / 310814 | Narrow blades; expect edge wear |
| Step | Action | Why |
|---|---|---|
| 1 | Grip with the thumb hooked around the handle and the remaining fingers pressed on the back of the blade | Spreads pressure evenly across the whole blade instead of concentrating it under the handle |
| 2 | Work with two knives: a narrow one to lift material from the pan and load the blade, a wider one to lay it on the wall | The standard two-knife method; it keeps the working blade clean |
| 3 | Load the blade face with compound, spread across the width you intend to use | An unevenly loaded blade deposits an uneven band |
| 4 | Bring the blade flat against the surface and pull in one direction: horizontal or vertical, but consistent within the pass | Changing direction mid-pass leaves a step |
| 5 | Keep pressure even from one end of the blade to the other | Uneven pressure is the most common cause of tracks and ridges |
| 6 | For the levelling pass, reduce the blade angle toward the surface and lighten the pressure | A shallower angle spreads and thins; a steeper angle removes |
| 7 | Let each coat dry before the next; make each successive coat wider than the last | This is what makes the repair disappear rather than show as a raised patch |
| 8 | Scrape the blade clean on the edge of the pan between loads | Dried compound on the edge is what makes a blade drag and tear |
On blade angle. A blade held close to flat spreads material; a blade held steeply scrapes it off. That single variable is what turns the same tool from a filling knife into a scraper, so decide which you are doing before the stroke, not during it.
This is the core use for the deep-blade pattern. Take a narrow blade (310812 or 310814) to press filler into holes and dents and strike them off flush. Let it dry.
Then take a wide blade (310820 or 310822) loaded across its full edge and lay a thin, even coat over the whole area in consistent passes, overlapping each pass by about a third of the blade width. Finish with a levelling pass at a shallower angle and lighter pressure. These four operations, filling, smoothing, applying filler and surfacing, are the standard sequence for this tool, and they are the reason two widths are better than one.
Remodel and repair work is small-area, precision work in confined spaces, often around fittings and frames. Use 310812 through 310816: the narrow blades reach into the space and give the control needed to match the existing surface.
Wider blades are actively unhelpful here: a 220 mm edge cannot be kept flat in a 200 mm gap, and forcing it loads the blade and the handle in a way neither is designed for. Stainless earns its place in occupied buildings for a second reason: far less risk of rust staining a finished surface.
The series can run plasterboard joints and the smaller sizes are the right widths for bedding tape. Work the usual sequence: a narrow blade to bed the tape and cover screw heads, then successively wider blades over successively wider bands. This series stops at 220 mm; for the wide finishing pass, the 316808–316814 series in the Leading Tools range is the right tool and this one is the backup.
Leading Tools groups this series under Scraper, and the narrow sizes will take off old paint, wallpaper residue and adhesive. Two cautions. First, use the narrow sizes: wide blades are harder to keep flat under scraping pressure. Second, scraping is what dulls and chips an edge, so keep a dedicated knife for it rather than blunting the blade you finish with.
Q1. What does the Size designation mean, and which size should I buy if I can only buy one?
Sizes are marked as in the catalog: 310812 is 120mm x 120mm and 310822 is 220mm x 120mm; the first figure changes from 120 to 220 mm and the second stays at 120 mm.
Contact Leading Tools sales if you need to know which dimension each figure denotes. If you can only buy one, take 310816 (160 mm), wide enough for general patch and filling work and narrow enough to stay controllable, though standard trade instruction is to keep two widths and alternate, a narrow one to load and detail and a wide one to lay on and level.
Q2. Is this a drywall taping knife or a filling knife / scraper?
Leading Tools groups it under Scraper; it is used for filling and surfacing. If you need a dedicated drywall joint knife, take 316808–316814 from the Leading Tools range.
Q3. Do I need to oil a stainless blade, and is stainless better than blue carbon steel?
No oiling is needed, which is the reason to buy stainless rather than carbon or blue steel: carbon-steel blades have to be washed, dried and oiled at the end of every shift or they rust.
You still have to rinse the compound off with clean water and dry the blade: stainless has high corrosion resistance and low upkeep, but chlorinated water, coastal air or prolonged soaking can still cause rust spots, and dried compound ruins the edge for the next job. Choose stainless for shared tools, damp sites and crews that will not oil, and blue carbon steel for the operator who already has the cleaning habit.
Q4. The blade drags and tears the compound, or I get lines and ridges at the edge of every pass. What is wrong?
Dragging and tearing is almost always the edge: dried compound stuck along it, a nick from scraping over a fastener or corner bead, or a rolled edge.
Clean the edge, inspect it against the light, and retire a chipped blade from finishing work to scraping duty. Lines and ridges usually come from uneven pressure across the blade, a blade angle that is too steep so it cuts rather than spreads, or corners sitting hard on the wall.
Q5. Can I get into the corner where a sloping ceiling meets the wall, and does the edge need sharpening?
Not with a square corner, no: a square-cornered blade cannot follow an internal angle tighter than 90°, which is the known limitation of the pattern, and finishers use a dedicated corner tool. A filling blade's edge is meant to be clean and straight rather than knife-sharp, so it does not need sharpening the way a cutting blade does; a rolled edge can usually be brought back with a fine stone.
| Item | Specification |
|---|---|
| Blade material | Stainless Steel |
| Blade edge profile | Straight, square edge; square corners; rectangular blade |
| Size (as marked) | 120mm x 120mm to 220mm x 120mm; first figure 120 / 140 / 160 / 180 / 200 / 220 mm, second figure 120 mm on all six models |
| Blade mount | Blade clamped along its top edge into a plastic mount |
| Rivets | Two rivets through the mount |
On corrosion. High corrosion resistance and low upkeep; chlorinated water, coastal air or prolonged soaking can still cause rust spots, so rinse with clean water and dry after use. Do not leave the blade sitting in wet compound either; see Storage under Care & Maintenance.
| Item | Specification |
|---|---|
| Handle type | Two-tone soft-grip |
| Handle orientation | Mounted across the back of the blade, perpendicular to the working edge |
| Hanging hole | Present, moulded through the top of the handle |
| Art. Nr | Size | Material | Handle |
|---|---|---|---|
| 310812 | 120mm x 120mm (first figure ≈ 4.7 in) | Stainless Steel | Two-tone soft-grip, hanging hole |
| 310814 | 140mm x 120mm (first figure ≈ 5.5 in) | Stainless Steel | Two-tone soft-grip, hanging hole |
| 310816 | 160mm x 120mm (first figure ≈ 6.3 in) | Stainless Steel | Two-tone soft-grip, hanging hole |
| 310818 | 180mm x 120mm (first figure ≈ 7.1 in) | Stainless Steel | Two-tone soft-grip, hanging hole |
| 310820 | 200mm x 120mm (first figure ≈ 7.9 in) | Stainless Steel | Two-tone soft-grip, hanging hole |
| 310822 | 220mm x 120mm (first figure ≈ 8.7 in) | Stainless Steel | Two-tone soft-grip, hanging hole |
Inch figures are conversions at 1 in = 25.4 mm and are given for reference only; the specification is metric.
| Design aspect | 310812–310822 Stainless (this series) | 316808–316814 Stainless | 316608–316614 Blue Carbon Steel |
|---|---|---|---|
| Blade proportion | Marked 120mm x 120mm to 220mm x 120mm | Marked in inches, with a reinforcing spine along the top edge | Marked in inches |
| Edge profile | Straight, square | Straight, square | Straight, square |
| Handle | Soft-grip across the blade back | Soft-grip in line with the blade | Soft-grip in line with the blade |
| Sizing | Metric, 120–220 mm in 20 mm steps | Imperial, 8 / 10 / 12 / 14 in | Imperial, 8 / 10 / 12 / 14 in |
| Corrosion resistance | High, no oiling routine required | High, no oiling routine required | Must be dried and oiled after use |
| Best at | Filling, surfacing, patch repair, scraping | Bedding tape and feathering long drywall joints | The same joint work, where blade feel outweighs maintenance |
All three Leading Tools taping knife series carry a straight, square blade.
Blade width is the first decision, and the trade-off is always the same: a wider blade covers more per stroke and levels a longer span, but it is heavier, harder to keep flat, and less controllable in a confined space. The standard advice is to own two widths and alternate rather than force one blade to do everything: a narrow knife for the first pass and getting into tight work, a wide one for the later passes over a broad surface.
| Job | Primary size | Second knife | Why |
|---|---|---|---|
| Detail filling: screw heads, small dents, around boxes and frames | 310812 (120 mm) | 310816 (160 mm) | Smallest footprint, easiest to keep off the surrounding surface |
| General patch repair and remodel work | 310814 (140 mm) or 310816 (160 mm) | 310812 (120 mm) for detail | Covers a typical patch in one or two passes without becoming unwieldy |
| Bedding tape into a first coat | 310812 (120 mm) or 310814 (140 mm) | : | A narrow blade is the usual choice for the bedding pass |
| Levelling and building coats over a joint | 310816 (160 mm) or 310818 (180 mm) | 310814 (140 mm) | Mid-width is the usual second-coat choice |
| Broad surface filling and levelling | 310820 (200 mm) or 310822 (220 mm) | 310818 (180 mm) | Widest edge, fewest passes, largest compound reservoir |
| Overhead and ceiling work | 310818 (180 mm) or 310820 (200 mm) | : | Wider covers more per stroke, so fewer overhead passes |
| Scraping old paint, wallpaper residue and adhesive | 310812 (120 mm) or 310814 (140 mm) | : | Use a narrow blade for scraping |
| Damp or shared-tool conditions, any task | Any 3108xx model | : | Stainless needs no oiling routine; rinse with clean water and dry after use |
| Buyer stocking one size only | 310816 (160 mm) | : | Mid-ladder; covers detail and general filling acceptably |
| Professional daily use | Own three: 310812 / 310816 / 310820 | Fill in as the work demands | Two-knife working is the standard recommendation; three covers detail, general and broad work |
Both are stainless, both are straight-edged, and both are in the Leading Tools range, so this is a live choice for a buyer, not a theoretical one.
Choose 310812–310822 when the work is filling, surfacing, patch repair and scraping rather than running long drywall joints; when the customer needs a fine 20 mm size ladder; when the specification and the accessories are metric; or when the maximum width needed is 220 mm or less.
Choose 316808–316814 when the work is drywall joint finishing at scale: a long shallow blade with a reinforcing spine and an in-line handle is the pattern built for drawing along a joint and feathering a wide finish coat, and the range reaches 14 in (356 mm) where this series stops at 220 mm. If the buyer is stocking in inches, that is also the series that matches their existing kit.
The blue carbon steel series (316608–316614) is the other blade material Leading Tools offers.
Choose stainless (this series) when the tool will be shared, transported in a damp van, used on wet trades, or handed to operators who will not run an end-of-shift oiling routine; when compound will sit on or around the blade for a while; and when "wipe it and put it away" is the required maintenance standard.
Choose blue carbon steel when the operator already has a cleaning and oiling habit.
Complete art-number reference for the series.
| Art. Nr | Size | Blade material | Edge profile | Handle |
|---|---|---|---|---|
| 310812 | 120mm x 120mm (first figure ≈ 4.7 in) | Stainless Steel | Straight, square | Two-tone soft-grip, hanging hole |
| 310814 | 140mm x 120mm (first figure ≈ 5.5 in) | Stainless Steel | Straight, square | Two-tone soft-grip, hanging hole |
| 310816 | 160mm x 120mm (first figure ≈ 6.3 in) | Stainless Steel | Straight, square | Two-tone soft-grip, hanging hole |
| 310818 | 180mm x 120mm (first figure ≈ 7.1 in) | Stainless Steel | Straight, square | Two-tone soft-grip, hanging hole |
| 310820 | 200mm x 120mm (first figure ≈ 7.9 in) | Stainless Steel | Straight, square | Two-tone soft-grip, hanging hole |
| 310822 | 220mm x 120mm (first figure ≈ 8.7 in) | Stainless Steel | Straight, square | Two-tone soft-grip, hanging hole |
Related Leading Tools series, for buyers comparing across the range:
| Art. Nr | Size | Material | Series |
|---|---|---|---|
| 316808 / 316810 / 316812 / 316814 | 8" / 10" / 12" / 14" | Stainless Steel | Long-bladed stainless taping knife |
| 316608 / 316610 / 316612 / 316614 | 8" / 10" / 12" / 14" | Blue Carbon Steel | Long-bladed blue carbon steel taping knife |
High corrosion resistance and low upkeep; chlorinated water, coastal air or prolonged soaking can still cause rust spots, so rinse with clean water and dry after use. Low upkeep is not the same as no cleaning: dried compound on the edge is what makes a blade drag and tear on the next job.
| Situation | Recommendation | Reason |
|---|---|---|
| Workshop or store | Hang by the moulded hanging hole, or lay flat | Keeps the edge off other tools and keeps the blade flat |
| Tool bag | Guard or sleeve over the edge | Protects the edge, and protects whoever reaches into the bag |
| Overnight in a mud pan | Take it out, wash and dry it | Compound left to set on the blade ruins the edge for the next job, and long soaking can still cause rust spots |
| Vehicle transport | Secured and padded, blade not loaded against anything | Prevents edge chips and blade distortion |
| Long-term storage | Clean, dry, stored flat or hanging | Prevents distortion and edge damage |
Wave deformation. On large stainless taping knives, repeated heavy pressure in one direction can put a permanent ripple in the edge. Prevent it by varying stroke direction and storing the blade flat or hanging.

In compliance with EU personal data protection laws, we are committed to protecting and providing you with control over your personal data. By clicking "Accept All", you allow us to place cookies to enhance your experience on this site, help us analyze site performance and usage, and enable us to deliver relevant marketing content. You can manage your cookie settings below. By clicking "Agree" you agree to the current settings. For more information, please visit the Privacy Statement.
This website uses cookies
In compliance with EU personal data protection laws, we are committed to protecting your personal data and providing you with control over it. By clicking "Agree", you allow us to place cookies to improve your experience on this site, help us analyze site performance and usage, and allow us to deliver relevant marketing content.
By clicking "Only necessary" you allow us to place only necessary cookies. The website cannot function without these cookies and you cannot switch them off on your system. These cookies are typically set only in response to an action you perform (i.e. a service request), such as setting privacy preferences, logging in, or filling in a form. You can set your browser to block or prompt you for these cookies, but this may prevent some site features from working.



