
Copyright 2026 © Leading Tools Industrial Co., Ltd.
All Rights Reserved. Website Design by Awakening Design
CATALOG TYPE
Product Categories
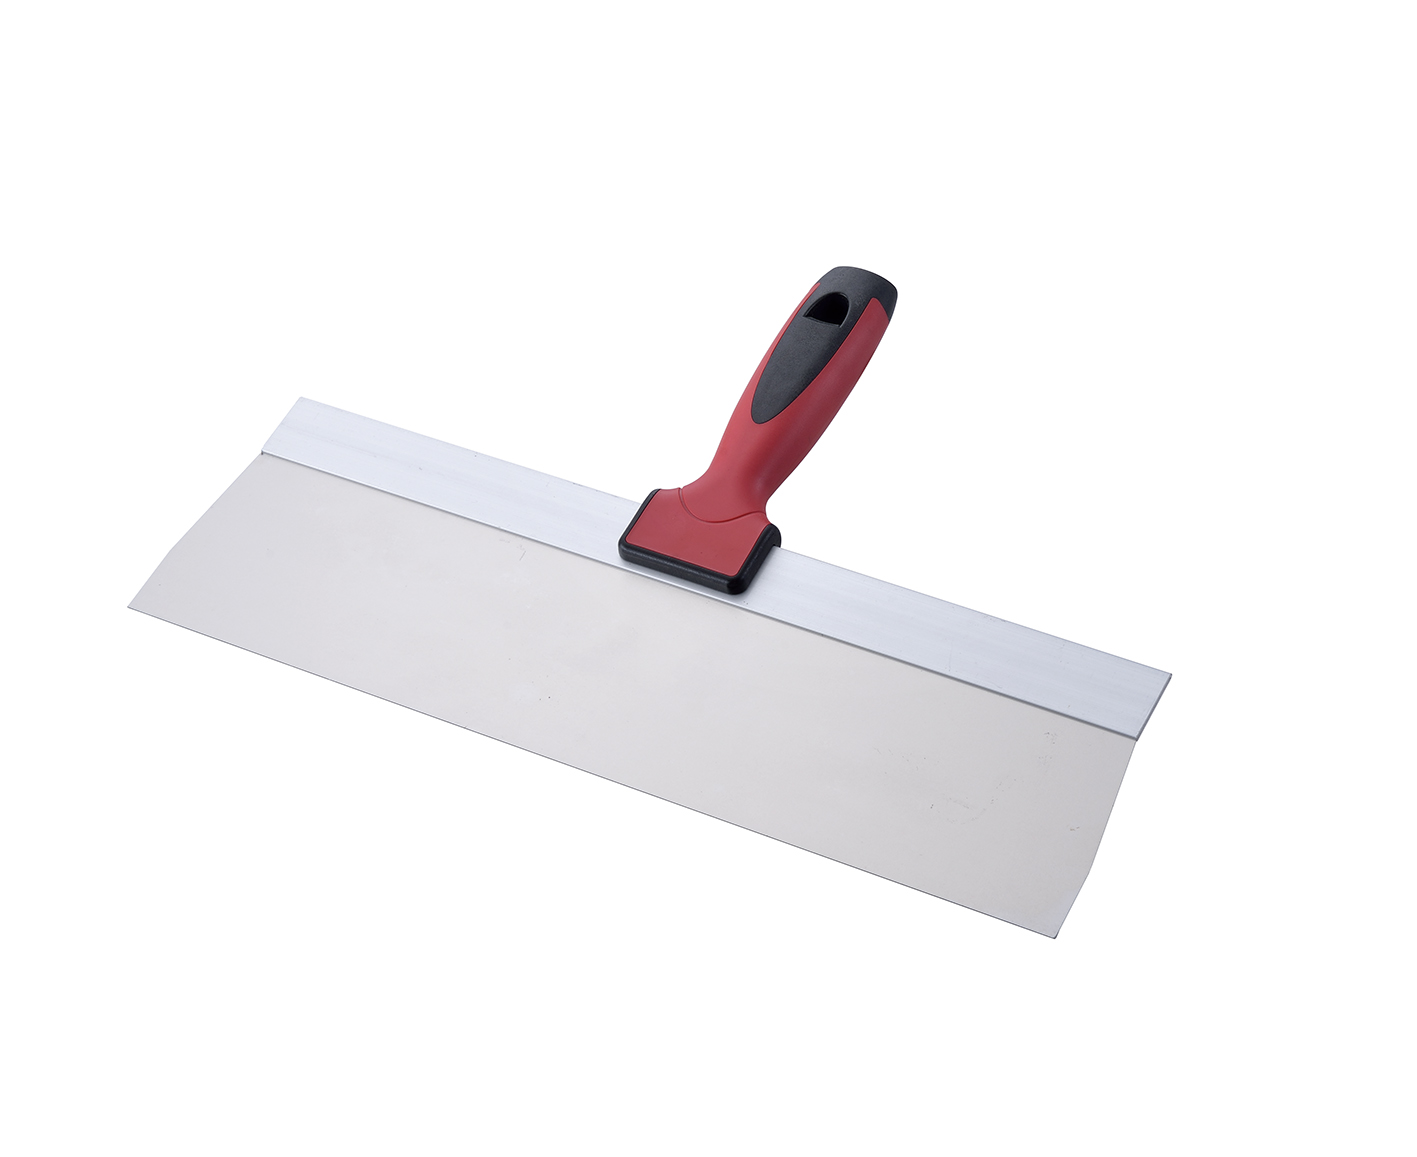
Taping Knife — Stainless Steel, 8"–14"
Product Description
Product name: Taping Knife — Stainless Steel
This page covers four Art. Nrs: 316808 (8 in), 316810 (10 in), 316812 (12 in), 316814 (14 in): all Stainless Steel, all with the same reinforced blade back and two-tone soft-grip handle with hanging hole
The 316808 is the 8 in blade in Leading Tools' imperial-sized stainless steel taping knife series. A taping knife is the tool a drywall finisher uses to lay joint compound over plasterboard joints, to bed paper or mesh tape into that first coat, and then to level and feather each following coat until the joint no longer reads through the board face.
The blade on this series is straight and square-edged. The blade is plain rectangular stainless with a straight working edge and square corners and a full-length reinforcing bar along its top edge, and a red-and-black soft-grip handle is mounted on the blade back.
Where the 8 in sits in the range. Drywall joints are built up over three passes, each wider than the last, so the widths in this series are designed to be owned together rather than substituted for one another.
The standard sequence puts the narrowest knife on the bedding coat, the middle widths on the leveling coat, and the widest on the final feather coat, and one knife should not be used both to apply and to smooth. In that sequence the 316808 is the bedding and detail knife: narrow enough to concentrate hand pressure on the tape, short enough to stay flat in a cupboard, a window return, or a stairwell, and small enough for fastener holes and patch repairs.
Buyer profile. The stainless series suits crews that share tools, work in damp or humid conditions, run cementitious as well as gypsum materials, or simply cannot be relied on to wash, dry and oil a blade at the end of every shift. A stainless blade tolerates neglect, so it suits shared tools. For a carbon steel blade, see the blue carbon steel series in the Leading Tools range (316608–316614); it must be wiped dry and given a thin coat of tool oil after use, otherwise it rusts.
On a building site, wipe the blade when you set it down and do not leave it soaking in the mud pan; rinse it with clean water and dry it at the end of the day, and it goes back in the bag without an oil film.
High corrosion resistance and low upkeep; chlorinated water, coastal air or prolonged soaking can still cause rust spots, so rinse with clean water and dry after use. Stainless is the long-service choice, and it is the material to recommend when the tool will not get an oiling routine.
The choice between the two materials is about upkeep. Stainless needs no oiling routine. A carbon steel blade costs less, but it must be wiped dry and given a thin coat of tool oil after use, otherwise it rusts. Leading Tools offers both materials in the same four widths, so the customer can choose.
The reinforcement running the full length of the blade's top edge is what stops an 8 in blade from twisting when the operator loads one end more heavily than the other. Without it, the pull wanders, the compound thickness varies across the pass, and the finisher pays for it in sanding. The 316808 uses the same full-length reinforcing bar.
Use the narrowest knife to bed tape, and progressively wider knives for each following coat, and do not try to apply and smooth with the same blade. At 8 in the blade concentrates hand pressure onto the tape, so the compound underneath is genuinely squeezed out rather than merely smeared over, and it stays controllable in the places a 12 in or 14 in blade cannot be kept flat: window and door returns, cupboards, stairwells, behind pipework, and around ductwork in plant rooms.
Because 316808, 316810, 316812 and 316814 share blade material, blade construction and handle, a contractor can run the whole three-coat sequence without relearning the pressure for every knife.
The handle is a two-tone soft-grip with a hanging hole. This series has no metal hammer end on the handle butt.
| Situation | Use the 316808? | Notes |
|---|---|---|
| Bedding paper or mesh tape into the first coat | Yes, this is its primary job | The narrowest knife in the sequence does the bedding |
| Second coat over a taped joint | Small areas and patches only | The second coat should be wider than the first; prefer 316810 or 316812 |
| Final feather coat on a full wall | No; use 316812 or 316814 | The last coat must be the widest |
| Filling and striking off screw and nail heads | Yes | A standard job for this class of knife |
| Inside corners at about 90° | Yes | Blade tilted into the angle, pulled along the corner |
| Inside angles tighter than 90° (sloping ceiling to wall) | No; a square-cornered blade cannot reach in | Use a dedicated pointed corner knife |
| External corners over corner bead | Yes for the first coat | Wider blades for the following coats |
| Working with wet, alkaline or cementitious materials | Yes, stainless suits this work | Carbon steel corrodes if not cleaned and oiled promptly |
| Scraping old paint, adhesive or wallpaper | No; use a stiff scraper | A taping-knife blade is not made for scraping and will be damaged by it |
| Shared-crew or damp-storage use | Yes, the stainless series is the right choice |
| Step | Action | Blade angle | Why it matters |
|---|---|---|---|
| 1 | Load the blade: lift compound from the pan onto the back of the blade in an even band across the working width | : | An uneven load produces an uneven pass; reload rather than fight a bad load |
| 2 | Grip: thumb round the handle, fingers spread along the blade back, so pressure is even across the whole edge | : | An even hand spreads load across the blade instead of into one corner |
| 3 | Lay a band of compound down the joint, then set the tape into it | Shallow | The tape has to sit in wet compound, not on top of a dried band |
| 4 | Bed the tape: press and pull along the joint so the surplus compound is squeezed out from under the tape | Shallow | Compound left trapped under the tape becomes a bubble or a lifted edge later |
| 5 | Level and feather with a wider knife once the bedding coat is dry, drawing the compound out until the edge thins to nothing | About 45° | Each coat must be wider than the last, or the joint reads as a band |
| 6 | Inside corners: apply compound to one face of the angle, tilt the blade to about 45° into the corner and pull along it in one direction | About 45° into the angle | Working one face at a time keeps the blade from dragging still-soft compound off the other face |
| 7 | Work with two knives: a small one to place compound, a wide one to spread it, rather than doing both jobs with one | ; | Using one knife to both apply and smooth leaves ridges |
| 8 | Let each coat dry, knock off ridges, then apply the next coat wider than the last | : | Ridges left behind telegraph through the following coats |
| 9 | Wash and dry the blade before it goes back in the bag | : | Dried compound in the blade-to-handle joint holds moisture and degrades the edge |
Do not hold the blade at 90° to the wall while spreading: at that angle the tool strikes compound off rather than laying it down.
Run a band of compound down the joint, lay the tape into it, then pull the 8 in blade along the joint under steady pressure so the surplus compound is squeezed out from beneath the tape. Wipe what comes out back into the pan rather than smearing it along the wall: anything left on the surface has to be sanded off later. This is a job for the narrow knife, and the same knife should not then be used to smooth the joint; that is the next width's job.
Fill fastener holes with the blade lightly loaded and strike off the surplus in a single pass. Filling screw heads is a standard job for this class of knife.
For patch repairs in occupied or remodel work, the 8 in blade is wide enough to feather a small repair into the surrounding surface but small enough to work around furniture, skirting and fittings. Feather the edges well past the patch: a repair that shows is nearly always an edge that was not thinned far enough.
Apply compound to one face of the angle, tilt the blade to about 45° into the corner and pull along it in one direction. Let that face set before working the second face, otherwise the blade drags the still-soft compound off the adjacent face.
Where the angle is tighter than 90°, a sloping ceiling meeting a wall, a dormer cheek, a raked soffit, a square-cornered blade cannot get into the crease. That is the case for a dedicated pointed corner knife.
Utility spaces are full of exposed ductwork, pipe penetrations and structural returns, and the blade that fits is the short one. The 8 in blade can be kept flat against a surface in places where 12 in and 14 in blades bridge across obstructions and skip. Combine with the stainless blade's tolerance of wet and cementitious material and the 316808 becomes the knife that stays in the bag for awkward work.
| Point | Guidance |
|---|---|
| Loading the blade | Lift compound onto the back of the blade in an even band across the working width; reload rather than dragging a thin or lopsided load along the joint |
| Grip and pressure | Thumb round the handle, fingers along the blade back, pressure even across the whole edge; keep the blade flat to the surface and slide it in one direction |
| Direction | Pull along the joint in one direction per pass rather than scrubbing back and forth |
| Two-knife working | A narrow knife to place compound and a wide knife to spread it, alternating between them |
| Between coats | Let each coat dry before the next; each coat wider than the one before |
| Compound types | Used with all-purpose pre-mixed, lightweight and setting-type (hot mud) compounds: a stainless blade does not restrict compound choice |
| Setting-type compound | Clean the blade before the compound sets, not after; setting compound cures chemically and will not soften off with water once it has gone off |
| Cementitious materials | Clean the blade promptly: dried material on the edge shows in the next pass |
Q1. What is the 316808 used for, and which size should I start with?
It is the 8 in knife in the series, used to bed paper or mesh tape into the first coat of joint compound and for screw holes and small patches. If you buy only one size, the 10 in (316810) is a general-purpose width; a finisher realistically needs at least two widths.
Q2. Stainless steel or blue carbon steel: which should I choose?
Stainless has high corrosion resistance and needs no oiling routine, so it suits shared tools and damp conditions. Blue carbon steel costs less, but it rusts unless it is wiped dry and given a thin coat of tool oil after use.
Q3. How do I look after the blade?
Wash the compound off before it dries, towel the blade dry, including around the handle joint, and hang it up. No oiling is needed. High corrosion resistance and low upkeep; chlorinated water, coastal air or prolonged soaking can still cause rust spots, so rinse with clean water and dry after use. Wipe the blade when you set it down; do not leave it soaking in the mud pan.
Q4. Can I use it to scrape old paint, adhesive or wallpaper?
No. The blade is made for spreading compound, and scraping damages the edge. Use a stiff scraper or a putty knife for that work.
Q5. How is 316808 different from the 310812 stainless taping knife?
Shape. The 3168xx blade is long and shallow, 8 to 14 in wide, made for running long plasterboard joints. The 3108xx blade is 120 mm deep and 120 to 220 mm wide with a T-handle, made for broad filling, skimming and stripping over a compact area.
| Item | Specification |
|---|---|
| Blade material | Stainless Steel |
| Blade width | 8, 10, 12, 14 in = 203–356 mm |
| Blade edge profile | Straight, square edge; rectangular blade with square corners |
| Blade back | Full-length reinforcing bar along the top edge of the blade |
| Corrosion behavior | No oiling routine; rinse with clean water and dry after use |
| Item | Specification |
|---|---|
| Handle type | Two-tone soft-grip |
| Color | Red body with black grip inlay |
| Hanging hole | Present, at the top of the handle |
| Handle position | Mounted on the blade back |
| Hammer end on handle butt | Not present on this series |
| Art. Nr | Size | Blade width (mm, 1 in = 25.4 mm) | Material | Handle |
|---|---|---|---|---|
| 316808 | 8 in | 203 mm | Stainless Steel | Two-tone soft-grip, hanging hole |
| 316810 | 10 in | 254 mm | Stainless Steel | Two-tone soft-grip, hanging hole |
| 316812 | 12 in | 305 mm | Stainless Steel | Two-tone soft-grip, hanging hole |
| 316814 | 14 in | 356 mm | Stainless Steel | Two-tone soft-grip, hanging hole |
Leading Tools makes three separate Taping Knife series. They are not three versions of the same tool, and the difference matters at the point of sale.
| Design aspect | Stainless, imperial (316808–316814) | Stainless, metric wide (310812–310822) | Blue Carbon Steel (316608–316614) |
|---|---|---|---|
| Blade format | Long, shallow rectangular blade, 8–14 in wide | Wide-but-deep blade, 120–220 mm wide × 120 mm deep | Long, shallow rectangular blade, 8–14 in wide |
| Blade edge | Straight, square | Straight, square | Straight, square |
| Handle | Soft-grip on the blade back, hanging hole | T-shaped soft-grip clamped across the blade top, hanging hole | Soft-grip on the blade back, hanging hole |
| Blade back | Full-length reinforcing bar | Plastic clamp bar with visible rivets | Full-length reinforcing bar |
| Corrosion resistance | High; no oiling routine | High; no oiling routine | Carbon steel; must be wiped dry and thinly oiled after use or it rusts |
| Primary job | Bedding, leveling and feathering drywall joints over long runs | Broad filling, skimming and stripping over a compact area | Bedding, leveling and feathering, for a finisher who maintains tools |
| Sizes | 8 / 10 / 12 / 14 in | 120 / 140 / 160 / 180 / 200 / 220 mm (all × 120 mm) | 8 / 10 / 12 / 14 in |
Choose the 316808 when:
Consider a different width when:
| Stage of the job | Choose | Why |
|---|---|---|
| Bedding paper or mesh tape | 316808 (8 in) | The narrowest blade concentrates pressure on the tape and squeezes the compound out from under it |
| Second / leveling coat | 316810 (10 in) or 316812 (12 in) | Each coat has to be wider than the one before it or the joint reads as a band |
| Third / feather coat | 316812 (12 in) or 316814 (14 in) | The widest blade thins the edge out over the longest run |
| Large commercial ceilings and long walls | 316814 (14 in) | Fewer passes per joint; throughput dominates over fine control |
| Fastener holes, patches, returns, confined spaces | 316808 (8 in) | Short blade stays flat where a long one cannot |
| Screw-head filling on a board face | 316808 (8 in) | Filling screw heads is a standard job for this class of knife |
All three sit in the same Leading Tools product family, so the buyer is choosing between them, not just choosing a size.
Choose the stainless imperial series (316808–316814, this product) when:
Choose the stainless metric wide series (310812–310822) when:
Choose the blue carbon steel series (316608–316614) when:
The blade is rectangular with a straight working edge and square corners, which is the standard drywall taping-knife profile, built for maximum blade contact against a flat board face while spreading, leveling and feathering. That is the great majority of drywall finishing work.
A square-edged blade does have a known limitation: it cannot reach cleanly into an inside angle tighter than 90°, such as the junction of a sloping ceiling and a wall, and some finishers grind the corners off an old knife to cope. Inside corners at or near 90° are worked with this blade tilted into the angle instead; see Scenario C: Inside corners at 90° under How to Use below.
| Art. Nr | Size | Blade width (mm) | Material | Handle |
|---|---|---|---|---|
| 316808 | 8" | 203 mm | Stainless Steel | Two-tone soft-grip with hanging hole |
| 316810 | 10" | 254 mm | Stainless Steel | Two-tone soft-grip with hanging hole |
| 316812 | 12" | 305 mm | Stainless Steel | Two-tone soft-grip with hanging hole |
| 316814 | 14" | 356 mm | Stainless Steel | Two-tone soft-grip with hanging hole |
Sizes are specified in inches; millimeter figures are converted at 1 in = 25.4 mm and rounded to the nearest millimeter. All four share the same blade construction, reinforcing bar and handle.
| Series | Material | Art. Nr and sizes | Handle |
|---|---|---|---|
| 310812–310822 | Stainless Steel | 310812 120 mm × 120 mm, 310814 140 mm × 120 mm, 310816 160 mm × 120 mm, 310818 180 mm × 120 mm, 310820 200 mm × 120 mm, 310822 220 mm × 120 mm | T-shaped two-tone soft-grip with hanging hole |
| 316608–316614 | Blue Carbon Steel | 316608 8", 316610 10", 316612 12", 316614 14" | Two-tone soft-grip with hanging hole |
| Task | 316808 (8") | 316810 (10") | 316812 (12") | 316814 (14") |
|---|---|---|---|---|
| Bedding paper or mesh tape | Primary | Workable | Too wide | Too wide |
| Second / leveling coat | Workable | Primary | Primary | Workable |
| Final feather coat | Too narrow | Secondary | Primary | Primary |
| Fastener holes and small patches | Primary | Workable | Oversized | Oversized |
| Medium patches | Workable | Primary | Workable | Oversized |
| Large-area wall and ceiling coverage | Too narrow | Secondary | Primary | Primary |
| Window and door returns, cupboards, stairwells | Primary | Workable | Awkward | Awkward |
| Inside corners at 90°, blade tilted into the angle | Good | Good | Limited by blade length | Limited by blade length |
| Inside angles tighter than 90° | Poor, square corners cannot reach in | Poor | Poor | Poor |
Stainless steel does not need an oil film for storage. High corrosion resistance and low upkeep; chlorinated water, coastal air or prolonged soaking can still cause rust spots, so rinse with clean water and dry after use. The whole routine is: wash the compound off before it dries, dry the blade, put it away.
Carbon steel, by contrast, needs oiling. A taping knife should be cleaned immediately after use so compound does not dry on the blade.
| Situation | Recommendation | Reason |
|---|---|---|
| Between coats during a shift | Wipe the blade; do not leave it standing in the pan all day | Compound drying on the blade has to be scraped off later, and long soaking can still cause rust spots |
| Overnight | Wash, dry, hang up | Simple routine; no oil film required, unlike carbon steel |
| Tool bag or van | Edge protected, not loose among other steel tools | Protects the working edge from nicks |
| Long-term storage | Clean, dry, hang or lay flat and covered | Keeps the edge straight and the surface clean |
Stainless has high corrosion resistance and low upkeep, but chlorinated water, coastal air or prolonged soaking can still cause rust spots, as can compound left to dry on the blade for a long period or carbon-steel particles from grinding nearby. Remove light surface marks with a fine abrasive, rinse with clean water and dry. If a customer reports serious rusting on a stainless blade, the cause is worth investigating rather than assuming a material fault.
Treat the working edge with the same care as any sharp hand tool: keep fingers behind the edge when cleaning, do not use the blade as a pry bar or a chisel, and keep it out of reach of children.
Product name: Taping Knife — Stainless Steel
This page covers four Art. Nrs: 316808 (8 in), 316810 (10 in), 316812 (12 in), 316814 (14 in): all Stainless Steel, all with the same reinforced blade back and two-tone soft-grip handle with hanging hole
The 316808 is the 8 in blade in Leading Tools' imperial-sized stainless steel taping knife series. A taping knife is the tool a drywall finisher uses to lay joint compound over plasterboard joints, to bed paper or mesh tape into that first coat, and then to level and feather each following coat until the joint no longer reads through the board face.
The blade on this series is straight and square-edged. The blade is plain rectangular stainless with a straight working edge and square corners and a full-length reinforcing bar along its top edge, and a red-and-black soft-grip handle is mounted on the blade back.
Where the 8 in sits in the range. Drywall joints are built up over three passes, each wider than the last, so the widths in this series are designed to be owned together rather than substituted for one another.
The standard sequence puts the narrowest knife on the bedding coat, the middle widths on the leveling coat, and the widest on the final feather coat, and one knife should not be used both to apply and to smooth. In that sequence the 316808 is the bedding and detail knife: narrow enough to concentrate hand pressure on the tape, short enough to stay flat in a cupboard, a window return, or a stairwell, and small enough for fastener holes and patch repairs.
Buyer profile. The stainless series suits crews that share tools, work in damp or humid conditions, run cementitious as well as gypsum materials, or simply cannot be relied on to wash, dry and oil a blade at the end of every shift. A stainless blade tolerates neglect, so it suits shared tools. For a carbon steel blade, see the blue carbon steel series in the Leading Tools range (316608–316614); it must be wiped dry and given a thin coat of tool oil after use, otherwise it rusts.
On a building site, wipe the blade when you set it down and do not leave it soaking in the mud pan; rinse it with clean water and dry it at the end of the day, and it goes back in the bag without an oil film.
High corrosion resistance and low upkeep; chlorinated water, coastal air or prolonged soaking can still cause rust spots, so rinse with clean water and dry after use. Stainless is the long-service choice, and it is the material to recommend when the tool will not get an oiling routine.
The choice between the two materials is about upkeep. Stainless needs no oiling routine. A carbon steel blade costs less, but it must be wiped dry and given a thin coat of tool oil after use, otherwise it rusts. Leading Tools offers both materials in the same four widths, so the customer can choose.
The reinforcement running the full length of the blade's top edge is what stops an 8 in blade from twisting when the operator loads one end more heavily than the other. Without it, the pull wanders, the compound thickness varies across the pass, and the finisher pays for it in sanding. The 316808 uses the same full-length reinforcing bar.
Use the narrowest knife to bed tape, and progressively wider knives for each following coat, and do not try to apply and smooth with the same blade. At 8 in the blade concentrates hand pressure onto the tape, so the compound underneath is genuinely squeezed out rather than merely smeared over, and it stays controllable in the places a 12 in or 14 in blade cannot be kept flat: window and door returns, cupboards, stairwells, behind pipework, and around ductwork in plant rooms.
Because 316808, 316810, 316812 and 316814 share blade material, blade construction and handle, a contractor can run the whole three-coat sequence without relearning the pressure for every knife.
The handle is a two-tone soft-grip with a hanging hole. This series has no metal hammer end on the handle butt.
| Situation | Use the 316808? | Notes |
|---|---|---|
| Bedding paper or mesh tape into the first coat | Yes, this is its primary job | The narrowest knife in the sequence does the bedding |
| Second coat over a taped joint | Small areas and patches only | The second coat should be wider than the first; prefer 316810 or 316812 |
| Final feather coat on a full wall | No; use 316812 or 316814 | The last coat must be the widest |
| Filling and striking off screw and nail heads | Yes | A standard job for this class of knife |
| Inside corners at about 90° | Yes | Blade tilted into the angle, pulled along the corner |
| Inside angles tighter than 90° (sloping ceiling to wall) | No; a square-cornered blade cannot reach in | Use a dedicated pointed corner knife |
| External corners over corner bead | Yes for the first coat | Wider blades for the following coats |
| Working with wet, alkaline or cementitious materials | Yes, stainless suits this work | Carbon steel corrodes if not cleaned and oiled promptly |
| Scraping old paint, adhesive or wallpaper | No; use a stiff scraper | A taping-knife blade is not made for scraping and will be damaged by it |
| Shared-crew or damp-storage use | Yes, the stainless series is the right choice |
| Step | Action | Blade angle | Why it matters |
|---|---|---|---|
| 1 | Load the blade: lift compound from the pan onto the back of the blade in an even band across the working width | : | An uneven load produces an uneven pass; reload rather than fight a bad load |
| 2 | Grip: thumb round the handle, fingers spread along the blade back, so pressure is even across the whole edge | : | An even hand spreads load across the blade instead of into one corner |
| 3 | Lay a band of compound down the joint, then set the tape into it | Shallow | The tape has to sit in wet compound, not on top of a dried band |
| 4 | Bed the tape: press and pull along the joint so the surplus compound is squeezed out from under the tape | Shallow | Compound left trapped under the tape becomes a bubble or a lifted edge later |
| 5 | Level and feather with a wider knife once the bedding coat is dry, drawing the compound out until the edge thins to nothing | About 45° | Each coat must be wider than the last, or the joint reads as a band |
| 6 | Inside corners: apply compound to one face of the angle, tilt the blade to about 45° into the corner and pull along it in one direction | About 45° into the angle | Working one face at a time keeps the blade from dragging still-soft compound off the other face |
| 7 | Work with two knives: a small one to place compound, a wide one to spread it, rather than doing both jobs with one | ; | Using one knife to both apply and smooth leaves ridges |
| 8 | Let each coat dry, knock off ridges, then apply the next coat wider than the last | : | Ridges left behind telegraph through the following coats |
| 9 | Wash and dry the blade before it goes back in the bag | : | Dried compound in the blade-to-handle joint holds moisture and degrades the edge |
Do not hold the blade at 90° to the wall while spreading: at that angle the tool strikes compound off rather than laying it down.
Run a band of compound down the joint, lay the tape into it, then pull the 8 in blade along the joint under steady pressure so the surplus compound is squeezed out from beneath the tape. Wipe what comes out back into the pan rather than smearing it along the wall: anything left on the surface has to be sanded off later. This is a job for the narrow knife, and the same knife should not then be used to smooth the joint; that is the next width's job.
Fill fastener holes with the blade lightly loaded and strike off the surplus in a single pass. Filling screw heads is a standard job for this class of knife.
For patch repairs in occupied or remodel work, the 8 in blade is wide enough to feather a small repair into the surrounding surface but small enough to work around furniture, skirting and fittings. Feather the edges well past the patch: a repair that shows is nearly always an edge that was not thinned far enough.
Apply compound to one face of the angle, tilt the blade to about 45° into the corner and pull along it in one direction. Let that face set before working the second face, otherwise the blade drags the still-soft compound off the adjacent face.
Where the angle is tighter than 90°, a sloping ceiling meeting a wall, a dormer cheek, a raked soffit, a square-cornered blade cannot get into the crease. That is the case for a dedicated pointed corner knife.
Utility spaces are full of exposed ductwork, pipe penetrations and structural returns, and the blade that fits is the short one. The 8 in blade can be kept flat against a surface in places where 12 in and 14 in blades bridge across obstructions and skip. Combine with the stainless blade's tolerance of wet and cementitious material and the 316808 becomes the knife that stays in the bag for awkward work.
| Point | Guidance |
|---|---|
| Loading the blade | Lift compound onto the back of the blade in an even band across the working width; reload rather than dragging a thin or lopsided load along the joint |
| Grip and pressure | Thumb round the handle, fingers along the blade back, pressure even across the whole edge; keep the blade flat to the surface and slide it in one direction |
| Direction | Pull along the joint in one direction per pass rather than scrubbing back and forth |
| Two-knife working | A narrow knife to place compound and a wide knife to spread it, alternating between them |
| Between coats | Let each coat dry before the next; each coat wider than the one before |
| Compound types | Used with all-purpose pre-mixed, lightweight and setting-type (hot mud) compounds: a stainless blade does not restrict compound choice |
| Setting-type compound | Clean the blade before the compound sets, not after; setting compound cures chemically and will not soften off with water once it has gone off |
| Cementitious materials | Clean the blade promptly: dried material on the edge shows in the next pass |
Q1. What is the 316808 used for, and which size should I start with?
It is the 8 in knife in the series, used to bed paper or mesh tape into the first coat of joint compound and for screw holes and small patches. If you buy only one size, the 10 in (316810) is a general-purpose width; a finisher realistically needs at least two widths.
Q2. Stainless steel or blue carbon steel: which should I choose?
Stainless has high corrosion resistance and needs no oiling routine, so it suits shared tools and damp conditions. Blue carbon steel costs less, but it rusts unless it is wiped dry and given a thin coat of tool oil after use.
Q3. How do I look after the blade?
Wash the compound off before it dries, towel the blade dry, including around the handle joint, and hang it up. No oiling is needed. High corrosion resistance and low upkeep; chlorinated water, coastal air or prolonged soaking can still cause rust spots, so rinse with clean water and dry after use. Wipe the blade when you set it down; do not leave it soaking in the mud pan.
Q4. Can I use it to scrape old paint, adhesive or wallpaper?
No. The blade is made for spreading compound, and scraping damages the edge. Use a stiff scraper or a putty knife for that work.
Q5. How is 316808 different from the 310812 stainless taping knife?
Shape. The 3168xx blade is long and shallow, 8 to 14 in wide, made for running long plasterboard joints. The 3108xx blade is 120 mm deep and 120 to 220 mm wide with a T-handle, made for broad filling, skimming and stripping over a compact area.
| Item | Specification |
|---|---|
| Blade material | Stainless Steel |
| Blade width | 8, 10, 12, 14 in = 203–356 mm |
| Blade edge profile | Straight, square edge; rectangular blade with square corners |
| Blade back | Full-length reinforcing bar along the top edge of the blade |
| Corrosion behavior | No oiling routine; rinse with clean water and dry after use |
| Item | Specification |
|---|---|
| Handle type | Two-tone soft-grip |
| Color | Red body with black grip inlay |
| Hanging hole | Present, at the top of the handle |
| Handle position | Mounted on the blade back |
| Hammer end on handle butt | Not present on this series |
| Art. Nr | Size | Blade width (mm, 1 in = 25.4 mm) | Material | Handle |
|---|---|---|---|---|
| 316808 | 8 in | 203 mm | Stainless Steel | Two-tone soft-grip, hanging hole |
| 316810 | 10 in | 254 mm | Stainless Steel | Two-tone soft-grip, hanging hole |
| 316812 | 12 in | 305 mm | Stainless Steel | Two-tone soft-grip, hanging hole |
| 316814 | 14 in | 356 mm | Stainless Steel | Two-tone soft-grip, hanging hole |
Leading Tools makes three separate Taping Knife series. They are not three versions of the same tool, and the difference matters at the point of sale.
| Design aspect | Stainless, imperial (316808–316814) | Stainless, metric wide (310812–310822) | Blue Carbon Steel (316608–316614) |
|---|---|---|---|
| Blade format | Long, shallow rectangular blade, 8–14 in wide | Wide-but-deep blade, 120–220 mm wide × 120 mm deep | Long, shallow rectangular blade, 8–14 in wide |
| Blade edge | Straight, square | Straight, square | Straight, square |
| Handle | Soft-grip on the blade back, hanging hole | T-shaped soft-grip clamped across the blade top, hanging hole | Soft-grip on the blade back, hanging hole |
| Blade back | Full-length reinforcing bar | Plastic clamp bar with visible rivets | Full-length reinforcing bar |
| Corrosion resistance | High; no oiling routine | High; no oiling routine | Carbon steel; must be wiped dry and thinly oiled after use or it rusts |
| Primary job | Bedding, leveling and feathering drywall joints over long runs | Broad filling, skimming and stripping over a compact area | Bedding, leveling and feathering, for a finisher who maintains tools |
| Sizes | 8 / 10 / 12 / 14 in | 120 / 140 / 160 / 180 / 200 / 220 mm (all × 120 mm) | 8 / 10 / 12 / 14 in |
Choose the 316808 when:
Consider a different width when:
| Stage of the job | Choose | Why |
|---|---|---|
| Bedding paper or mesh tape | 316808 (8 in) | The narrowest blade concentrates pressure on the tape and squeezes the compound out from under it |
| Second / leveling coat | 316810 (10 in) or 316812 (12 in) | Each coat has to be wider than the one before it or the joint reads as a band |
| Third / feather coat | 316812 (12 in) or 316814 (14 in) | The widest blade thins the edge out over the longest run |
| Large commercial ceilings and long walls | 316814 (14 in) | Fewer passes per joint; throughput dominates over fine control |
| Fastener holes, patches, returns, confined spaces | 316808 (8 in) | Short blade stays flat where a long one cannot |
| Screw-head filling on a board face | 316808 (8 in) | Filling screw heads is a standard job for this class of knife |
All three sit in the same Leading Tools product family, so the buyer is choosing between them, not just choosing a size.
Choose the stainless imperial series (316808–316814, this product) when:
Choose the stainless metric wide series (310812–310822) when:
Choose the blue carbon steel series (316608–316614) when:
The blade is rectangular with a straight working edge and square corners, which is the standard drywall taping-knife profile, built for maximum blade contact against a flat board face while spreading, leveling and feathering. That is the great majority of drywall finishing work.
A square-edged blade does have a known limitation: it cannot reach cleanly into an inside angle tighter than 90°, such as the junction of a sloping ceiling and a wall, and some finishers grind the corners off an old knife to cope. Inside corners at or near 90° are worked with this blade tilted into the angle instead; see Scenario C: Inside corners at 90° under How to Use below.
| Art. Nr | Size | Blade width (mm) | Material | Handle |
|---|---|---|---|---|
| 316808 | 8" | 203 mm | Stainless Steel | Two-tone soft-grip with hanging hole |
| 316810 | 10" | 254 mm | Stainless Steel | Two-tone soft-grip with hanging hole |
| 316812 | 12" | 305 mm | Stainless Steel | Two-tone soft-grip with hanging hole |
| 316814 | 14" | 356 mm | Stainless Steel | Two-tone soft-grip with hanging hole |
Sizes are specified in inches; millimeter figures are converted at 1 in = 25.4 mm and rounded to the nearest millimeter. All four share the same blade construction, reinforcing bar and handle.
| Series | Material | Art. Nr and sizes | Handle |
|---|---|---|---|
| 310812–310822 | Stainless Steel | 310812 120 mm × 120 mm, 310814 140 mm × 120 mm, 310816 160 mm × 120 mm, 310818 180 mm × 120 mm, 310820 200 mm × 120 mm, 310822 220 mm × 120 mm | T-shaped two-tone soft-grip with hanging hole |
| 316608–316614 | Blue Carbon Steel | 316608 8", 316610 10", 316612 12", 316614 14" | Two-tone soft-grip with hanging hole |
| Task | 316808 (8") | 316810 (10") | 316812 (12") | 316814 (14") |
|---|---|---|---|---|
| Bedding paper or mesh tape | Primary | Workable | Too wide | Too wide |
| Second / leveling coat | Workable | Primary | Primary | Workable |
| Final feather coat | Too narrow | Secondary | Primary | Primary |
| Fastener holes and small patches | Primary | Workable | Oversized | Oversized |
| Medium patches | Workable | Primary | Workable | Oversized |
| Large-area wall and ceiling coverage | Too narrow | Secondary | Primary | Primary |
| Window and door returns, cupboards, stairwells | Primary | Workable | Awkward | Awkward |
| Inside corners at 90°, blade tilted into the angle | Good | Good | Limited by blade length | Limited by blade length |
| Inside angles tighter than 90° | Poor, square corners cannot reach in | Poor | Poor | Poor |
Stainless steel does not need an oil film for storage. High corrosion resistance and low upkeep; chlorinated water, coastal air or prolonged soaking can still cause rust spots, so rinse with clean water and dry after use. The whole routine is: wash the compound off before it dries, dry the blade, put it away.
Carbon steel, by contrast, needs oiling. A taping knife should be cleaned immediately after use so compound does not dry on the blade.
| Situation | Recommendation | Reason |
|---|---|---|
| Between coats during a shift | Wipe the blade; do not leave it standing in the pan all day | Compound drying on the blade has to be scraped off later, and long soaking can still cause rust spots |
| Overnight | Wash, dry, hang up | Simple routine; no oil film required, unlike carbon steel |
| Tool bag or van | Edge protected, not loose among other steel tools | Protects the working edge from nicks |
| Long-term storage | Clean, dry, hang or lay flat and covered | Keeps the edge straight and the surface clean |
Stainless has high corrosion resistance and low upkeep, but chlorinated water, coastal air or prolonged soaking can still cause rust spots, as can compound left to dry on the blade for a long period or carbon-steel particles from grinding nearby. Remove light surface marks with a fine abrasive, rinse with clean water and dry. If a customer reports serious rusting on a stainless blade, the cause is worth investigating rather than assuming a material fault.
Treat the working edge with the same care as any sharp hand tool: keep fingers behind the edge when cleaning, do not use the blade as a pry bar or a chisel, and keep it out of reach of children.

In compliance with EU personal data protection laws, we are committed to protecting and providing you with control over your personal data. By clicking "Accept All", you allow us to place cookies to enhance your experience on this site, help us analyze site performance and usage, and enable us to deliver relevant marketing content. You can manage your cookie settings below. By clicking "Agree" you agree to the current settings. For more information, please visit the Privacy Statement.
This website uses cookies
In compliance with EU personal data protection laws, we are committed to protecting your personal data and providing you with control over it. By clicking "Agree", you allow us to place cookies to improve your experience on this site, help us analyze site performance and usage, and allow us to deliver relevant marketing content.
By clicking "Only necessary" you allow us to place only necessary cookies. The website cannot function without these cookies and you cannot switch them off on your system. These cookies are typically set only in response to an action you perform (i.e. a service request), such as setting privacy preferences, logging in, or filling in a form. You can set your browser to block or prompt you for these cookies, but this may prevent some site features from working.



