
Copyright 2026 © Leading Tools Industrial Co., Ltd.
All Rights Reserved. Website Design by Awakening Design
CATALOG TYPE
Product Categories
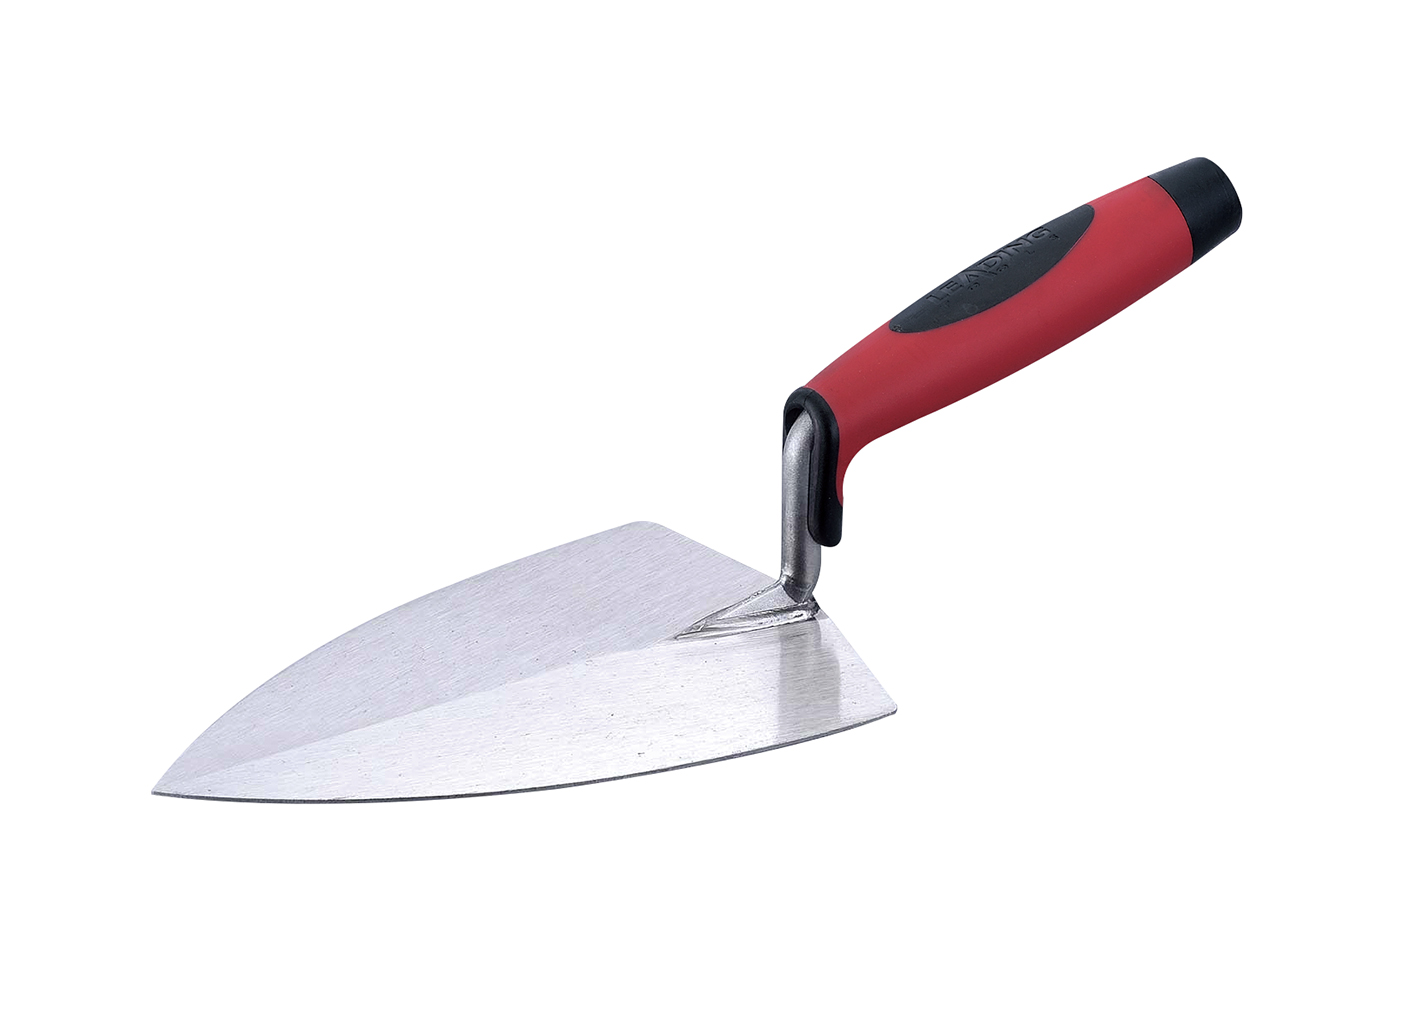
Tile Setter's Trowel — CO2 Welded Carbon Steel
Product Description
| Item | Detail |
|---|---|
| Product name | Tile Setter's Trowel |
| Product line | CO2 Welding Carbon Steel |
| Art. Nr | 165721 (5"), 166721 (6"), 167721 (7") |
| Product family | Brick Trowel family |
| Blade pattern | Tile setter's pattern: triangular blade, pointed toe, rounded shoulders |
| Blade material | Carbon steel |
| Construction | CO2 welding (blade and shank joined, not one-piece forged) |
| Handle | Two-tone soft-grip handle on a welded shank |
| Sizes offered | 3 sizes only: 5", 6", 7" |
The Tile Setter's Trowel is a small pointed masonry trowel used mainly for back-buttering: spreading a coat of thin-set or mortar directly onto the back face of a tile or stone unit before it is pressed into the bed. It sits in the Brick Trowel family of the Leading Tools range because it shares the pointed-toe masonry blade form, but its working task is tile setting, not bricklaying: the blade is short (5"–7") and narrow, sized to a tile back rather than to a brick bed.
Correct blade size for the tile back, not for a brick bed. A brick trowel carries enough mortar for a course of brick; used on a tile it over-applies and pushes adhesive out at the tile edges, which then has to be cleaned out of the joints before grouting. At 5"–7" the blade of this trowel matches the area of a tile back so a single loaded stroke does not deposit more material than the joint can absorb.
Pointed toe gives a defined start and stop. Back-buttering is judged on coverage, and the failure mode is a thin or empty patch near a corner. A pointed toe lets the operator drive material into the corner of the tile back and lift out cleanly, instead of stopping short as a square-nosed blade does. This is why the triangular pointed trowel suits fine adhesive application and corner work.
Carbon steel blade. The carbon steel blade can keep a thin, springy working edge. For back-buttering, where the blade is repeatedly pressed flat against the tile back, that spring helps the operator feel the thickness of the adhesive coat through the tool.
CO2 welded construction. The blade and shank are joined by CO2 welding rather than forged in one piece. Back-buttering is a spreading and pressing motion rather than a prying or striking one, so a welded shank suits the load.
A standard tile-setting pattern. This is not a house-only shape. A distributor carrying 165721/166721/167721 is offering a familiar form.
Three sizes in one product line. One construction and one handle. The three sizes can be matched to the tile back, from mosaic and subway tile to large-format tile; choose by the area of the tile back.
| Situation | Use this trowel? | Why |
|---|---|---|
| Back-buttering a tile or stone unit before setting | Yes, this is the primary use | Back-buttering means applying a thin coat of adhesive to the tile back so it merges with the combed bed and fills voids |
| Large-format tile (by common usage, long edge 15" and over) | Yes, recommended | TCNA recommends back-buttering large-format tile; it is a common way to reach the ANSI A108.5 contact requirement |
| Natural stone with a sawn or irregular back | Yes | The back-applied coat fills the irregular back face so the stone is evenly supported |
| Wet areas: shower walls, tub surrounds, exterior | Yes | Wet-area installations carry a higher coverage requirement than dry interior areas |
| Gauged porcelain panels (3–6 mm) | Yes | Thin panels do not tolerate uneven adhesive; the back coat is combed in the same direction as the bed |
| Combing the adhesive bed on the substrate | No; use a notched trowel | Notching the bed is the notched trowel's job; the two tools are complementary |
| Laying brick or block | No; use a brick trowel | A bricklaying blade is 9"–12" and carries far more mortar |
| Prying, chiseling, scraping hardened material | No | Not a prying, chiseling or scraping tool; see Care & Maintenance below |
| Step | Action | Note |
|---|---|---|
| 1 | Prepare and comb the adhesive bed on the substrate with the correct notched trowel | Ridge height is set by the notch size, which is chosen from tile size |
| 2 | Lay the tile face-down on a clean board, or hold it in the free hand | Keep the face clean: adhesive on the face is much harder to remove after it sets |
| 3 | Scoop a working amount of adhesive onto the blade | Load the blade, not the toe |
| 4 | Press the adhesive flat across the tile back with the flat of the blade, working from a corner outward with the pointed toe leading | The point is to leave a thin, even, gap-free skim over the whole back |
| 5 | Go over the back a second time to close any thin spots | Press the trowel down to spread the mortar flat over the entire tile back |
| 6 | Optionally comb the back coat with the notched trowel, running the ridges in the same direction as the ridges on the bed | Matching ridge directions let air escape along the furrows and increase contact area |
| 7 | Set the tile into the bed and press it home, then check level and alignment | Adjust before the adhesive begins to set |
| 8 | Clean the trowel before the adhesive stiffens | See Care & Maintenance below |
The two coats, combed bed plus back-buttered tile, merge under pressure and fill the voids that a single combed bed alone leaves between the ridges. This is the reason back-buttering exists.
By common usage, large-format tile means a long edge of 15" or more. TCNA recommends back-buttering large-format tile. ANSI A108.5 requires adhesive contact of at least 80% in dry interior areas and at least 95% in wet areas and exterior work, and back-buttering is a common way to reach it. Confirm the requirement against the adhesive manufacturer's data sheet and local codes.
Large tiles are also the case where getting it wrong is hardest to detect and most expensive to fix: a large tile has less ability to bridge substrate irregularity, and a void behind it announces itself later as a hollow sound and eventually a crack. The 7" (167721) is the size to reach for here: a longer blade covers a large tile back in fewer passes, which is both faster and more consistent.
The notched trowel selection also changes with the tile; follow the adhesive manufacturer's recommendation.
Marble, granite, limestone and travertine tiles often have sawn, raked or naturally uneven back faces. Back-buttering with this trowel fills those irregularities so the stone sits on a continuous bed of adhesive instead of on high spots, which is what reduces the risk of localized stress cracking. Because stone backs are not flat, the second pass (step 5 of Basic Technique above) matters more here than on a smooth porcelain back.
Apply adhesive to both the substrate and the tile back, then set the tile before either coat skins over. Because both surfaces are buttered, the bond is more reliable.
Gauged porcelain panels at 3–6 mm thickness are the least tolerant substrate for uneven adhesive: they are too thin to bridge anything. Standard practice combs the adhesive in one direction on the substrate and back-butters in the same direction, so the two ridge sets align and collapse into a solid bed. Follow the adhesive manufacturer’s data sheet for notch size and application. The 7" blade (167721) is the practical choice for panel work: a longer blade covers more panel area in one stroke, which reduces the number of stroke joins where a thin spot can occur.
| Tool | Role |
|---|---|
| Notched trowel | Comb adhesive on the substrate to a consistent ridge height |
| Tile Setter's Trowel (165721 / 166721 / 167721) | Back-butter the tile back; ensure full, void-free coverage |
| Margin trowel | Mix and cut adhesive, work in tight spaces, clean joints |
| Grout float | Pack grout into the joints |
| Tile cutter / wet saw | Cut tiles to fit |
Q1. Is this a brick trowel or a tile trowel, and can I use it instead of a notched trowel?
Both descriptions are used.
Leading Tools groups it in the Brick Trowel family because it shares the pointed masonry blade form, but the product name is Tile Setter's Trowel and its working task is back-buttering tile (spreading a flat coat of adhesive on the tile back). It does not replace a notched trowel: the notched trowel combs ridges into the adhesive on the substrate, while this trowel spreads a flat coat on the tile back, so they are two steps of one system.
Q2. Do I have to back-butter, or is combing the bed enough?
For small tile in dry interior areas, a properly combed bed may be sufficient. For large-format tile (by common usage, a long edge of 15" and over), TCNA recommends back-buttering, and the ANSI A108.5 contact requirement is higher in wet and exterior areas (95%) than in dry interior areas (80%).
Q3. Which size should I buy first?
Choose by tile size: 5" (165721) for mosaic, subway and cut-piece work; 6" (166721) for general mid-size work; 7" (167721) for large-format tile and stone, since it covers a large tile back in fewer passes. If too much adhesive squeezes out at the tile edges, apply a thinner skim or move down to the 6" or 5".
Q4. How do I clean it and keep it from rusting?
Clean and oil the blade at the end of every working day; a carbon steel blade rusts if it is stored wet or without oil. If mortar has hardened on the blade, soak it in water, scrape it with a plastic or wooden scraper rather than a steel wire brush, then dry it completely and re-oil it. This model is carbon steel only; for a stainless steel version, contact Leading Tools sales.
Q5. What should I avoid doing with it?
Do not use it for prying or chiseling. If the handle is loose or wobbling, stop using the tool and refit it properly before further use; replace the tool if the shank or handle socket is damaged.
| Property | Detail |
|---|---|
| Blade pattern | Tile setter's, triangular, pointed toe, rounded shoulders, widening to the heel |
| Blade material | Carbon steel |
| Blade size | 5" / 6" / 7" nominal (127 / 152 / 178 mm at 1" = 25.4 mm) |
| Surface | Ground and polished bright blade face |
Only the blade length is quoted as the nominal size. The blade is longer than it is wide, so a single stroke sweeps a band down the tile back rather than dabbing at it; this is the geometric reason the pattern is used for back-buttering rather than a square finishing blade.
| Property | Detail |
|---|---|
| Handle type | Two-tone soft-grip, closed end |
| Grip code | BF21; other handle options on request: contact Leading Tools sales |
| Mounting | Handle seated on the welded shank |
Soft-grip handles are standard on this pattern and are valued for hold and comfort.
The product line designation for this trowel is "CO2 Welding Carbon Steel." CO2 welding joins the shank to the blade at the heel, so the finished tool is an assembly of two parts rather than one piece of steel.
What that means in practice:
| ART. Nr | Size | Material | Construction | Handle |
|---|---|---|---|---|
| 165721 | 5" | Carbon steel | CO2 welding | Two-tone soft grip |
| 166721 | 6" | Carbon steel | CO2 welding | Two-tone soft grip |
| 167721 | 7" | Carbon steel | CO2 welding | Two-tone soft grip |
All three art numbers share one blade pattern, one material and one construction; only the size changes. The Tile Setter's Trowel is listed here in carbon steel only; for other blade materials, contact Leading Tools sales.
| Size | ART. Nr | Choose it when |
|---|---|---|
| 5" | 165721 | Mosaic, subway and small-format tile; cut pieces; work where the tile back is small and control matters more than coverage per stroke |
| 6" | 166721 | The general-purpose size; suits mid-size wall and floor tile |
| 7" | 167721 | Large-format tile and stone. |
Choose the size by the area of the tile back; the 5" is the detail and cut-piece size.
The two tools do different jobs.
| Tool | Job | Where the material goes |
|---|---|---|
| Notched trowel | Comb the adhesive on the substrate to a consistent ridge height | Onto the wall or floor |
| Tile Setter's Trowel (this product) | Back-butter: load and flatten adhesive on the tile back | Onto the tile |
The two are complementary steps of one system, not substitutes. Using this trowel to comb a bed would not produce ridges; using a notched trowel to back-butter produces ridged, uneven back coverage.
Choose the notch of the notched trowel according to the tile size and the adhesive manufacturer's recommendation (see the Notched Trowel series).
Both are pointed masonry blades, which is why this product sits in the Brick Trowel chapter, but they are sized and used for different work.
Brick trowel patterns are distinguished by the heel shape: the London pattern has a rounded heel that helps push mortar forward and press it into narrow joints, while the Philadelphia pattern has a square heel that carries more mortar and is favored for block work. A tile setter's blade is much shorter than either: a bricklaying trowel runs 9"–12" while this one runs 5"–7", and is not intended to carry a brick's worth of mortar.
This product is carbon steel. The carbon steel blade costs less, and it must be wiped dry and given a thin coat of tool oil after use, or it will rust (see Care & Maintenance below).
Stainless steel has high corrosion resistance and a low maintenance burden; chlorinated water, coastal air or prolonged soaking can still cause rust spots, so rinse with clean water and dry after use. This model is listed in carbon steel only; for a stainless steel version, contact Leading Tools sales.
Complete art-number reference for the Tile Setter's Trowel, CO2 Welding Carbon Steel. All three art numbers in the line are listed.
| ART. Nr | Size (Imperial) | Size (Metric, converted) | Blade pattern | Material | Construction | Handle |
|---|---|---|---|---|---|---|
| 165721 | 5" | 127 mm | Tile setter's, triangular, pointed toe | Carbon steel | CO2 welding | Two-tone soft grip |
| 166721 | 6" | 152 mm | Tile setter's, triangular, pointed toe | Carbon steel | CO2 welding | Two-tone soft grip |
| 167721 | 7" | 178 mm | Tile setter's, triangular, pointed toe | Carbon steel | CO2 welding | Two-tone soft grip |
Metric values are converted at 1" = 25.4 mm and rounded; the nominal sizes for this product are given in imperial only.
Care for a carbon steel trowel is simple: wipe the tool clean at the end of the day and oil it. A water-displacing spray, machine oil or mineral oil are all adequate; wrapping the tool in cloth or newspaper for storage is the usual practice. A carbon steel blade rusts if it is put away wet or left without oil.
| Item | Detail |
|---|---|
| Product name | Tile Setter's Trowel |
| Product line | CO2 Welding Carbon Steel |
| Art. Nr | 165721 (5"), 166721 (6"), 167721 (7") |
| Product family | Brick Trowel family |
| Blade pattern | Tile setter's pattern: triangular blade, pointed toe, rounded shoulders |
| Blade material | Carbon steel |
| Construction | CO2 welding (blade and shank joined, not one-piece forged) |
| Handle | Two-tone soft-grip handle on a welded shank |
| Sizes offered | 3 sizes only: 5", 6", 7" |
The Tile Setter's Trowel is a small pointed masonry trowel used mainly for back-buttering: spreading a coat of thin-set or mortar directly onto the back face of a tile or stone unit before it is pressed into the bed. It sits in the Brick Trowel family of the Leading Tools range because it shares the pointed-toe masonry blade form, but its working task is tile setting, not bricklaying: the blade is short (5"–7") and narrow, sized to a tile back rather than to a brick bed.
Correct blade size for the tile back, not for a brick bed. A brick trowel carries enough mortar for a course of brick; used on a tile it over-applies and pushes adhesive out at the tile edges, which then has to be cleaned out of the joints before grouting. At 5"–7" the blade of this trowel matches the area of a tile back so a single loaded stroke does not deposit more material than the joint can absorb.
Pointed toe gives a defined start and stop. Back-buttering is judged on coverage, and the failure mode is a thin or empty patch near a corner. A pointed toe lets the operator drive material into the corner of the tile back and lift out cleanly, instead of stopping short as a square-nosed blade does. This is why the triangular pointed trowel suits fine adhesive application and corner work.
Carbon steel blade. The carbon steel blade can keep a thin, springy working edge. For back-buttering, where the blade is repeatedly pressed flat against the tile back, that spring helps the operator feel the thickness of the adhesive coat through the tool.
CO2 welded construction. The blade and shank are joined by CO2 welding rather than forged in one piece. Back-buttering is a spreading and pressing motion rather than a prying or striking one, so a welded shank suits the load.
A standard tile-setting pattern. This is not a house-only shape. A distributor carrying 165721/166721/167721 is offering a familiar form.
Three sizes in one product line. One construction and one handle. The three sizes can be matched to the tile back, from mosaic and subway tile to large-format tile; choose by the area of the tile back.
| Situation | Use this trowel? | Why |
|---|---|---|
| Back-buttering a tile or stone unit before setting | Yes, this is the primary use | Back-buttering means applying a thin coat of adhesive to the tile back so it merges with the combed bed and fills voids |
| Large-format tile (by common usage, long edge 15" and over) | Yes, recommended | TCNA recommends back-buttering large-format tile; it is a common way to reach the ANSI A108.5 contact requirement |
| Natural stone with a sawn or irregular back | Yes | The back-applied coat fills the irregular back face so the stone is evenly supported |
| Wet areas: shower walls, tub surrounds, exterior | Yes | Wet-area installations carry a higher coverage requirement than dry interior areas |
| Gauged porcelain panels (3–6 mm) | Yes | Thin panels do not tolerate uneven adhesive; the back coat is combed in the same direction as the bed |
| Combing the adhesive bed on the substrate | No; use a notched trowel | Notching the bed is the notched trowel's job; the two tools are complementary |
| Laying brick or block | No; use a brick trowel | A bricklaying blade is 9"–12" and carries far more mortar |
| Prying, chiseling, scraping hardened material | No | Not a prying, chiseling or scraping tool; see Care & Maintenance below |
| Step | Action | Note |
|---|---|---|
| 1 | Prepare and comb the adhesive bed on the substrate with the correct notched trowel | Ridge height is set by the notch size, which is chosen from tile size |
| 2 | Lay the tile face-down on a clean board, or hold it in the free hand | Keep the face clean: adhesive on the face is much harder to remove after it sets |
| 3 | Scoop a working amount of adhesive onto the blade | Load the blade, not the toe |
| 4 | Press the adhesive flat across the tile back with the flat of the blade, working from a corner outward with the pointed toe leading | The point is to leave a thin, even, gap-free skim over the whole back |
| 5 | Go over the back a second time to close any thin spots | Press the trowel down to spread the mortar flat over the entire tile back |
| 6 | Optionally comb the back coat with the notched trowel, running the ridges in the same direction as the ridges on the bed | Matching ridge directions let air escape along the furrows and increase contact area |
| 7 | Set the tile into the bed and press it home, then check level and alignment | Adjust before the adhesive begins to set |
| 8 | Clean the trowel before the adhesive stiffens | See Care & Maintenance below |
The two coats, combed bed plus back-buttered tile, merge under pressure and fill the voids that a single combed bed alone leaves between the ridges. This is the reason back-buttering exists.
By common usage, large-format tile means a long edge of 15" or more. TCNA recommends back-buttering large-format tile. ANSI A108.5 requires adhesive contact of at least 80% in dry interior areas and at least 95% in wet areas and exterior work, and back-buttering is a common way to reach it. Confirm the requirement against the adhesive manufacturer's data sheet and local codes.
Large tiles are also the case where getting it wrong is hardest to detect and most expensive to fix: a large tile has less ability to bridge substrate irregularity, and a void behind it announces itself later as a hollow sound and eventually a crack. The 7" (167721) is the size to reach for here: a longer blade covers a large tile back in fewer passes, which is both faster and more consistent.
The notched trowel selection also changes with the tile; follow the adhesive manufacturer's recommendation.
Marble, granite, limestone and travertine tiles often have sawn, raked or naturally uneven back faces. Back-buttering with this trowel fills those irregularities so the stone sits on a continuous bed of adhesive instead of on high spots, which is what reduces the risk of localized stress cracking. Because stone backs are not flat, the second pass (step 5 of Basic Technique above) matters more here than on a smooth porcelain back.
Apply adhesive to both the substrate and the tile back, then set the tile before either coat skins over. Because both surfaces are buttered, the bond is more reliable.
Gauged porcelain panels at 3–6 mm thickness are the least tolerant substrate for uneven adhesive: they are too thin to bridge anything. Standard practice combs the adhesive in one direction on the substrate and back-butters in the same direction, so the two ridge sets align and collapse into a solid bed. Follow the adhesive manufacturer’s data sheet for notch size and application. The 7" blade (167721) is the practical choice for panel work: a longer blade covers more panel area in one stroke, which reduces the number of stroke joins where a thin spot can occur.
| Tool | Role |
|---|---|
| Notched trowel | Comb adhesive on the substrate to a consistent ridge height |
| Tile Setter's Trowel (165721 / 166721 / 167721) | Back-butter the tile back; ensure full, void-free coverage |
| Margin trowel | Mix and cut adhesive, work in tight spaces, clean joints |
| Grout float | Pack grout into the joints |
| Tile cutter / wet saw | Cut tiles to fit |
Q1. Is this a brick trowel or a tile trowel, and can I use it instead of a notched trowel?
Both descriptions are used.
Leading Tools groups it in the Brick Trowel family because it shares the pointed masonry blade form, but the product name is Tile Setter's Trowel and its working task is back-buttering tile (spreading a flat coat of adhesive on the tile back). It does not replace a notched trowel: the notched trowel combs ridges into the adhesive on the substrate, while this trowel spreads a flat coat on the tile back, so they are two steps of one system.
Q2. Do I have to back-butter, or is combing the bed enough?
For small tile in dry interior areas, a properly combed bed may be sufficient. For large-format tile (by common usage, a long edge of 15" and over), TCNA recommends back-buttering, and the ANSI A108.5 contact requirement is higher in wet and exterior areas (95%) than in dry interior areas (80%).
Q3. Which size should I buy first?
Choose by tile size: 5" (165721) for mosaic, subway and cut-piece work; 6" (166721) for general mid-size work; 7" (167721) for large-format tile and stone, since it covers a large tile back in fewer passes. If too much adhesive squeezes out at the tile edges, apply a thinner skim or move down to the 6" or 5".
Q4. How do I clean it and keep it from rusting?
Clean and oil the blade at the end of every working day; a carbon steel blade rusts if it is stored wet or without oil. If mortar has hardened on the blade, soak it in water, scrape it with a plastic or wooden scraper rather than a steel wire brush, then dry it completely and re-oil it. This model is carbon steel only; for a stainless steel version, contact Leading Tools sales.
Q5. What should I avoid doing with it?
Do not use it for prying or chiseling. If the handle is loose or wobbling, stop using the tool and refit it properly before further use; replace the tool if the shank or handle socket is damaged.
| Property | Detail |
|---|---|
| Blade pattern | Tile setter's, triangular, pointed toe, rounded shoulders, widening to the heel |
| Blade material | Carbon steel |
| Blade size | 5" / 6" / 7" nominal (127 / 152 / 178 mm at 1" = 25.4 mm) |
| Surface | Ground and polished bright blade face |
Only the blade length is quoted as the nominal size. The blade is longer than it is wide, so a single stroke sweeps a band down the tile back rather than dabbing at it; this is the geometric reason the pattern is used for back-buttering rather than a square finishing blade.
| Property | Detail |
|---|---|
| Handle type | Two-tone soft-grip, closed end |
| Grip code | BF21; other handle options on request: contact Leading Tools sales |
| Mounting | Handle seated on the welded shank |
Soft-grip handles are standard on this pattern and are valued for hold and comfort.
The product line designation for this trowel is "CO2 Welding Carbon Steel." CO2 welding joins the shank to the blade at the heel, so the finished tool is an assembly of two parts rather than one piece of steel.
What that means in practice:
| ART. Nr | Size | Material | Construction | Handle |
|---|---|---|---|---|
| 165721 | 5" | Carbon steel | CO2 welding | Two-tone soft grip |
| 166721 | 6" | Carbon steel | CO2 welding | Two-tone soft grip |
| 167721 | 7" | Carbon steel | CO2 welding | Two-tone soft grip |
All three art numbers share one blade pattern, one material and one construction; only the size changes. The Tile Setter's Trowel is listed here in carbon steel only; for other blade materials, contact Leading Tools sales.
| Size | ART. Nr | Choose it when |
|---|---|---|
| 5" | 165721 | Mosaic, subway and small-format tile; cut pieces; work where the tile back is small and control matters more than coverage per stroke |
| 6" | 166721 | The general-purpose size; suits mid-size wall and floor tile |
| 7" | 167721 | Large-format tile and stone. |
Choose the size by the area of the tile back; the 5" is the detail and cut-piece size.
The two tools do different jobs.
| Tool | Job | Where the material goes |
|---|---|---|
| Notched trowel | Comb the adhesive on the substrate to a consistent ridge height | Onto the wall or floor |
| Tile Setter's Trowel (this product) | Back-butter: load and flatten adhesive on the tile back | Onto the tile |
The two are complementary steps of one system, not substitutes. Using this trowel to comb a bed would not produce ridges; using a notched trowel to back-butter produces ridged, uneven back coverage.
Choose the notch of the notched trowel according to the tile size and the adhesive manufacturer's recommendation (see the Notched Trowel series).
Both are pointed masonry blades, which is why this product sits in the Brick Trowel chapter, but they are sized and used for different work.
Brick trowel patterns are distinguished by the heel shape: the London pattern has a rounded heel that helps push mortar forward and press it into narrow joints, while the Philadelphia pattern has a square heel that carries more mortar and is favored for block work. A tile setter's blade is much shorter than either: a bricklaying trowel runs 9"–12" while this one runs 5"–7", and is not intended to carry a brick's worth of mortar.
This product is carbon steel. The carbon steel blade costs less, and it must be wiped dry and given a thin coat of tool oil after use, or it will rust (see Care & Maintenance below).
Stainless steel has high corrosion resistance and a low maintenance burden; chlorinated water, coastal air or prolonged soaking can still cause rust spots, so rinse with clean water and dry after use. This model is listed in carbon steel only; for a stainless steel version, contact Leading Tools sales.
Complete art-number reference for the Tile Setter's Trowel, CO2 Welding Carbon Steel. All three art numbers in the line are listed.
| ART. Nr | Size (Imperial) | Size (Metric, converted) | Blade pattern | Material | Construction | Handle |
|---|---|---|---|---|---|---|
| 165721 | 5" | 127 mm | Tile setter's, triangular, pointed toe | Carbon steel | CO2 welding | Two-tone soft grip |
| 166721 | 6" | 152 mm | Tile setter's, triangular, pointed toe | Carbon steel | CO2 welding | Two-tone soft grip |
| 167721 | 7" | 178 mm | Tile setter's, triangular, pointed toe | Carbon steel | CO2 welding | Two-tone soft grip |
Metric values are converted at 1" = 25.4 mm and rounded; the nominal sizes for this product are given in imperial only.
Care for a carbon steel trowel is simple: wipe the tool clean at the end of the day and oil it. A water-displacing spray, machine oil or mineral oil are all adequate; wrapping the tool in cloth or newspaper for storage is the usual practice. A carbon steel blade rusts if it is put away wet or left without oil.

In compliance with EU personal data protection laws, we are committed to protecting and providing you with control over your personal data. By clicking "Accept All", you allow us to place cookies to enhance your experience on this site, help us analyze site performance and usage, and enable us to deliver relevant marketing content. You can manage your cookie settings below. By clicking "Agree" you agree to the current settings. For more information, please visit the Privacy Statement.
This website uses cookies
In compliance with EU personal data protection laws, we are committed to protecting your personal data and providing you with control over it. By clicking "Agree", you allow us to place cookies to improve your experience on this site, help us analyze site performance and usage, and allow us to deliver relevant marketing content.
By clicking "Only necessary" you allow us to place only necessary cookies. The website cannot function without these cookies and you cannot switch them off on your system. These cookies are typically set only in response to an action you perform (i.e. a service request), such as setting privacy preferences, logging in, or filling in a form. You can set your browser to block or prompt you for these cookies, but this may prevent some site features from working.



