
Copyright 2026 © Leading Tools Industrial Co., Ltd.
All Rights Reserved. Website Design by Awakening Design
CATALOG TYPE
Product Categories
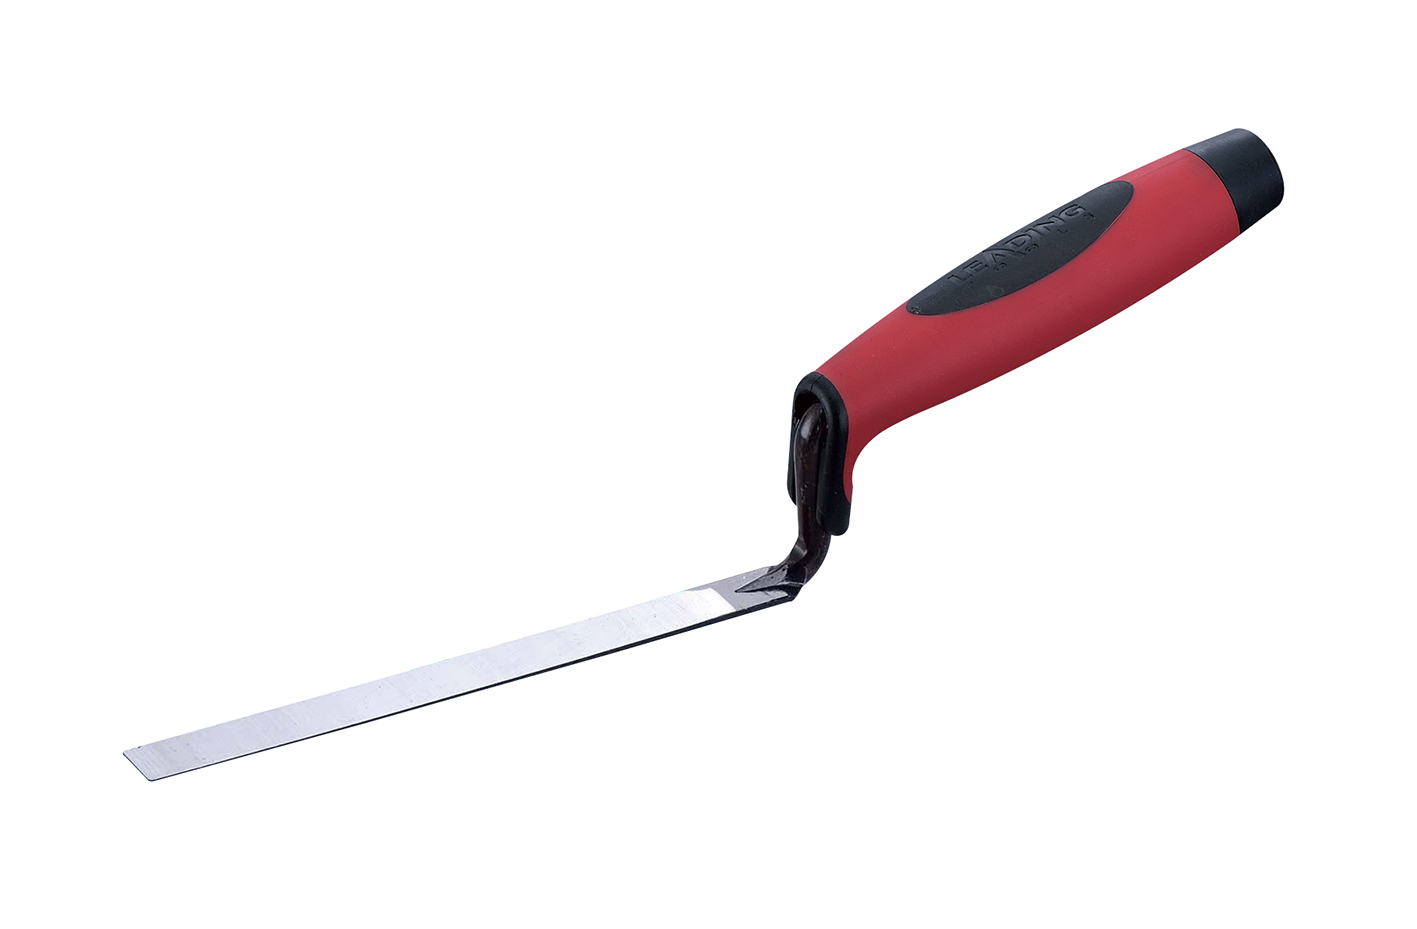
Tuck Pointing Trowel — Drop Forged Chrome-Moly Alloy Steel
Product Description
| Item | Detail |
|---|---|
| Product Name | Tuck Pointing Trowel — Drop Forged Chrome-Moly Alloy Steel |
| Article Numbers | 070721, 071721, 072721, 073721, 074721, 075721, 076721, 077721, 078721, nine blade widths |
| Blade Width Range | 3/16" to 1" (4 mm to 25 mm; 1" = 25.4 mm) |
| Blade Length | 7" (178 mm), identical on all nine article numbers |
| Blade Material | chrome-molybdenum alloy steel, heat-treated |
| Construction | Forged in one piece |
| Handle | Soft-grip handle with end cap, mounted on a cranked (raised) shank |
| Blade Tip | Square-cut, parallel-sided strip blade |
| Product Family | Brick Trowel range |
| Companion Range | Tuck Pointing Trowel — Stainless Steel, 6–16 mm (see Full Size Reference below) |
Also sold as a tuck pointer. It is not the same tool as a pointing trowel: a pointing trowel has a wider diamond-shaped blade, while a tuck pointer has a narrow strip blade sized to the joint for refilling raked-out joints and finishing new joints. If a specification says "pointing trowel" but the drawing shows a strip blade, this range is the correct match.
| Situation | Use this tool? | Why |
|---|---|---|
| Refilling raked-out joints in an existing wall | Yes, primary use | The blade enters the joint and packs mortar to depth |
| Filling bed joints and head joints in new brickwork | Yes | Joint-filling and packing is the tool's defined function |
| Packing and shaping mortar during grouting | Yes | Secondary use |
| Forming a weatherproof joint between brick courses | Yes | — |
| Bedding a brick or spreading a mortar bed | No | Blade capacity is too low; use a brick trowel |
| Raking out old mortar before repointing | No | Use a raker, chisel, or grinder |
| Cutting hardened mortar or metal ties | No | Not a cutting tool; edge damage will destroy joint accuracy |
| Prying or levering brick | No | The blade is narrow and will take a permanent set |
| Step | Action | Detail |
|---|---|---|
| 1 | Rake out and clean the joint | Remove loose or failed mortar and clear dust and debris from the joint line before any filling |
| 2 | Mix to the right consistency | Target a thick peanut-butter consistency. Test it: hold a loaded blade at 45°: correct mortar clings to the face and does not slump off |
| 3 | Load a small amount | Take a thin ribbon onto the strip blade from a hawk or mortar board. Do not try to scoop a load; the blade is not built to carry one |
| 4 | Fill the head joints | Load the blade and pack the vertical joints (perpends); many masons fill these first, which is a common practice. Compaction comes first; removing surplus can wait |
| 5 | Fill the bed joints | Hold the board tight against the wall under the joint and press mortar into the horizontal joints until flush with the brick face, then cut off the surplus |
| 6 | Compact, do not just fill | Press firmly enough to drive out voids; on deeper joints refill in several passes rather than in one pass. The narrow straight blade is the one to use to press a dense recessed joint |
| 7 | Wait for the initial set | Wait until the mortar has taken its initial set (roughly 15–90 minutes, depending on the weather). Test with a thumb: correct timing leaves a shallow print without sinking in or sticking |
| 8 | Strike the profile | Finish to match the existing joint shape with a brick jointer, striking the vertical and horizontal joints (many masons strike the vertical joints first, a common practice); for a concave joint, work from the top of the joint downward |
| 9 | Brush off | Remove crumbs and surplus with a sideways brushing action once the mortar has stiffened |
This is the primary job. Once the failed mortar has been cut out to a sound depth, the tuck pointer refills the prepared joint from behind the face outward, so that the mortar is compacted rather than merely surfaced. Filling from a blade sized to the joint means the mortar goes where the joint is and nowhere else, which matters most on stained, weathered, or historic brick where face cleaning is slow and risks damaging the brick.
On restoration and extension work the new joint must read the same width and profile as the original wall. Because the tool comes in nine widths across 4–25 mm, a blade can be matched to the surveyed joint rather than approximated. The 4 mm and 6 mm sizes suit fine joints.
Around window reveals, sills, returns, and internal corners, a standard brick trowel cannot get its blade flat to the joint without the handle fouling the wall. The strip blade on a cranked shank keeps the hand clear and the blade in plane. The square tip is the advantage at these locations specifically: a joint that terminates against a frame, a bead, or a corner has to be packed right to the stop, and a square blade end reaches it in one stroke.
When a short section of joint has failed: a spalled area, a made-good utility cut, a single damaged perpend, the tuck pointer places mortar exactly in the failed length without disturbing the adjacent sound joints. Because the blade carries only a thin ribbon, there is very little surplus to clean off afterwards, which is the practical difference between a half-hour patch and a half-day patch plus cleaning.
Tuck-pointing trowels are also used to pack and shape mortar during grouting. On rubble and random stone, joint widths vary along a single course, and the wider blades in this range (19, 21, 25 mm) do the bulk packing before a narrower blade dresses the visible line.
Mortar consistency governs the result more than technique does. Too wet and it will not compact cleanly into a narrow joint and will run onto the face; too dry and the blade drags, tears the surface and leaves voids behind the face. The 45° blade test is the fastest field check: correct mortar clings to the blade at that angle. Note that "full" does not always mean flush: some profiles finish the mortar recessed roughly 5 mm behind the brick or tile face, so check the specified profile before filling.
Q1: What is the difference between a tuck pointing trowel and a pointing trowel?
A: A pointing trowel has a wider diamond-shaped blade and is used for picking up small amounts of mortar, patching and detail work. A tuck pointer has a narrow strip blade sized to the joint width and is used to pack mortar into a raked-out joint. The two names are often mixed, so compare blade shape and width, not the product title.
Q2: Which width should I order for standard modern brickwork?
A: 10 mm (073721) is the closest match to the 3/8" joint that is most common in US brickwork. Add a 6 mm (071721) for narrower work and a 12 mm (074721) for wider joints. The joint width is fixed by the wall: a blade narrower than the joint fills unevenly, and a blade wider than the joint rides on the brick faces and smears them.
Q3: Mortar will not go into the joint cleanly or smears on the brick. What is wrong?
A: Usually blade width against joint width, so select a blade closer to the joint opening.
If the mix is too wet or the blade is wider than the joint, mortar smears on the brick faces; firm up the mix, drop one blade width, and hold the mortar board tight under the joint. If the blade drags and tears the mortar, the mix is too dry or the joint was not cleaned out properly before filling.
Q4: Should I order the alloy steel range or stainless, and what if the blade rusts?
A: The alloy steel range is the standard choice and is fine where tools are dried and oiled daily.
Choose stainless for lime, white and color-matched mortars where an oxidation mark is a visible defect, for wet or coastal work, and where tools are shared or stored damp. A rusting blade can be saved if it has not started to pit: soak and scrub with white vinegar, or rub with a baking-soda paste and rinse, then dry fully and re-oil straight away.
Q5: Can I use it to rake out the old mortar?
A: No. Cutting out is a separate operation done with a raker, chisel or grinder, and using a tuck pointer as a cutting tool will burr the edge and cost you the accuracy you bought it for. If the grip feels loose or slippery, stop using it for fine work, and replace the tool if the handle is loose, split or glazed hard.
| Attribute | Detail |
|---|---|
| Blade Type | Narrow parallel-sided strip blade (tuck pointer pattern) |
| Blade Widths | 4, 6, 8, 10, 12, 16, 19, 21, 25 mm — 3/16", 1/4", 5/16", 3/8", 1/2", 5/8", 3/4", 7/8", 1" |
| Blade Length | 7" (178 mm) on every article number |
| Blade Tip | Square-cut with defined corners |
| Blade Material | chrome-molybdenum alloy steel, heat-treated |
| Blade Finish | Polished bright working face |
| Attribute | Detail |
|---|---|
| Handle Type | Soft grip (BF21) with end cap |
| Shank | Cranked (raised) shank in a dark finish, lifting the handle above the blade plane |
Why the crank matters more here than on a wide trowel. The blade has to lie flat inside a joint that is at wall-face level. Without a raised shank the hand would foul the wall before the blade reached full depth.
Handle. Standard soft grip (BF21); other handles can be fitted on request: contact Leading Tools sales.
The blade, crank and shank are forged in one piece instead of being joined from separately-made parts. In tuck pointing the operator pushes along a 7" lever with a narrow blade at the end, and the one-piece construction has no joint at the blade-to-crank transition.
| Feature | Tuck Pointing Trowel (this range) | Pointing Trowel | Standard Brick Trowel |
|---|---|---|---|
| Main function | Packing mortar into a joint | General filling and shaping | Carrying and spreading mortar beds |
| Blade shape | Narrow parallel strip | Diamond / leaf | Broad triangular (London or Philadelphia) |
| Typical size | 4–25 mm wide × 7" long | ~5" long diamond blade. | 9"–12" long blade |
| Mortar capacity | Low, by design | Medium | High |
| Access to a raked joint | Enters the joint itself | Works at the joint mouth | Cannot enter |
| Best use | Repointing, tuckpointing, patch repair | Small fills, shaping, dressing | Laying units, bedding mortar |
| Where it fails | Cannot bed a brick | Too wide for a narrow raked joint | Smears the face on joint work |
| Attribute | Drop Forged Chrome-Moly Alloy Steel (070721–078721) | Stainless Steel (270821–278821) |
|---|---|---|
| Widths offered | 4, 6, 8, 10, 12, 16, 19, 21, 25 mm, nine steps | 6, 8, 10, 12, 14, 16 mm, six steps |
| Blade length | 7" (178 mm) | — |
| Shank finish | Dark / black finish | Bright polished stainless |
| Corrosion behavior | Requires drying and oiling after every use | High corrosion resistance, low maintenance; rinse and dry after use |
| Best fit | Cement mortar, general repointing, site work | Lime, white and color-matched mortars; wet or coastal work |
| Width | Imperial | ART. NR | Typical Use |
|---|---|---|---|
| 4 mm | 3/16" | 070721 | Hairline and very fine joints; thin repair lines; detailed restoration work where the original joint is minimal |
| 6 mm | 1/4" | 071721 | Fine brick joints and narrow head joints. |
| 8 mm | 5/16" | 072721 | Fine joints between 6 mm and 10 mm |
| 10 mm | 3/8" | 073721 | The most common US brick joint width; the default choice for general repointing |
| 12 mm | 1/2" | 074721 | Joints of about 1/2"; brick with irregular faces often needs this width or wider |
| 16 mm | 5/8" | 075721 | Wide joints; hand-made and irregular brick |
| 19 mm | 3/4" | 076721 | Wide or irregular joints and coarse masonry repair |
| 21 mm | 7/8" | 077721 | Large joint spaces and irregular repair cavities |
| 25 mm | 1" | 078721 | Very wide joints, broad packing lines, rubble and stone repair |
Start from the joint, not from the tool. Measure the existing joint at several points on the elevation; on old work the width will vary and you should size to the prevailing dimension, not the widest outlier. A useful reference point: 3/8" (10 mm) is a common joint width in US brickwork.
Choose a narrower blade when the joint is fine, the work is restoration or decorative, the surrounding brick face is stained or fragile and must not be smeared, or precise placement matters more than speed.
Choose a wider blade when joints are wide or irregular, more mortar must go in per stroke, or the repair is a cavity rather than a joint line. On rubble and stone, joint width is not constant and the wider blades do the bulk fill before a narrower one dresses the visible line.
A two-blade kit is the normal working answer. Most masons carry more than one width because a single elevation rarely has a single joint size: a 1/4"–3/8" blade for standard joints and a 3/4" blade when the joint opens up. A practical starting pair for modern brickwork is 073721 (10 mm) plus 071721 (6 mm).
| Decision factor | Order the forged alloy steel range | Order the stainless range |
|---|---|---|
| Mortar type | Grey cement mortar | Lime, white or pigmented color-matched mortar, where a rust mark is a visible defect |
| Site discipline | Crew reliably dries and oils tools daily | Tools stored wet, shared, or left in a damp bag |
| Environment | Interior and normal exterior work | Coastal, wet, or continuously humid work |
| Width required | 4, 19, 21 and 25 mm are available only in the forged range | 14 mm is available only in the stainless range; 6, 8, 10, 12 and 16 mm are available in both ranges |
Specify the tuck pointing trowel when the job is joint filling. Specify a brick trowel when the job is spreading bed mortar and laying units. The two are not substitutes: the strip blade cannot carry enough mortar to bed a brick, and the brick trowel cannot enter a raked joint. On a site doing both laying and repointing, the tuck pointer is a companion tool in the same kit, not a replacement for the bricklaying trowel.
Where the joint has to be shaped to a defined profile: concave, weathered, raked, the finishing pass belongs to a brick jointer, used after the mortar has started to set. The tuck pointer's job ends when the joint is packed full and compacted.
| ART. NR | Size (Imperial) | Size (Metric) | Blade Length | Blade Type | Material | Construction | Handle |
|---|---|---|---|---|---|---|---|
| 070721 | 3/16" × 7" | 4 mm | 7" (178 mm) | Narrow square-tip strip | chrome-molybdenum alloy steel, heat-treated | Forged in one piece | Soft grip, cranked shank |
| 071721 | 1/4" × 7" | 6 mm | 7" (178 mm) | Narrow square-tip strip | chrome-molybdenum alloy steel, heat-treated | Forged in one piece | Soft grip, cranked shank |
| 072721 | 5/16" × 7" | 8 mm | 7" (178 mm) | Narrow square-tip strip | chrome-molybdenum alloy steel, heat-treated | Forged in one piece | Soft grip, cranked shank |
| 073721 | 3/8" × 7" | 10 mm | 7" (178 mm) | Narrow square-tip strip | chrome-molybdenum alloy steel, heat-treated | Forged in one piece | Soft grip, cranked shank |
| 074721 | 1/2" × 7" | 12 mm | 7" (178 mm) | Narrow square-tip strip | chrome-molybdenum alloy steel, heat-treated | Forged in one piece | Soft grip, cranked shank |
| 075721 | 5/8" × 7" | 16 mm | 7" (178 mm) | Narrow square-tip strip | chrome-molybdenum alloy steel, heat-treated | Forged in one piece | Soft grip, cranked shank |
| 076721 | 3/4" × 7" | 19 mm | 7" (178 mm) | Narrow square-tip strip | chrome-molybdenum alloy steel, heat-treated | Forged in one piece | Soft grip, cranked shank |
| 077721 | 7/8" × 7" | 21 mm | 7" (178 mm) | Narrow square-tip strip | chrome-molybdenum alloy steel, heat-treated | Forged in one piece | Soft grip, cranked shank |
| 078721 | 1" × 7" | 25 mm | 7" (178 mm) | Narrow square-tip strip | chrome-molybdenum alloy steel, heat-treated | Forged in one piece | Soft grip, cranked shank |
| ART. NR | Size (Metric) | Blade Type | Material | Handle |
|---|---|---|---|---|
| 276821 | 6 mm | Narrow strip | Stainless steel | Soft grip, cranked shank |
| 278821 | 8 mm | Narrow strip | Stainless steel | Soft grip, cranked shank |
| 270821 | 10 mm | Narrow strip | Stainless steel | Soft grip, cranked shank |
| 272821 | 12 mm | Narrow strip | Stainless steel | Soft grip, cranked shank |
| 274821 | 14 mm | Narrow strip | Stainless steel | Soft grip, cranked shank |
| Contact us | 16 mm | Narrow strip | Stainless steel | Soft grip, cranked shank |
The drop forged range is alloy steel, not stainless, and will flash-rust if stored damp.
Joint accuracy depends entirely on a straight blade. A bent, twisted, or burred blade will not track the joint line, and the operator will compensate by pressing harder, which smears the face. Check the blade against a known flat surface after any drop or any sideways lever load, and dress burrs with a fine file. A blade that has taken a permanent set should be replaced rather than straightened; the narrow section will not return true.
The soft-grip handle is what gives control during fine placement, so grip condition is a functional item, not a cosmetic one. Keep it clean of cement dust, and check periodically for looseness at the shank, splitting of the grip, or a hardened, glazed grip surface. Replace the tool if the handle has worked loose on the shank: a loose handle on a narrow blade turns every push stroke into a wander.
Store blades so they cannot be bent against each other or against heavier tools. For storage over weeks or months, wipe on a heavier oil film or wrap the blade in oiled cloth before boxing.
| Item | Detail |
|---|---|
| Product Name | Tuck Pointing Trowel — Drop Forged Chrome-Moly Alloy Steel |
| Article Numbers | 070721, 071721, 072721, 073721, 074721, 075721, 076721, 077721, 078721, nine blade widths |
| Blade Width Range | 3/16" to 1" (4 mm to 25 mm; 1" = 25.4 mm) |
| Blade Length | 7" (178 mm), identical on all nine article numbers |
| Blade Material | chrome-molybdenum alloy steel, heat-treated |
| Construction | Forged in one piece |
| Handle | Soft-grip handle with end cap, mounted on a cranked (raised) shank |
| Blade Tip | Square-cut, parallel-sided strip blade |
| Product Family | Brick Trowel range |
| Companion Range | Tuck Pointing Trowel — Stainless Steel, 6–16 mm (see Full Size Reference below) |
Also sold as a tuck pointer. It is not the same tool as a pointing trowel: a pointing trowel has a wider diamond-shaped blade, while a tuck pointer has a narrow strip blade sized to the joint for refilling raked-out joints and finishing new joints. If a specification says "pointing trowel" but the drawing shows a strip blade, this range is the correct match.
| Situation | Use this tool? | Why |
|---|---|---|
| Refilling raked-out joints in an existing wall | Yes, primary use | The blade enters the joint and packs mortar to depth |
| Filling bed joints and head joints in new brickwork | Yes | Joint-filling and packing is the tool's defined function |
| Packing and shaping mortar during grouting | Yes | Secondary use |
| Forming a weatherproof joint between brick courses | Yes | — |
| Bedding a brick or spreading a mortar bed | No | Blade capacity is too low; use a brick trowel |
| Raking out old mortar before repointing | No | Use a raker, chisel, or grinder |
| Cutting hardened mortar or metal ties | No | Not a cutting tool; edge damage will destroy joint accuracy |
| Prying or levering brick | No | The blade is narrow and will take a permanent set |
| Step | Action | Detail |
|---|---|---|
| 1 | Rake out and clean the joint | Remove loose or failed mortar and clear dust and debris from the joint line before any filling |
| 2 | Mix to the right consistency | Target a thick peanut-butter consistency. Test it: hold a loaded blade at 45°: correct mortar clings to the face and does not slump off |
| 3 | Load a small amount | Take a thin ribbon onto the strip blade from a hawk or mortar board. Do not try to scoop a load; the blade is not built to carry one |
| 4 | Fill the head joints | Load the blade and pack the vertical joints (perpends); many masons fill these first, which is a common practice. Compaction comes first; removing surplus can wait |
| 5 | Fill the bed joints | Hold the board tight against the wall under the joint and press mortar into the horizontal joints until flush with the brick face, then cut off the surplus |
| 6 | Compact, do not just fill | Press firmly enough to drive out voids; on deeper joints refill in several passes rather than in one pass. The narrow straight blade is the one to use to press a dense recessed joint |
| 7 | Wait for the initial set | Wait until the mortar has taken its initial set (roughly 15–90 minutes, depending on the weather). Test with a thumb: correct timing leaves a shallow print without sinking in or sticking |
| 8 | Strike the profile | Finish to match the existing joint shape with a brick jointer, striking the vertical and horizontal joints (many masons strike the vertical joints first, a common practice); for a concave joint, work from the top of the joint downward |
| 9 | Brush off | Remove crumbs and surplus with a sideways brushing action once the mortar has stiffened |
This is the primary job. Once the failed mortar has been cut out to a sound depth, the tuck pointer refills the prepared joint from behind the face outward, so that the mortar is compacted rather than merely surfaced. Filling from a blade sized to the joint means the mortar goes where the joint is and nowhere else, which matters most on stained, weathered, or historic brick where face cleaning is slow and risks damaging the brick.
On restoration and extension work the new joint must read the same width and profile as the original wall. Because the tool comes in nine widths across 4–25 mm, a blade can be matched to the surveyed joint rather than approximated. The 4 mm and 6 mm sizes suit fine joints.
Around window reveals, sills, returns, and internal corners, a standard brick trowel cannot get its blade flat to the joint without the handle fouling the wall. The strip blade on a cranked shank keeps the hand clear and the blade in plane. The square tip is the advantage at these locations specifically: a joint that terminates against a frame, a bead, or a corner has to be packed right to the stop, and a square blade end reaches it in one stroke.
When a short section of joint has failed: a spalled area, a made-good utility cut, a single damaged perpend, the tuck pointer places mortar exactly in the failed length without disturbing the adjacent sound joints. Because the blade carries only a thin ribbon, there is very little surplus to clean off afterwards, which is the practical difference between a half-hour patch and a half-day patch plus cleaning.
Tuck-pointing trowels are also used to pack and shape mortar during grouting. On rubble and random stone, joint widths vary along a single course, and the wider blades in this range (19, 21, 25 mm) do the bulk packing before a narrower blade dresses the visible line.
Mortar consistency governs the result more than technique does. Too wet and it will not compact cleanly into a narrow joint and will run onto the face; too dry and the blade drags, tears the surface and leaves voids behind the face. The 45° blade test is the fastest field check: correct mortar clings to the blade at that angle. Note that "full" does not always mean flush: some profiles finish the mortar recessed roughly 5 mm behind the brick or tile face, so check the specified profile before filling.
Q1: What is the difference between a tuck pointing trowel and a pointing trowel?
A: A pointing trowel has a wider diamond-shaped blade and is used for picking up small amounts of mortar, patching and detail work. A tuck pointer has a narrow strip blade sized to the joint width and is used to pack mortar into a raked-out joint. The two names are often mixed, so compare blade shape and width, not the product title.
Q2: Which width should I order for standard modern brickwork?
A: 10 mm (073721) is the closest match to the 3/8" joint that is most common in US brickwork. Add a 6 mm (071721) for narrower work and a 12 mm (074721) for wider joints. The joint width is fixed by the wall: a blade narrower than the joint fills unevenly, and a blade wider than the joint rides on the brick faces and smears them.
Q3: Mortar will not go into the joint cleanly or smears on the brick. What is wrong?
A: Usually blade width against joint width, so select a blade closer to the joint opening.
If the mix is too wet or the blade is wider than the joint, mortar smears on the brick faces; firm up the mix, drop one blade width, and hold the mortar board tight under the joint. If the blade drags and tears the mortar, the mix is too dry or the joint was not cleaned out properly before filling.
Q4: Should I order the alloy steel range or stainless, and what if the blade rusts?
A: The alloy steel range is the standard choice and is fine where tools are dried and oiled daily.
Choose stainless for lime, white and color-matched mortars where an oxidation mark is a visible defect, for wet or coastal work, and where tools are shared or stored damp. A rusting blade can be saved if it has not started to pit: soak and scrub with white vinegar, or rub with a baking-soda paste and rinse, then dry fully and re-oil straight away.
Q5: Can I use it to rake out the old mortar?
A: No. Cutting out is a separate operation done with a raker, chisel or grinder, and using a tuck pointer as a cutting tool will burr the edge and cost you the accuracy you bought it for. If the grip feels loose or slippery, stop using it for fine work, and replace the tool if the handle is loose, split or glazed hard.
| Attribute | Detail |
|---|---|
| Blade Type | Narrow parallel-sided strip blade (tuck pointer pattern) |
| Blade Widths | 4, 6, 8, 10, 12, 16, 19, 21, 25 mm — 3/16", 1/4", 5/16", 3/8", 1/2", 5/8", 3/4", 7/8", 1" |
| Blade Length | 7" (178 mm) on every article number |
| Blade Tip | Square-cut with defined corners |
| Blade Material | chrome-molybdenum alloy steel, heat-treated |
| Blade Finish | Polished bright working face |
| Attribute | Detail |
|---|---|
| Handle Type | Soft grip (BF21) with end cap |
| Shank | Cranked (raised) shank in a dark finish, lifting the handle above the blade plane |
Why the crank matters more here than on a wide trowel. The blade has to lie flat inside a joint that is at wall-face level. Without a raised shank the hand would foul the wall before the blade reached full depth.
Handle. Standard soft grip (BF21); other handles can be fitted on request: contact Leading Tools sales.
The blade, crank and shank are forged in one piece instead of being joined from separately-made parts. In tuck pointing the operator pushes along a 7" lever with a narrow blade at the end, and the one-piece construction has no joint at the blade-to-crank transition.
| Feature | Tuck Pointing Trowel (this range) | Pointing Trowel | Standard Brick Trowel |
|---|---|---|---|
| Main function | Packing mortar into a joint | General filling and shaping | Carrying and spreading mortar beds |
| Blade shape | Narrow parallel strip | Diamond / leaf | Broad triangular (London or Philadelphia) |
| Typical size | 4–25 mm wide × 7" long | ~5" long diamond blade. | 9"–12" long blade |
| Mortar capacity | Low, by design | Medium | High |
| Access to a raked joint | Enters the joint itself | Works at the joint mouth | Cannot enter |
| Best use | Repointing, tuckpointing, patch repair | Small fills, shaping, dressing | Laying units, bedding mortar |
| Where it fails | Cannot bed a brick | Too wide for a narrow raked joint | Smears the face on joint work |
| Attribute | Drop Forged Chrome-Moly Alloy Steel (070721–078721) | Stainless Steel (270821–278821) |
|---|---|---|
| Widths offered | 4, 6, 8, 10, 12, 16, 19, 21, 25 mm, nine steps | 6, 8, 10, 12, 14, 16 mm, six steps |
| Blade length | 7" (178 mm) | — |
| Shank finish | Dark / black finish | Bright polished stainless |
| Corrosion behavior | Requires drying and oiling after every use | High corrosion resistance, low maintenance; rinse and dry after use |
| Best fit | Cement mortar, general repointing, site work | Lime, white and color-matched mortars; wet or coastal work |
| Width | Imperial | ART. NR | Typical Use |
|---|---|---|---|
| 4 mm | 3/16" | 070721 | Hairline and very fine joints; thin repair lines; detailed restoration work where the original joint is minimal |
| 6 mm | 1/4" | 071721 | Fine brick joints and narrow head joints. |
| 8 mm | 5/16" | 072721 | Fine joints between 6 mm and 10 mm |
| 10 mm | 3/8" | 073721 | The most common US brick joint width; the default choice for general repointing |
| 12 mm | 1/2" | 074721 | Joints of about 1/2"; brick with irregular faces often needs this width or wider |
| 16 mm | 5/8" | 075721 | Wide joints; hand-made and irregular brick |
| 19 mm | 3/4" | 076721 | Wide or irregular joints and coarse masonry repair |
| 21 mm | 7/8" | 077721 | Large joint spaces and irregular repair cavities |
| 25 mm | 1" | 078721 | Very wide joints, broad packing lines, rubble and stone repair |
Start from the joint, not from the tool. Measure the existing joint at several points on the elevation; on old work the width will vary and you should size to the prevailing dimension, not the widest outlier. A useful reference point: 3/8" (10 mm) is a common joint width in US brickwork.
Choose a narrower blade when the joint is fine, the work is restoration or decorative, the surrounding brick face is stained or fragile and must not be smeared, or precise placement matters more than speed.
Choose a wider blade when joints are wide or irregular, more mortar must go in per stroke, or the repair is a cavity rather than a joint line. On rubble and stone, joint width is not constant and the wider blades do the bulk fill before a narrower one dresses the visible line.
A two-blade kit is the normal working answer. Most masons carry more than one width because a single elevation rarely has a single joint size: a 1/4"–3/8" blade for standard joints and a 3/4" blade when the joint opens up. A practical starting pair for modern brickwork is 073721 (10 mm) plus 071721 (6 mm).
| Decision factor | Order the forged alloy steel range | Order the stainless range |
|---|---|---|
| Mortar type | Grey cement mortar | Lime, white or pigmented color-matched mortar, where a rust mark is a visible defect |
| Site discipline | Crew reliably dries and oils tools daily | Tools stored wet, shared, or left in a damp bag |
| Environment | Interior and normal exterior work | Coastal, wet, or continuously humid work |
| Width required | 4, 19, 21 and 25 mm are available only in the forged range | 14 mm is available only in the stainless range; 6, 8, 10, 12 and 16 mm are available in both ranges |
Specify the tuck pointing trowel when the job is joint filling. Specify a brick trowel when the job is spreading bed mortar and laying units. The two are not substitutes: the strip blade cannot carry enough mortar to bed a brick, and the brick trowel cannot enter a raked joint. On a site doing both laying and repointing, the tuck pointer is a companion tool in the same kit, not a replacement for the bricklaying trowel.
Where the joint has to be shaped to a defined profile: concave, weathered, raked, the finishing pass belongs to a brick jointer, used after the mortar has started to set. The tuck pointer's job ends when the joint is packed full and compacted.
| ART. NR | Size (Imperial) | Size (Metric) | Blade Length | Blade Type | Material | Construction | Handle |
|---|---|---|---|---|---|---|---|
| 070721 | 3/16" × 7" | 4 mm | 7" (178 mm) | Narrow square-tip strip | chrome-molybdenum alloy steel, heat-treated | Forged in one piece | Soft grip, cranked shank |
| 071721 | 1/4" × 7" | 6 mm | 7" (178 mm) | Narrow square-tip strip | chrome-molybdenum alloy steel, heat-treated | Forged in one piece | Soft grip, cranked shank |
| 072721 | 5/16" × 7" | 8 mm | 7" (178 mm) | Narrow square-tip strip | chrome-molybdenum alloy steel, heat-treated | Forged in one piece | Soft grip, cranked shank |
| 073721 | 3/8" × 7" | 10 mm | 7" (178 mm) | Narrow square-tip strip | chrome-molybdenum alloy steel, heat-treated | Forged in one piece | Soft grip, cranked shank |
| 074721 | 1/2" × 7" | 12 mm | 7" (178 mm) | Narrow square-tip strip | chrome-molybdenum alloy steel, heat-treated | Forged in one piece | Soft grip, cranked shank |
| 075721 | 5/8" × 7" | 16 mm | 7" (178 mm) | Narrow square-tip strip | chrome-molybdenum alloy steel, heat-treated | Forged in one piece | Soft grip, cranked shank |
| 076721 | 3/4" × 7" | 19 mm | 7" (178 mm) | Narrow square-tip strip | chrome-molybdenum alloy steel, heat-treated | Forged in one piece | Soft grip, cranked shank |
| 077721 | 7/8" × 7" | 21 mm | 7" (178 mm) | Narrow square-tip strip | chrome-molybdenum alloy steel, heat-treated | Forged in one piece | Soft grip, cranked shank |
| 078721 | 1" × 7" | 25 mm | 7" (178 mm) | Narrow square-tip strip | chrome-molybdenum alloy steel, heat-treated | Forged in one piece | Soft grip, cranked shank |
| ART. NR | Size (Metric) | Blade Type | Material | Handle |
|---|---|---|---|---|
| 276821 | 6 mm | Narrow strip | Stainless steel | Soft grip, cranked shank |
| 278821 | 8 mm | Narrow strip | Stainless steel | Soft grip, cranked shank |
| 270821 | 10 mm | Narrow strip | Stainless steel | Soft grip, cranked shank |
| 272821 | 12 mm | Narrow strip | Stainless steel | Soft grip, cranked shank |
| 274821 | 14 mm | Narrow strip | Stainless steel | Soft grip, cranked shank |
| Contact us | 16 mm | Narrow strip | Stainless steel | Soft grip, cranked shank |
The drop forged range is alloy steel, not stainless, and will flash-rust if stored damp.
Joint accuracy depends entirely on a straight blade. A bent, twisted, or burred blade will not track the joint line, and the operator will compensate by pressing harder, which smears the face. Check the blade against a known flat surface after any drop or any sideways lever load, and dress burrs with a fine file. A blade that has taken a permanent set should be replaced rather than straightened; the narrow section will not return true.
The soft-grip handle is what gives control during fine placement, so grip condition is a functional item, not a cosmetic one. Keep it clean of cement dust, and check periodically for looseness at the shank, splitting of the grip, or a hardened, glazed grip surface. Replace the tool if the handle has worked loose on the shank: a loose handle on a narrow blade turns every push stroke into a wander.
Store blades so they cannot be bent against each other or against heavier tools. For storage over weeks or months, wipe on a heavier oil film or wrap the blade in oiled cloth before boxing.

In compliance with EU personal data protection laws, we are committed to protecting and providing you with control over your personal data. By clicking "Accept All", you allow us to place cookies to enhance your experience on this site, help us analyze site performance and usage, and enable us to deliver relevant marketing content. You can manage your cookie settings below. By clicking "Agree" you agree to the current settings. For more information, please visit the Privacy Statement.
This website uses cookies
In compliance with EU personal data protection laws, we are committed to protecting your personal data and providing you with control over it. By clicking "Agree", you allow us to place cookies to improve your experience on this site, help us analyze site performance and usage, and allow us to deliver relevant marketing content.
By clicking "Only necessary" you allow us to place only necessary cookies. The website cannot function without these cookies and you cannot switch them off on your system. These cookies are typically set only in response to an action you perform (i.e. a service request), such as setting privacy preferences, logging in, or filling in a form. You can set your browser to block or prompt you for these cookies, but this may prevent some site features from working.



