
Copyright 2026 © Leading Tools Industrial Co., Ltd.
All Rights Reserved. Website Design by Awakening Design
CATALOG TYPE
Product Categories
Universal Groover
Product Description
Universal Groover
Art. Nr: 300181
The Universal Groover is a hand finishing tool that presses a control joint, a groove, into the face of a concrete slab while the concrete is still plastic, so that drying-shrinkage and thermal cracking is directed along a planned line instead of appearing at random across the slab. It works on the inside face of the slab. The rounded perimeter edge of the same slab is formed with an edger (300100 / 300101 or 300170–300173 in the same Leading Tools range), and the two tools are not interchangeable.
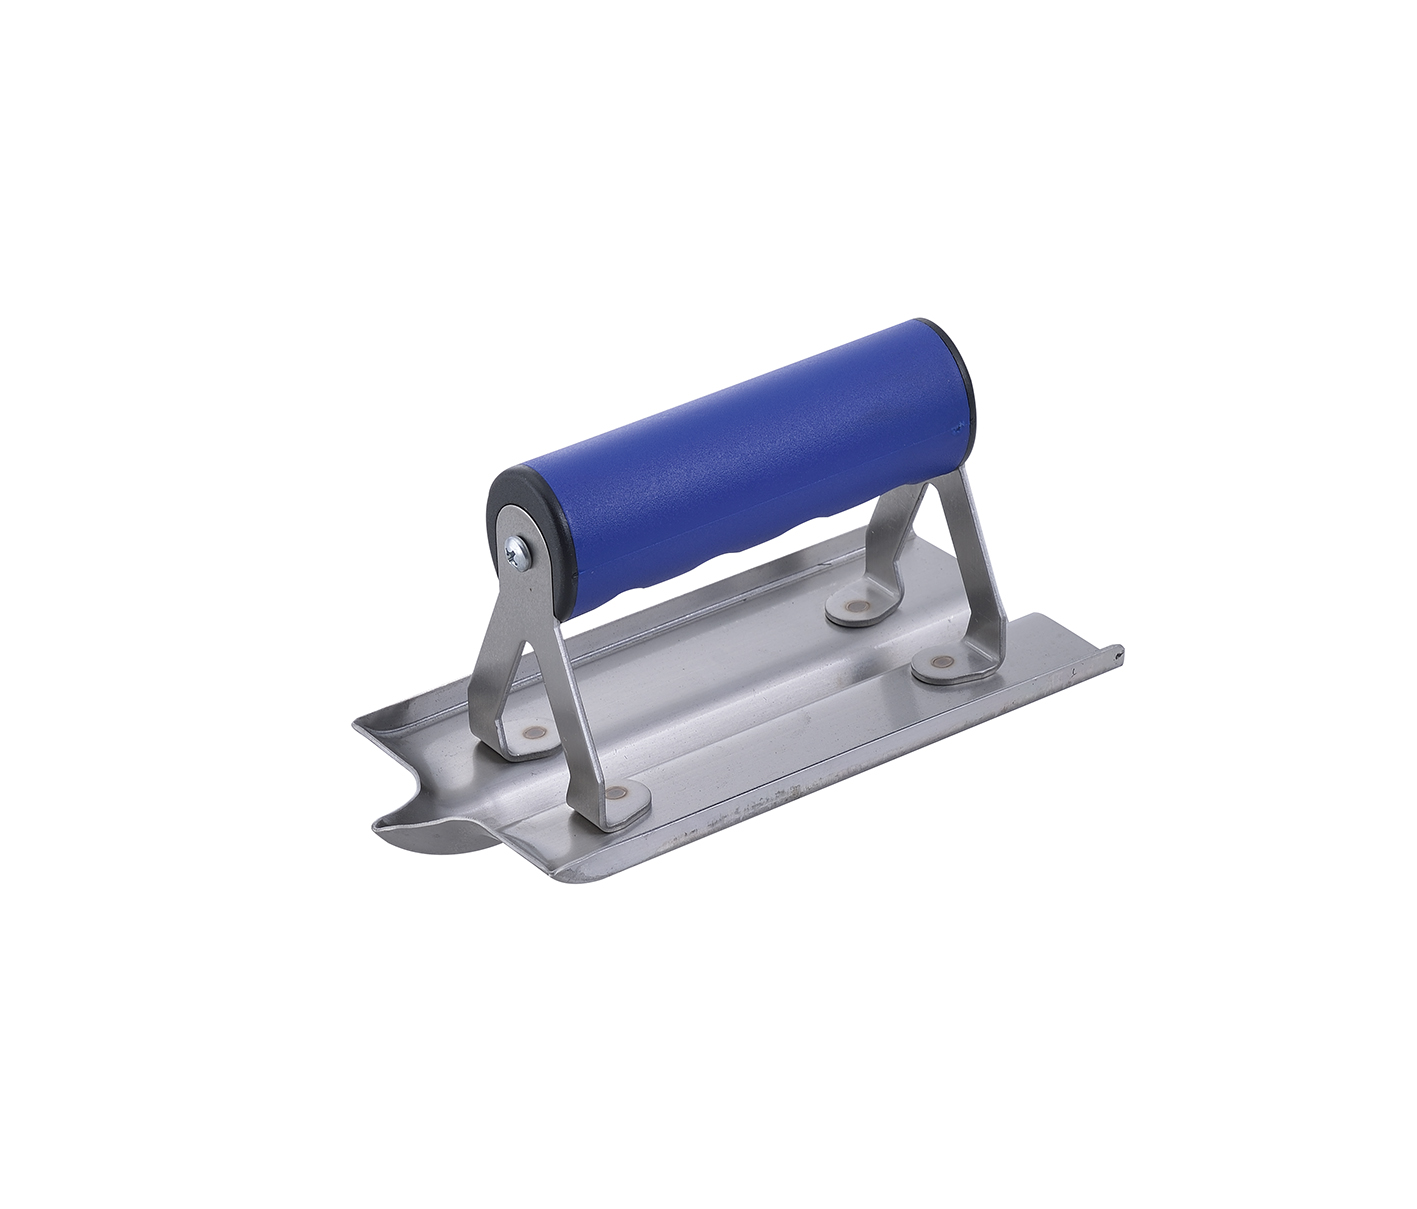
Leading Tools places the Universal Groover in the Corner group of its Professional Tools range, in a single size: 300181 at 3" × 6" (76 × 152 mm; 1" = 25.4 mm), specified in Stainless Steel. It has a blue soft-grip handle carried on two angled struts with round mounting pads, a blade with both ends turned up and a groove-forming bit running lengthwise along the underside.
Concrete shrinks as it dries and moves with temperature. Without a planned weak line, that movement releases as random cracking across the slab face. A groove pressed to sufficient depth creates the weakened plane where the crack forms instead, so the crack stays straight, stays in the joint and stays out of sight. The joint is a separate operation from edging and needs a separate tool.
Both ends of the blade are turned up, so the tool can enter and leave the surface without digging in, can be worked in either direction, and can be steered along a radius.
300181 is stainless steel, with high corrosion resistance and low upkeep. The face stays smooth, so wet concrete releases and the tool slides rather than drags. Chlorinated water, coastal air or prolonged soaking can still cause rust spots, so rinse with clean water and dry after use.
Joint depth should be at least one quarter of the slab thickness (ACI 360R recommendation); joint spacing and depth follow the project specification and drawings. See Joint depth and spacing below.
Two splayed struts with round mounting pads spread the operator's downward load across a wider footprint of the blade than a single central bracket does.
| Situation | Use the Universal Groover? | What to do |
|---|---|---|
| Control joint in the face of a fresh slab | Yes | Groove on the marked line once the perimeter has been edged |
| Curved or radiused joint line; decorative scoring | Yes | Steer the tool along the marked radius; the turned-up ends allow direction change without lifting |
| Rounding the outside perimeter of the slab | No, use an edger | Edge first with 300100 / 300101 or 300170–300173, then groove |
| Bleed water still standing on the surface | Not yet | Wait. Working the surface now presses bleed water back into it |
| Surface firm enough to walk with only a shallow impression | Yes, this is the window | Groove now; the joint will close if the surface is softer than this |
| Concrete already hardened past hand-tool range | No | Saw-cut the joint instead; the minimum depth rule is the same |
| Joint depth required exceeds the tool's bit depth | No | Saw-cut the joint instead; groove depth: contact us |
| Thin cement-based topping | Yes, but work fast | Follow the topping manufacturer's working time; the grooving window can be shorter than on a full-depth slab |
| Step | Action | What to watch |
|---|---|---|
| 1 | Confirm the surface is ready. The blade should ride on the surface without the bit ploughing or the base plate sinking | Too soft and the groove closes behind the tool; too hard and the shoulders tear |
| 2 | Mark the joint layout before starting. Snap chalk lines for straight runs; lay a bending guide or trammel line for curves | Joint spacing follows the project specification and drawings |
| 3 | Set the bit on the line and hold the tool square to the surface | The bit, not the blade edge, must sit on the mark |
| 4 | Push or pull along the line under firm, even downward pressure. Either direction works: the turned-up ends let the tool enter and leave without digging in | Even pressure is what produces even depth |
| 5 | Make more than one pass if needed. Full depth and width often take repeated passes rather than one heavy stroke | Forcing depth in a single pass tears the shoulders |
| 6 | Steer through curves without lifting. Keep the radius constant and the pressure constant through the turn | Abrupt direction changes leave a kinked joint line |
| 7 | Check depth against the slab thickness. The joint should reach at least one quarter of the slab thickness (ACI 360R recommendation) | A joint shallower than this will not control the crack; the slab will crack somewhere else |
| 8 | Inspect the shoulders and the line. Clean, unchipped shoulders and a consistent depth along the whole run | Chipping usually means the bit shoulder is worn or the concrete has gone too hard |
Depth is the specification that decides whether the joint works at all. Joint depth should be at least one quarter of the slab thickness (ACI 360R recommendation).
Joint spacing and depth follow the project specification and drawings.
The depth actually delivered is set by the bit projection on the tool. Groove depth and profile: contact us.
Set out the curve first: a trammel from a fixed centre, a bent guide batten, or a chalked arc. Start the pass on the tangent, not in the middle of the curve, so the tool is already tracking before the radius begins.
Keep the radius and the downward pressure constant through the turn; the turned-up ends let the tool change direction without being lifted, which is what keeps the joint line continuous rather than segmented. Typical work: garden and park paths, pool surrounds, slabs with radiused corners, and geometric decorative layouts.
In architectural and decorative concrete the groove is a design element as much as a control joint. The same tool scores panel lines that imitate stone or brick coursing, band courses, and dividing lines between different texture areas. Two points of discipline: decorative lines still have to respect the structural joint layout, so score the functional joints first and fit the decorative lines to them; and a stainless, smooth-faced blade matters more here than on plain slab work, because any staining or drag mark shows on a finished decorative surface.
Stamping compresses or closes a joint that was grooved before the stamp was laid, so the joint is re-cut with the groover after stamping, following the stamped pattern lines. Where a joint is re-run, keep the bit clean between passes: stamping normally involves a release agent, and release agent picked up in the bit channel transfers into the joint.
Thin cement-based toppings crack for the same reason slabs do and need the same jointed lines, usually matching the joints in the slab beneath. Follow the topping manufacturer's working time, and mark out the layout before placement rather than after.
Q: What is the difference between the Universal Groover 300181 and the Concrete Groover 300110?
A: Both are 3" × 6" with both ends turned up. 300181 is specified as Stainless Steel and has a blue soft-grip handle on two splayed struts, while 300110 has a wood roller handle on a single bracket.
Q: Do I push or pull it, and how do I get a smooth curved joint?
A: Both work: align the bit on the line, hold the tool square, and push or pull along it, often over more than one pass to reach full depth. For curves, set the line out with a physical guide, start the pass on the tangent and hold pressure steady; the turned-up ends let you change direction without lifting.
Q: The groove closed up behind the tool, or the joint edges are torn and chipped. What went wrong?
A: If the groove closed up, the concrete was still too soft when it was grooved; wait until the surface is firmer and re-groove on the same line. If the edges are torn, the concrete has gone too hard for a hand tool or the bit is worn, in which case saw-cut the joint instead.
Q: Do I need this tool as well as an edger?
A: Yes, they do different jobs. The edger rounds the outside perimeter of the slab; the groover cuts the control joint in the slab face. Leading Tools carries both: Concrete Edger 300100 / 300101 / 300171–300173 and Straight End Edger 300170 for edging, Concrete Groover 300110 and Universal Groover 300181 for jointing.
Q: Should I buy a hand groover or a walking groover?
A: A hand groover, which 300181 is, is lighter and more precise, and is the right tool for small areas, decorative lines and curves. A walking groover on a long handle saves the operator bending and suits large commercial floors with long straight joints. Crews doing both types of work usually own both.
| Model | Blade Size | Metric equivalent | Blade material |
|---|---|---|---|
| 300181 | 3" × 6" | 76 × 152 mm | Stainless Steel |
Blue soft-grip handle carried on two angled struts with round mounting pads. This differs from the wood roller handle on a single rectangular bracket used for the Concrete Groover 300110 in the same range.
| Item | Value |
|---|---|
| Product name / product group | Universal Groover — Corner, Professional Tools |
| Art. number | 300181 |
| Blade size | 3" × 6" (76 × 152 mm) |
| Blade material | Stainless Steel |
| Blade end form | Both ends turned up (rounded) |
| Handle | Blue soft-grip on two angled struts with round pads |
Both tools sit in the same Leading Tools group, both are 3" × 6", and both cut control joints. They compare as follows:
| Feature | Universal Groover 300181 | Concrete Groover 300110 |
|---|---|---|
| Art. Nr / size | 300181 · 3" × 6" | 300110 · 3" × 6" |
| Handle | Blue soft-grip | Natural wood roller |
| Bracket | Two splayed struts with round mounting pads | Single rectangular bracket |
| Blade ends | Both ends turned up | Both ends turned up |
| Sizes offered | 3" × 6" only | 3" × 6" only |
How that translates into a buying decision. Take the Universal Groover when the buyer wants a blue soft-grip handle, or a blade specified as Stainless Steel for a tool that will live in a wet truck box. Take the Concrete Groover 300110 when the buyer wants the traditional wood-handled tool, or when a customer's existing kit is wood-handled and consistency matters.
| Type | Buy it when | Trade-off |
|---|---|---|
| Hand groover (300181 is one) | Small to medium slabs; decorative and curved lines; anywhere the joint has to be placed precisely | Operator works kneeling or bent over; slow over large floor areas |
| Walking groover (long handle) | Large commercial slabs with many long straight joints | Less precise; not suited to tight curves or short runs |
A crew doing both types of work normally owns both. 300181 is the precision tool of the pair.
The joint should reach at least one quarter of the slab thickness (ACI 360R recommendation); joint spacing and depth follow the project specification and drawings. That makes bit depth, not blade footprint, the specification that decides which slabs a groover can serve.
Groove depth and profile: contact us. Where the required depth exceeds what the groove can reach, the joint is saw-cut instead.
| Tool | Art. Nr and size | What it does |
|---|---|---|
| Concrete Edger | 300100 3" × 6"; 300101 4" × 10" (wood roller handle); 300171 3" × 6"; 300172 4" × 11" (Curved End Outside Edger); 300173 4" × 6" (300171–300173: Stainless Steel; blue soft-grip handle) | Rounds the outside perimeter of the slab so the arris resists chipping |
| Concrete Groover | 300110 3" × 6" (wood roller handle, single bracket) | Cuts the control joint inside the slab face |
| Straight End Edger | 300170 3-1/2" × 6" (Stainless Steel; blue soft-grip handle) | Edging with straight ends, for edge runs that finish flush against a wall, riser or existing slab |
| Universal Groover | 300181 3" × 6" (Stainless Steel; blue soft-grip handle, two struts, turned-up ends) | Cuts the control joint inside the slab face, with a blue soft-grip handle on two struts |
Complete art-number reference for the Leading Tools Universal Groover.
| Art. Nr | Blade Size | Metric equivalent | Blade material | Handle |
|---|---|---|---|---|
| 300181 | 3" × 6" | 76 × 152 mm | Stainless Steel | Blue soft-grip on two angled struts |
The Universal Groover is a single-art-number model; there is no second size in the range.
| Art. Nr | Product | Size | Material | Handle |
|---|---|---|---|---|
| 300100 | Concrete Edger | 3" × 6" | — | Wood roller |
| 300101 | Concrete Edger | 4" × 10" | — | Wood roller |
| 300110 | Concrete Groover | 3" × 6" | — | Wood roller |
| 300170 | Straight End Edger | 3-1/2" × 6" | Stainless Steel | Blue soft-grip |
| 300171 | Concrete Edger | 3" × 6" | Stainless Steel | Blue soft-grip |
| 300172 | Concrete Edger (Curved End Outside Edger) | 4" × 11" | Stainless Steel | Blue soft-grip |
| 300173 | Concrete Edger | 4" × 6" | Stainless Steel | Blue soft-grip |
| Feature | Universal Groover (300181) | Concrete Groover (300110) |
|---|---|---|
| Material marked in the catalog | Stainless Steel | Please contact us |
| Blade ends | Turned up at both ends | Turned up at both ends |
| Sizes available | 3" × 6" only | 3" × 6" only |
| Handle / bracket | Blue soft-grip, two splayed struts | Wood roller, single rectangular bracket |
Stainless steel: high corrosion resistance and low upkeep; chlorinated water, coastal air or prolonged soaking can still cause rust spots, so rinse with clean water and dry after use.
The bit is the working part of the tool and the part that determines whether the joint is to specification.
Before each job, confirm the two struts are tight at both the blade and the handle, and check the soft grip for splits or wear. On a tool where the load is carried through two splayed struts rather than one bracket, a loose fixing on one side twists the blade and puts the joint off line.
Hang the tool or lay it flat, blade face protected, in a dry place, after rinsing with clean water and drying.
Universal Groover
Art. Nr: 300181
The Universal Groover is a hand finishing tool that presses a control joint, a groove, into the face of a concrete slab while the concrete is still plastic, so that drying-shrinkage and thermal cracking is directed along a planned line instead of appearing at random across the slab. It works on the inside face of the slab. The rounded perimeter edge of the same slab is formed with an edger (300100 / 300101 or 300170–300173 in the same Leading Tools range), and the two tools are not interchangeable.
Leading Tools places the Universal Groover in the Corner group of its Professional Tools range, in a single size: 300181 at 3" × 6" (76 × 152 mm; 1" = 25.4 mm), specified in Stainless Steel. It has a blue soft-grip handle carried on two angled struts with round mounting pads, a blade with both ends turned up and a groove-forming bit running lengthwise along the underside.
Concrete shrinks as it dries and moves with temperature. Without a planned weak line, that movement releases as random cracking across the slab face. A groove pressed to sufficient depth creates the weakened plane where the crack forms instead, so the crack stays straight, stays in the joint and stays out of sight. The joint is a separate operation from edging and needs a separate tool.
Both ends of the blade are turned up, so the tool can enter and leave the surface without digging in, can be worked in either direction, and can be steered along a radius.
300181 is stainless steel, with high corrosion resistance and low upkeep. The face stays smooth, so wet concrete releases and the tool slides rather than drags. Chlorinated water, coastal air or prolonged soaking can still cause rust spots, so rinse with clean water and dry after use.
Joint depth should be at least one quarter of the slab thickness (ACI 360R recommendation); joint spacing and depth follow the project specification and drawings. See Joint depth and spacing below.
Two splayed struts with round mounting pads spread the operator's downward load across a wider footprint of the blade than a single central bracket does.
| Situation | Use the Universal Groover? | What to do |
|---|---|---|
| Control joint in the face of a fresh slab | Yes | Groove on the marked line once the perimeter has been edged |
| Curved or radiused joint line; decorative scoring | Yes | Steer the tool along the marked radius; the turned-up ends allow direction change without lifting |
| Rounding the outside perimeter of the slab | No, use an edger | Edge first with 300100 / 300101 or 300170–300173, then groove |
| Bleed water still standing on the surface | Not yet | Wait. Working the surface now presses bleed water back into it |
| Surface firm enough to walk with only a shallow impression | Yes, this is the window | Groove now; the joint will close if the surface is softer than this |
| Concrete already hardened past hand-tool range | No | Saw-cut the joint instead; the minimum depth rule is the same |
| Joint depth required exceeds the tool's bit depth | No | Saw-cut the joint instead; groove depth: contact us |
| Thin cement-based topping | Yes, but work fast | Follow the topping manufacturer's working time; the grooving window can be shorter than on a full-depth slab |
| Step | Action | What to watch |
|---|---|---|
| 1 | Confirm the surface is ready. The blade should ride on the surface without the bit ploughing or the base plate sinking | Too soft and the groove closes behind the tool; too hard and the shoulders tear |
| 2 | Mark the joint layout before starting. Snap chalk lines for straight runs; lay a bending guide or trammel line for curves | Joint spacing follows the project specification and drawings |
| 3 | Set the bit on the line and hold the tool square to the surface | The bit, not the blade edge, must sit on the mark |
| 4 | Push or pull along the line under firm, even downward pressure. Either direction works: the turned-up ends let the tool enter and leave without digging in | Even pressure is what produces even depth |
| 5 | Make more than one pass if needed. Full depth and width often take repeated passes rather than one heavy stroke | Forcing depth in a single pass tears the shoulders |
| 6 | Steer through curves without lifting. Keep the radius constant and the pressure constant through the turn | Abrupt direction changes leave a kinked joint line |
| 7 | Check depth against the slab thickness. The joint should reach at least one quarter of the slab thickness (ACI 360R recommendation) | A joint shallower than this will not control the crack; the slab will crack somewhere else |
| 8 | Inspect the shoulders and the line. Clean, unchipped shoulders and a consistent depth along the whole run | Chipping usually means the bit shoulder is worn or the concrete has gone too hard |
Depth is the specification that decides whether the joint works at all. Joint depth should be at least one quarter of the slab thickness (ACI 360R recommendation).
Joint spacing and depth follow the project specification and drawings.
The depth actually delivered is set by the bit projection on the tool. Groove depth and profile: contact us.
Set out the curve first: a trammel from a fixed centre, a bent guide batten, or a chalked arc. Start the pass on the tangent, not in the middle of the curve, so the tool is already tracking before the radius begins.
Keep the radius and the downward pressure constant through the turn; the turned-up ends let the tool change direction without being lifted, which is what keeps the joint line continuous rather than segmented. Typical work: garden and park paths, pool surrounds, slabs with radiused corners, and geometric decorative layouts.
In architectural and decorative concrete the groove is a design element as much as a control joint. The same tool scores panel lines that imitate stone or brick coursing, band courses, and dividing lines between different texture areas. Two points of discipline: decorative lines still have to respect the structural joint layout, so score the functional joints first and fit the decorative lines to them; and a stainless, smooth-faced blade matters more here than on plain slab work, because any staining or drag mark shows on a finished decorative surface.
Stamping compresses or closes a joint that was grooved before the stamp was laid, so the joint is re-cut with the groover after stamping, following the stamped pattern lines. Where a joint is re-run, keep the bit clean between passes: stamping normally involves a release agent, and release agent picked up in the bit channel transfers into the joint.
Thin cement-based toppings crack for the same reason slabs do and need the same jointed lines, usually matching the joints in the slab beneath. Follow the topping manufacturer's working time, and mark out the layout before placement rather than after.
Q: What is the difference between the Universal Groover 300181 and the Concrete Groover 300110?
A: Both are 3" × 6" with both ends turned up. 300181 is specified as Stainless Steel and has a blue soft-grip handle on two splayed struts, while 300110 has a wood roller handle on a single bracket.
Q: Do I push or pull it, and how do I get a smooth curved joint?
A: Both work: align the bit on the line, hold the tool square, and push or pull along it, often over more than one pass to reach full depth. For curves, set the line out with a physical guide, start the pass on the tangent and hold pressure steady; the turned-up ends let you change direction without lifting.
Q: The groove closed up behind the tool, or the joint edges are torn and chipped. What went wrong?
A: If the groove closed up, the concrete was still too soft when it was grooved; wait until the surface is firmer and re-groove on the same line. If the edges are torn, the concrete has gone too hard for a hand tool or the bit is worn, in which case saw-cut the joint instead.
Q: Do I need this tool as well as an edger?
A: Yes, they do different jobs. The edger rounds the outside perimeter of the slab; the groover cuts the control joint in the slab face. Leading Tools carries both: Concrete Edger 300100 / 300101 / 300171–300173 and Straight End Edger 300170 for edging, Concrete Groover 300110 and Universal Groover 300181 for jointing.
Q: Should I buy a hand groover or a walking groover?
A: A hand groover, which 300181 is, is lighter and more precise, and is the right tool for small areas, decorative lines and curves. A walking groover on a long handle saves the operator bending and suits large commercial floors with long straight joints. Crews doing both types of work usually own both.
| Model | Blade Size | Metric equivalent | Blade material |
|---|---|---|---|
| 300181 | 3" × 6" | 76 × 152 mm | Stainless Steel |
Blue soft-grip handle carried on two angled struts with round mounting pads. This differs from the wood roller handle on a single rectangular bracket used for the Concrete Groover 300110 in the same range.
| Item | Value |
|---|---|
| Product name / product group | Universal Groover — Corner, Professional Tools |
| Art. number | 300181 |
| Blade size | 3" × 6" (76 × 152 mm) |
| Blade material | Stainless Steel |
| Blade end form | Both ends turned up (rounded) |
| Handle | Blue soft-grip on two angled struts with round pads |
Both tools sit in the same Leading Tools group, both are 3" × 6", and both cut control joints. They compare as follows:
| Feature | Universal Groover 300181 | Concrete Groover 300110 |
|---|---|---|
| Art. Nr / size | 300181 · 3" × 6" | 300110 · 3" × 6" |
| Handle | Blue soft-grip | Natural wood roller |
| Bracket | Two splayed struts with round mounting pads | Single rectangular bracket |
| Blade ends | Both ends turned up | Both ends turned up |
| Sizes offered | 3" × 6" only | 3" × 6" only |
How that translates into a buying decision. Take the Universal Groover when the buyer wants a blue soft-grip handle, or a blade specified as Stainless Steel for a tool that will live in a wet truck box. Take the Concrete Groover 300110 when the buyer wants the traditional wood-handled tool, or when a customer's existing kit is wood-handled and consistency matters.
| Type | Buy it when | Trade-off |
|---|---|---|
| Hand groover (300181 is one) | Small to medium slabs; decorative and curved lines; anywhere the joint has to be placed precisely | Operator works kneeling or bent over; slow over large floor areas |
| Walking groover (long handle) | Large commercial slabs with many long straight joints | Less precise; not suited to tight curves or short runs |
A crew doing both types of work normally owns both. 300181 is the precision tool of the pair.
The joint should reach at least one quarter of the slab thickness (ACI 360R recommendation); joint spacing and depth follow the project specification and drawings. That makes bit depth, not blade footprint, the specification that decides which slabs a groover can serve.
Groove depth and profile: contact us. Where the required depth exceeds what the groove can reach, the joint is saw-cut instead.
| Tool | Art. Nr and size | What it does |
|---|---|---|
| Concrete Edger | 300100 3" × 6"; 300101 4" × 10" (wood roller handle); 300171 3" × 6"; 300172 4" × 11" (Curved End Outside Edger); 300173 4" × 6" (300171–300173: Stainless Steel; blue soft-grip handle) | Rounds the outside perimeter of the slab so the arris resists chipping |
| Concrete Groover | 300110 3" × 6" (wood roller handle, single bracket) | Cuts the control joint inside the slab face |
| Straight End Edger | 300170 3-1/2" × 6" (Stainless Steel; blue soft-grip handle) | Edging with straight ends, for edge runs that finish flush against a wall, riser or existing slab |
| Universal Groover | 300181 3" × 6" (Stainless Steel; blue soft-grip handle, two struts, turned-up ends) | Cuts the control joint inside the slab face, with a blue soft-grip handle on two struts |
Complete art-number reference for the Leading Tools Universal Groover.
| Art. Nr | Blade Size | Metric equivalent | Blade material | Handle |
|---|---|---|---|---|
| 300181 | 3" × 6" | 76 × 152 mm | Stainless Steel | Blue soft-grip on two angled struts |
The Universal Groover is a single-art-number model; there is no second size in the range.
| Art. Nr | Product | Size | Material | Handle |
|---|---|---|---|---|
| 300100 | Concrete Edger | 3" × 6" | — | Wood roller |
| 300101 | Concrete Edger | 4" × 10" | — | Wood roller |
| 300110 | Concrete Groover | 3" × 6" | — | Wood roller |
| 300170 | Straight End Edger | 3-1/2" × 6" | Stainless Steel | Blue soft-grip |
| 300171 | Concrete Edger | 3" × 6" | Stainless Steel | Blue soft-grip |
| 300172 | Concrete Edger (Curved End Outside Edger) | 4" × 11" | Stainless Steel | Blue soft-grip |
| 300173 | Concrete Edger | 4" × 6" | Stainless Steel | Blue soft-grip |
| Feature | Universal Groover (300181) | Concrete Groover (300110) |
|---|---|---|
| Material marked in the catalog | Stainless Steel | Please contact us |
| Blade ends | Turned up at both ends | Turned up at both ends |
| Sizes available | 3" × 6" only | 3" × 6" only |
| Handle / bracket | Blue soft-grip, two splayed struts | Wood roller, single rectangular bracket |
Stainless steel: high corrosion resistance and low upkeep; chlorinated water, coastal air or prolonged soaking can still cause rust spots, so rinse with clean water and dry after use.
The bit is the working part of the tool and the part that determines whether the joint is to specification.
Before each job, confirm the two struts are tight at both the blade and the handle, and check the soft grip for splits or wear. On a tool where the load is carried through two splayed struts rather than one bracket, a loose fixing on one side twists the blade and puts the joint off line.
Hang the tool or lay it flat, blade face protected, in a dry place, after rinsing with clean water and drying.

In compliance with EU personal data protection laws, we are committed to protecting and providing you with control over your personal data. By clicking "Accept All", you allow us to place cookies to enhance your experience on this site, help us analyze site performance and usage, and enable us to deliver relevant marketing content. You can manage your cookie settings below. By clicking "Agree" you agree to the current settings. For more information, please visit the Privacy Statement.
This website uses cookies
In compliance with EU personal data protection laws, we are committed to protecting your personal data and providing you with control over it. By clicking "Agree", you allow us to place cookies to improve your experience on this site, help us analyze site performance and usage, and allow us to deliver relevant marketing content.
By clicking "Only necessary" you allow us to place only necessary cookies. The website cannot function without these cookies and you cannot switch them off on your system. These cookies are typically set only in response to an action you perform (i.e. a service request), such as setting privacy preferences, logging in, or filling in a form. You can set your browser to block or prompt you for these cookies, but this may prevent some site features from working.



