
Copyright 2026 © Leading Tools Industrial Co., Ltd.
All Rights Reserved. Website Design by Awakening Design
CATALOG TYPE
Product Categories
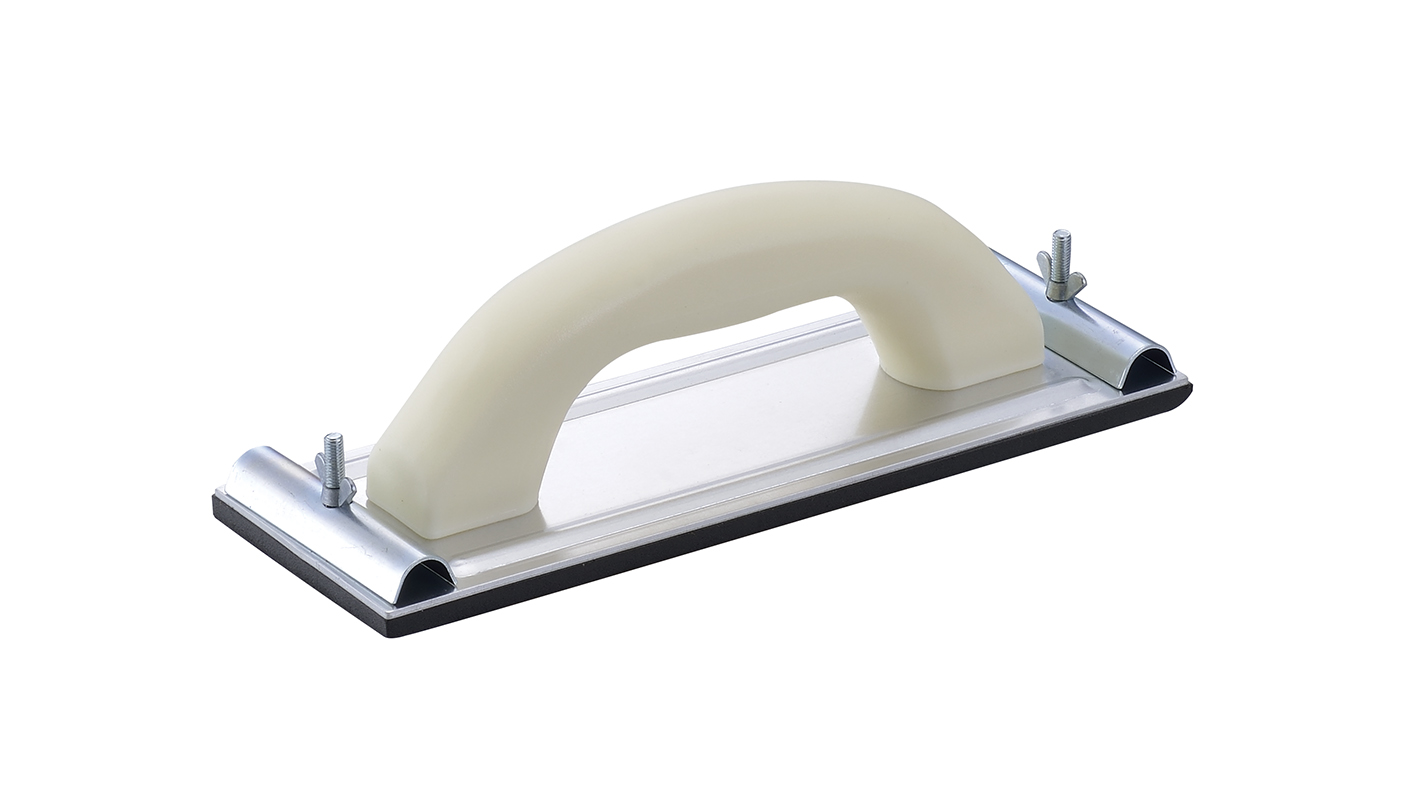
Aluminum Hand Sander
Product Description
Aluminum Hand Sander
Art. Nr: 301090 — 80mm × 235mm
The Aluminum Hand Sander is a hand-held sandpaper holder used to level dried joint compound and plaster by hand.
Its job sits at the very end of the drywall and plastering sequence: after the taping and finishing coats have cured, the tool carries an abrasive sheet across the wall or ceiling to remove trowel ridges, joint crowns and lap marks so the surface can take paint, wallpaper or a decorative coating without those defects showing through. It is used for the manual sanding of filled and skim-coated surfaces, and it reaches the edges, outside corners and small areas a pole sander cannot.
Leading Tools lists this model in the Float group, in a single size: 301090 at 80mm × 235mm. It has an aluminum base plate carrying a cream/off-white bow handle, with a metal clamp bar and a wing screw at each end of the plate, that is, one sandpaper attachment system, not three.
Plastering and drywall finishing are wet trades. A hand sander lives in a bucket with damp sponges, gets set down on fresh compound, and goes back into a van that is not dry.
A carbon-steel base plate in that cycle will show rust at the first scratch in its coating, and a rusted plate transfers marks onto a surface that is about to be painted. An aluminum base plate does not rust, so it leaves no rust marks on a surface that is about to be painted.
Overhead work is where weight is felt most: the operator holds the tool above shoulder height and applies pressure upward, so every gram counts. An aluminum plate gives plate rigidity at a lower weight than steel.
The failure mode of hand sanding is not scratching; it is dishing. If the plate flexes or has been bent, pressure concentrates at one point and the sander cuts a hollow that a raking light will show after painting. A rigid aluminum plate holds a flat reference face across the full 235mm, so pressure spreads over the whole sheet and the tool cuts high points rather than chasing the surface.
Three attachment methods exist: clamp, hook-and-loop, and spray adhesive, but a given tool has one of them. 301090 is a clamp-type sander: a metal clamp bar with a wing screw at each end of the plate. That means the buyer is not tied to a proprietary consumable.
Any abrasive sheet or mesh that can be cut to roughly 80 × 235mm and folded will clamp, including offcuts from a standard sheet. Hook-and-loop tools are quicker to reload but require purpose-made hook-compatible sheets.
A pole sander covers open wall fast and then stops at every edge. The hand sander finishes what the pole sander leaves: edges, outside corners, small areas. That is a real division of labor on site, and at 80 × 235mm this model is at the narrow end of the class, which is where reveals, mullion returns and patch repairs live.
The hand sander is only used after the finishing material has fully cured. Sanding a compound that is still soft loads the abrasive with wet gypsum, tears the surface and wastes the sheet.
| Material | Wait before sanding | Note |
|---|---|---|
| Gypsum joint compound (drying-type) | Minimum 24 hours after application, depending on conditions | Longer in cold or humid conditions, or over a thick fill |
| Setting-type compound and other plasters | Fully dry or hardened, as the manufacturer's instructions state | : |
| Thick or built-up applications | Allow additional time beyond the above | ; |
Cure test before you start. Touch the surface lightly with a piece of used sandpaper. If the abrasive clogs or gums, the surface is not cured; stop and wait. This costs ten seconds and saves a sheet and a repair.
| Situation | Use this tool? | What to do |
|---|---|---|
| Cured joint compound, flat wall or ceiling | Yes | Clamp 120–150 grit, work in curved strokes |
| Level-5 skim coat, paint-ready prep | Yes | Start at 150, step to 180, then 220 |
| Edges, outside corners, reveals, small patches after pole sanding | Yes, this is the hand sander's specific role | Work the areas the pole sander could not reach |
| Inside corners and tight radii | No, use a sponge block or folded paper | A rigid plate will cut one face of the corner |
| Surface still soft or gumming the paper | No | Wait for full cure and re-test |
| Removing heavy build or a run | Use with caution | Start at 80–100 to knock the ridge down, then refine upward through the grits |
| Step | Action | Detail |
|---|---|---|
| 1 | Choose the grit | 80–100 for heavy build; 120 to start general leveling; 150 for intermediate; 180–220 for paint-ready finish |
| 2 | Fold the sheet | Fold once along the short dimension to make a reinforced edge: this is the edge that goes under the clamp, and it is what stops the paper tearing at the clamp bar |
| 3 | Clamp the first edge | Seat the folded edge under the clamp bar at one end of the plate and tighten the wing screw |
| 4 | Stretch and clamp the second edge | Draw the sheet taut across the plate, then clamp the far end. Both ends must be firmly seated in the clamps or the paper will slip in use |
| 5 | Check it is flat | The sheet must be flat and wrinkle-free. A wrinkle becomes a ridge and a ridge becomes a scratch line |
| 6 | Verify flat contact | Press the loaded sander against a known flat surface and confirm the whole face makes contact. Any lifted corner will gouge the wall |
| 7 | Sand with curved strokes | Hold the plate flat against the surface and work in circular, figure-8 or curved motions. Do not grind repeatedly in one direction over the same spot, that leaves directional scratch patterns and hollows that show under paint |
| 8 | Keep the pressure light-to-moderate | Let the abrasive cut. Excessive pressure gouges the surface and wears the sheet faster |
| 9 | Load through the palm | Apply pressure with the palm on the handle, not through the fingers, so the load spreads over the whole plate |
| 10 | Check as you go | Run a clean hand over the surface, and use a raking light: a lamp held at a low angle to the wall, to find what your hand missed |
A note on stroke direction. Use curved or circular motions over open areas, because repeated same-direction grinding leaves visible scratch patterns. Along a taped joint or over a fastener head, use a short, even push-pull stroke that follows the length of the joint rather than crossing it.
Never skip more than one grit step at a time. Each grit has to remove the scratch pattern the previous one left; skip too far and the coarse scratches survive under the paint.
Level-5 guidance follows the same logic from a finer starting point: begin at 150, step up to 180, then 220, and inspect at every step rather than jumping to the finest grit.
Sanding drywall and joint compound generates dust containing gypsum and crystalline silica; long-term inhalation is harmful, so the dust must be controlled.
The Level-5 finish is the highest drywall finishing level and is typically specified where gloss or semi-gloss paint, critical lighting or high-quality interior finishes are involved.
After the Level-5 skim coat has dried, hand sanding is the standard route to a paint-ready face because it removes very little material and generates far less airborne dust than power sanding. Start at 150 grit and step up through 180 to 220, checking after each pass. The 80mm width of 301090 makes it slower than a wide block over open wall, but it is the right tool for the perimeter, the openings and the final touch-in.
Before wallpaper, paint or a texture coating goes on, the hand sander removes trowel marks, joint ridges and minor irregularities that would otherwise be visible through the finish. This is the tool's core commercial use and the reason it sits at the end of the taping sequence. Wallpaper and gloss paint are the least forgiving finishes; matte paint hides more, but a raking light will still find a missed ridge.
Q: What sandpaper does 301090 take, and how does it attach?
A: The plate is 80 × 235mm, so it takes a strip of sheet or mesh about 80 mm wide and at least 235 mm long, plus folding allowance.
It is clamp-only, with a metal clamp bar and a wing screw at each end: fold the sheet, seat it under one bar, stretch it across the plate, and clamp the far end. Any paper or mesh cut to size will clamp, so there is no proprietary consumable.
Q: What grit should I start with?
A: 120 for general leveling of dried joint compound, 150 for intermediate work, and 180–220 for a paint-ready finish. Use 80–100 only to knock down heavy build, then work back up through the grits.
Q: I get scratch marks or gouges, or the sandpaper keeps clogging. What is wrong?
A: Scratches mean the grit was too coarse or the pressure too heavy, so step up to a finer grit, let the abrasive cut, and work in curved strokes.
Gouges come from pressure concentrated in one spot or a plate that is no longer flat, so keep the sander moving and check the plate against a straight edge. If the paper clogs, the surface is not fully cured, so wait; if it is cured, switch to open-mesh abrasive.
Q: The sandpaper slips or tears at the clamp. Will the plate rust?
A: Fold the sheet once at each clamped edge, seat both ends fully in the clamps and tighten evenly. Over-tightening on an unfolded edge tears the paper, and dried compound in the clamp threads makes it slip. Store the tool dry.
Q: How does this differ from the Hook-and-Loop Sponge Float (611685) in the same Float group?
A: They do completely different jobs. 301090 abrades a dry, cured surface with a clamped abrasive sheet; 611685 carries interchangeable hook-attached sponge pads for wet work. If the surface is still wet, 301090 is not the tool.
| Attribute | Specification |
|---|---|
| Art. Nr | 301090 |
| Size | 80mm × 235mm |
| Imperial equivalent | ≈3-1/8" × 9-1/4" (1" = 25.4mm) |
| Product group | Float, Professional Tools |
| Sizes in range | One, no second size in the range |
| Attribute | Specification |
|---|---|
| Base plate material | Aluminum |
| Plate profile | Flat and rigid across the full working face |
| Attribute | Specification |
|---|---|
| Handle type | Cream/off-white bow handle |
| Grip form | Arched bow spanning the plate, taken in the palm |
| Attribute | Specification |
|---|---|
| Attachment method on 301090 | Clamp type only: one metal clamp bar with a wing screw at each end of the plate |
| Clamp screws | One wing screw per end (two total) |
| Abrasive size taken | ≈80 × 235mm strip of sheet or mesh, plus folding allowance |
| Hook-and-loop face | Not on this model |
| Adhesive-backed abrasive | Not the intended system on this model |
| Compatible with sanding mesh | Yes, mesh clamps in the same way |
301090 has a rigid aluminum plate. That is the right choice for flat work and the wrong choice for curved work. The alternatives below are separate products, not accessories for this model.
| Backer type | Best for | Characteristics |
|---|---|---|
| Rigid aluminum (301090) | Flat drywall patches, final paint prep, ceilings | Flat rigid plate, light weight |
| Flexible / sponge backer | Contoured surfaces, radii, arch heads, corners | Follows slight contours; less aggressive; for corners and details a sponge block or folded paper is the usual choice rather than a rigid sander |
| Hybrid (firm center, flexible edges) | General-purpose use | Combines control with contour-following |
| Finish stage | Grit | What it does |
|---|---|---|
| Heavy build / ridge removal | 80–100 | Fast material removal; leaves visible scratches that must be refined out |
| Initial leveling | 120 | Standard starting grit for drywall joint compound |
| Intermediate leveling | 150 | Good balance of cut rate and finish quality; the usual grit for general joint and screw-head sanding |
| Paint-ready finish | 180–220 | Minimal removal; produces a surface ready for primer |
Open-mesh abrasive is worth considering for any job with volume: the holes let gypsum dust pass instead of loading the abrasive, so mesh is less prone to clogging than paper.
Complete art-number reference for the Leading Tools Aluminum Hand Sander.
| Art. Nr | Size | Metric | Imperial (1" = 25.4mm) | Base plate material | Handle |
|---|---|---|---|---|---|
| 301090 | 80mm × 235mm | 80 × 235mm | ≈3-1/8" × 9-1/4" | Aluminum | Cream/off-white bow handle |
The Aluminum Hand Sander is a single-art-number model; there is no second size in the range.
| Art. Nr | Product | Size | Working face |
|---|---|---|---|
| 611701 | Rubber Grout Float | 95mm × 245mm | Blue rubber pad, white arched handle |
| 301090 | Aluminum Hand Sander | 80mm × 235mm | Aluminum plate with end clamp bars |
| 611685 | Hook-and-Loop Sponge Float | 130mm × 270mm | Hook-faced plate for interchangeable sponge pads, green handle |
| 611686 | Sponge Float | 130mm × 305mm | Sponge pad on a perforated plate, blue handle |
| Feature | Aluminum Hand Sander (301090) | Hook-and-Loop Sponge Float (611685) | Rubber Grout Float (611701) |
|---|---|---|---|
| Operation | Abrades a dry, cured surface | Wets and rubs a surface, or carries an abrasive/scouring pad | Presses and strikes off wet grout |
| Face | Rigid aluminum plate | Hook face for interchangeable pads | Rubber pad |
| Consumable | Clamped abrasive sheet or mesh | Sponge or pad, hook-attached | None, the rubber is the working face |
| Timing on site | After the compound has cured | During or after the wet stage | While the grout is workable |
| Size | 80 × 235mm | 130 × 270mm | 95 × 245mm |
Buyers frequently confuse these. If the surface is still wet, this is not the tool.
Aluminum Hand Sander
Art. Nr: 301090 — 80mm × 235mm
The Aluminum Hand Sander is a hand-held sandpaper holder used to level dried joint compound and plaster by hand.
Its job sits at the very end of the drywall and plastering sequence: after the taping and finishing coats have cured, the tool carries an abrasive sheet across the wall or ceiling to remove trowel ridges, joint crowns and lap marks so the surface can take paint, wallpaper or a decorative coating without those defects showing through. It is used for the manual sanding of filled and skim-coated surfaces, and it reaches the edges, outside corners and small areas a pole sander cannot.
Leading Tools lists this model in the Float group, in a single size: 301090 at 80mm × 235mm. It has an aluminum base plate carrying a cream/off-white bow handle, with a metal clamp bar and a wing screw at each end of the plate, that is, one sandpaper attachment system, not three.
Plastering and drywall finishing are wet trades. A hand sander lives in a bucket with damp sponges, gets set down on fresh compound, and goes back into a van that is not dry.
A carbon-steel base plate in that cycle will show rust at the first scratch in its coating, and a rusted plate transfers marks onto a surface that is about to be painted. An aluminum base plate does not rust, so it leaves no rust marks on a surface that is about to be painted.
Overhead work is where weight is felt most: the operator holds the tool above shoulder height and applies pressure upward, so every gram counts. An aluminum plate gives plate rigidity at a lower weight than steel.
The failure mode of hand sanding is not scratching; it is dishing. If the plate flexes or has been bent, pressure concentrates at one point and the sander cuts a hollow that a raking light will show after painting. A rigid aluminum plate holds a flat reference face across the full 235mm, so pressure spreads over the whole sheet and the tool cuts high points rather than chasing the surface.
Three attachment methods exist: clamp, hook-and-loop, and spray adhesive, but a given tool has one of them. 301090 is a clamp-type sander: a metal clamp bar with a wing screw at each end of the plate. That means the buyer is not tied to a proprietary consumable.
Any abrasive sheet or mesh that can be cut to roughly 80 × 235mm and folded will clamp, including offcuts from a standard sheet. Hook-and-loop tools are quicker to reload but require purpose-made hook-compatible sheets.
A pole sander covers open wall fast and then stops at every edge. The hand sander finishes what the pole sander leaves: edges, outside corners, small areas. That is a real division of labor on site, and at 80 × 235mm this model is at the narrow end of the class, which is where reveals, mullion returns and patch repairs live.
The hand sander is only used after the finishing material has fully cured. Sanding a compound that is still soft loads the abrasive with wet gypsum, tears the surface and wastes the sheet.
| Material | Wait before sanding | Note |
|---|---|---|
| Gypsum joint compound (drying-type) | Minimum 24 hours after application, depending on conditions | Longer in cold or humid conditions, or over a thick fill |
| Setting-type compound and other plasters | Fully dry or hardened, as the manufacturer's instructions state | : |
| Thick or built-up applications | Allow additional time beyond the above | ; |
Cure test before you start. Touch the surface lightly with a piece of used sandpaper. If the abrasive clogs or gums, the surface is not cured; stop and wait. This costs ten seconds and saves a sheet and a repair.
| Situation | Use this tool? | What to do |
|---|---|---|
| Cured joint compound, flat wall or ceiling | Yes | Clamp 120–150 grit, work in curved strokes |
| Level-5 skim coat, paint-ready prep | Yes | Start at 150, step to 180, then 220 |
| Edges, outside corners, reveals, small patches after pole sanding | Yes, this is the hand sander's specific role | Work the areas the pole sander could not reach |
| Inside corners and tight radii | No, use a sponge block or folded paper | A rigid plate will cut one face of the corner |
| Surface still soft or gumming the paper | No | Wait for full cure and re-test |
| Removing heavy build or a run | Use with caution | Start at 80–100 to knock the ridge down, then refine upward through the grits |
| Step | Action | Detail |
|---|---|---|
| 1 | Choose the grit | 80–100 for heavy build; 120 to start general leveling; 150 for intermediate; 180–220 for paint-ready finish |
| 2 | Fold the sheet | Fold once along the short dimension to make a reinforced edge: this is the edge that goes under the clamp, and it is what stops the paper tearing at the clamp bar |
| 3 | Clamp the first edge | Seat the folded edge under the clamp bar at one end of the plate and tighten the wing screw |
| 4 | Stretch and clamp the second edge | Draw the sheet taut across the plate, then clamp the far end. Both ends must be firmly seated in the clamps or the paper will slip in use |
| 5 | Check it is flat | The sheet must be flat and wrinkle-free. A wrinkle becomes a ridge and a ridge becomes a scratch line |
| 6 | Verify flat contact | Press the loaded sander against a known flat surface and confirm the whole face makes contact. Any lifted corner will gouge the wall |
| 7 | Sand with curved strokes | Hold the plate flat against the surface and work in circular, figure-8 or curved motions. Do not grind repeatedly in one direction over the same spot, that leaves directional scratch patterns and hollows that show under paint |
| 8 | Keep the pressure light-to-moderate | Let the abrasive cut. Excessive pressure gouges the surface and wears the sheet faster |
| 9 | Load through the palm | Apply pressure with the palm on the handle, not through the fingers, so the load spreads over the whole plate |
| 10 | Check as you go | Run a clean hand over the surface, and use a raking light: a lamp held at a low angle to the wall, to find what your hand missed |
A note on stroke direction. Use curved or circular motions over open areas, because repeated same-direction grinding leaves visible scratch patterns. Along a taped joint or over a fastener head, use a short, even push-pull stroke that follows the length of the joint rather than crossing it.
Never skip more than one grit step at a time. Each grit has to remove the scratch pattern the previous one left; skip too far and the coarse scratches survive under the paint.
Level-5 guidance follows the same logic from a finer starting point: begin at 150, step up to 180, then 220, and inspect at every step rather than jumping to the finest grit.
Sanding drywall and joint compound generates dust containing gypsum and crystalline silica; long-term inhalation is harmful, so the dust must be controlled.
The Level-5 finish is the highest drywall finishing level and is typically specified where gloss or semi-gloss paint, critical lighting or high-quality interior finishes are involved.
After the Level-5 skim coat has dried, hand sanding is the standard route to a paint-ready face because it removes very little material and generates far less airborne dust than power sanding. Start at 150 grit and step up through 180 to 220, checking after each pass. The 80mm width of 301090 makes it slower than a wide block over open wall, but it is the right tool for the perimeter, the openings and the final touch-in.
Before wallpaper, paint or a texture coating goes on, the hand sander removes trowel marks, joint ridges and minor irregularities that would otherwise be visible through the finish. This is the tool's core commercial use and the reason it sits at the end of the taping sequence. Wallpaper and gloss paint are the least forgiving finishes; matte paint hides more, but a raking light will still find a missed ridge.
Q: What sandpaper does 301090 take, and how does it attach?
A: The plate is 80 × 235mm, so it takes a strip of sheet or mesh about 80 mm wide and at least 235 mm long, plus folding allowance.
It is clamp-only, with a metal clamp bar and a wing screw at each end: fold the sheet, seat it under one bar, stretch it across the plate, and clamp the far end. Any paper or mesh cut to size will clamp, so there is no proprietary consumable.
Q: What grit should I start with?
A: 120 for general leveling of dried joint compound, 150 for intermediate work, and 180–220 for a paint-ready finish. Use 80–100 only to knock down heavy build, then work back up through the grits.
Q: I get scratch marks or gouges, or the sandpaper keeps clogging. What is wrong?
A: Scratches mean the grit was too coarse or the pressure too heavy, so step up to a finer grit, let the abrasive cut, and work in curved strokes.
Gouges come from pressure concentrated in one spot or a plate that is no longer flat, so keep the sander moving and check the plate against a straight edge. If the paper clogs, the surface is not fully cured, so wait; if it is cured, switch to open-mesh abrasive.
Q: The sandpaper slips or tears at the clamp. Will the plate rust?
A: Fold the sheet once at each clamped edge, seat both ends fully in the clamps and tighten evenly. Over-tightening on an unfolded edge tears the paper, and dried compound in the clamp threads makes it slip. Store the tool dry.
Q: How does this differ from the Hook-and-Loop Sponge Float (611685) in the same Float group?
A: They do completely different jobs. 301090 abrades a dry, cured surface with a clamped abrasive sheet; 611685 carries interchangeable hook-attached sponge pads for wet work. If the surface is still wet, 301090 is not the tool.
| Attribute | Specification |
|---|---|
| Art. Nr | 301090 |
| Size | 80mm × 235mm |
| Imperial equivalent | ≈3-1/8" × 9-1/4" (1" = 25.4mm) |
| Product group | Float, Professional Tools |
| Sizes in range | One, no second size in the range |
| Attribute | Specification |
|---|---|
| Base plate material | Aluminum |
| Plate profile | Flat and rigid across the full working face |
| Attribute | Specification |
|---|---|
| Handle type | Cream/off-white bow handle |
| Grip form | Arched bow spanning the plate, taken in the palm |
| Attribute | Specification |
|---|---|
| Attachment method on 301090 | Clamp type only: one metal clamp bar with a wing screw at each end of the plate |
| Clamp screws | One wing screw per end (two total) |
| Abrasive size taken | ≈80 × 235mm strip of sheet or mesh, plus folding allowance |
| Hook-and-loop face | Not on this model |
| Adhesive-backed abrasive | Not the intended system on this model |
| Compatible with sanding mesh | Yes, mesh clamps in the same way |
301090 has a rigid aluminum plate. That is the right choice for flat work and the wrong choice for curved work. The alternatives below are separate products, not accessories for this model.
| Backer type | Best for | Characteristics |
|---|---|---|
| Rigid aluminum (301090) | Flat drywall patches, final paint prep, ceilings | Flat rigid plate, light weight |
| Flexible / sponge backer | Contoured surfaces, radii, arch heads, corners | Follows slight contours; less aggressive; for corners and details a sponge block or folded paper is the usual choice rather than a rigid sander |
| Hybrid (firm center, flexible edges) | General-purpose use | Combines control with contour-following |
| Finish stage | Grit | What it does |
|---|---|---|
| Heavy build / ridge removal | 80–100 | Fast material removal; leaves visible scratches that must be refined out |
| Initial leveling | 120 | Standard starting grit for drywall joint compound |
| Intermediate leveling | 150 | Good balance of cut rate and finish quality; the usual grit for general joint and screw-head sanding |
| Paint-ready finish | 180–220 | Minimal removal; produces a surface ready for primer |
Open-mesh abrasive is worth considering for any job with volume: the holes let gypsum dust pass instead of loading the abrasive, so mesh is less prone to clogging than paper.
Complete art-number reference for the Leading Tools Aluminum Hand Sander.
| Art. Nr | Size | Metric | Imperial (1" = 25.4mm) | Base plate material | Handle |
|---|---|---|---|---|---|
| 301090 | 80mm × 235mm | 80 × 235mm | ≈3-1/8" × 9-1/4" | Aluminum | Cream/off-white bow handle |
The Aluminum Hand Sander is a single-art-number model; there is no second size in the range.
| Art. Nr | Product | Size | Working face |
|---|---|---|---|
| 611701 | Rubber Grout Float | 95mm × 245mm | Blue rubber pad, white arched handle |
| 301090 | Aluminum Hand Sander | 80mm × 235mm | Aluminum plate with end clamp bars |
| 611685 | Hook-and-Loop Sponge Float | 130mm × 270mm | Hook-faced plate for interchangeable sponge pads, green handle |
| 611686 | Sponge Float | 130mm × 305mm | Sponge pad on a perforated plate, blue handle |
| Feature | Aluminum Hand Sander (301090) | Hook-and-Loop Sponge Float (611685) | Rubber Grout Float (611701) |
|---|---|---|---|
| Operation | Abrades a dry, cured surface | Wets and rubs a surface, or carries an abrasive/scouring pad | Presses and strikes off wet grout |
| Face | Rigid aluminum plate | Hook face for interchangeable pads | Rubber pad |
| Consumable | Clamped abrasive sheet or mesh | Sponge or pad, hook-attached | None, the rubber is the working face |
| Timing on site | After the compound has cured | During or after the wet stage | While the grout is workable |
| Size | 80 × 235mm | 130 × 270mm | 95 × 245mm |
Buyers frequently confuse these. If the surface is still wet, this is not the tool.

In compliance with EU personal data protection laws, we are committed to protecting and providing you with control over your personal data. By clicking "Accept All", you allow us to place cookies to enhance your experience on this site, help us analyze site performance and usage, and enable us to deliver relevant marketing content. You can manage your cookie settings below. By clicking "Agree" you agree to the current settings. For more information, please visit the Privacy Statement.
This website uses cookies
In compliance with EU personal data protection laws, we are committed to protecting your personal data and providing you with control over it. By clicking "Agree", you allow us to place cookies to improve your experience on this site, help us analyze site performance and usage, and allow us to deliver relevant marketing content.
By clicking "Only necessary" you allow us to place only necessary cookies. The website cannot function without these cookies and you cannot switch them off on your system. These cookies are typically set only in response to an action you perform (i.e. a service request), such as setting privacy preferences, logging in, or filling in a form. You can set your browser to block or prompt you for these cookies, but this may prevent some site features from working.



