
Copyright 2026 © Leading Tools Industrial Co., Ltd.
All Rights Reserved. Website Design by Awakening Design
CATALOG TYPE
Product Categories
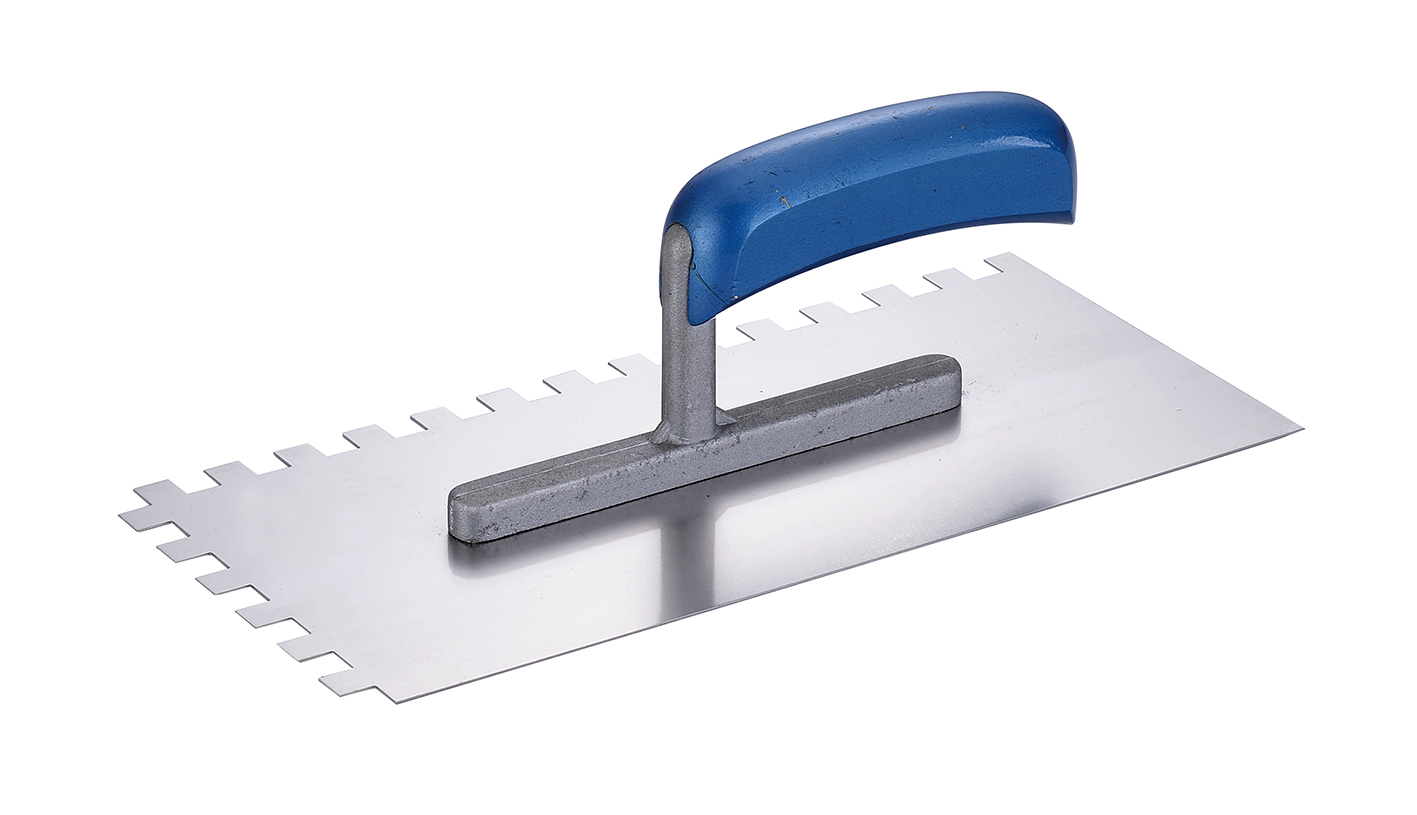
German Standard Notched Trowel
Product Description
German Standard Notched Trowel: five art numbers, one square notch size each (4–12 mm), all on a 130 × 280 mm blade
| Item | Value |
|---|---|
| Product name | German Standard Notched Trowel |
| Art. Nr | 702301-74, 702301-76, 702301-78, 702301-80, 702301-82 |
| Blade size (all five) | 130 mm x 280 mm (approx. 5-1/8" x 11") |
| Notch type (all five) | Square only (⊔) |
| Notch sizes | 4 x 4 mm / 6 x 6 mm / 8 x 8 mm / 10 x 10 mm / 12 x 12 mm, one per art number |
| Construction | Spot Riveted |
| Blade material | Stainless steel; for carbon steel, contact sales |
| Handle | Blue bridge handle on a mount |
| Series | German Standard Notched Trowel 702301 square-notch series; the full notch drawings are on page 15 of the product catalog, which can be downloaded from the site footer |
| Flat-blade counterpart | German Standard Trowel 702301, same 130 mm x 280 mm blade, wood handle |
| Alternative notch series | Notched Trowel 641821 / 644821 / 646821 / 648821 / 661821 / 664821 / 666821 / 668821, shown in the catalog with U, V or square notches, ordered with a notch code after the art number |
The "German Standard" part of the trade name comes from the blade: art number 702301 German Standard Trowel is a flat, un-notched 130 mm x 280 mm trowel with a wood handle. The -74 through -82 suffixes are square notches cut into that same blade platform, which is why the base number is identical. It is a product-family name, not a certification.
The two digits after the dash are not a sequence number; they are the Leading Tools notch code, and the full notch drawings are on page 15 of the product catalog, which can be downloaded from the site footer:
| Suffix | Notch code | Notch width | Land (gap) width | Notch depth |
|---|---|---|---|---|
| -74 | SQ. NOTCHED code 74 | 4 mm | 4 mm | 4 mm |
| -76 | SQ. NOTCHED code 76 | 6 mm | 6 mm | 6 mm |
| -78 | SQ. NOTCHED code 78 | 8 mm | 8 mm | 8 mm |
| -80 | SQ. NOTCHED code 80 | 10 mm | 10 mm | 10 mm |
| -82 | SQ. NOTCHED code 82 | 12 mm | 12 mm | 12 mm |
Codes 74, 76, 78, 80 and 82 each have the notch width, the gap between notches and the notch depth all equal: a true 1:1:1 square profile. That geometry is what makes the half-bed rule usable: with an equal notch and land, the ribs collapse into the gaps and finish at roughly half the notch depth. Codes 74 to 82 match the -74 to -82 art numbers exactly.
Every art number uses the same blade size, the same Spot Riveted mount and the same handle; choose by the notch that matches the tile; see Selection Guide and How to Use below.
One five-part art-number series covers tile sizes from mosaic to large format. The five notches run from mosaic work to 600–900 mm large format. The range 702301-74 through -82 covers these tile sizes from one short product line.
Bed thickness becomes a number you can state, not a feel. Because the notch profiles are true squares with equal notch and land, the ribs collapse into the gaps and the finished bed lands at roughly half the notch depth. When an architect specifies adhesive thickness rather than tile size, the notch code answers the question directly: 12 mm square gives about 6 mm of bed, 6 mm square about 3 mm.
Square geometry carries more adhesive than U or V of the same depth. In the square profile the notch width equals the rib width and the walls are vertical, so it deposits the largest volume of the three standard profiles.
The flat-bottomed rib fills voids in an uneven tile back instead of bridging them, and once the tile is pressed the flattened rib fills the valleys and produces a fuller, more stable bond. The trade-off: square ribs collapse sideways and will fold in air if the tile is twisted down.
Stainless steel blade. The five art numbers are stainless steel; each art number corresponds to one blade material. Carbon steel is the cost option and has to be dried and oiled after every use; contact Leading Tools sales for it.
Stainless steel has high corrosion resistance and low maintenance; chlorinated water, coastal air or prolonged soaking can still cause rust spots, so rinse with clean water and dry after use. Stainless suits wet-area crews and sites with daily washdown.
Spot Riveted mounting. The blade is joined to the mount by spot-riveting; for mount material and joint details, contact us.
Same blade footprint as the flat 702301. A contractor already running the flat German Standard Trowel gets a notched tool with the same 130 mm x 280 mm blade, so material per pass and working reach stay constant across the pair.
The notch code is drawn geometry, not a marketing number. The product catalog draws each square code to dimension; the full notch drawings are on page 15 of the product catalog, which can be downloaded from the site footer.
Square notch only. If a job needs U or V geometry, choose the Notched Trowel 641821 series, which is shown in the catalog with U, V and square notches for every blade size, in 4" and 4-1/2" widths from 11" to 18" long, ordered the same way with a notch code after the art number.
| Art. Nr | Application | Tile size | Notes |
|---|---|---|---|
| 702301-74 (4 mm) | Mosaic sheets, thin small-format tile | Up to 100 mm | Minimal bed, about 2 mm; the smallest square notch offered in the series |
| 702301-76 (6 mm) | Dry-area wall tile | 100–300 mm (10x10 to 30x30 cm) | About a 3 mm bed; estimate adhesive consumption from the adhesive manufacturer's data sheet |
| 702301-78 (8 mm) | Medium floor tile; render and insulation-board base coats | 200–400 mm | Step up from -76 when the tile passes about 200 mm on a floor |
| 702301-80 (10 mm) | Standard floor tile, natural stone | 300–600 mm | The default for most residential floors |
| 702301-82 (12 mm) | Large format, uneven substrates | 600–900 mm | Back-buttering is the normal expectation at this size |
| Step | Action | Notes |
|---|---|---|
| 1. Flatten | Place adhesive on the substrate with the flat of the blade and level it to roughly 3 mm | Flatten first and comb second, so the comb only meters what is already placed |
| 2. Comb | Draw the notched edge through in one direction only, in straight parallel passes | Never swirl or work in circles: curved passes fold air into the bed |
| 3. Hold the angle steady | Work at about 45°, within a 45–60° working range | A steeper angle leaves a thicker bed; hold one angle for the whole stroke rather than drifting |
| 4. Set the tile | Press the tile straight down into the ribs with firm, even pressure | Do not twist square-notch ribs down: twisting is the classic way to trap air under a square profile |
| 5. Check coverage | Lift one tile early in the run and read the back | Dry walls need at least 80%, wet walls 95%, floors a solid bed; if the comb lines are still visible and the valleys unfilled, the notch is too small |
| 6. Correct | If short, back-butter or move up one notch size | Back-butter with the same notched edge at 45°, one direction, over the full tile back |
| What you see on the tile back | Reading | Action |
|---|---|---|
| Continuous adhesive, ribs closed, valleys filled | Meets the floor and wet-area requirement | Continue; no change needed |
| Ribs closed over most of the back but comb lines still traceable | Acceptable for a dry interior wall only | Back-butter for wet areas and floors |
| Open comb lines with unfilled valleys | Notch too small for the tile | Move up one art number in the series, or back-butter, or both |
| Air voids at the tile centre | Ribs were twisted rather than pressed | Press straight down; square ribs do not tolerate rocking |
This is the band the 6 mm notch was made for. Comb the substrate at about 45° in a single direction, working an area you can tile before the adhesive skins, and press tiles straight home.
Expect roughly a 3 mm bed; adhesive consumption depends on the adhesive and the substrate, so estimate it from the adhesive manufacturer's data sheet. Lift the first tile of each wall to confirm at least 80% contact before committing to the run. For mosaic sheets and tile up to 100 mm, drop to 702301-74.
Floors are laid to a solid bed, which is a step change from the 80% minimum for a dry wall. Move to 702301-78 once floor tile passes about 200 mm, and to 702301-80 from about 300 mm.
Comb in one direction, keep the angle constant so rib height does not vary across the room, and lift a tile in the first square metre to confirm the valleys are filling. Square notch suits floor work because it deposits the most adhesive for a given depth.
Combing the substrate alone will not reach the required coverage on large-format or low-porosity tile; the tile back is buttered as well.
For large-format tile (an edge of 600 mm or more) on a level substrate, the usual method is a large notch on the substrate (702301-80, 10 mm, or 702301-82, 12 mm) plus a small notch on the tile back (for example 4 mm, 702301-74), and the direction of the back coat must match the substrate combing, applied parallel to the tile's short edge.
Exterior work and underfloor heating also call for back-buttering, and from a 12 mm square notch upward it is the normal expectation. Where a national standard or the adhesive manufacturer's data sheet applies, that governs. Back-butter with the same notched edge at 45°, combing in one direction across the whole tile back.
Natural stone backs are frequently uneven from sawing or natural cleft, which is exactly the case where a flat-bottomed square rib helps: the constant-section rib fills the low spots rather than bridging them, and once the tile is pressed the flattened rib fills the valleys.
Use 702301-78 as a minimum for medium stone and 702301-80 for larger or denser stone, then verify on a lifted piece. Specify the stainless blade where the stone or the setting material holds moisture against the tool. Confirm adhesive compatibility with the stone supplier before starting; some stones are sensitive to cement-based and moisture-carrying adhesives.
Notched trowels are not tile-only tools. They are also used for EIFS (external insulation systems), stucco and plaster, and waterproofing work, where the notch meters the base coat onto insulation board and gives a mechanical key.
For board base coats, 702301-78 or -80 are the practical sizes; match the notch to the board texture and the base coat's stated application thickness rather than to a tile table. Keep the same one-direction combing discipline; the reason for it (not folding air into the bed) is unchanged.
| Adhesive type | Suitability | Notes |
|---|---|---|
| Cement-based thin-set mortar | Standard application | The reference case for every notch-to-tile-size table in the Selection Guide |
| Polymer-modified thin-set | Suitable | Longer open time; clean the blade before the polymer starts to cure |
| Ready-mixed paste adhesive | Test first | Thicker pastes may not release cleanly from a 4 or 6 mm notch; comb a test area |
| Epoxy adhesive | Test first, clean immediately | Cured epoxy has to be removed mechanically and solvents can damage the blade |
| Self-levelling compound | Not a substitute for a levelling tool | Notch depth is not a reliable depth control for a flowing compound; use the compound manufacturer's specified tool |
| Error | Result | How to avoid it |
|---|---|---|
| Swirling or combing in circles | Air folded into the bed; rib height varies | Comb in one direction only, in straight parallel passes, every pass |
| Angle drifting through the stroke | Bed thickness varies across the wall or floor | Hold a steady 45–60° from the start to the end of each pass |
| Twisting the tile down onto square ribs | Trapped air at the tile centre | Press straight down; U-notch ribs tolerate rocking, square ribs do not |
| Using 702301-76 on tile above 300 mm | Coverage below the required percentage | Move up the series and back-butter |
| Skipping back-buttering on tile over 600 mm | Corner voids and unfilled valleys | Back-butter from 600 mm upward at the latest; from 12 mm notch upward as a rule |
| Back-coating across the substrate combing direction | Air trapped between the two combed passes | Match the back-coat direction to the substrate combing, parallel to the tile's short edge |
| Clogged notches | Rib height drops and coverage drops with it | Clear the notches before the adhesive sets |
| Working past the adhesive's open time | Skinned adhesive; poor transfer to the tile back | Work to the adhesive manufacturer's stated open time and in sections you can tile within it |
Q: Which of the five art numbers do I order?
A: Match the notch to the tile. 702301-74 (4 mm) for mosaic and tile up to 100 mm; 702301-76 (6 mm) for standard wall tile 100–300 mm; 702301-78 (8 mm) for medium floor tile 200–400 mm; 702301-80 (10 mm) for floor tile 300–600 mm; 702301-82 (12 mm) for large format 600–900 mm.
Q: There are air pockets under the middle of my tiles.
A: This is the classic square-notch problem: the tile was twisted or rocked into the adhesive, so the ribs collapsed sideways over trapped air. Press the tile straight down with firm, even pressure.
Q: My coverage came out short. What went wrong?
A: Either the notch is too small for the tile, or the combing was inconsistent. Check the tile size against the table in the Selection Guide first; if the size is right, look at the stroke, because a drifting angle or a swirled pass both produce short coverage.
Q: Carbon steel or stainless steel: which should I order?
A: The five art numbers are stainless steel; each art number corresponds to one blade material. Carbon steel is the lower-cost option but must be dried and oiled after every use; contact Leading Tools sales for it.
Stainless steel has high corrosion resistance and low maintenance; rinse with clean water and wipe dry after use. Stainless suits wet-area crews and daily washdown.
Q: Is 702301-76 the same tool as the plain 702301?
A: Same blade size, different tool. 702301 is the flat, un-notched German Standard Trowel with a wood handle; 702301-76 is the 6 mm square-notch version on the same 130 mm x 280 mm blade, with a blue bridge handle.
| Art. Nr | Blade size | Notch type | Notch size |
|---|---|---|---|
| 702301-74 | 130 mm x 280 mm | Square (⊔) | 4 mm x 4 mm |
| 702301-76 | 130 mm x 280 mm | Square (⊔) | 6 mm x 6 mm |
| 702301-78 | 130 mm x 280 mm | Square (⊔) | 8 mm x 8 mm |
| 702301-80 | 130 mm x 280 mm | Square (⊔) | 10 mm x 10 mm |
| 702301-82 | 130 mm x 280 mm | Square (⊔) | 12 mm x 12 mm |
| Feature | Specification |
|---|---|
| Blade shape | Rectangular flat blade |
| Blade size | 130 mm x 280 mm (approx. 5-1/8" x 11") for every art number in the series |
| Notch profile | Square (SQ), flat-bottomed, vertical notch walls; notch width = land width = depth |
| Notch sizes offered | 4, 6, 8, 10, 12 mm |
| Notch layout | The notches run along one long combing edge and the adjacent short end; the remaining edges are left plain so the same tool can spread flat before combing |
| Blade material | Stainless steel |
| Construction | Spot Riveted: the blade is joined to the mount by spot-riveting; for mount material and joint details, contact us |
| Feature | Specification |
|---|---|
| Handle type | Bridge handle |
| Handle color | Blue |
| Mounting | Handle on a mount; the blade is joined to the mount by spot-riveting; for mount material and joint details, contact us |
The five art numbers are stainless steel. Each art number corresponds to one blade material; for a carbon steel blade, contact Leading Tools sales. The comparison below is for reference.
| Variant | Blade material | Characteristics | Best for |
|---|---|---|---|
| Carbon steel (CS) | Carbon steel blade | Rusts if left wet; must be dried and oiled after each use | Dry-area work and cost-driven projects where the blade is maintained after every use |
| Stainless steel (SS) | Stainless steel blade | High corrosion resistance and low maintenance; chlorinated water, coastal air or prolonged soaking can still cause rust spots, so rinse with clean water and dry after use | Wet areas, daily washdown, long service life |
The base code 702301 refers to the flat, wood-handled German Standard Trowel. The notched versions are identified by their -74 / -76 / -78 / -80 / -82 suffixes, not by the base code alone.
| Notch profile | Geometry | Adhesive volume | Conventional use |
|---|---|---|---|
| Square (⊔): this series | Notch width equals rib width; vertical walls; flat notch bottom | Highest of the three profiles for a given depth | Specification work where bed thickness is specified |
| U-notch | Rounded notch bottom; adhesive spreads from the base outward | Intermediate | Some professional tilers prefer U for floors |
| V-notch | Pointed ribs | Lowest of the three | Light wall tile, mosaic and dry areas |
The 702301 series is square-only. The practical consequence for a specifier: square deposits the most adhesive and therefore reaches the highest coverage percentages, but it is also the profile that punishes a twisting set: the ribs collapse sideways and can close over trapped air if the tile is rocked instead of pressed. U-notch ribs, being round-bottomed, spread from the base outward and tolerate rocking.
Bed thickness figures below follow the half-bed rule for square notches: with an equal notch and land, the finished bed after the tile is bedded is approximately half the notch depth.
| Notch size | Art. Nr | Tile format band | Bed after the tile is pressed |
|---|---|---|---|
| 4 mm SQ | 702301-74 | Mosaic and small tile up to about 100 mm | Approx. 2 mm |
| 6 mm SQ | 702301-76 | Standard wall tile 100–300 mm (10x10–30x30 cm) | Approx. 3 mm |
| 8 mm SQ | 702301-78 | Medium floor tile 200–400 mm | Approx. 4 mm |
| 10 mm SQ | 702301-80 | Standard floor tile 300–600 mm | Approx. 5 mm |
| 12 mm SQ | 702301-82 | Large format 600–900 mm; back-buttering recommended from this size up | Approx. 6 mm |
Correct notch, correct coverage. Coverage is a specified quantity, not a matter of judgment. Under ANSI A108.5, dry-area tiling requires at least 80% adhesive contact, and wet-area and exterior tiling require 95%; floors are laid to a solid bed. The adhesive manufacturer's data sheet and local codes govern. Selecting a notch that reaches the required figure for the tile in hand is the entire function of this tool.
Half-depth rule. Square notches compress to about half their depth. This is the single most useful conversion in the series: a specification written in bed thickness converts straight to a notch code, and a specification written in another notch profile can be compared honestly rather than by matching numbers that mean different things.
Combing is what releases trapped air. The adhesive is first flattened to roughly 3 mm with a plain trowel, then combed with a notched trowel so air and moisture have a path out and no bubbles form under the tile. That is why the notched edge is not simply a way of using less adhesive.
Five art numbers, one blade size. Each art number carries one square notch size (4, 6, 8, 10 or 12 mm), all on the same 130 mm x 280 mm blade, so blade area, reach and balance do not change when the crew moves from wall tile to large-format floor tile.
Art numbers, blade size and notch size are Leading Tools specifications; tile format and compressed bed thickness are typical values. Where a national standard or an adhesive manufacturer's data sheet applies, that governs.
| Art. Nr | Square notch | Tile format | Bed after the tile is pressed |
|---|---|---|---|
| 702301-74 | 4 mm x 4 mm | Mosaic and small tile up to 100 mm | Approx. 2 mm |
| 702301-76 | 6 mm x 6 mm | Standard wall tile 100–300 mm (10x10–30x30 cm), dry areas | Approx. 3 mm |
| 702301-78 | 8 mm x 8 mm | Medium floor tile 200–400 mm | Approx. 4 mm |
| 702301-80 | 10 mm x 10 mm | Standard floor tile 300–600 mm; the default for most residential floors | Approx. 5 mm |
| 702301-82 | 12 mm x 12 mm | Large format 600–900 mm | Approx. 6 mm |
| Application | Required adhesive contact | What it means for notch choice |
|---|---|---|
| Dry interior wall | At least 80% (ANSI A108.5) | 702301-76 is sized for this band at 100–300 mm tile |
| Wet-area wall (shower, wet room) | 95% (ANSI A108.5) | Stay at the low end of the size band for the notch, or move up one size and back-butter |
| All floors | Solid bed | Floors above 200 mm belong to 702301-78, -80 or -82, not to the 4 or 6 mm sizes |
| Large format and low-porosity tile | Combing alone typically will not reach the figure | Back-butter as well as comb; from 12 mm square upward this is the normal expectation |
The check: lift a tile immediately after setting and read the back. If the comb lines are still clearly visible and the valleys are unfilled, the notch is too small for the tile. This single check settles most selection arguments faster than any table.
Leading Tools offers two notched trowel series, compared below.
| Dimension | German Standard Notched Trowel 702301-74 / -76 / -78 / -80 / -82 | Notched Trowel 641821 series |
|---|---|---|
| Blade size | 130 mm x 280 mm, fixed across the series | 4" or 4-1/2" wide, 11" / 14" / 16" / 18" long: eight art numbers |
| Notch profiles offered | Square only (⊔) | U, V and square |
| Notch sizes | 4, 6, 8, 10, 12 mm: metric, one per art number | Add the notch code after the art number (U 25–39, V 40–59, square 60–89) |
| Construction | Spot Riveted | Spot Riveted |
| Blade material | Stainless steel | Stainless steel |
| Handle | Blue bridge handle | Red and black soft-grip handle |
| Best suited to | Metric-specification tiling where the notch code is specified | Jobs needing U or V geometry, or a wider / longer blade than 130 mm x 280 mm |
Choose 702301-74 / -76 / -78 / -80 / -82 when the specification is written in millimetres of notch or millimetres of bed, when the work is square-notch tiling on floors or in wet areas, or when the crew already runs the flat 702301 and wants the same blade footprint.
Choose the 641821 series when U-notch or V-notch geometry is required, when a longer blade is wanted for floor work, or when the customer's specification is written in inches.
| Art. Nr | What it is | When to specify it instead |
|---|---|---|
| 702301 | German Standard Trowel: the same 130 mm x 280 mm blade with no notches, wood handle | Flat spreading, smoothing and finishing rather than combing |
| 641821 / 644821 / 646821 / 648821 | Notched Trowel, 4" x 11" / 14" / 16" / 18", U, V or square notch | U or V geometry, or a longer blade than 280 mm |
| 661821 / 664821 / 666821 / 668821 | Notched Trowel, 4-1/2" x 11" / 14" / 16" / 18", U, V or square notch | As above, with a wider blade |
| 611510 / 611511 / 611512 | DIY Trowel, 4-1/2" x 10-1/2" to 4-3/4" x 11", spot riveted, light weight | Light-duty flat trowel work |
| 711100 / 712100 / 713100 / 714100 | Flooring Trowel, 130 x 480 mm to 120 x 500 mm, wood handle | Long flat blade for floor screed and levelling work |
All five art numbers in the 702301 square-notch series.
| Art. Nr | Blade size | Notch type | Notch size | Blade material | Handle | Construction |
|---|---|---|---|---|---|---|
| 702301-74 | 130 mm x 280 mm | Square (⊔) | 4 mm x 4 mm | Stainless steel | Blue bridge handle | Spot Riveted |
| 702301-76 | 130 mm x 280 mm | Square (⊔) | 6 mm x 6 mm | Stainless steel | Blue bridge handle | Spot Riveted |
| 702301-78 | 130 mm x 280 mm | Square (⊔) | 8 mm x 8 mm | Stainless steel | Blue bridge handle | Spot Riveted |
| 702301-80 | 130 mm x 280 mm | Square (⊔) | 10 mm x 10 mm | Stainless steel | Blue bridge handle | Spot Riveted |
| 702301-82 | 130 mm x 280 mm | Square (⊔) | 12 mm x 12 mm | Stainless steel | Blue bridge handle | Spot Riveted |
Related art numbers from the Notched Trowel 641821 series, with the notch profiles shown in the catalog. To order, add the notch code after the art number:
| Art. Nr | Blade size | U notch | V notch | Square notch |
|---|---|---|---|---|
| 641821 | 4" x 11" | Yes | Yes | Yes |
| 644821 | 4" x 14" | Yes | Yes | Yes |
| 646821 | 4" x 16" | Yes | Yes | Yes |
| 648821 | 4" x 18" | Yes | Yes | Yes |
| 661821 | 4-1/2" x 11" | Yes | Yes | Yes |
| 664821 | 4-1/2" x 14" | Yes | Yes | Yes |
| 666821 | 4-1/2" x 16" | Yes | Yes | Yes |
| 668821 | 4-1/2" x 18" | Yes | Yes | Yes |
| Contaminant | Cleaning method |
|---|---|
| Wet thin-set or grout | Wipe the blade and clear the notches with a damp sponge or cloth before the material sets |
| Cured adhesive | Soak in warm soapy water to soften, then lift off with a plastic scraper, not a metal blade, which scores the face |
| Light surface rust on a carbon steel blade | Soak in white vinegar, then dry completely and re-oil |
| Epoxy adhesive | Mechanical removal only; solvents may damage the blade surface |
| General | Rinse, dry completely, store dry |
Clear each notch individually while the residue is still soft, using a wooden or plastic pick or a small stiff brush. Avoid metal picks in the notches: rounding the square corners changes the rib profile and therefore the bed thickness the notch is supposed to deliver. Because each code defines an exact square, a rounded notch is no longer the size the art number specifies.
Store the trowel flat or hung so the blade cannot bow, and keep it dry. Carbon steel blades in particular must not be stored damp. For storage longer than about a week, a light film of oil on a carbon steel blade prevents surface rust forming.
Replace the trowel when the notch corners have rounded or a notch has deformed: the notch dimension is the specification, and a worn notch quietly delivers a thinner bed than the size marked on the tool. Replace a blade that no longer sits flat, since uneven contact produces ribs of uneven height.
German Standard Notched Trowel: five art numbers, one square notch size each (4–12 mm), all on a 130 × 280 mm blade
| Item | Value |
|---|---|
| Product name | German Standard Notched Trowel |
| Art. Nr | 702301-74, 702301-76, 702301-78, 702301-80, 702301-82 |
| Blade size (all five) | 130 mm x 280 mm (approx. 5-1/8" x 11") |
| Notch type (all five) | Square only (⊔) |
| Notch sizes | 4 x 4 mm / 6 x 6 mm / 8 x 8 mm / 10 x 10 mm / 12 x 12 mm, one per art number |
| Construction | Spot Riveted |
| Blade material | Stainless steel; for carbon steel, contact sales |
| Handle | Blue bridge handle on a mount |
| Series | German Standard Notched Trowel 702301 square-notch series; the full notch drawings are on page 15 of the product catalog, which can be downloaded from the site footer |
| Flat-blade counterpart | German Standard Trowel 702301, same 130 mm x 280 mm blade, wood handle |
| Alternative notch series | Notched Trowel 641821 / 644821 / 646821 / 648821 / 661821 / 664821 / 666821 / 668821, shown in the catalog with U, V or square notches, ordered with a notch code after the art number |
The "German Standard" part of the trade name comes from the blade: art number 702301 German Standard Trowel is a flat, un-notched 130 mm x 280 mm trowel with a wood handle. The -74 through -82 suffixes are square notches cut into that same blade platform, which is why the base number is identical. It is a product-family name, not a certification.
The two digits after the dash are not a sequence number; they are the Leading Tools notch code, and the full notch drawings are on page 15 of the product catalog, which can be downloaded from the site footer:
| Suffix | Notch code | Notch width | Land (gap) width | Notch depth |
|---|---|---|---|---|
| -74 | SQ. NOTCHED code 74 | 4 mm | 4 mm | 4 mm |
| -76 | SQ. NOTCHED code 76 | 6 mm | 6 mm | 6 mm |
| -78 | SQ. NOTCHED code 78 | 8 mm | 8 mm | 8 mm |
| -80 | SQ. NOTCHED code 80 | 10 mm | 10 mm | 10 mm |
| -82 | SQ. NOTCHED code 82 | 12 mm | 12 mm | 12 mm |
Codes 74, 76, 78, 80 and 82 each have the notch width, the gap between notches and the notch depth all equal: a true 1:1:1 square profile. That geometry is what makes the half-bed rule usable: with an equal notch and land, the ribs collapse into the gaps and finish at roughly half the notch depth. Codes 74 to 82 match the -74 to -82 art numbers exactly.
Every art number uses the same blade size, the same Spot Riveted mount and the same handle; choose by the notch that matches the tile; see Selection Guide and How to Use below.
One five-part art-number series covers tile sizes from mosaic to large format. The five notches run from mosaic work to 600–900 mm large format. The range 702301-74 through -82 covers these tile sizes from one short product line.
Bed thickness becomes a number you can state, not a feel. Because the notch profiles are true squares with equal notch and land, the ribs collapse into the gaps and the finished bed lands at roughly half the notch depth. When an architect specifies adhesive thickness rather than tile size, the notch code answers the question directly: 12 mm square gives about 6 mm of bed, 6 mm square about 3 mm.
Square geometry carries more adhesive than U or V of the same depth. In the square profile the notch width equals the rib width and the walls are vertical, so it deposits the largest volume of the three standard profiles.
The flat-bottomed rib fills voids in an uneven tile back instead of bridging them, and once the tile is pressed the flattened rib fills the valleys and produces a fuller, more stable bond. The trade-off: square ribs collapse sideways and will fold in air if the tile is twisted down.
Stainless steel blade. The five art numbers are stainless steel; each art number corresponds to one blade material. Carbon steel is the cost option and has to be dried and oiled after every use; contact Leading Tools sales for it.
Stainless steel has high corrosion resistance and low maintenance; chlorinated water, coastal air or prolonged soaking can still cause rust spots, so rinse with clean water and dry after use. Stainless suits wet-area crews and sites with daily washdown.
Spot Riveted mounting. The blade is joined to the mount by spot-riveting; for mount material and joint details, contact us.
Same blade footprint as the flat 702301. A contractor already running the flat German Standard Trowel gets a notched tool with the same 130 mm x 280 mm blade, so material per pass and working reach stay constant across the pair.
The notch code is drawn geometry, not a marketing number. The product catalog draws each square code to dimension; the full notch drawings are on page 15 of the product catalog, which can be downloaded from the site footer.
Square notch only. If a job needs U or V geometry, choose the Notched Trowel 641821 series, which is shown in the catalog with U, V and square notches for every blade size, in 4" and 4-1/2" widths from 11" to 18" long, ordered the same way with a notch code after the art number.
| Art. Nr | Application | Tile size | Notes |
|---|---|---|---|
| 702301-74 (4 mm) | Mosaic sheets, thin small-format tile | Up to 100 mm | Minimal bed, about 2 mm; the smallest square notch offered in the series |
| 702301-76 (6 mm) | Dry-area wall tile | 100–300 mm (10x10 to 30x30 cm) | About a 3 mm bed; estimate adhesive consumption from the adhesive manufacturer's data sheet |
| 702301-78 (8 mm) | Medium floor tile; render and insulation-board base coats | 200–400 mm | Step up from -76 when the tile passes about 200 mm on a floor |
| 702301-80 (10 mm) | Standard floor tile, natural stone | 300–600 mm | The default for most residential floors |
| 702301-82 (12 mm) | Large format, uneven substrates | 600–900 mm | Back-buttering is the normal expectation at this size |
| Step | Action | Notes |
|---|---|---|
| 1. Flatten | Place adhesive on the substrate with the flat of the blade and level it to roughly 3 mm | Flatten first and comb second, so the comb only meters what is already placed |
| 2. Comb | Draw the notched edge through in one direction only, in straight parallel passes | Never swirl or work in circles: curved passes fold air into the bed |
| 3. Hold the angle steady | Work at about 45°, within a 45–60° working range | A steeper angle leaves a thicker bed; hold one angle for the whole stroke rather than drifting |
| 4. Set the tile | Press the tile straight down into the ribs with firm, even pressure | Do not twist square-notch ribs down: twisting is the classic way to trap air under a square profile |
| 5. Check coverage | Lift one tile early in the run and read the back | Dry walls need at least 80%, wet walls 95%, floors a solid bed; if the comb lines are still visible and the valleys unfilled, the notch is too small |
| 6. Correct | If short, back-butter or move up one notch size | Back-butter with the same notched edge at 45°, one direction, over the full tile back |
| What you see on the tile back | Reading | Action |
|---|---|---|
| Continuous adhesive, ribs closed, valleys filled | Meets the floor and wet-area requirement | Continue; no change needed |
| Ribs closed over most of the back but comb lines still traceable | Acceptable for a dry interior wall only | Back-butter for wet areas and floors |
| Open comb lines with unfilled valleys | Notch too small for the tile | Move up one art number in the series, or back-butter, or both |
| Air voids at the tile centre | Ribs were twisted rather than pressed | Press straight down; square ribs do not tolerate rocking |
This is the band the 6 mm notch was made for. Comb the substrate at about 45° in a single direction, working an area you can tile before the adhesive skins, and press tiles straight home.
Expect roughly a 3 mm bed; adhesive consumption depends on the adhesive and the substrate, so estimate it from the adhesive manufacturer's data sheet. Lift the first tile of each wall to confirm at least 80% contact before committing to the run. For mosaic sheets and tile up to 100 mm, drop to 702301-74.
Floors are laid to a solid bed, which is a step change from the 80% minimum for a dry wall. Move to 702301-78 once floor tile passes about 200 mm, and to 702301-80 from about 300 mm.
Comb in one direction, keep the angle constant so rib height does not vary across the room, and lift a tile in the first square metre to confirm the valleys are filling. Square notch suits floor work because it deposits the most adhesive for a given depth.
Combing the substrate alone will not reach the required coverage on large-format or low-porosity tile; the tile back is buttered as well.
For large-format tile (an edge of 600 mm or more) on a level substrate, the usual method is a large notch on the substrate (702301-80, 10 mm, or 702301-82, 12 mm) plus a small notch on the tile back (for example 4 mm, 702301-74), and the direction of the back coat must match the substrate combing, applied parallel to the tile's short edge.
Exterior work and underfloor heating also call for back-buttering, and from a 12 mm square notch upward it is the normal expectation. Where a national standard or the adhesive manufacturer's data sheet applies, that governs. Back-butter with the same notched edge at 45°, combing in one direction across the whole tile back.
Natural stone backs are frequently uneven from sawing or natural cleft, which is exactly the case where a flat-bottomed square rib helps: the constant-section rib fills the low spots rather than bridging them, and once the tile is pressed the flattened rib fills the valleys.
Use 702301-78 as a minimum for medium stone and 702301-80 for larger or denser stone, then verify on a lifted piece. Specify the stainless blade where the stone or the setting material holds moisture against the tool. Confirm adhesive compatibility with the stone supplier before starting; some stones are sensitive to cement-based and moisture-carrying adhesives.
Notched trowels are not tile-only tools. They are also used for EIFS (external insulation systems), stucco and plaster, and waterproofing work, where the notch meters the base coat onto insulation board and gives a mechanical key.
For board base coats, 702301-78 or -80 are the practical sizes; match the notch to the board texture and the base coat's stated application thickness rather than to a tile table. Keep the same one-direction combing discipline; the reason for it (not folding air into the bed) is unchanged.
| Adhesive type | Suitability | Notes |
|---|---|---|
| Cement-based thin-set mortar | Standard application | The reference case for every notch-to-tile-size table in the Selection Guide |
| Polymer-modified thin-set | Suitable | Longer open time; clean the blade before the polymer starts to cure |
| Ready-mixed paste adhesive | Test first | Thicker pastes may not release cleanly from a 4 or 6 mm notch; comb a test area |
| Epoxy adhesive | Test first, clean immediately | Cured epoxy has to be removed mechanically and solvents can damage the blade |
| Self-levelling compound | Not a substitute for a levelling tool | Notch depth is not a reliable depth control for a flowing compound; use the compound manufacturer's specified tool |
| Error | Result | How to avoid it |
|---|---|---|
| Swirling or combing in circles | Air folded into the bed; rib height varies | Comb in one direction only, in straight parallel passes, every pass |
| Angle drifting through the stroke | Bed thickness varies across the wall or floor | Hold a steady 45–60° from the start to the end of each pass |
| Twisting the tile down onto square ribs | Trapped air at the tile centre | Press straight down; U-notch ribs tolerate rocking, square ribs do not |
| Using 702301-76 on tile above 300 mm | Coverage below the required percentage | Move up the series and back-butter |
| Skipping back-buttering on tile over 600 mm | Corner voids and unfilled valleys | Back-butter from 600 mm upward at the latest; from 12 mm notch upward as a rule |
| Back-coating across the substrate combing direction | Air trapped between the two combed passes | Match the back-coat direction to the substrate combing, parallel to the tile's short edge |
| Clogged notches | Rib height drops and coverage drops with it | Clear the notches before the adhesive sets |
| Working past the adhesive's open time | Skinned adhesive; poor transfer to the tile back | Work to the adhesive manufacturer's stated open time and in sections you can tile within it |
Q: Which of the five art numbers do I order?
A: Match the notch to the tile. 702301-74 (4 mm) for mosaic and tile up to 100 mm; 702301-76 (6 mm) for standard wall tile 100–300 mm; 702301-78 (8 mm) for medium floor tile 200–400 mm; 702301-80 (10 mm) for floor tile 300–600 mm; 702301-82 (12 mm) for large format 600–900 mm.
Q: There are air pockets under the middle of my tiles.
A: This is the classic square-notch problem: the tile was twisted or rocked into the adhesive, so the ribs collapsed sideways over trapped air. Press the tile straight down with firm, even pressure.
Q: My coverage came out short. What went wrong?
A: Either the notch is too small for the tile, or the combing was inconsistent. Check the tile size against the table in the Selection Guide first; if the size is right, look at the stroke, because a drifting angle or a swirled pass both produce short coverage.
Q: Carbon steel or stainless steel: which should I order?
A: The five art numbers are stainless steel; each art number corresponds to one blade material. Carbon steel is the lower-cost option but must be dried and oiled after every use; contact Leading Tools sales for it.
Stainless steel has high corrosion resistance and low maintenance; rinse with clean water and wipe dry after use. Stainless suits wet-area crews and daily washdown.
Q: Is 702301-76 the same tool as the plain 702301?
A: Same blade size, different tool. 702301 is the flat, un-notched German Standard Trowel with a wood handle; 702301-76 is the 6 mm square-notch version on the same 130 mm x 280 mm blade, with a blue bridge handle.
| Art. Nr | Blade size | Notch type | Notch size |
|---|---|---|---|
| 702301-74 | 130 mm x 280 mm | Square (⊔) | 4 mm x 4 mm |
| 702301-76 | 130 mm x 280 mm | Square (⊔) | 6 mm x 6 mm |
| 702301-78 | 130 mm x 280 mm | Square (⊔) | 8 mm x 8 mm |
| 702301-80 | 130 mm x 280 mm | Square (⊔) | 10 mm x 10 mm |
| 702301-82 | 130 mm x 280 mm | Square (⊔) | 12 mm x 12 mm |
| Feature | Specification |
|---|---|
| Blade shape | Rectangular flat blade |
| Blade size | 130 mm x 280 mm (approx. 5-1/8" x 11") for every art number in the series |
| Notch profile | Square (SQ), flat-bottomed, vertical notch walls; notch width = land width = depth |
| Notch sizes offered | 4, 6, 8, 10, 12 mm |
| Notch layout | The notches run along one long combing edge and the adjacent short end; the remaining edges are left plain so the same tool can spread flat before combing |
| Blade material | Stainless steel |
| Construction | Spot Riveted: the blade is joined to the mount by spot-riveting; for mount material and joint details, contact us |
| Feature | Specification |
|---|---|
| Handle type | Bridge handle |
| Handle color | Blue |
| Mounting | Handle on a mount; the blade is joined to the mount by spot-riveting; for mount material and joint details, contact us |
The five art numbers are stainless steel. Each art number corresponds to one blade material; for a carbon steel blade, contact Leading Tools sales. The comparison below is for reference.
| Variant | Blade material | Characteristics | Best for |
|---|---|---|---|
| Carbon steel (CS) | Carbon steel blade | Rusts if left wet; must be dried and oiled after each use | Dry-area work and cost-driven projects where the blade is maintained after every use |
| Stainless steel (SS) | Stainless steel blade | High corrosion resistance and low maintenance; chlorinated water, coastal air or prolonged soaking can still cause rust spots, so rinse with clean water and dry after use | Wet areas, daily washdown, long service life |
The base code 702301 refers to the flat, wood-handled German Standard Trowel. The notched versions are identified by their -74 / -76 / -78 / -80 / -82 suffixes, not by the base code alone.
| Notch profile | Geometry | Adhesive volume | Conventional use |
|---|---|---|---|
| Square (⊔): this series | Notch width equals rib width; vertical walls; flat notch bottom | Highest of the three profiles for a given depth | Specification work where bed thickness is specified |
| U-notch | Rounded notch bottom; adhesive spreads from the base outward | Intermediate | Some professional tilers prefer U for floors |
| V-notch | Pointed ribs | Lowest of the three | Light wall tile, mosaic and dry areas |
The 702301 series is square-only. The practical consequence for a specifier: square deposits the most adhesive and therefore reaches the highest coverage percentages, but it is also the profile that punishes a twisting set: the ribs collapse sideways and can close over trapped air if the tile is rocked instead of pressed. U-notch ribs, being round-bottomed, spread from the base outward and tolerate rocking.
Bed thickness figures below follow the half-bed rule for square notches: with an equal notch and land, the finished bed after the tile is bedded is approximately half the notch depth.
| Notch size | Art. Nr | Tile format band | Bed after the tile is pressed |
|---|---|---|---|
| 4 mm SQ | 702301-74 | Mosaic and small tile up to about 100 mm | Approx. 2 mm |
| 6 mm SQ | 702301-76 | Standard wall tile 100–300 mm (10x10–30x30 cm) | Approx. 3 mm |
| 8 mm SQ | 702301-78 | Medium floor tile 200–400 mm | Approx. 4 mm |
| 10 mm SQ | 702301-80 | Standard floor tile 300–600 mm | Approx. 5 mm |
| 12 mm SQ | 702301-82 | Large format 600–900 mm; back-buttering recommended from this size up | Approx. 6 mm |
Correct notch, correct coverage. Coverage is a specified quantity, not a matter of judgment. Under ANSI A108.5, dry-area tiling requires at least 80% adhesive contact, and wet-area and exterior tiling require 95%; floors are laid to a solid bed. The adhesive manufacturer's data sheet and local codes govern. Selecting a notch that reaches the required figure for the tile in hand is the entire function of this tool.
Half-depth rule. Square notches compress to about half their depth. This is the single most useful conversion in the series: a specification written in bed thickness converts straight to a notch code, and a specification written in another notch profile can be compared honestly rather than by matching numbers that mean different things.
Combing is what releases trapped air. The adhesive is first flattened to roughly 3 mm with a plain trowel, then combed with a notched trowel so air and moisture have a path out and no bubbles form under the tile. That is why the notched edge is not simply a way of using less adhesive.
Five art numbers, one blade size. Each art number carries one square notch size (4, 6, 8, 10 or 12 mm), all on the same 130 mm x 280 mm blade, so blade area, reach and balance do not change when the crew moves from wall tile to large-format floor tile.
Art numbers, blade size and notch size are Leading Tools specifications; tile format and compressed bed thickness are typical values. Where a national standard or an adhesive manufacturer's data sheet applies, that governs.
| Art. Nr | Square notch | Tile format | Bed after the tile is pressed |
|---|---|---|---|
| 702301-74 | 4 mm x 4 mm | Mosaic and small tile up to 100 mm | Approx. 2 mm |
| 702301-76 | 6 mm x 6 mm | Standard wall tile 100–300 mm (10x10–30x30 cm), dry areas | Approx. 3 mm |
| 702301-78 | 8 mm x 8 mm | Medium floor tile 200–400 mm | Approx. 4 mm |
| 702301-80 | 10 mm x 10 mm | Standard floor tile 300–600 mm; the default for most residential floors | Approx. 5 mm |
| 702301-82 | 12 mm x 12 mm | Large format 600–900 mm | Approx. 6 mm |
| Application | Required adhesive contact | What it means for notch choice |
|---|---|---|
| Dry interior wall | At least 80% (ANSI A108.5) | 702301-76 is sized for this band at 100–300 mm tile |
| Wet-area wall (shower, wet room) | 95% (ANSI A108.5) | Stay at the low end of the size band for the notch, or move up one size and back-butter |
| All floors | Solid bed | Floors above 200 mm belong to 702301-78, -80 or -82, not to the 4 or 6 mm sizes |
| Large format and low-porosity tile | Combing alone typically will not reach the figure | Back-butter as well as comb; from 12 mm square upward this is the normal expectation |
The check: lift a tile immediately after setting and read the back. If the comb lines are still clearly visible and the valleys are unfilled, the notch is too small for the tile. This single check settles most selection arguments faster than any table.
Leading Tools offers two notched trowel series, compared below.
| Dimension | German Standard Notched Trowel 702301-74 / -76 / -78 / -80 / -82 | Notched Trowel 641821 series |
|---|---|---|
| Blade size | 130 mm x 280 mm, fixed across the series | 4" or 4-1/2" wide, 11" / 14" / 16" / 18" long: eight art numbers |
| Notch profiles offered | Square only (⊔) | U, V and square |
| Notch sizes | 4, 6, 8, 10, 12 mm: metric, one per art number | Add the notch code after the art number (U 25–39, V 40–59, square 60–89) |
| Construction | Spot Riveted | Spot Riveted |
| Blade material | Stainless steel | Stainless steel |
| Handle | Blue bridge handle | Red and black soft-grip handle |
| Best suited to | Metric-specification tiling where the notch code is specified | Jobs needing U or V geometry, or a wider / longer blade than 130 mm x 280 mm |
Choose 702301-74 / -76 / -78 / -80 / -82 when the specification is written in millimetres of notch or millimetres of bed, when the work is square-notch tiling on floors or in wet areas, or when the crew already runs the flat 702301 and wants the same blade footprint.
Choose the 641821 series when U-notch or V-notch geometry is required, when a longer blade is wanted for floor work, or when the customer's specification is written in inches.
| Art. Nr | What it is | When to specify it instead |
|---|---|---|
| 702301 | German Standard Trowel: the same 130 mm x 280 mm blade with no notches, wood handle | Flat spreading, smoothing and finishing rather than combing |
| 641821 / 644821 / 646821 / 648821 | Notched Trowel, 4" x 11" / 14" / 16" / 18", U, V or square notch | U or V geometry, or a longer blade than 280 mm |
| 661821 / 664821 / 666821 / 668821 | Notched Trowel, 4-1/2" x 11" / 14" / 16" / 18", U, V or square notch | As above, with a wider blade |
| 611510 / 611511 / 611512 | DIY Trowel, 4-1/2" x 10-1/2" to 4-3/4" x 11", spot riveted, light weight | Light-duty flat trowel work |
| 711100 / 712100 / 713100 / 714100 | Flooring Trowel, 130 x 480 mm to 120 x 500 mm, wood handle | Long flat blade for floor screed and levelling work |
All five art numbers in the 702301 square-notch series.
| Art. Nr | Blade size | Notch type | Notch size | Blade material | Handle | Construction |
|---|---|---|---|---|---|---|
| 702301-74 | 130 mm x 280 mm | Square (⊔) | 4 mm x 4 mm | Stainless steel | Blue bridge handle | Spot Riveted |
| 702301-76 | 130 mm x 280 mm | Square (⊔) | 6 mm x 6 mm | Stainless steel | Blue bridge handle | Spot Riveted |
| 702301-78 | 130 mm x 280 mm | Square (⊔) | 8 mm x 8 mm | Stainless steel | Blue bridge handle | Spot Riveted |
| 702301-80 | 130 mm x 280 mm | Square (⊔) | 10 mm x 10 mm | Stainless steel | Blue bridge handle | Spot Riveted |
| 702301-82 | 130 mm x 280 mm | Square (⊔) | 12 mm x 12 mm | Stainless steel | Blue bridge handle | Spot Riveted |
Related art numbers from the Notched Trowel 641821 series, with the notch profiles shown in the catalog. To order, add the notch code after the art number:
| Art. Nr | Blade size | U notch | V notch | Square notch |
|---|---|---|---|---|
| 641821 | 4" x 11" | Yes | Yes | Yes |
| 644821 | 4" x 14" | Yes | Yes | Yes |
| 646821 | 4" x 16" | Yes | Yes | Yes |
| 648821 | 4" x 18" | Yes | Yes | Yes |
| 661821 | 4-1/2" x 11" | Yes | Yes | Yes |
| 664821 | 4-1/2" x 14" | Yes | Yes | Yes |
| 666821 | 4-1/2" x 16" | Yes | Yes | Yes |
| 668821 | 4-1/2" x 18" | Yes | Yes | Yes |
| Contaminant | Cleaning method |
|---|---|
| Wet thin-set or grout | Wipe the blade and clear the notches with a damp sponge or cloth before the material sets |
| Cured adhesive | Soak in warm soapy water to soften, then lift off with a plastic scraper, not a metal blade, which scores the face |
| Light surface rust on a carbon steel blade | Soak in white vinegar, then dry completely and re-oil |
| Epoxy adhesive | Mechanical removal only; solvents may damage the blade surface |
| General | Rinse, dry completely, store dry |
Clear each notch individually while the residue is still soft, using a wooden or plastic pick or a small stiff brush. Avoid metal picks in the notches: rounding the square corners changes the rib profile and therefore the bed thickness the notch is supposed to deliver. Because each code defines an exact square, a rounded notch is no longer the size the art number specifies.
Store the trowel flat or hung so the blade cannot bow, and keep it dry. Carbon steel blades in particular must not be stored damp. For storage longer than about a week, a light film of oil on a carbon steel blade prevents surface rust forming.
Replace the trowel when the notch corners have rounded or a notch has deformed: the notch dimension is the specification, and a worn notch quietly delivers a thinner bed than the size marked on the tool. Replace a blade that no longer sits flat, since uneven contact produces ribs of uneven height.

In compliance with EU personal data protection laws, we are committed to protecting and providing you with control over your personal data. By clicking "Accept All", you allow us to place cookies to enhance your experience on this site, help us analyze site performance and usage, and enable us to deliver relevant marketing content. You can manage your cookie settings below. By clicking "Agree" you agree to the current settings. For more information, please visit the Privacy Statement.
This website uses cookies
In compliance with EU personal data protection laws, we are committed to protecting your personal data and providing you with control over it. By clicking "Agree", you allow us to place cookies to improve your experience on this site, help us analyze site performance and usage, and allow us to deliver relevant marketing content.
By clicking "Only necessary" you allow us to place only necessary cookies. The website cannot function without these cookies and you cannot switch them off on your system. These cookies are typically set only in response to an action you perform (i.e. a service request), such as setting privacy preferences, logging in, or filling in a form. You can set your browser to block or prompt you for these cookies, but this may prevent some site features from working.



