
Copyright 2026 © Leading Tools Industrial Co., Ltd.
All Rights Reserved. Website Design by Awakening Design
CATALOG TYPE
Product Categories
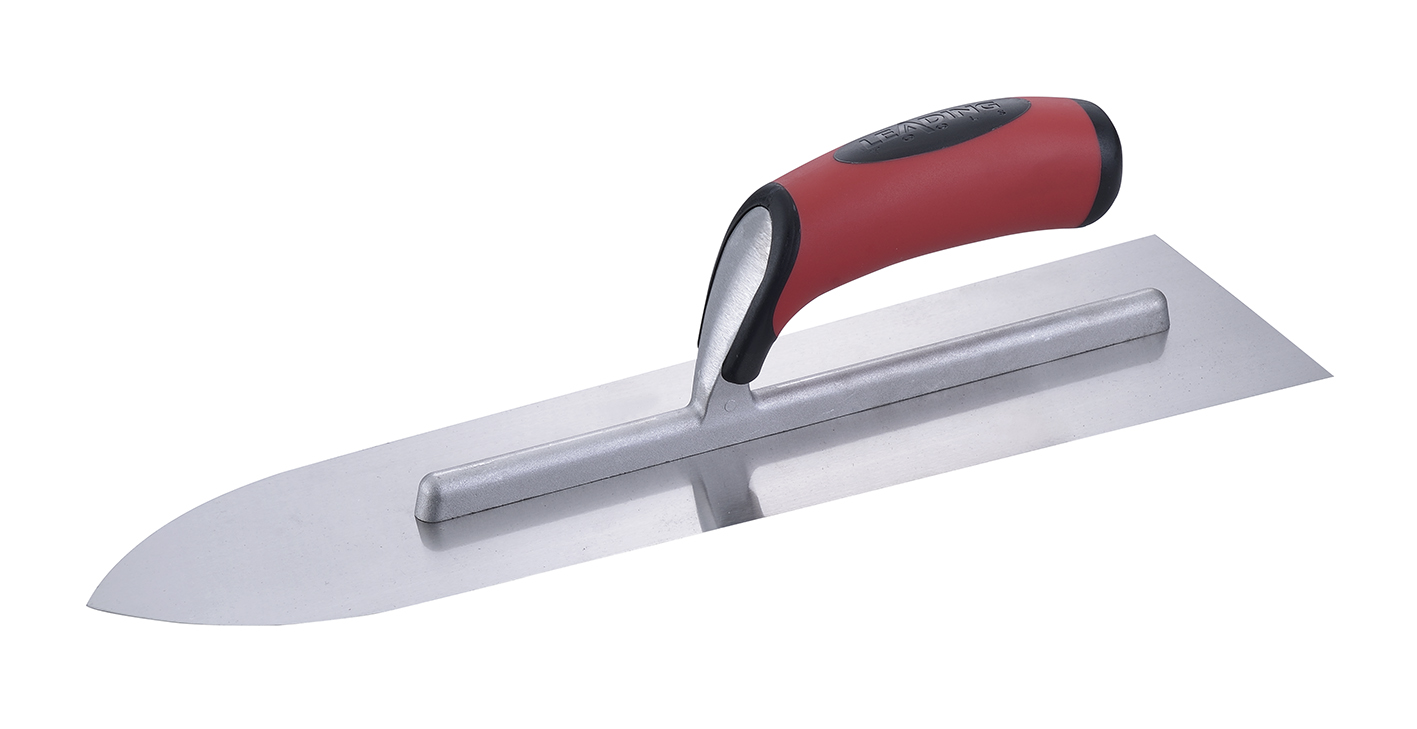
Pointed Finishing Trowel
Product Description
Pointed Finishing Trowel: pointed-nose plaster trowel range
| Item | Detail |
|---|---|
| Product name | Pointed Finishing Trowel |
| Article numbers in this family | 608821 / 609821 / 610821 |
| Featured article number | 608821 — 4-1/2" × 14" (approx. 114 × 356 mm) |
| Callouts | Spot Riveted; stainless steel on the listed art numbers (carbon steel: contact sales); Quality Consistent |
| Tool category | Pointed-nose finishing trowel: the blade tapers to a point at the toe |
| Situation | Use the 608821? | Notes |
|---|---|---|
| Laying on and flattening plaster or render on walls and ceilings | Yes | The 14" blade closes a useful width per pass; the pointed toe handles the edges of the same section without a tool change |
| Internal corners, wall/ceiling junctions, window and door reveals | Yes, the main purpose of the pointed toe | The tapered toe enters the angle; a square-nose blade rides on its corner and leaves material short |
| Patching and small repairs in confined space (behind pipes, around boxes) | Yes | Narrow specialist blade role for tight spaces |
| Filling brick joints | No | Use a Pointing Trowel to carry mortar to the joint and a Brick Jointer to tool the profile |
| Mixing or gauging small plaster batches | No | Use a gauging trowel |
| Laying bricks | No | Use a brick trowel |
| Step | Action | Detail |
|---|---|---|
| 1 | Load from the hawk | Cut a manageable ribbon of material off the hawk with the blade edge and pick it up on the blade: small controlled loads beat one large load that squeezes out |
| 2 | Check consistency before you commit | Correctly gauged material holds its shape when cut with the blade edge: a good test is that it cuts like marzipan; too wet or too dry and no tool will save the finish |
| 3 | Lay on | Present the blade at a low angle with the heel leading, press the material onto the background and draw the blade forward, keeping the leading edge just off the surface |
| 4 | Flatten | Reduce the blade angle to roughly 20° with steady, even pressure, and use overlapping passes so no pass line is left standing |
| 5 | Cut in the edges | Turn the trowel so the pointed toe leads and run it into the corner, along the bead or against the reveal; keep the heel off the adjacent face so you do not mark work you have already closed |
| 6 | Wait, then close | Let the material take up (thumb-firm) before the final passes |
| 7 | Final pass | Reduce pressure almost to nothing and take one continuous overlapping pass to burnish; do not chase the surface once it has gone off |
| 8 | Clean immediately | Wash the blade before the material cures and dry it, carbon steel especially |
| Stage | Blade angle | Notes |
|---|---|---|
| Laying on | 30–45° | Enough angle to push material off the blade onto the background |
| Flattening / consolidating | approx. 20° | Steady, even pressure |
| Corner and edge cutting-in | Variable, toe leading | Angle follows the corner, not the wall |
| Final burnishing pass | Near flat, minimal pressure | Overlapping strokes to remove pass lines |
This is the geometry the tool was built for. Work the open field of the wall first with the blade square to the surface, then rotate the trowel so the toe leads and run the point into the internal angle.
Because the blade narrows, the toe reaches the bottom of the angle while the rest of the blade is still clear of the return face, so you close the corner without scoring the wall you just finished. On reveals, run the toe along the bead or arris and let the taper act as the guide.
Common failure: trying to do this with a rectangular trowel, then filling the shortfall by hand afterwards: the repair is always visible under a raking light.
Around pipework, service boxes, ductwork and behind fixed equipment, the working space is often narrower than a standard trowel. The pointed nose of the 608821 covers a meaningful share of that work without a second narrow tool: lay the material on with the heel, cut in with the toe, and finish flat where the space allows. Keep patch material slightly stiffer than the surrounding batch so it does not slump out of a small repair.
Q1: Can I use this trowel for brick joints?
No. This is a plaster and finishing trowel with a pointed toe. For brickwork, use a Pointing Trowel to carry mortar to the joint and a Brick Jointer to tool the joint profile.
Q2: Carbon steel or stainless steel, which should I order?
The listed art numbers are stainless steel; each art number corresponds to one blade material, so for carbon steel contact Leading Tools sales. The deciding factors are how wet the work is and how disciplined the clean-down routine is. Carbon steel must be dried and wiped with an oiled cloth after every use; stainless tolerates a missed clean-down better.
Q3: Which length should I stock first?
14" (608821) if your customers do detail, corner and repair work; 16" (609821) as a single general-purpose size; 18" (610821) for large flat areas.
Q4: Material sticks to the blade and tears the surface. What is wrong?
Usually the mix, not the tool. Check three things in order: mix consistency, since correctly mixed material holds its shape when cut with the blade; a blade face fouled with hardened material, which must be cleaned off; and timing, since material that has started to set should be tooled, not re-worked.
Q5: How is this different from the 605821 series?
Same Spot Riveted construction, same steel options and same soft grip. The 605821 series (Pointed Finishing Trowel — Long Size) is sized in metric, 90/110 mm wide and 405–600 mm long. Choose the 608821 family for 14"–18" blades; the 605821 series is sized in metric, and its -50 and -60 sizes are longer than 18".
| Attribute | Detail |
|---|---|
| Blade dimensions (608821) | 4-1/2" × 14" (approx. 114 × 356 mm) |
| Nominal width | 4-1/2" (114 mm), measured at the widest point near the heel; the blade narrows forward of this |
| Blade shape | Tapered pointed profile, square-cut heel, blade narrows to a point at the toe |
| Blade material | Stainless Steel (SS) |
| Attachment method | Spot Riveted (contact us for mount material and joint details) |
Blade profile. The blade is widest at the heel and tapers forward to a point.
This is the defining geometry of the tool and it is what separates it from a rectangular finishing trowel: the toe can be driven into a 90° internal corner, run along a stop bead, or slid under an obstruction, while the full-width heel still carries and flattens material. A rectangular blade of the same length can do the second job but not the first.
| Attribute | Detail |
|---|---|
| Handle type | Soft-grip handle (F21) |
| Mounting | Spot Riveted; for mount material and joint details, contact us |
A soft-grip handle suits this class of tool: it reduces hand fatigue and improves grip over a full working day.
Spot Riveted construction. The blade is joined to the mount by spot-riveting; for mount material and joint details, contact us.
| Specification | Value |
|---|---|
| Article number | 608821 |
| Blade size | 4-1/2" × 14" (114 × 356 mm) |
| Blade shape | Tapered pointed profile, narrows to a point at the tip |
| Material | Stainless steel; for carbon steel, contact sales |
| Heel | Square-cut |
| Toe | Pointed |
| Construction | Spot riveted |
| Handle | Soft grip |
| Primary use | Plaster and render laying-on and finishing; corner, angle and edge work |
| Article No. | Blade size | Best for |
|---|---|---|
| 608821 | 4-1/2" × 14" (114 × 356 mm) | The control size: corners, angles, patch work, and anyone who has to hold the trowel overhead for long periods |
| 609821 | 4-1/2" × 16" (114 × 406 mm) | The general-purpose size: enough reach for open wall work, still manageable in one hand |
| 610821 | 4-1/2" × 18" (114 × 457 mm) | The coverage size: long uninterrupted runs and large flat fields where pass count is the limiting factor |
Choose by scope of work rather than by preference: match the blade to the size of the area being worked.
The listed art numbers are stainless steel. Each art number corresponds to one blade material; for a carbon steel blade, contact Leading Tools sales. The comparison below is for reference.
| Criterion | Carbon steel (CS) | Stainless steel (SS) |
|---|---|---|
| Corrosion resistance | Both steels resist corrosion to a degree, but carbon steel is the one that will show rust if left wet | The safer choice wherever the tool is repeatedly wetted |
| Drying discipline required | High, must be dried after every wash | Lower, but still clean and dry it |
| Rust-staining risk on finished work | Present if the blade is allowed to corrode | Low |
| Lime-rich and heritage mortars | Stainless is the safer choice for lime work | Preferred |
| Maintenance burden | Higher, oil or an oiled cloth wipe is the standard rust prevention | Lower |
Recommendation. For dry interior plastering with a disciplined clean-down routine, carbon steel is workable; contact sales for it. The listed stainless steel art numbers are the right choice where the tool lives outdoors, where it is used in wet render or lime work, or where a rust mark on a finished face would be expensive to remedy.
| If the work is… | Choose | Why |
|---|---|---|
| Internal corners, reveals, small patches, ceilings | 608821 (14") | Shortest lever arm, least fatigue, easiest to control the pointed toe |
| Mixed wall work, average room-scale plastering | 609821 (16") | Balance of reach and control |
| Long walls, large flat fields | 610821 (18") | Fewest passes per area |
Because the width is fixed at 4-1/2" across the family, all three enter corners and tight spaces equally well; length only changes how much surface is closed per stroke.
| Tool | Type | When to choose it instead of the 608821 |
|---|---|---|
| Pointed Finishing Trowel 608821 (this product) | 14" pointed-nose plaster/finishing trowel | — |
| Pointing Trowel | Small pointed brick trowel | Taking up small amounts of mortar, patching, and carrying mortar to the joint in brickwork |
| Brick trowel (Wide London Pattern Brick Trowel, Philadelphia Pattern Brick Trowel) | Large triangular trowel for buttering and laying bricks | Laying courses, buttering bricks |
| Brick Jointer | Narrow tool for compacting and shaping a mortar joint to a consistent profile | Producing a specified joint profile in masonry |
| Square-nose finishing trowel | Rectangular blade, same length class | Pure open-field flattening where no corner work is involved |
| Pointed Finishing Trowel — Long Size, 605821 series | Long-size version, 90/110 mm × 405/455/500/600 mm | Metric (mm) sizing; the -50 and -60 sizes are longer than 18" |
Every article number in the Pointed Finishing Trowel family.
| Article No. | Blade size (imperial) | Blade size (metric, 1" = 25.4 mm) | Blade shape | Material | Handle | Construction |
|---|---|---|---|---|---|---|
| 608821 | 4-1/2" × 14" | approx. 114 × 356 mm | Tapered, pointed toe | Stainless steel | Soft grip | Spot riveted |
| 609821 | 4-1/2" × 16" | approx. 114 × 406 mm | Tapered, pointed toe | Stainless steel | Soft grip | Spot riveted |
| 610821 | 4-1/2" × 18" | approx. 114 × 457 mm | Tapered, pointed toe | Stainless steel | Soft grip | Spot riveted |
Metric equivalents are converted at 1" = 25.4 mm and rounded to the nearest millimeter.
Related family in the same range: the Pointed Finishing Trowel — Long Size 605821-40 / -45 / -50 / -60, sized 90/110 mm × 405 / 455 / 500 / 600 mm, shares the Spot Riveted construction, the soft grip and the stainless steel blade, in metric sizes (the -50 and -60 sizes are longer than 18").
| Item | Frequency | Method |
|---|---|---|
| Blade edge and toe | Every job | Run a finger along the edge; nicks and burrs can be removed with fine abrasive paper, keeping the edge smooth and rounded |
| Rust removal (carbon steel) | As needed | Abrasive dressing followed by an oiled wipe |
| Mount | Monthly | Check for movement between blade and mount; any play means the tool is finished for precision work |
| Handle | Monthly | Check the soft grip for splitting, hardening or loosening |
| Blade flatness | Monthly | Lay the blade on a known flat surface and sight along it; a warped blade cannot produce a flat finish |
| Care aspect | Carbon steel | Stainless steel |
|---|---|---|
| Drying after use | Immediate and complete | Prompt |
| Rust prevention | Oiled cloth wipe as routine | Optional |
| Tolerance of a missed clean-down | Low | Higher |
| Edge dressing | Same method: remove nicks with fine abrasive paper | Same method |
| Long-term durability with correct care | Good | Good |
Pointed Finishing Trowel: pointed-nose plaster trowel range
| Item | Detail |
|---|---|
| Product name | Pointed Finishing Trowel |
| Article numbers in this family | 608821 / 609821 / 610821 |
| Featured article number | 608821 — 4-1/2" × 14" (approx. 114 × 356 mm) |
| Callouts | Spot Riveted; stainless steel on the listed art numbers (carbon steel: contact sales); Quality Consistent |
| Tool category | Pointed-nose finishing trowel: the blade tapers to a point at the toe |
| Situation | Use the 608821? | Notes |
|---|---|---|
| Laying on and flattening plaster or render on walls and ceilings | Yes | The 14" blade closes a useful width per pass; the pointed toe handles the edges of the same section without a tool change |
| Internal corners, wall/ceiling junctions, window and door reveals | Yes, the main purpose of the pointed toe | The tapered toe enters the angle; a square-nose blade rides on its corner and leaves material short |
| Patching and small repairs in confined space (behind pipes, around boxes) | Yes | Narrow specialist blade role for tight spaces |
| Filling brick joints | No | Use a Pointing Trowel to carry mortar to the joint and a Brick Jointer to tool the profile |
| Mixing or gauging small plaster batches | No | Use a gauging trowel |
| Laying bricks | No | Use a brick trowel |
| Step | Action | Detail |
|---|---|---|
| 1 | Load from the hawk | Cut a manageable ribbon of material off the hawk with the blade edge and pick it up on the blade: small controlled loads beat one large load that squeezes out |
| 2 | Check consistency before you commit | Correctly gauged material holds its shape when cut with the blade edge: a good test is that it cuts like marzipan; too wet or too dry and no tool will save the finish |
| 3 | Lay on | Present the blade at a low angle with the heel leading, press the material onto the background and draw the blade forward, keeping the leading edge just off the surface |
| 4 | Flatten | Reduce the blade angle to roughly 20° with steady, even pressure, and use overlapping passes so no pass line is left standing |
| 5 | Cut in the edges | Turn the trowel so the pointed toe leads and run it into the corner, along the bead or against the reveal; keep the heel off the adjacent face so you do not mark work you have already closed |
| 6 | Wait, then close | Let the material take up (thumb-firm) before the final passes |
| 7 | Final pass | Reduce pressure almost to nothing and take one continuous overlapping pass to burnish; do not chase the surface once it has gone off |
| 8 | Clean immediately | Wash the blade before the material cures and dry it, carbon steel especially |
| Stage | Blade angle | Notes |
|---|---|---|
| Laying on | 30–45° | Enough angle to push material off the blade onto the background |
| Flattening / consolidating | approx. 20° | Steady, even pressure |
| Corner and edge cutting-in | Variable, toe leading | Angle follows the corner, not the wall |
| Final burnishing pass | Near flat, minimal pressure | Overlapping strokes to remove pass lines |
This is the geometry the tool was built for. Work the open field of the wall first with the blade square to the surface, then rotate the trowel so the toe leads and run the point into the internal angle.
Because the blade narrows, the toe reaches the bottom of the angle while the rest of the blade is still clear of the return face, so you close the corner without scoring the wall you just finished. On reveals, run the toe along the bead or arris and let the taper act as the guide.
Common failure: trying to do this with a rectangular trowel, then filling the shortfall by hand afterwards: the repair is always visible under a raking light.
Around pipework, service boxes, ductwork and behind fixed equipment, the working space is often narrower than a standard trowel. The pointed nose of the 608821 covers a meaningful share of that work without a second narrow tool: lay the material on with the heel, cut in with the toe, and finish flat where the space allows. Keep patch material slightly stiffer than the surrounding batch so it does not slump out of a small repair.
Q1: Can I use this trowel for brick joints?
No. This is a plaster and finishing trowel with a pointed toe. For brickwork, use a Pointing Trowel to carry mortar to the joint and a Brick Jointer to tool the joint profile.
Q2: Carbon steel or stainless steel, which should I order?
The listed art numbers are stainless steel; each art number corresponds to one blade material, so for carbon steel contact Leading Tools sales. The deciding factors are how wet the work is and how disciplined the clean-down routine is. Carbon steel must be dried and wiped with an oiled cloth after every use; stainless tolerates a missed clean-down better.
Q3: Which length should I stock first?
14" (608821) if your customers do detail, corner and repair work; 16" (609821) as a single general-purpose size; 18" (610821) for large flat areas.
Q4: Material sticks to the blade and tears the surface. What is wrong?
Usually the mix, not the tool. Check three things in order: mix consistency, since correctly mixed material holds its shape when cut with the blade; a blade face fouled with hardened material, which must be cleaned off; and timing, since material that has started to set should be tooled, not re-worked.
Q5: How is this different from the 605821 series?
Same Spot Riveted construction, same steel options and same soft grip. The 605821 series (Pointed Finishing Trowel — Long Size) is sized in metric, 90/110 mm wide and 405–600 mm long. Choose the 608821 family for 14"–18" blades; the 605821 series is sized in metric, and its -50 and -60 sizes are longer than 18".
| Attribute | Detail |
|---|---|
| Blade dimensions (608821) | 4-1/2" × 14" (approx. 114 × 356 mm) |
| Nominal width | 4-1/2" (114 mm), measured at the widest point near the heel; the blade narrows forward of this |
| Blade shape | Tapered pointed profile, square-cut heel, blade narrows to a point at the toe |
| Blade material | Stainless Steel (SS) |
| Attachment method | Spot Riveted (contact us for mount material and joint details) |
Blade profile. The blade is widest at the heel and tapers forward to a point.
This is the defining geometry of the tool and it is what separates it from a rectangular finishing trowel: the toe can be driven into a 90° internal corner, run along a stop bead, or slid under an obstruction, while the full-width heel still carries and flattens material. A rectangular blade of the same length can do the second job but not the first.
| Attribute | Detail |
|---|---|
| Handle type | Soft-grip handle (F21) |
| Mounting | Spot Riveted; for mount material and joint details, contact us |
A soft-grip handle suits this class of tool: it reduces hand fatigue and improves grip over a full working day.
Spot Riveted construction. The blade is joined to the mount by spot-riveting; for mount material and joint details, contact us.
| Specification | Value |
|---|---|
| Article number | 608821 |
| Blade size | 4-1/2" × 14" (114 × 356 mm) |
| Blade shape | Tapered pointed profile, narrows to a point at the tip |
| Material | Stainless steel; for carbon steel, contact sales |
| Heel | Square-cut |
| Toe | Pointed |
| Construction | Spot riveted |
| Handle | Soft grip |
| Primary use | Plaster and render laying-on and finishing; corner, angle and edge work |
| Article No. | Blade size | Best for |
|---|---|---|
| 608821 | 4-1/2" × 14" (114 × 356 mm) | The control size: corners, angles, patch work, and anyone who has to hold the trowel overhead for long periods |
| 609821 | 4-1/2" × 16" (114 × 406 mm) | The general-purpose size: enough reach for open wall work, still manageable in one hand |
| 610821 | 4-1/2" × 18" (114 × 457 mm) | The coverage size: long uninterrupted runs and large flat fields where pass count is the limiting factor |
Choose by scope of work rather than by preference: match the blade to the size of the area being worked.
The listed art numbers are stainless steel. Each art number corresponds to one blade material; for a carbon steel blade, contact Leading Tools sales. The comparison below is for reference.
| Criterion | Carbon steel (CS) | Stainless steel (SS) |
|---|---|---|
| Corrosion resistance | Both steels resist corrosion to a degree, but carbon steel is the one that will show rust if left wet | The safer choice wherever the tool is repeatedly wetted |
| Drying discipline required | High, must be dried after every wash | Lower, but still clean and dry it |
| Rust-staining risk on finished work | Present if the blade is allowed to corrode | Low |
| Lime-rich and heritage mortars | Stainless is the safer choice for lime work | Preferred |
| Maintenance burden | Higher, oil or an oiled cloth wipe is the standard rust prevention | Lower |
Recommendation. For dry interior plastering with a disciplined clean-down routine, carbon steel is workable; contact sales for it. The listed stainless steel art numbers are the right choice where the tool lives outdoors, where it is used in wet render or lime work, or where a rust mark on a finished face would be expensive to remedy.
| If the work is… | Choose | Why |
|---|---|---|
| Internal corners, reveals, small patches, ceilings | 608821 (14") | Shortest lever arm, least fatigue, easiest to control the pointed toe |
| Mixed wall work, average room-scale plastering | 609821 (16") | Balance of reach and control |
| Long walls, large flat fields | 610821 (18") | Fewest passes per area |
Because the width is fixed at 4-1/2" across the family, all three enter corners and tight spaces equally well; length only changes how much surface is closed per stroke.
| Tool | Type | When to choose it instead of the 608821 |
|---|---|---|
| Pointed Finishing Trowel 608821 (this product) | 14" pointed-nose plaster/finishing trowel | — |
| Pointing Trowel | Small pointed brick trowel | Taking up small amounts of mortar, patching, and carrying mortar to the joint in brickwork |
| Brick trowel (Wide London Pattern Brick Trowel, Philadelphia Pattern Brick Trowel) | Large triangular trowel for buttering and laying bricks | Laying courses, buttering bricks |
| Brick Jointer | Narrow tool for compacting and shaping a mortar joint to a consistent profile | Producing a specified joint profile in masonry |
| Square-nose finishing trowel | Rectangular blade, same length class | Pure open-field flattening where no corner work is involved |
| Pointed Finishing Trowel — Long Size, 605821 series | Long-size version, 90/110 mm × 405/455/500/600 mm | Metric (mm) sizing; the -50 and -60 sizes are longer than 18" |
Every article number in the Pointed Finishing Trowel family.
| Article No. | Blade size (imperial) | Blade size (metric, 1" = 25.4 mm) | Blade shape | Material | Handle | Construction |
|---|---|---|---|---|---|---|
| 608821 | 4-1/2" × 14" | approx. 114 × 356 mm | Tapered, pointed toe | Stainless steel | Soft grip | Spot riveted |
| 609821 | 4-1/2" × 16" | approx. 114 × 406 mm | Tapered, pointed toe | Stainless steel | Soft grip | Spot riveted |
| 610821 | 4-1/2" × 18" | approx. 114 × 457 mm | Tapered, pointed toe | Stainless steel | Soft grip | Spot riveted |
Metric equivalents are converted at 1" = 25.4 mm and rounded to the nearest millimeter.
Related family in the same range: the Pointed Finishing Trowel — Long Size 605821-40 / -45 / -50 / -60, sized 90/110 mm × 405 / 455 / 500 / 600 mm, shares the Spot Riveted construction, the soft grip and the stainless steel blade, in metric sizes (the -50 and -60 sizes are longer than 18").
| Item | Frequency | Method |
|---|---|---|
| Blade edge and toe | Every job | Run a finger along the edge; nicks and burrs can be removed with fine abrasive paper, keeping the edge smooth and rounded |
| Rust removal (carbon steel) | As needed | Abrasive dressing followed by an oiled wipe |
| Mount | Monthly | Check for movement between blade and mount; any play means the tool is finished for precision work |
| Handle | Monthly | Check the soft grip for splitting, hardening or loosening |
| Blade flatness | Monthly | Lay the blade on a known flat surface and sight along it; a warped blade cannot produce a flat finish |
| Care aspect | Carbon steel | Stainless steel |
|---|---|---|
| Drying after use | Immediate and complete | Prompt |
| Rust prevention | Oiled cloth wipe as routine | Optional |
| Tolerance of a missed clean-down | Low | Higher |
| Edge dressing | Same method: remove nicks with fine abrasive paper | Same method |
| Long-term durability with correct care | Good | Good |

In compliance with EU personal data protection laws, we are committed to protecting and providing you with control over your personal data. By clicking "Accept All", you allow us to place cookies to enhance your experience on this site, help us analyze site performance and usage, and enable us to deliver relevant marketing content. You can manage your cookie settings below. By clicking "Agree" you agree to the current settings. For more information, please visit the Privacy Statement.
This website uses cookies
In compliance with EU personal data protection laws, we are committed to protecting your personal data and providing you with control over it. By clicking "Agree", you allow us to place cookies to improve your experience on this site, help us analyze site performance and usage, and allow us to deliver relevant marketing content.
By clicking "Only necessary" you allow us to place only necessary cookies. The website cannot function without these cookies and you cannot switch them off on your system. These cookies are typically set only in response to an action you perform (i.e. a service request), such as setting privacy preferences, logging in, or filling in a form. You can set your browser to block or prompt you for these cookies, but this may prevent some site features from working.



