
Copyright 2026 © Leading Tools Industrial Co., Ltd.
All Rights Reserved. Website Design by Awakening Design
CATALOG TYPE
Product Categories
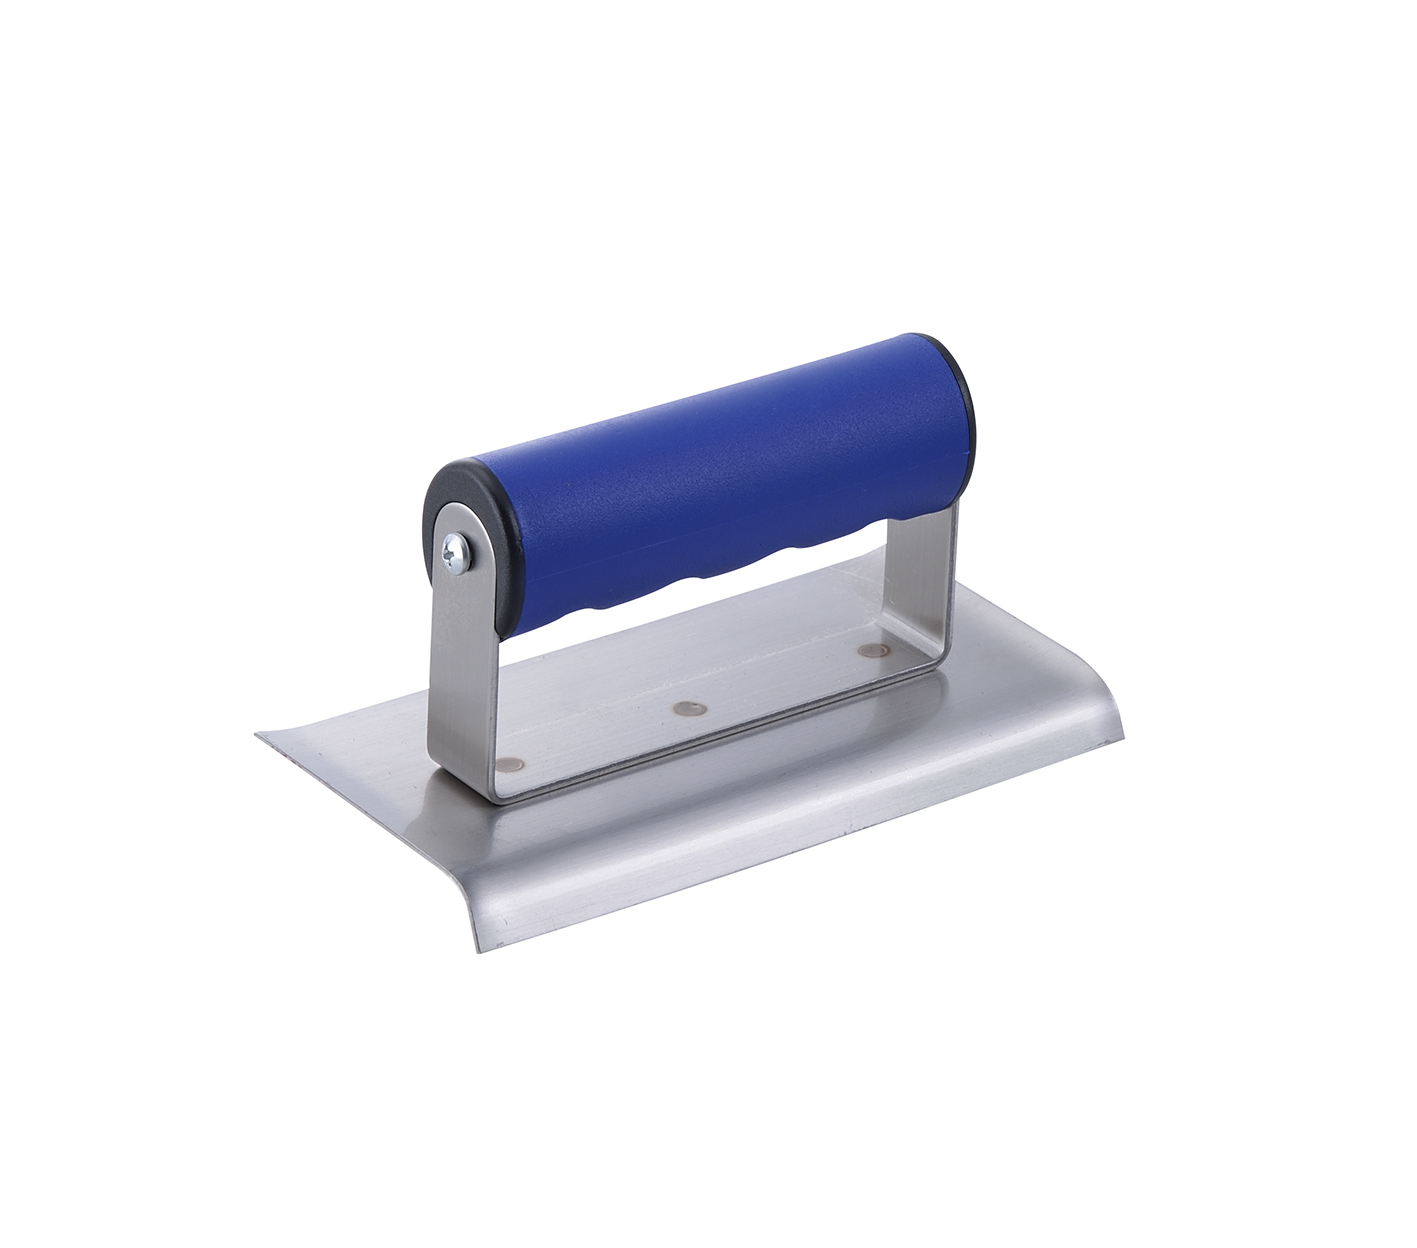
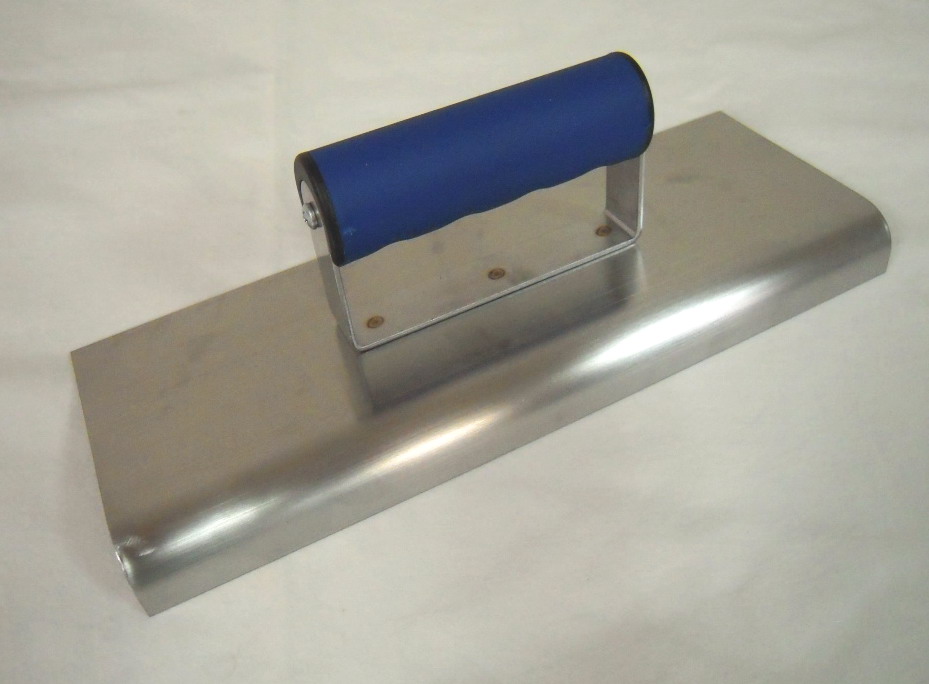
Straight End Edger — Stainless Steel
Product Description
Straight End Edger — Stainless Steel
Art. Nr: 300170
The Straight End Edger is a hand finishing tool that forms the rounded edge, the arris, on freshly placed concrete, so the edge does not chip or spall once the slab is in service. What separates it from an ordinary concrete edger is the shape of the two short ends of the blade: they are straight and square instead of turned up, so the blade can be run right up against a wall, a form face or an existing slab edge without the turned-up end lifting the tool off the line.
Leading Tools places the Straight End Edger in the Corner group of its Professional Tools range, under a Stainless Steel material sub-heading, as a single art number: 300170 at 3-1/2" × 6" (89 × 152 mm; 1" = 25.4 mm). Three related Leading Tools tools sit alongside it in the same range: Concrete Edger 300100/300101/300171–300173, Concrete Groover 300110 and Universal Groover 300181, and the Selection Guide on the Specification tab sets out which job belongs to which tool.
An un-edged slab arris is a sharp 90° corner in a material with almost no tensile strength at the corner. Edging replaces the corner with a radius, and that radius is what stops walkway, driveway, warehouse and platform edges from chipping and spalling once the slab is loaded and weathered. The tool is doing structural work, and the finished radius is the deliverable.
This is the whole reason the straight-end variant exists. A curved-end edger has both short ends turned up so it can be set down and lifted mid-slab without gouging the fresh surface; that same turned-up end prevents the tool from finishing the last inches of an edge that runs into a wall or a form. The straight-end blade solves that case: the square end sits flush against the fixed face, and the edge line stays true all the way to the junction.
Concrete edging is wet, alkaline work, and the tool spends its life in cement paste. The 300170 blade is stainless steel, with high corrosion resistance and low upkeep, which is why stainless is the usual choice for decorative, stained and polished floors. Chlorinated water, coastal air or prolonged soaking can still cause rust spots, so rinse with clean water and dry after use.
The 300170 carries a blue soft-grip handle on a metal bracket, the same soft-grip handle type as the stainless steel curved-end Concrete Edger 300171–300173, so a crew working with both does not change grip type. Elsewhere in the Leading Tools range the Concrete Edger 300100/300101 and Concrete Groover 300110 carry wooden roller handles, so the handle type genuinely differs between those tools and the 300170.
The 300170 is a single mid-width size, 3-1/2" × 6" (89 × 152 mm). Narrower, wider or longer stainless soft-grip blades are listed under the Concrete Edger: 300171 at 3" × 6", 300173 at 4" × 6" and 300172 at 4" × 11", all with curved ends.
| Stage | Do you use the Straight End Edger? | Why |
|---|---|---|
| Concrete placed, still bleeding water on the surface | No | Working the surface before bleed water has gone weakens it |
| Bleed water gone, surface has lost its sheen and is still workable but no longer sticky | Yes, this is the window | The edge can be formed without pressing bleed water back into the surface |
| Before the forms are stripped | Yes | Edging must be finished while the forms are still in place; the blade rides between the form and the slab |
| Surface hard enough that the tool no longer marks it | Too late | The hand-tool window has closed; correction now requires grinding |
| New concrete placed against an existing slab | Yes | Edge the new concrete along the junction, with the square end running along the existing slab edge |
The practical field test is the thumb test: press a thumb into the concrete near the junction. A clear impression with no material sticking to the thumb means the surface is ready; if concrete sticks, wait; if no impression can be made, the hand-tool window has closed.
| Step | Action |
|---|---|
| 1 | Confirm the timing: bleed water gone, surface dull, still workable |
| 2 | Clear the junction: remove debris and standing water, and check the fixed face (wall, form, curb) is clean and, if splatter matters, masked |
| 3 | Set the blade flat on the slab with the square end against the fixed face and the forming lip on the concrete side |
| 4 | Load the tool through the handle with steady, even downward pressure: enough to smooth and straighten the arris, not enough to press the blade into the surface |
| 5 | Run one long, continuous stroke along the junction, keeping the square end in contact with the fixed face for the whole stroke |
| 6 | Keep pace and pressure constant; do not stop or jab mid-stroke |
| 7 | Overlap the next stroke into the last so the whole run is covered without a visible start-stop mark |
| 8 | Finish by removing the tool marks left alongside the edge with a trowel or float, while the surface is still workable |
Place the square end flat against the wall face and run the full length of the junction in continuous strokes. The forming lip produces the rounded transition on the concrete side while the square end holds the line true against the wall. This matters most in warehouses, plants and parking structures, where the floor-wall junction takes point loads from forklifts, pallet jacks and carts, and where an un-radiused edge is the first thing to spall.
Edging is done while the forms are still standing; the blade rides in the gap between the form and the concrete, so the work must be finished before the forms are stripped. Confirm the forms are clean and the concrete has been placed to the correct level before starting, because a low fill leaves the forming lip riding on nothing and a high fill leaves a lip of concrete above the form.
Where new concrete is placed against an existing slab, edge the new concrete along the junction in the normal way, with the square end running along the existing slab edge.
On poured-in-place curbs, the square end runs along the curb face to form a clean transition between the curb and the adjoining slab. On decorative floors, stamped, stained or polished, the wall junction is a visible detail line and a stainless blade lowers the risk of rust marking on a surface that will be sealed or polished. Thin cement-based toppings can set faster than a full-depth slab, so follow the topping manufacturer's working time and complete the run without pausing.
Concrete placement → screeding → bull float / highway float → edging (Concrete Edger 300100/300101 and 300171–300173 on free perimeter edges; Straight End Edger 300170 at wall, form and slab junctions) → grooving (Concrete Groover 300110 / Universal Groover 300181) → final floating → optional steel troweling → curing.
Wear gloves, eye protection and, where the work generates dust, a dust mask; fresh concrete is strongly alkaline and abrasive to skin.
Q: What is the difference between a Straight End Edger and an ordinary concrete edger?
A: The end form. Curved-end edgers have both short ends turned up so they can be set down and lifted mid-slab without gouging the fresh surface; the straight-end version has square ends so it can finish an edge right up to a wall, form or adjoining slab. Leading Tools carries both families.
Q: When should I edge, and why does the tool stick or tear the concrete?
A: Edge after the bleed water has left the surface and the sheen has gone, while the concrete is still workable, and before the forms are stripped. If the tool sticks, the surface is still too wet; if the concrete tears at the junction, it has gone past the hand-tool window, so start edging as soon as the bleed water has gone on the next pour.
Q: The edge line comes out uneven or wavy, or the tool leaves a groove. Why?
A: Either the square end was not held in continuous contact with the fixed face, the stroke was broken into short jabs, or there was too much downward pressure. Use one long continuous stroke at constant pace and pressure, keep the blade flat on the slab, and run the square end flush along the wall or form face rather than pushing it into it.
Q: What does the stainless steel blade mean for care?
A: High corrosion resistance and low upkeep, with a lower risk of rust marks on decorative surfaces. Chlorinated water, coastal air or prolonged soaking can still cause rust spots, so rinse with clean water and dry after use. The Leading Tools 300170 is stainless.
Q: Which size suits general junction work?
A: 300170 (3-1/2" × 6", 89 × 152 mm), the single size of the Straight End Edger. If you need a narrower, wider or longer stainless soft-grip blade on a free perimeter edge, see the curved-end Concrete Edger 300171 (3" × 6"), 300173 (4" × 6") and 300172 (4" × 11").
| Model | Blade Size | Metric equivalent | Material |
|---|---|---|---|
| 300170 | 3-1/2" × 6" | 89 × 152 mm | Stainless Steel |
How to read the size. Sizes are given as width × length: the first figure is the blade width across the plate, the second is the blade length along the edge being finished. Some conventions quote the same tool length × width, so 300170 (3-1/2" × 6") reads as 6" × 3-1/2" in that convention. Both orders are given here to prevent ordering errors.
| Item | Value |
|---|---|
| Product name / product group | Straight End Edger — Corner, Professional Tools |
| Art. numbers | 300170 |
| Blade sizes | 3-1/2" × 6" |
| Blade material | Stainless Steel |
| End form | Straight (square) ends |
| Handle | Blue soft-grip handle on a metal bracket |
The blade material for this tool is specified as "Stainless Steel". In service that grade delivers:
Handle type: blue soft-grip (comfort-grip) handle, attached to the blade through a metal bracket. The grip is moulded rather than turned wood, and the bracket raises it far enough above the plate for the operator to load the forming lip through the heel of the palm while walking the edge. Soft ergonomic grips are specified across this tool class specifically to reduce hand fatigue over extended finishing sessions.
The blade consists of:
This is the choice that determines whether the tool can do the job at all, and it comes before size. The two forms are:
| Question | Straight End Edger (300170) | Curved End Edger (Concrete Edger 300100 / 300101 / 300171–300173) |
|---|---|---|
| Blade ends | Square, flush to the end of the plate | Turned up at both ends |
| Where it works | Edges that run into a fixed face: wall, column, form, curb, adjoining slab | Free slab perimeter, where the tool is set down and lifted mid-run |
| Risk it avoids | Leaving the last inches of the edge unformed at the junction | Gouging the fresh surface at the start and end of each stroke |
| Typical jobs | Floor-to-wall junctions, edges cast against formwork, refurbished slab edges | Sidewalks, driveways, patios, open slab perimeters |
A crew that finishes interior floors and slabs cast against forms needs the straight-end tool; a crew doing open sidewalks needs the curved-end tool; most contractors carry both, which is why Leading Tools offers both families in its range.
| If the work is… | Choose | Why |
|---|---|---|
| General residential and light commercial junctions | 300170 — 3-1/2" × 6" | Mid-width blade; balances coverage against control |
| Tighter spaces, wider plates or longer runs on free perimeter edges, in stainless with a soft grip | Concrete Edger 300171 (3" × 6"), 300173 (4" × 6") or 300172 (4" × 11") | Same stainless blade and blue soft grip as 300170, but with curved ends, so they suit open slab edges rather than wall junctions |
The first figure is blade width. A wider blade covers more of the slab surface either side of the arris per pass and is steadier on long straight runs; it is harder to work into a tight radius or a confined corner.
A narrower blade is more manoeuvrable in confined spaces and easier to keep flat where the operator cannot stand square to the work. Blade width does not change the radius formed on the concrete; that is set by the forming lip, not the plate.
The second figure is blade length along the edge. Correct edging technique is long, continuous, uninterrupted strokes, not short back-and-forth jabbing, and a longer blade makes those strokes easier to hold on line. The trade-off with a longer blade, such as the 11" blade of Concrete Edger 300172, is bulk, storage and the extra effort of keeping a long plate perfectly flat where the slab surface is not perfectly level.
Radius and lip depth: contact us.
Leading Tools' 300170 is stainless throughout, the usual choice for decorative, stained or polished floors. It has a blue soft-grip handle, so for extended sessions confirm before each shift that the grip surface is clean and dry, that the handle is tight on the bracket, and that pressure is applied through the heel of the palm rather than the fingers.
The single art number of the Leading Tools Straight End Edger.
| Art. Nr | Size | Metric | Length × width | Material | Handle | Best use |
|---|---|---|---|---|---|---|
| 300170 | 3-1/2" × 6" | 89 × 152 mm | 6" × 3-1/2" | Stainless Steel | Blue soft grip | Standard residential and commercial floor-to-wall junctions; balanced coverage and control |
Before each use, confirm the handle is tight on the bracket, the grip surface is not worn or split, and the bracket is neither cracked nor bent. A loose bracket makes even pressure impossible and shows up immediately as an uneven edge line.
Straight End Edger — Stainless Steel
Art. Nr: 300170
The Straight End Edger is a hand finishing tool that forms the rounded edge, the arris, on freshly placed concrete, so the edge does not chip or spall once the slab is in service. What separates it from an ordinary concrete edger is the shape of the two short ends of the blade: they are straight and square instead of turned up, so the blade can be run right up against a wall, a form face or an existing slab edge without the turned-up end lifting the tool off the line.
Leading Tools places the Straight End Edger in the Corner group of its Professional Tools range, under a Stainless Steel material sub-heading, as a single art number: 300170 at 3-1/2" × 6" (89 × 152 mm; 1" = 25.4 mm). Three related Leading Tools tools sit alongside it in the same range: Concrete Edger 300100/300101/300171–300173, Concrete Groover 300110 and Universal Groover 300181, and the Selection Guide on the Specification tab sets out which job belongs to which tool.
An un-edged slab arris is a sharp 90° corner in a material with almost no tensile strength at the corner. Edging replaces the corner with a radius, and that radius is what stops walkway, driveway, warehouse and platform edges from chipping and spalling once the slab is loaded and weathered. The tool is doing structural work, and the finished radius is the deliverable.
This is the whole reason the straight-end variant exists. A curved-end edger has both short ends turned up so it can be set down and lifted mid-slab without gouging the fresh surface; that same turned-up end prevents the tool from finishing the last inches of an edge that runs into a wall or a form. The straight-end blade solves that case: the square end sits flush against the fixed face, and the edge line stays true all the way to the junction.
Concrete edging is wet, alkaline work, and the tool spends its life in cement paste. The 300170 blade is stainless steel, with high corrosion resistance and low upkeep, which is why stainless is the usual choice for decorative, stained and polished floors. Chlorinated water, coastal air or prolonged soaking can still cause rust spots, so rinse with clean water and dry after use.
The 300170 carries a blue soft-grip handle on a metal bracket, the same soft-grip handle type as the stainless steel curved-end Concrete Edger 300171–300173, so a crew working with both does not change grip type. Elsewhere in the Leading Tools range the Concrete Edger 300100/300101 and Concrete Groover 300110 carry wooden roller handles, so the handle type genuinely differs between those tools and the 300170.
The 300170 is a single mid-width size, 3-1/2" × 6" (89 × 152 mm). Narrower, wider or longer stainless soft-grip blades are listed under the Concrete Edger: 300171 at 3" × 6", 300173 at 4" × 6" and 300172 at 4" × 11", all with curved ends.
| Stage | Do you use the Straight End Edger? | Why |
|---|---|---|
| Concrete placed, still bleeding water on the surface | No | Working the surface before bleed water has gone weakens it |
| Bleed water gone, surface has lost its sheen and is still workable but no longer sticky | Yes, this is the window | The edge can be formed without pressing bleed water back into the surface |
| Before the forms are stripped | Yes | Edging must be finished while the forms are still in place; the blade rides between the form and the slab |
| Surface hard enough that the tool no longer marks it | Too late | The hand-tool window has closed; correction now requires grinding |
| New concrete placed against an existing slab | Yes | Edge the new concrete along the junction, with the square end running along the existing slab edge |
The practical field test is the thumb test: press a thumb into the concrete near the junction. A clear impression with no material sticking to the thumb means the surface is ready; if concrete sticks, wait; if no impression can be made, the hand-tool window has closed.
| Step | Action |
|---|---|
| 1 | Confirm the timing: bleed water gone, surface dull, still workable |
| 2 | Clear the junction: remove debris and standing water, and check the fixed face (wall, form, curb) is clean and, if splatter matters, masked |
| 3 | Set the blade flat on the slab with the square end against the fixed face and the forming lip on the concrete side |
| 4 | Load the tool through the handle with steady, even downward pressure: enough to smooth and straighten the arris, not enough to press the blade into the surface |
| 5 | Run one long, continuous stroke along the junction, keeping the square end in contact with the fixed face for the whole stroke |
| 6 | Keep pace and pressure constant; do not stop or jab mid-stroke |
| 7 | Overlap the next stroke into the last so the whole run is covered without a visible start-stop mark |
| 8 | Finish by removing the tool marks left alongside the edge with a trowel or float, while the surface is still workable |
Place the square end flat against the wall face and run the full length of the junction in continuous strokes. The forming lip produces the rounded transition on the concrete side while the square end holds the line true against the wall. This matters most in warehouses, plants and parking structures, where the floor-wall junction takes point loads from forklifts, pallet jacks and carts, and where an un-radiused edge is the first thing to spall.
Edging is done while the forms are still standing; the blade rides in the gap between the form and the concrete, so the work must be finished before the forms are stripped. Confirm the forms are clean and the concrete has been placed to the correct level before starting, because a low fill leaves the forming lip riding on nothing and a high fill leaves a lip of concrete above the form.
Where new concrete is placed against an existing slab, edge the new concrete along the junction in the normal way, with the square end running along the existing slab edge.
On poured-in-place curbs, the square end runs along the curb face to form a clean transition between the curb and the adjoining slab. On decorative floors, stamped, stained or polished, the wall junction is a visible detail line and a stainless blade lowers the risk of rust marking on a surface that will be sealed or polished. Thin cement-based toppings can set faster than a full-depth slab, so follow the topping manufacturer's working time and complete the run without pausing.
Concrete placement → screeding → bull float / highway float → edging (Concrete Edger 300100/300101 and 300171–300173 on free perimeter edges; Straight End Edger 300170 at wall, form and slab junctions) → grooving (Concrete Groover 300110 / Universal Groover 300181) → final floating → optional steel troweling → curing.
Wear gloves, eye protection and, where the work generates dust, a dust mask; fresh concrete is strongly alkaline and abrasive to skin.
Q: What is the difference between a Straight End Edger and an ordinary concrete edger?
A: The end form. Curved-end edgers have both short ends turned up so they can be set down and lifted mid-slab without gouging the fresh surface; the straight-end version has square ends so it can finish an edge right up to a wall, form or adjoining slab. Leading Tools carries both families.
Q: When should I edge, and why does the tool stick or tear the concrete?
A: Edge after the bleed water has left the surface and the sheen has gone, while the concrete is still workable, and before the forms are stripped. If the tool sticks, the surface is still too wet; if the concrete tears at the junction, it has gone past the hand-tool window, so start edging as soon as the bleed water has gone on the next pour.
Q: The edge line comes out uneven or wavy, or the tool leaves a groove. Why?
A: Either the square end was not held in continuous contact with the fixed face, the stroke was broken into short jabs, or there was too much downward pressure. Use one long continuous stroke at constant pace and pressure, keep the blade flat on the slab, and run the square end flush along the wall or form face rather than pushing it into it.
Q: What does the stainless steel blade mean for care?
A: High corrosion resistance and low upkeep, with a lower risk of rust marks on decorative surfaces. Chlorinated water, coastal air or prolonged soaking can still cause rust spots, so rinse with clean water and dry after use. The Leading Tools 300170 is stainless.
Q: Which size suits general junction work?
A: 300170 (3-1/2" × 6", 89 × 152 mm), the single size of the Straight End Edger. If you need a narrower, wider or longer stainless soft-grip blade on a free perimeter edge, see the curved-end Concrete Edger 300171 (3" × 6"), 300173 (4" × 6") and 300172 (4" × 11").
| Model | Blade Size | Metric equivalent | Material |
|---|---|---|---|
| 300170 | 3-1/2" × 6" | 89 × 152 mm | Stainless Steel |
How to read the size. Sizes are given as width × length: the first figure is the blade width across the plate, the second is the blade length along the edge being finished. Some conventions quote the same tool length × width, so 300170 (3-1/2" × 6") reads as 6" × 3-1/2" in that convention. Both orders are given here to prevent ordering errors.
| Item | Value |
|---|---|
| Product name / product group | Straight End Edger — Corner, Professional Tools |
| Art. numbers | 300170 |
| Blade sizes | 3-1/2" × 6" |
| Blade material | Stainless Steel |
| End form | Straight (square) ends |
| Handle | Blue soft-grip handle on a metal bracket |
The blade material for this tool is specified as "Stainless Steel". In service that grade delivers:
Handle type: blue soft-grip (comfort-grip) handle, attached to the blade through a metal bracket. The grip is moulded rather than turned wood, and the bracket raises it far enough above the plate for the operator to load the forming lip through the heel of the palm while walking the edge. Soft ergonomic grips are specified across this tool class specifically to reduce hand fatigue over extended finishing sessions.
The blade consists of:
This is the choice that determines whether the tool can do the job at all, and it comes before size. The two forms are:
| Question | Straight End Edger (300170) | Curved End Edger (Concrete Edger 300100 / 300101 / 300171–300173) |
|---|---|---|
| Blade ends | Square, flush to the end of the plate | Turned up at both ends |
| Where it works | Edges that run into a fixed face: wall, column, form, curb, adjoining slab | Free slab perimeter, where the tool is set down and lifted mid-run |
| Risk it avoids | Leaving the last inches of the edge unformed at the junction | Gouging the fresh surface at the start and end of each stroke |
| Typical jobs | Floor-to-wall junctions, edges cast against formwork, refurbished slab edges | Sidewalks, driveways, patios, open slab perimeters |
A crew that finishes interior floors and slabs cast against forms needs the straight-end tool; a crew doing open sidewalks needs the curved-end tool; most contractors carry both, which is why Leading Tools offers both families in its range.
| If the work is… | Choose | Why |
|---|---|---|
| General residential and light commercial junctions | 300170 — 3-1/2" × 6" | Mid-width blade; balances coverage against control |
| Tighter spaces, wider plates or longer runs on free perimeter edges, in stainless with a soft grip | Concrete Edger 300171 (3" × 6"), 300173 (4" × 6") or 300172 (4" × 11") | Same stainless blade and blue soft grip as 300170, but with curved ends, so they suit open slab edges rather than wall junctions |
The first figure is blade width. A wider blade covers more of the slab surface either side of the arris per pass and is steadier on long straight runs; it is harder to work into a tight radius or a confined corner.
A narrower blade is more manoeuvrable in confined spaces and easier to keep flat where the operator cannot stand square to the work. Blade width does not change the radius formed on the concrete; that is set by the forming lip, not the plate.
The second figure is blade length along the edge. Correct edging technique is long, continuous, uninterrupted strokes, not short back-and-forth jabbing, and a longer blade makes those strokes easier to hold on line. The trade-off with a longer blade, such as the 11" blade of Concrete Edger 300172, is bulk, storage and the extra effort of keeping a long plate perfectly flat where the slab surface is not perfectly level.
Radius and lip depth: contact us.
Leading Tools' 300170 is stainless throughout, the usual choice for decorative, stained or polished floors. It has a blue soft-grip handle, so for extended sessions confirm before each shift that the grip surface is clean and dry, that the handle is tight on the bracket, and that pressure is applied through the heel of the palm rather than the fingers.
The single art number of the Leading Tools Straight End Edger.
| Art. Nr | Size | Metric | Length × width | Material | Handle | Best use |
|---|---|---|---|---|---|---|
| 300170 | 3-1/2" × 6" | 89 × 152 mm | 6" × 3-1/2" | Stainless Steel | Blue soft grip | Standard residential and commercial floor-to-wall junctions; balanced coverage and control |
Before each use, confirm the handle is tight on the bracket, the grip surface is not worn or split, and the bracket is neither cracked nor bent. A loose bracket makes even pressure impossible and shows up immediately as an uneven edge line.

In compliance with EU personal data protection laws, we are committed to protecting and providing you with control over your personal data. By clicking "Accept All", you allow us to place cookies to enhance your experience on this site, help us analyze site performance and usage, and enable us to deliver relevant marketing content. You can manage your cookie settings below. By clicking "Agree" you agree to the current settings. For more information, please visit the Privacy Statement.
This website uses cookies
In compliance with EU personal data protection laws, we are committed to protecting your personal data and providing you with control over it. By clicking "Agree", you allow us to place cookies to improve your experience on this site, help us analyze site performance and usage, and allow us to deliver relevant marketing content.
By clicking "Only necessary" you allow us to place only necessary cookies. The website cannot function without these cookies and you cannot switch them off on your system. These cookies are typically set only in response to an action you perform (i.e. a service request), such as setting privacy preferences, logging in, or filling in a form. You can set your browser to block or prompt you for these cookies, but this may prevent some site features from working.



